Reloop DIGITAL JOCKEY 2 Instruction Manual
Professional midi controller with integrated 4 channel soundcard
For more information, please visit reloop.com
Hide thumbs
Also See for DIGITAL JOCKEY 2:
- Instruction manual (52 pages) ,
- Instruction manual (33 pages)
Table of Contents
Advertisement
Available languages
Available languages
Quick Links
DIGITAL JOCKEY 2
Professioneller MIDI-Controller mit integrierter 4-Kanal Soundkarte
Professional MIDI controller with integrated 4 channel soundcard
Contrôleur MIDI professionnel avec carte son 4 canaux intégrée
WARNUNG!
Um Feuer oder einen elektrischen Schock zu
vermeiden, setzen Sie dieses Gerät nicht Was-
ser oder Flüssigkeiten aus! Öffnen Sie niemals
das Gehäuse!
WARNING!
To prevent fire or avoid an electric shock
do not expose the device to water or fluids!
Never open the housing!
ATTENTION !
Afin d'éviter un incendie ou une décharge
électrique, veillez à tenir cet appareil à l'écart
des liquides et de l'humidité ! N´ouvrez jamais
le boîtier !
Für weiteren Gebrauch aufbewahren!
Keep information for further reference!
Gardez ces instructions pour des utilisa-
tions ultérieurs!
www.digital-jockey.dj
INTERFACE EDITION
DEUTSCH
Seite 02-10
ENGLISH
page 11-19
FRANÇAIS
page 20-27
Bedienungsanleitung
ACHTUNG!
Lesen Sie sich vor der ersten Inbetriebnahme zur eigenen Sicherheit diese
Bedienungsanleitung sorgfältig durch! Alle Personen, die mit der Aufstel-
lung, Inbetriebnahme, Bedienung, Wartung und Instandhaltung dieses Gerä-
tes zu tun haben, müssen entsprechend qualifiziert sein und diese Betriebs-
anleitung genau beachten. Dieses Produkt erfüllt die Anforderungen der
geltenden europäischen und nationalen Richtlinien, die Konformität wurde
nachgewiesen, die entsprechenden Erklärungen und Unterlagen sind beim
Hersteller hinterlegt.
Instruction Manual
CAUTION!
For your own safety, please read this operation manual carefully before ini-
tial operation! All persons involved in the installation, setting-up, operation,
maintenance and service of this device must be appropriately qualified and
observe this operation manual in detail. This product complies with the requi-
rements of the applicable European and national regulations. Conformity has
been proven. The respective statements and documents are deposited at the
Mode d'emploi
ATTENTION!
Pour votre propre sécurité, veuillez lire attentivement ce mode d'emploi
avant la première utilisation ! Toutes les personnes chargées de l'installation,
de la mise en service, de l'utilisation, de l'entretien et la maintenance de
cet appareil doivent posséder les qualifications nécessaires et respecter les
instructions de ce mode d'emploi. Ce produit est conforme aux directives
européennes et nationales, la conformité a été certifiée et les déclarations
et documents sont en possession du fabricant.
1
Advertisement
Table of Contents

Subscribe to Our Youtube Channel
Related Manuals for Reloop DIGITAL JOCKEY 2


Summary of Contents for Reloop DIGITAL JOCKEY 2
- Page 1 DIGITAL JOCKEY 2 INTERFACE EDITION Professioneller MIDI-Controller mit integrierter 4-Kanal Soundkarte Professional MIDI controller with integrated 4 channel soundcard Contrôleur MIDI professionnel avec carte son 4 canaux intégrée Bedienungsanleitung WARNUNG! Um Feuer oder einen elektrischen Schock zu ACHTUNG! vermeiden, setzen Sie dieses Gerät nicht Was- Lesen Sie sich vor der ersten Inbetriebnahme zur eigenen Sicherheit diese ser oder Flüssigkeiten aus! Öffnen Sie niemals...
- Page 2 Vielen Dank, dass Sie unserer Diskjockey-Technologie Ihr Vertrauenschenken. Vor Inbetrieb- nahme bitten wir Sie, alle Anweisungen sorgfältig zu studieren und zu befolgen. Nehmen Sie den Reloop Digital Jockey 2 aus der Verpackung. Bitte überprüfen Sie vor der ers- ten Inbetriebnahme, ob kein offensichtlicher Transportschaden vorliegt. Sollten Sie Schäden am Stromkabel oder am Gehäuse entdecken, nehmen Sie das Gerät nicht in Betrieb und setzen Sie...
-
Page 3: Bestimmungsgemäße Verwendung
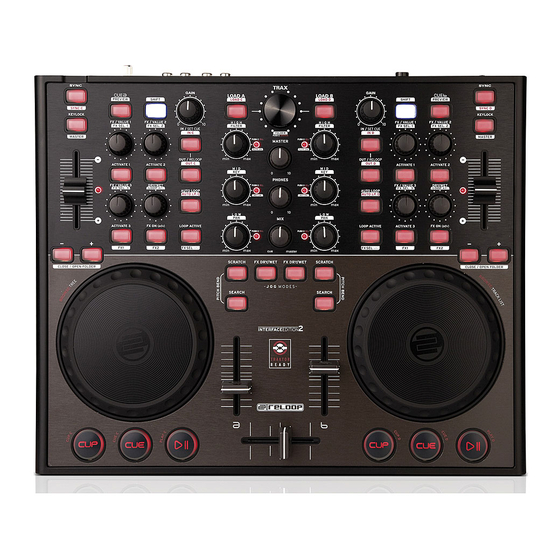
• Regler und Schalter sollten niemals mit Sprühreinigungsmitteln und Schmiermitteln behandelt werden. Dieses Gerät sollte nur mit einem feuchten Tuch gereinigt werden, verwenden Sie nie- mals Lösungsmittel oder Waschbenzin zum Reinigen. • Bei Umzügen sollte das Gerät im ursprünglichen Versandkarton transportiert werden. •... - Page 4 Load-Taste (Shift: Deck C/D-Taste) [Traktor PRO] B22. Loop In / Set Cue-Taste (Shift: Loop In-Taste Deck C/D) [Traktor PRO] B23. Loop Out / Reloop-Taste (Shift: Loop Out Deck C/D) [Traktor PRO] B24. Auto Loop-Taste (Shift: Auto Loop Deck C/D) [Traktor PRO] B25.
- Page 5 Gerätevorderseite B35. 6,3 mm Mikrofonanschluss B36. Mikrofon-Equalizer B37. Record Gain B38. 6,3 mm Kopfhöreranschluss B39. Kopfhörer-Equalizer B40. Crossfader-Kurve Geräterückseite B41. Netzkabel-Zugentlastung B42. Netzteilanschluss B43. Ein/Aus-Schalter B44. USB-Anschluss B45. Audio Ausgang (Master) B46. Audio Eingang B47. Phono/Line-Wahlschalter B48. Frei zuweisbarer MDI-Switch B49.
-
Page 6: Erste Schritte
1. Erste Schritte Nehmen Sie den Reloop Digital Jockey 2 aus der Verpackung. Zum Schutz des Gerätes, wurde der Digital Jockey 2 mit einer Schutzfolie versehen. Bitte entfernen Sie diese vor der ersten Inbetriebnahme. Verbinden Sie nun das Netzteil mit der DC-Buchse -B42- auf der Rückseite des Gerätes. -
Page 7: Asio Treiber Installation
PRO unterscheidet sich größtenteils zu Traktor LE in der Effekt- und 4-Deck-Steuerung. Bitte beachten Sie hier auch die Bedienoberfläche Traktor LE. Ihr Digital Jockey 2 ist für Traktor PRO sehr umfangreich ausgelegt. Im Folgenden wird die vol- le Traktor Funktionsbelegung beschrieben. Bitte beachten Sie ebenfalls die vollständige Traktor Software-Bedienungsanleitung die Sie im Traktor Menü... - Page 8 B4. Linefader Mit dem Linefader wird die Kanallautstärke reguliert. B5. Crossfader Bei diesem Regler handelt es sich um einen Fader, mit dem Sie zwischen Deck A und Deck B überblenden können. B6. Jog Wheel Die großen Jog Wheels können für diverse Funktionen eingesetzt werden, beispielsweise zum Scratchen oder für die Pitch Bend Funktion.
- Page 9 Shift: Loop In Deck C/D. Hier wird für Deck C/D der Loop In-Punkt gesetzt. [Traktor PRO] B23. Loop Out/Reloop-Taste Drücken Sie die Loop Out-Taste, um den Loop-Endpunkt zu setzen. Nun geht der Player in den Loop-Modus über. Erneutes Drücken auf die Loop Out-Taste verlässt den Loop Out-Modus. Im Wiedergabe-Modus ruft das Drücken der Loop Out-Taste einen zuvor gesetzten, manuellen Loop...
-
Page 10: Minimale Systemanforderungen
Kurve bis hin zu einer harten Einstellung ist die Kurve stufenlos einstellbar. B41. Netzkabel-Zugentlastung Das Kabel wird hiermit vom Zug entlastet. B42. Netzteilanschluss An diese Buchse können Sie das Netzteil des Digital Jockey 2 anschließen. B43. Ein/Aus-Schalter Mit diesem Schalter lässt sich Ihr Digital Jockey 2 ein- bzw. ausschalten. B44. USB-Anschluss Schließen Sie hier Ihr USB-Kabel an. -
Page 11: Safety Instructions
If you detect any damage to the power cable or the casing, do not operate the device and contact your specialised dealer. In order to protect the Digital Jockey 2 the device has been supplied with a protective foil. Please remove this foil before initial operation. -
Page 12: Application In Accordance With Regulations
• Keep this operation manual in a safe place for later reference in the event of questions or problems. APPLICATION IN ACCORDANCE WITH REGULATIONS • This device is a professional DJ MIDI controller with integrated 4 channel soundcard that can control software. - Page 13 [Traktor PRO] B22. Loop In / Set Cue Button (Shift: Loop In Button Deck C/D) [Traktor PRO] B23. Loop Out / Reloop Button (Shift: Loop Out Deck C/D) [Traktor PRO] B24. Auto Loop Button (Shift: Auto Loop Deck C/D) [Traktor PRO] B25.
-
Page 14: First Steps
Effect On Button 1. First Steps Remove the Digital Jockey 2 from its packaging. In order to protect the Digital Jockey 2 the device has been supplied with a protective foil. Please remove this foil before initial operation. Now connect the mains adapter to the DC jack -B42- on the device‘s backside. Turn on the device via the On/Off button -B43-. - Page 15 Connect your headphones to this jack. Via the headphones equalizer -B39- it is posible to adjust the headphones‘ sound characteristics. NOTE! As the Reloop Digital Jockey 2 Interface Edition is not a stand-alone device the inputs and outputs are only functional in combination with computer and software. PHONO / LINE...
-
Page 16: Operation
After the controller has been connected and the software has been installed you can control Traktor with the Digital Jockey 2. Compared to Traktor LE the Digital Jockey 2‘s user interface for Traktor Pro mainly differs in the effect and 4 deck operation. Please also see the user interface for Traktor LE. - Page 17 By pushing the loop out button again you will leave the loop out mode. When pushing the loop out button in playback mode you will call up a previously set manual loop (Reloop). Shift: Loop Out C/D. Setting a loop out point for deck C/D.
- Page 18 B42. Mains Connection You can connect the Digital Jockey 2‘s mains adapter to this connection. B43. On/Off Button With this button ou can turn the Digital Jockey 2 on and off respectively. B44. USB Port Connect your USB cord to this input.
- Page 19 Only Interface Edition: B45. Audio Output (Master) Connect your main sound system via RCA cord to this output. B46. Audio Input An external sound source (e.g. CD player, turntable) can be connected to this input. B47. Phono/Line Switch Depending on the connected sound source you can de-/activate the phono pre-amp. B48.
- Page 20 état de l’appareil. Si le boîtier ou le câble sont endommagés, n’utilisez pas l’appareil et contactez votre revendeur. Afin de protéger l‘appareil, la console Digital Jockey 2 a été emballée dans un film plastique. Veuillez l‘enlever avant la première mise en service.
-
Page 21: Utilisation Conforme
UTILISATION CONFORME • Cet appareil est un contrôleur MIDI professionnel avec carte son 4 canaux intégrée permettant de commander le logiciel. L’appareil doit pour cela être raccorder à un ordinateur par un câble USB. • Ce produit est certifié pour le branchement sur secteur 240 V, 50 Hz tension alternative et est exclusivement conçu pour être utilisé... - Page 22 B22. Touche Loop In / Set Cue (Shift : Touche Loop In Deck C/D) [Traktor PRO] B23. Touche Loop Out / Reloop (Shift : Loop Out Deck C/D) [Traktor PRO] B24. Touche Auto Loop (Shift : Auto Loop Deck C/D) [Traktor PRO] B25.
-
Page 23: Premiers Pas
Touche Effect-On 2. Premiers Pas: Retirer le Reloop Digital Jockey 2 de son emballage. Afin de protéger l‘appareil, la console Digital Jockey 2 a été emballée dans un film plastique. Veuillez l‘enlever avant la première mise en ser- vice. Raccorder le bloc secteur avec la prise DC de la face arrière de l‘appareil. Allumer l‘appareil d‘une pression sur la touche Power. - Page 24 Traktor 3 LE Setup, procéder selon les instructions affichées sur l‘écran pour effectuer l‘installation. À la première exécution de Traktor LE, l‘assistant de configuration s‘affiche. Sélec- tionner alors „Reloop“ dans les fabricants et la version de votre logiciel Digital Jockey dans le menu de sélection pour charger le mappage correct.
- Page 25 Shift: Play/Pause pour les platines C/D [Traktor PRO] B2. Touche Cue Sert à accéder au point Cue. Shift: Point Cue pour les platines C/D. [Traktor PRO] B3. Touche CUP Tant que la touche CUP (Cue & Play) est enfoncée, le lecteur lit la piste depuis le point Cue. Shift: Touche CUP pour les platines C/D.
- Page 26 Shift: Loop In Deck C/D. Le point Loop In est alors défini pour les platines C/D. [Traktor PRO] B23. Touche Loop Out/Reloop Appuyer sur la touche Loop Out pour définir le point final d‘une boucle. Le lecteur passe alors en mode Loop.
- Page 27 Permet de décharger le câble de toute traction. B42. Connecteur du bloc secteur Cette prise sert à raccorder le bloc secteur de votre console Digital Jockey 2. B43. Interrupteur MARCHE/ARRÊT Cet interrupteur sert à allumer ou éteindre la console Digital Jockey 2.
- Page 32 © COPYRIGHT Reloop Distribution Nachdruck verboten! Global Distribution GmbH, Schuckertstrasse 28, 48153 Münster / Germany Reproduction prohibited! Fax: +49.251.6099368 Réproduction interdite!
Need help?
Do you have a question about the DIGITAL JOCKEY 2 and is the answer not in the manual?
Questions and answers