Table of Contents
Advertisement
Quick Links
Advertisement
Table of Contents

Subscribe to Our Youtube Channel
Related Manuals for thomann StairVille DMX-Master 3-FX


Summary of Contents for thomann StairVille DMX-Master 3-FX
- Page 1 DMX-Master 3-FX DMX controller user manual...
- Page 2 Musikhaus Thomann e.K. Treppendorf 30 96138 Burgebrach Deutschland Telephone: +49 (0) 9546 9223-0 E-mail: info@thomann.de Internet: www.thomann.de 08.02.2013...
-
Page 3: Table Of Contents
Table of contents Table of contents General notes............................... 5 Safety instructions............................. 7 Features............................... 10 Installation..............................11 Setup................................13 Connectors and controls........................14 Basics................................24 Operation..............................27 8.1 Introduction............................27 8.2 Scenes and banks..........................32 8.3 Chases..............................39 8.4 Blackout............................... 48 8.5 Overlay scenes........................... - Page 4 Table of contents 8.8 Channel inversion..........................64 8.9 Jog wheel configuration for pan and tilt movements ............66 8.10 Play mode............................69 8.11 MIDI control............................. 77 8.12 Operation mode ‘Easy Mode’....................85 8.13 Backup and restore data......................87 8.14 Additional functions........................89 Technical data............................
-
Page 5: General Notes
General notes General notes This user manual contains important information on safe operation of the device. Read and follow all safety notes and all instructions. Save this manual for future reference. Make sure that it is available to all persons using this device. If you sell the device, include the manual for the next owner. - Page 6 General notes Signal word Meaning DANGER! This combination of symbol and signal word indicates an immediate dangerous situation that will result in death or serious injury if it is not avoided. NOTICE! This combination of symbol and signal word indicates a possible dangerous situation that can result in material and environmental damage if it is not avoided.
-
Page 7: Safety Instructions
Safety instructions Safety instructions Intended use This device was specifically designed for the DMX control of LED spot lights and moving heads. Use the device only as described in this user manual. Any other use or use under other oper‐ ating conditions is considered to be improper and may result in personal injury or property damage. - Page 8 Safety instructions NOTICE! External power supply The device is powered by an external power supply. Before connecting the external power supply, ensure that the input voltage (AC outlet) matches the voltage rating of the device and that the AC outlet is protected by a residual cur‐ rent circuit breaker.
- Page 9 Safety instructions NOTICE! Operating conditions This device has been designed for indoor use only. To prevent damage, never expose the device to any liquid or moisture. Avoid direct sunlight, heavy dirt, and strong vibrations. DMX-Master 3-FX...
-
Page 10: Features
Features Features Special characteristics of the device: control of up to 16 DMX devices with 16 DMX channels each (256 channels) 240 scenes on 30 banks (8 per bank) six chases with up to 250 single steps six overlay scenes integrated effect generator fade in time, fade out time and speed for scenes and chases can be adjusted per channel all channels invertable... -
Page 11: Installation
Installation Installation Unpack and carefully check that there is no transportation damage before using the unit. Keep the equipment packaging. To fully protect the device against vibration, dust and moisture during transportation or storage use the original packaging or your own packaging material suitable for transport or storage, respectively. - Page 12 Installation DMX connection A 3-pin XLR socket is used as DMX output. The following diagram and table show the pin assignment of the XLR socket. Ground DMX data (–) DMX data (+) DMX controller...
-
Page 13: Setup
Setup Setup Establish all connections as long as the unit is switched off. Use the shortest possible high- quality cables for all connections. Connecting the power supply Connect the power supply unit which is included in the delivery to the 9-V input of the device, unit then put the mains plug into the socket. -
Page 14: Connectors And Controls
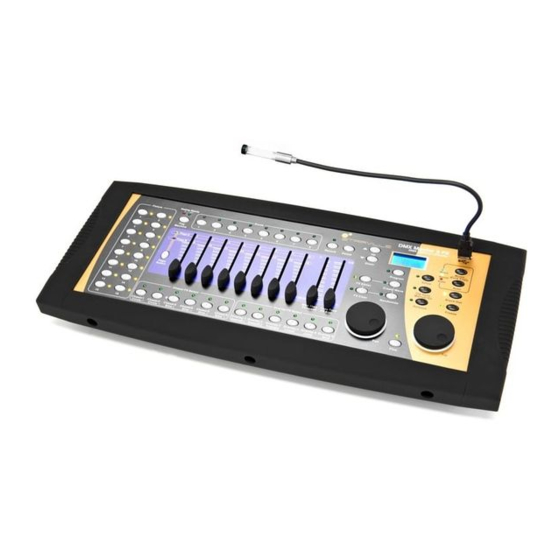
Connectors and controls Connectors and controls Front panel overall view DMX controller... - Page 15 Connectors and controls Front panel detailed view ‘A’ DMX-Master 3-FX...
- Page 16 Connectors and controls 1 [Fixture] group of buttons Buttons 1 to 16 select the control channels. The related control LEDs show if the respective channel is active (LED lights up) oder deactivate (LED is off). 2 [FOG MACHINE] button Activates a fog machine connected to the device. The HEATING and READY control LEDs show the operating status of the fog machine.
- Page 17 Connectors and controls 6 Wait Time | FX Speed Adjusts the program and effect speed and the sensitivity of the microphone. 7 Fade Time | FX Size Adjusts the fade in and fade out time used for scene and program changes and to adjust the display size of an effect. 8 [Overlay FX Select] group of buttons Buttons 1 to 6 activate or deactivate the overlay scenes.
- Page 18 Connectors and controls Front panel detailed view ‘B’ DMX controller...
- Page 19 Connectors and controls | [UP] and | [DOWN] buttons Switch between the 30 banks and to adjust the starting angle in the effect editor. 13 Display 14 [PROGRAM] and [Setup] buttons Buttons with control LEDs to switch between the operation modes. 15 USB plug for a USB storage device or the USB lamp which is included in the delivery.
- Page 20 Connectors and controls 19 [FREEZE] button Activates the freeze function. 20 [Tap Sync Manual Go] button Synchronises the timing or activates a chase in automatic mode. The display alternately shows the number of the current step or the number of the activated chase and of the current bank. 21 [Release] button Sets all DMX channels back to ‘0’.
- Page 21 Connectors and controls 26 [Create Wave] button Activates the wave function. 27 [FX Clear] button Resets the user-specific effect settings. 28 [FX Editor] button Activates the effect editor. DMX-Master 3-FX...
- Page 22 Connectors and controls Rear side DMX controller...
- Page 23 Connectors and controls 29 AUDIO RCA jack to connect audio equipment to the device. 30 Fog Plug to connect a fog machine to the device. 31 MIDI IN MIDI input. 32 DMX OUT Lockable DMX output connector. 33 OFF | ON Mains switch to turn the device on/off.
-
Page 24: Basics
Basics Basics This chapter provides basic information about the data transmission using the DMX protocol. Signal transmission DMX signals are generated by a DMX controller. The signals are transferred over a DMX cable to the connected devices. Each connection can transmit up to 512 channels. For each channel, a value between 0 and 255 is being transmitted. - Page 25 Basics If the cable length exceeds 300 m (328 yds.) or the number of devices is greater than 32, the signal must be amplified using a DMX booster. DMX-Master 3-FX...
- Page 26 Basics Signal processing Each DMX devices operates on a specific number of channels to transfer the incoming control signals into movements, changing of light intensitiy or colour, and so on. Since all receivers that are part of a DMX daisy chain receive all signals, a start address must be assigned to each DMX device.
-
Page 27: Operation
Operation Operation 8.1 Introduction This device controls up to 16 DMX devices (for example dimmers, LED pars, moving heads or scanners) each with 16 internal DMX channels. 240 scenes in 30 banks are available in total (eight scenes per bank). They can be used to programme up to six chases with 250 single steps. - Page 28 Operation Selecting the operation mode The device can operate in four operation modes offering different functions. When you turn it on, the operation mode ‘Play Mode’ is active. The display always shows the active operation mode. ‘Play Mode’ Use this operation mode to play programmed scenes, banks and chases in the mode you have selected (automatically, sound-controlled, MIDI-controlled).
- Page 29 Operation ‘Program Mode’ Button [PROGRAM]. ‘Setup Mode’ Button [Setup]. ‘Easy Mode’ Buttons [PROGRAM] and [Setup] simultaneously. You can switch between the operation modes at any time. To return to the operation mode ‘Play Mode’, press the button that is assigned to the operation mode where you came from for at least three seconds.
- Page 30 Operation Display During normal operation the upper line of the display shows the current operation mode. Depending on the operation mode, the second line shows the following: ‘Play Mode’ In this operation mode, the second line shows the selected bank and the scene that is run‐ ning at moment.
- Page 31 Operation Menu item Description ‘Fadetime’ Fade time channel configuration ‘Tilt’ Configuration of the jog wheel used for the tilt movement ‘Pan’ Configuration of the jog wheel used for the pan movement ‘Autostart’ Autostart configuration System messages or error reports can overwrite the current information in the display for a few seconds.
-
Page 32: Scenes And Banks
Operation 8.2 Scenes and banks Programming new scenes A scene is the collection of all 256 DMX values for all the DMX devices including those for pan and tilt movement. Up to 240 scenes can be stored. The scenes are subdivided in 30 banks with eight scenes each. - Page 33 Operation Using [Release], you can set all channels to ‘0’ at once. To get back to the operation mode ‘Play Mode’, press [PROGRAM] for three seconds. For information about how to play back a scene, refer to Ä Chapter 8.10 ‘Play mode’ on page 69. DMX-Master 3-FX...
- Page 34 Operation Editing scenes To switch to the operation mode ‘Program Mode’, press [PROGRAM] for three seconds. | [UP] or | [DOWN] to select the bank where the desired scene is stored. Load the scene to be edited using the related [ Scene] button, modify the settings as desired and store the scene back at its original location.
- Page 35 Operation Copying scenes To switch to the operation mode ‘Program Mode’, press [PROGRAM] for three seconds. | [UP] or | [DOWN] to select the bank where the desired scene is stored. Load the scene to be copied (source) using the related [ Scene] button, . | [UP] or | [DOWN] to select the bank where you want to copy the scene to (target).
- Page 36 Operation Copying device settings Use this function to copy all DMX values assigned to one device to another. To switch to the operation mode ‘Program Mode’, press [PROGRAM] for three seconds. Hold the [Fixture] button of the DMX device the DMX values of which you want to copy (source).
- Page 37 Operation The changes take place in the memory buffer first. To keep the new values perma‐ nently, store the scene as described above. Copying a complete bank To switch to the operation mode ‘Program Mode’, press [PROGRAM] for three seconds. | [UP] or | [DOWN] to select the bank to be copied (source).
- Page 38 Operation Deleting a scene To switch to the operation mode ‘Program Mode’, press [PROGRAM] for three seconds. | [UP] or | [DOWN] to select the bank where the desired scene is stored. Hold the [DELETE] button and press the [ Scene] button of the scene that you want to delete.
-
Page 39: Chases
Operation Deleting a bank To switch to the operation mode ‘Program Mode’, press [PROGRAM] for three seconds. | [UP] or | [DOWN] to select the bank to be deleted. Hold the [DELETE] button and press [MUSIC BANK COPY]. ð The related control LEDs quickly flash three times. This indicates that all scenes of the bank have been deleted successfully. - Page 40 Operation Inserting a scene into a chase Use this function to insert a scene into a chase at the current editing position. To switch to the operation mode ‘Program Mode’, press [PROGRAM] for three seconds. Press the [CHASER] button of the chase that you want to edit. You can edit only one chase at a time.
- Page 41 Operation Repeat the steps 3 and 4 until the chase is complete. A chase can contain up to 250 scenes. When this limit is reached, the display shows the message ‘Chaser Full’ . To get back to the operation mode ‘Play Mode’, press [PROGRAM] for three seconds. DMX-Master 3-FX...
- Page 42 Operation Inserting a bank into a chase Use this function to insert a bank containing several scenes into a chase at the current editing position. To switch to the operation mode ‘Program Mode’, press [PROGRAM] for three seconds. Press the [CHASER] button of the chase that you want to edit. You can edit only one chase at a time.
- Page 43 Operation Changing the editing position in Use this function to change the position in a chase where new scenes or banks are inserted. a chase To switch to the operation mode ‘Program Mode’, press [PROGRAM] for three seconds. Press the [CHASER] button of the chase that you want to edit. You can edit only one chase at a time.
- Page 44 Operation Now you can insert scenes or banks at the modified editing position ( Ä ‘Inserting a scene into a chase ’ on page 40). To get back to the operation mode ‘Play Mode’, press [PROGRAM] for three seconds. DMX controller...
- Page 45 Operation Removing a scene from a chase Use this function to remove a scene from a chase at the current editing position. To switch to the operation mode ‘Program Mode’, press [PROGRAM] for three seconds. Press the [CHASER] button of the chase that you want to edit. You can edit only one chase at a time.
- Page 46 Operation All scenes that were positioned behind the deleted one move one position forward. Example: If you press [DELETE] three times, the three scenes behind the original editing position will be deleted. To get back to the operation mode ‘Play Mode’, press [PROGRAM] for three seconds. Deleting a chase Use this function to delete the content of a chase completely.
- Page 47 Operation Deleting all chases Use this function to delete the content of all chases. The scenes and banks will be removed from all chases. Ensure that the device is turned on. Hold | [UP] and | [DOWN] simultaneously, then switch off the device. Keep the buttons pressed and turn on the device.
-
Page 48: Blackout
Operation 8.4 Blackout Setting up or modifying the You can configure the blackout function as necessary. It is possible to specify which channel of blackout function which DMX device will be overwritten by the blackout function and which DMX will be used. Doing so it is possible to dim fixtures with a single key stroke without changing their settings for colour, pan or tilt. - Page 49 Operation To configure the blackout function from scratch, continue with step 5. Press [BLACKOUT] once to load the existing configuration. Press the [Fixture] buttons related to the DMX devices which you want to be affected by the blackout function. Use the [Scene] buttons to turn specific channels on or off. The display either shows ‘CHxx: ON’...
- Page 50 Operation Ensure that the blackout function does not overwrite channels having fade times assigned to them. That way, all channels are supplied with the correct values when the blackout function is disabled. If, on the other hand, a channel with a fade time assigned to it is overwritten by the blackout function, it will be smoothly faded back to its original value when the blackout function is disabled.
- Page 51 Operation Resetting the blackout settings Use this function to set all 256 channels to ‘on’ and value ‘0’ in relation to the blackout func‐ tion. Proceed as follows to reset the blackout settings: To switch to the operation mode ‘Program Mode’, press [PROGRAM] for three seconds. | [UP] or | [DOWN] to select bank 31.
-
Page 52: Overlay Scenes
Operation 8.5 Overlay scenes Setting up or modifying overlay The overlay function is used to interrupt the normal sequence of scenes with a so-called scenes overlay scene with a single key stroke. You may think of, for example, to enable or disable the strobe function of some fixtures during the normal sequence. - Page 53 Operation You cannot load ‘empty’ scenes. When selecting a scene that contains no data, the dis‐ play shows the error message ‘NULL’ . Press the [Fixture] buttons related to the DMX devices which you want to be affected by the overlay function. Use the [Scene] buttons to turn specific channels on or off.
- Page 54 Operation This indicates that the settings of the overlay scene have been stored successfully. To get back to the operation mode ‘Play Mode’, press [PROGRAM] for three seconds. Deleting overlay scenes Proceed as follows to delete an overlay scene: To switch to the operation mode ‘Program Mode’, press [PROGRAM] for three seconds. | [UP] or | [DOWN] to select bank 31.
-
Page 55: Effect Generator
Operation 8.6 Effect generator The effect generator can store patterns for pan and tilt movement of moving heads or scan‐ ners together with the standard DMX values of a scene. You can select twelve different move‐ ment patters and modify them concerning size, speed and starting angle. The starting angle may be adjusted for each DMX device in use separately. - Page 56 Operation Effects You can select from twelve ready-made effects. Designation Description Circle CW Clockwise circular movement Circle CCW Counter-clockwise circular movement Sine up/down Sine-wave-like vertical movement Sine right/left Sine-wave-like horizontal movement Sine diagonally left Sine-wave-like diagonal movement from right to left Sine diagonally right Sine-wave-like diagonal movement from left to right Sawtooth 1...
- Page 57 Operation Designation Description Jump Movement jumping in a square shape Wild Complex asymmetric quick movement pattern. It results from a combination of sine-wave-like and cosine-wave- like movements. You may combine this effect with random function. That way a group of devices seem to move independently from each other.
- Page 58 Operation Wave movement using the When you have selected an effect in the effect generator, the [Create Wave] button shifts the button ‘Create Wave’ starting angle of the selected DMX devices each time when it is pressed. This forms a wave movement.
- Page 59 Operation Random function using the When you have selected an effect in the effect generator, the [Randomize] button changes the button ‘Randomize’ starting angles of the selected DMX devices randomly and independently from each other. This results in an apparent unordered movement. Each time you press [Randomize] again, the device creates a new set of values which results in a new pattern of movements.
- Page 60 Operation Modifying an effect Use this function to modify the settings of a predefined effect. To switch to the operation mode ‘Program Mode’, press [PROGRAM] for three seconds. Press [FX Editor]. ð The control LEDs of the effect buttons light up. Press the [Fixture] button related to the DMX devices which should be affected by the changes.
-
Page 61: Fading
Operation If you want to undo the changes made for the selected DMX devices, press [FX Clear]. To close the effect generator press [FX Editor]. To get back to the operation mode ‘Play Mode’, press [PROGRAM] for three seconds. Deleting an effect While you are in the operation mode ‘Program Mode’, you can delete the effect of the selected DMX devices at any time using [FX Clear]. - Page 62 Operation Fading is useful for movement and dimmer settings only. Therefore it is possible to specify the affected channels individually. DMX controller...
- Page 63 Operation Changing and storing fade time Proceed as follows to set up the fading function for a DMX channel: channels To switch to the operation mode ‘Setup Mode’, press [Setup] for three seconds. | [UP] or | [DOWN] to select the menu item ‘Fadetime’ . Now you can change the fading channels.
-
Page 64: Channel Inversion
Operation Deleting fade time channels Proceed as follows to remove the fading function from a DMX channel: To switch to the operation mode ‘Setup Mode’, press [Setup] for three seconds. | [UP] or | [DOWN] to select the menu item ‘Fadetime’ . Press the [Fixture] button of the DMX devices for which you want to remove the fading. - Page 65 Operation Activating or deactivating Proceed as follows to activate or deactivate the inversion of a DMX channel: channel inversion To switch to the operation mode ‘Setup Mode’, press [Setup] for three seconds. | [UP] or | [DOWN] to select the menu item ‘Invert’ . Press the [Fixture] button of the DMX devices which should be affected by the changes.
-
Page 66: Jog Wheel Configuration For Pan And Tilt Movements
Operation Resetting channel inversion Proceed as follows to deactivate the inversion for all DMX channels: To switch to the operation mode ‘Setup Mode’, press [Setup] for three seconds. | [UP] or | [DOWN] to select the menu item ‘Invert’ . Press all [Fixture] buttons. - Page 67 Operation The assignment of the jog wheels to the DMX channels can be different for each DMX device, for example channel 1 and 2 for DMX device 1 and channel 5 and channel 6 for DMX device 2. Anyway, you can use the jog wheels to control pan and tilt movement of both DMX devices. After initialisation of the memory, the jog wheels are assigned to channel 1 and channel 2 of all DMX devices ( Ä...
- Page 68 Operation Configuring the jog wheels Proceed as follows to assign the PAN and TILT jog wheels for pan and tilt movement: To switch to the operation mode ‘Setup Mode’, press [Setup] for three seconds. Select the menu item ‘Pan’ or ‘Tilt’ . Press the [Fixture] button of the DMX devices which should be affected by the changes.
-
Page 69: Play Mode
Operation Using the jog wheels You may use the two jog wheels in the operation mode ‘Play Mode’ and in the operation mode ‘Program Mode’. The DMX channels used change with the DMX device which is currently under control according to your assignment. Using the [Fine] button, you can specify if turning the jog wheel results in one DMX step ([Fine] turned on) or in eight DMX steps ([Fine] turned off). - Page 70 Operation Playing a bank with auto beat Use this function to play a bank or a chase consisting of stored scenes in an endless loop. Press [AUTO]. ð The auto beat that stopped last will be used automatically and shown in the display. The LED ‘AUTO’...
- Page 71 Operation Playing a bank with sound con‐ trol Press [MUSIC BANK COPY]. ð The sensitivity last used will be used again automatically and shown in the display. The LED ‘MUSIC’ lights up. | [UP] or | [DOWN] to select the desired bank ð...
- Page 72 Operation Using [Tap Sync Manual Go] you can jump to next used scene in the bank. This function is not available when playing with auto beat. This way, a scene can be ‘released’ during a calm phase of a piece of music. Overwriting channels manually During the play back you can use the faders to overwrite the automatically created values.
- Page 73 Operation Accessing a chase manually A chase must have been programmed before you can call it (refer to Ä ‘Programming chases ’ on page 39). Empty chases cannot be started. Press one of the [Chaser] buttons. If you press the button again, the chase will be deacti‐ vated.
- Page 74 Operation Playing a chase with auto beat Press one of the [Chaser] buttons. If you press the button again, the chase will be deacti‐ vated. Press [AUTO]. ð The LED ‘AUTO’ lights up. Adjust the play back speed using the FX Speed fader, the Fade Time fader and the button [Tap Sync Manual Go].
- Page 75 Operation Playing a chase with sound con‐ trol Press one of the [Chaser] buttons. If you press the button again, the chase will be deacti‐ vated. Press [MUSIC BANK COPY]. ð The LED ‘MUSIC’ lights up. You can select more than one chase at a time. They will be played one after the other. The right part of the first line of the display shows the number of the chase which is currently playing.
- Page 76 Operation Freezing and restarting play Use this function pause the play back and to start over again from the same location. All back parameters set before are kept, for example settings for auto beat and sound control. This function is available in the operation mode ‘Play Mode’ only. To freeze (pause) the current play back, press [FREEZE].
-
Page 77: Midi Control
Operation 8.11 MIDI control Overview You can control the device with a MIDI keyboard or another MIDI device. The device receives MIDI notes and calls up the different functions. The following variants of MIDI control are avail‐ able: MIDI synthesizer assignment In this variant, the scenes of the first 15 banks are directly available using MIDI functions. - Page 78 Operation Usage of ‘Pitch Wheel’ The values transmitted in the MIDI message ‘Pitch Wheel’ control the play back speed and the value selection for auto beat and for sound control sensitivity. For auto beat, the value range is limited to 10.96 s. This simplifies the handling during live per‐ formance.
- Page 79 Operation MIDI synthesizer assignment Assignment MIDI note Function Bank 1 Scene 1, Bank 1, on/off Scene 2, Bank 1, on/off Scene 3, Bank 1, on/off Scene 4, Bank 1, on/off Scene 5, Bank 1, on/off Scene 6, Bank 1, on/off Scene 7, Bank 1, on/off Scene 8, Bank 1, on/off Bank 2...
- Page 80 Operation Assignment MIDI note Function Bank 15 Scene 1, Bank 2, on/off Scene 2, Bank 2, on/off Scene 3, Bank 2, on/off Scene 4, Bank 2, on/off Scene 5, Bank 2, on/off Scene 6, Bank 2, on/off Scene 7, Bank 2, on/off Scene 8, Bank 2, on/off Chase 1 Chase 1 on/off...
- Page 81 Operation Assignment MIDI note Function Chase 6 Chase 6 on/off Chase off All chases off Blackout Blackout on/off DMX-Master 3-FX...
- Page 82 Operation MIDI keyboard assignment It is no problem to change scenes using MIDI (synthesizer or computer) with 30 Hz. The MIDI functions of the device are fast enough for live performances. MIDI note Function Keys 1…30 Bank 1 on (white and black) Bank 2 on Bank 3 on Bank 4 on...
- Page 83 Operation MIDI note Function Overlay 3, on/off Overlay 4, on/off Overlay 5, on/off Overlay 6, on/off Fourth-to-last black key Freeze on Fifth-to-last black key Freeze off Last three black keys Auto-Beat on/off Sound control on/off Tapsync / manual step Eight last white keys Chase 1 on/off Chase 2 on/off Chase 3 on/off...
- Page 84 Operation MIDI note Function Chase 5 on/off Chase 6 on/off All chases off Blackout on/off Assigning a MIDI channel and selecting the MIDI control mode To switch to the operation mode ‘Setup Mode’, press [Setup] for three seconds. ð You are in menu item ‘Midi’ . Use the PAN jog wheel to assign a MIDI channel.
-
Page 85: Operation Mode 'Easy Mode
Operation 8.12 Operation mode ‘Easy Mode’ You can use the operation mode ‘Easy Mode’ to quickly test DMX devices. In this operation mode, 16 DMX devices with ten channels each can be controlled. The values sent on these channels are set with the ten faders of the device (including the FX Speed and Fade Time faders. - Page 86 Operation Using the operation mode ‘Easy Mode’ Press [PROGRAM] and [Setup] simultaneously for three seconds. ð The display shows ‘Ease’ . Select the DMX device, the settings of which you want to change. You can adjust ten DMX channels of this DMX device using the faders. The [Page Select] button has no function.
-
Page 87: Backup And Restore Data
Operation 8.13 Backup and restore data Backing up data Connect a USB drive to the device. Press [Record] and | [UP] simultaneously for three seconds. ð The display shows ‘Saving File, waiting’ . Press one of the fixture [Fixture] buttons to select the file to be stored. The display shows a progress bar. - Page 88 Operation Restoring data Copy the data to be restored to a USB drive and connect that drive to the device. Press [Record] and | [DOWN] simultaneously for three seconds. ð The display shows ‘Loading File’ . The control LED of the [Fixture] button lights up when data for this DMX device is available on the USB drive.
-
Page 89: Additional Functions
Operation 8.14 Additional functions Initialising the memory This function can be used to erase the memory of the device completely and to initialise it with default values. The table below shows the settings of the device after the initialisation. Setting Status / value Scenes Empty... - Page 90 Operation Setting Status / value MIDI assignment MIDI keyboard Auto start function Proceed as follows to initialise the memory: Turn off the device. Hold [PROGRAM] and [Setup] simultaneously and turn on the device. Release the buttons. ð All control LEDs quickly flash three times. DMX controller...
- Page 91 Operation Desk lock function The desk lock function can be used to block the user interface against all inputs, protecting your settings against accidental changes. To activate the desk lock, press [Page Select], [PROGRAM] and [Setup] simultaneously. While the desk lock is active, all buttons, faders and jog wheels have no function. MIDI control is available without any restriction.
- Page 92 Operation Autostart function Using the autostart function you can specify that device is in a predefined play back mode when you turn it on. It is also possible to activate the desk lock function immediately. Setting up the autostart func‐ To switch to the operation mode ‘Setup Mode’, press [Setup] for three seconds.
- Page 93 Operation Using the current play back configuration for the autostart function You can store your current play back configuration to be automatically active again when the device is turned on. To do this, activate the autostart function first. To store the current play back configuration press [Record] and [Tap Sync Manual Go] simulta‐ neously.
- Page 94 Operation Resetting the logo Proceed as follows the reset the logo to the factory default value: Ensure that the device is turned off. Hold [AUTO], then switch on the device. Press [Delete]. Press [Record] to store the settings. Turn off the device and turn it on again. DMX controller...
-
Page 95: Technical Data
Technical data Technical data Mains power supply 12 V (DC) Dimensions (W × H × D) 526 mm × 232 mm × 88 mm (4 rack units) (20.7 in. × 9.1 in. × 3.4 in.) Weight 3.5 kg (7.7 lbs) DMX-Master 3-FX... -
Page 96: Protecting The Environment
Protecting the environment Protecting the environment Disposal of the packaging mate‐ rial For the transport and protective packaging, environmentally friendly materials have been chosen that can be supplied to normal recycling. Ensure that plastic bags, packaging, etc. are properly disposed of. Do not just dispose of these materials with your normal household waste, but make sure that they are collected for recycling. - Page 97 Notes DMX-Master 3-FX...
- Page 98 Notes DMX controller...
- Page 100 Musikhaus Thomann e.K. · Treppendorf 30 · 96138 Burgebrach · Germany · www.thomann.de...
Need help?
Do you have a question about the StairVille DMX-Master 3-FX and is the answer not in the manual?
Questions and answers