thomann Harley Benton DNAfx GiT Core User Manual
Multi effects unit
Hide thumbs
Also See for Harley Benton DNAfx GiT Core:
- User manual (73 pages) ,
- User manual (36 pages)
Table of Contents
Advertisement
Quick Links
Advertisement
Table of Contents

Related Manuals for thomann Harley Benton DNAfx GiT Core


Summary of Contents for thomann Harley Benton DNAfx GiT Core
- Page 1 DNAfx GiT Core Multi Effects Unit...
- Page 2 Thomann GmbH Hans-Thomann-Straße 1 96138 Burgebrach Germany Telephone: +49 (0) 9546 9223-0 Internet: www.thomann.de 03.07.2024, ID: 578764...
-
Page 3: Table Of Contents
Table of contents Table of contents General information..........................6 1.1 Symbols and signal words....................... 6 Safety instructions............................. 8 Features............................... 10 Installation..............................11 Connections and controls........................18 Operation..............................23 6.1 Presets..............................23 6.2 Expression pedal..........................27 6.3 Tap tempo............................30 6.4 Drum machine..........................30 6.5 Tuner.............................. - Page 4 Table of contents Plug and pin assignments........................55 Protecting the environment......................57 DNAfx GiT Core Multi Effects Unit...
- Page 5 DNAfx GiT Core Multi Effects Unit...
-
Page 6: General Information
Our products and documentation are subject to a process of continuous development. They are therefore subject to change. Please refer to the latest version of the documentation, which is ready for download under www.thomann.de. 1.1 Symbols and signal words In this section you will find an overview of the meaning of symbols and signal words that are used in this document. - Page 7 General information Signal word Meaning DANGER! This combination of symbol and signal word indicates an immediate dangerous situation that will result in death or serious injury if it is not avoided. WARNING! This combination of symbol and signal word indicates a pos‐ sible dangerous situation that can result in death or serious injury if it is not avoided.
-
Page 8: Safety Instructions
Safety instructions Safety instructions Intended use This device is intended to be used for sound processing of signals from musical instruments with electromagnetic pickups. Any other use or use under other operating conditions is con‐ sidered to be improper and may result in personal injury or property damage. No liability will be assumed for damages resulting from improper use. - Page 9 Safety instructions NOTICE! Damage to the device if operated in unsuitable ambient conditions! The device can be damaged if it is operated in unsuitable ambient conditions. Only operate the device indoors within the ambient conditions specified in the “Technical specifications” chapter of this user manual. Avoid operating it in environments with direct sun‐ light, heavy dirt and strong vibrations.
-
Page 10: Features
Features Features Special features of the device: 55 high-quality amp simulations 26 IR (Impulse Response) simulations 151 different guitar effects Up to 9 types of effects at the same time 40 drum rhythms and 10 metronome rhythms Phrase Looper with 80 seconds recording time Tap tempo function Up to 200 storable presets Large LED colour display... -
Page 11: Installation
Installation Installation Unpack and check carefully there is no transportation damage before using the unit. Keep the equipment packaging. To fully protect the product against vibration, dust and moisture during transportation or storage use the original packaging or your own packaging material suitable for transport or storage, respectively. - Page 12 Installation Connection options Amplifier Computer Smartphone / audio device 300mA AUX IN PHONES INPUT OUTPUT Smartphone Expression Pedal Guitar Headphones Connection to the power supply Make the desired connection between the guitar and the equipment. Connect the supplied power adapter to the power supply input of the device and then plug the power adapter into an AC outlet.
- Page 13 Installation Connection to the input socket of the amplifier 300mA AUX IN PHONES INPUT OUTPUT Guitar Amplifier Connect the guitar to the [INPUT] socket of the device. Turn off the [AMP] and [CAB] effects. Connect the input of the amplifier to the output jack [OUTPUT] of the unit. DNAfx GiT Core Multi Effects Unit...
- Page 14 Installation Connection to the power ampli‐ fier 300mA AUX IN PHONES INPUT OUTPUT Power amplifier Guitar Connect the guitar to the [INPUT] socket of the device. Turn off the [CAB] effect. Connect the RETURN interface of the power amplifier to the [OUTPUT] socket of the device.
- Page 15 Installation Connection to a effects looper 300mA AUX IN PHONES INPUT OUTPUT Guitar Amplifier Connect the guitar to the input of an amplifier. Turn off the [AMP] and [CAB] effects. Connect the SEND interface of the amplifier to the [INPUT] socket of the device. Connect the RETURN interface of the amplifier to the [OUTPUT] socket of the device.
- Page 16 Installation Studio 300mA AUX IN PHONES INPUT OUTPUT Audio device Guitar Headphones Connect the guitar to the [INPUT] socket of the device. Connect an audio interface to the [OUTPUT] socket of the device. Connect headphones to the [PHONES] socket. DNAfx GiT Core Multi Effects Unit...
- Page 17 Installation Stage 300mA AUX IN PHONES INPUT OUTPUT Guitar Headphones Mixer Connect the guitar to the [INPUT] socket of the device. Connect a mixer to the [OUTPUT] socket of the device. Connect headphones to the [PHONES] socket. DNAfx GiT Core Multi Effects Unit...
-
Page 18: Connections And Controls
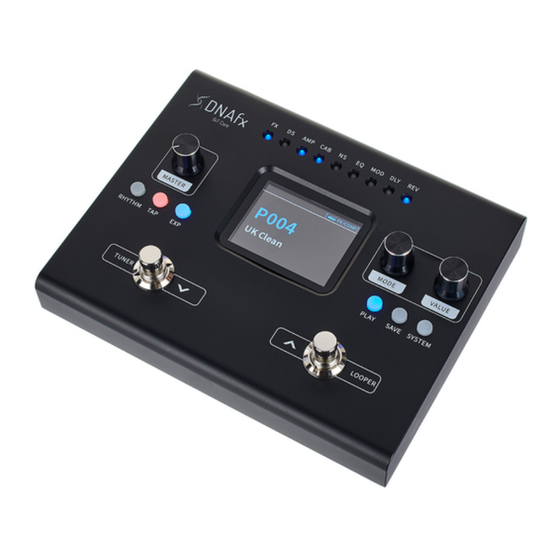
Connections and controls Connections and controls ö AMP CAB MOD DLY SAVE SYSTEM RHYTHM PLAY TUNER LOOPER & DNAfx GiT Core Multi Effects Unit... - Page 19 Connections and controls 1 Display 2 [FX], [DS], [AMP], [CAB], [NS], [EQ], [MOD], [DLY], [REV] | LED indicator light for effects The active effect blocks in the effects chain for the currently set preset light up. 3 [MODE] | Rotary control for switching on and off the respective effect modules 4 [VALUE] | Rotary control for switching menu pages and changing parameters 5 [SYSTEM] | Button for calling up the system settings 6 [SAVE] | Button for calling up the preset memory menu...
- Page 20 Connections and controls 12 [RHYTHM] | Button for calling up the configuration of the drums and metronome 13 [MASTER] | Rotary control for adjusting the overall volume Display 14 Preset number 15 Value controlled by the expression pedal 16 Preset name DNAfx GiT Core Multi Effects Unit...
- Page 21 Connections and controls Back 300mA AUX IN PHONES INPUT OUTPUT 17 [EXP] | 6.35-mm jack socket for connecting an external expression pedal 18 [AUX IN] | 3.5 mm input socket (stereo) for connecting an audio device (e.g. MP3 player or mobile phone) 19 [INPUT] | 6.35-mm jack socket for connecting a guitar or another instrument with a similar output level 20 [OUTPUT] | 6.35-mm jack socket (stereo) 21 [PHONES] | 3.5-mm jack socket (stereo) for connecting headphones...
- Page 22 Connections and controls 23 [OTG] | USB-C connection for connecting the device to a compatible smartphone or tablet You can use a compatible device to record the played songs directly or to edit presets with the special editor software. 24 Connection for the external power supply DNAfx GiT Core Multi Effects Unit...
-
Page 23: Operation
Operation Operation 6.1 Presets 6.1.1 Selecting presets The device has 200 pre-set slots. Press the [TUNER] or [LOOPER] foot switches or turn the [VALUE] rotary control to switch between presets. The LEDs in the effects block light up according to the effects chain setting for the current preset. -
Page 24: Editing Presets
Operation Preset Requirement Function P101…P150 AMP and CAB effects Direct connection to [INPUT] of the guitar amplifier disabled P151…P200 Individually configurable presets 6.1.2 Editing presets The device has 9 effects blocks that allow you to use up to 9 types of effects simultaneously in an effects chain. - Page 25 Operation Editing effects Turn [MODE] to select the desired effect block. Turn [VALUE] to select the desired value (display shows ‘GAIN’ ‘MID’ ‘PRES’ ‘BASS’ ‘TREBLE’ ‘MST’ ). Press [VALUE]. ð The set value is applied. Turn [VALUE] to change the parameters. Press [VALUE] to exit the edit menu.
-
Page 26: Storing Presets
Operation 6.1.3 Storing presets Press [SAVE]. ð A window for allocating a memory location and a name for the preset to be saved opens up. Turn [VALUE] until the desired preset number is reached, under which you want to save the settings. -
Page 27: Expression Pedal
Operation 6.2 Expression pedal Setting the effects volume Press [EXP]. ð The menu for setting the external expression pedal is called up. Turn [VALUE] until the display shows ‘Level/Volume/MST’ . Press [VALUE]. ð The set value is applied. Confirm the expression pedal. ð... - Page 28 Operation Confirm the expression pedal. ð The set parameter is activated. The [EXP] LED lights up. Calibrating the expression pedal Press [EXP]. ð The menu for setting the external expression pedal is called up. Lower the expression pedal to the rear and press [VALUE]. ð...
- Page 29 Operation Adjusting the expression pedal volume Press [EXP]. ð The menu for setting the external expression pedal is called up. Turn [VALUE] until the display shows ‘EXP VOL’ . Press [VALUE]. ð The display shows ‘EXP VOL PEDAL: ON’ . Turn [VALUE] to select the desired value for the volume from ‘MIN 000’...
-
Page 30: Tap Tempo
Operation 6.3 Tap tempo Turn [MODE] to select the [DLY] effect block. Press [MODE]. ð The delay effect is activated. Turn [VALUE] to select the ‘SUB-D’ submenu. Turn [VALUE] to select the desired value. Press [VALUE]. ð The setting is confirmed. Press [TAP] twice to control the delay time. - Page 31 Operation Press [VALUE]. ð The setting is confirmed. Submenu Menu level 2 Menu level 3 Description menu level 1 ‘MODE’ ‘RHYTHM’ Sets the Rhythm operating mode. ‘STYLE’ Adjusts the drum rhythm. ‘BPM’ Sets the beats per minute. ‘VOLUME’ Adjusts the volume. ‘METRONOME’...
-
Page 32: Tuner
Operation 6.5 Tuner Press and hold down the [TUNER] foot switch. ð The tuner is enabled. Turn [VALUE] to select the desired submenu. Press [VALUE]. ð The setting is confirmed. Press any foot switch to exit tuner mode. Submenu Description ‘MUTE’... -
Page 33: Looper
Operation 6.6 Looper Hold down the [LOOPER] foot switch. ð The looper is activated. Turn [VALUE] to select the desired submenu. Press [VALUE]. ð The setting is confirmed. Submenu Description ‘PLAY VOL’ Adjusts the playback volume of the looper. ‘TIME’ Shows the recording time. - Page 34 Operation Submenu Trigger Description ‘DUB’ With PLAY activated: The dubbing starts. Press [TUNER] ‘STOP’ With PLAY/DUB activated: Playback or dubbing stops. Press [LOOPER] ‘CLEAR’ Press and hold All audio tracks are deleted. [LOOPER] for one second – After recording for more than 80 seconds, the looper automatically starts play‐ back.
-
Page 35: Otg Function
Operation 6.7 OTG function The device can be used as an audio interface with a smartphone or tablet. Connect the device to a smartphone or tablet using an OTG cable. ð The device is connected for recording audio or video recordings on the mobile device. -
Page 36: System Settings
Operation 6.8 System settings Press [SYSTEM] to call up the system settings. Turn [VALUE] to select the desired submenu. Press [VALUE]. ð The setting is confirmed. Submenu Description ‘INPUT LEVEL’ Sets the input level of the device, -∞~+6 dB. ‘SCREEN’ Adjusts the brightness of the display. -
Page 37: Software
Make sure that the device is connected to the power supply via the supplied power adapter. 6.9.1 Software update The current software version can be downloaded for free from www.harleybenton.com or our website www.thomann.de. Install the current software version on your computer. Simultaneously hold down the [TUNER] and [LOOPER] foot switches and turn on the device. - Page 38 Operation We recommend removing the obsolete software version before installing the current software version. DNAfx GiT Core Multi Effects Unit...
-
Page 39: Effects List
Effects list Effects list FXCOMP Number Name Template CRY WAH DUNLOP® GCB95 535 WAH DUNLOP® Crybaby 535Q AUTO WAH @WAH TALK WAH AH RedKid Talk wah ’AH’ TALK WAH OH RedKid Talk wah ’OH’ TOUCH WAH ENVELOPE auto-wah YELLOW COMP YELLOW COMP compressor BLUE COMP BLUE COMP compressor... - Page 40 Effects list DS/OD Number Name Template TUBE DR B.K. Butler® Tubedrive IBANEZ® Ts808 PURE BOOST PURE BOOST FLEX BOOST FLEX BOOST DDRIVE BARBER® Direct Drive BLACKRAT ProCo® Rat GREY FAZE DUNLOP® Fuzz Face MUFFY EH® Big Muff MTL ZONE BOSS® METAL ZONE MTL MASTER Digitech®...
- Page 41 Effects list Number Name Template BEEBEE + Xotic® BB Plus RIET Suhr® Riot TIGHT DS Amptweaker® TightRock FULL DS Fulltone® GT-500 GOLD CLON Klon® Centaur DNAfx GiT Core Multi Effects Unit...
- Page 42 Effects list Number Name Template 65US DX Fender® 65 Deluxe reverb 65 USTW Fender® 65 Twin Reverb 59 US BASS Fender® 59 Bassman US SONIC Fender® Super Sonic US BLUES CL Fender® Blues Deluxe clean channel US BLUES OD Fender® Blues Deluxe J800 Marshall®...
- Page 43 Effects list Number Name Template MARKIII CL Mesa Boogie® MARK III Clean MARKIII DS Mesa Boogie® MARK III Distortion MARKV CL Mesa Boogie® MARK V Clean MARKV DS Mesa Boogie® MARK V Distortion TRI REC CL Mesa Boogie® Triple Rectifier Clean TRI REC DS Mesa Boogie®...
- Page 44 Effects list Number Name Template JAZZ 120 Roland® JC-120 UK30 CL Vox® AC30 Clean UK30 OD Vox® AC30 Overdriven HWT103 Hiwatt® DR-103 PV 5050 CL Peavey® 5150 Clean PV 5050 DS Peavey® 5150 Distortion REGAL TONE CL Tone King® Falcon Rhythm REGAL TONE OD1 Tone King®...
- Page 45 Effects list Number Name Template HUGEN CL Diezel® Hagen Clean HUGEN OD Diezel® Hagen Overdrive HUGEN DS Diezel® Hagen Distortion KOCHE OD Koch® Powertone Overdrive KOCHE DS Koch® Powertone Distortion ACOUSTIC 1 Acoustic simulator 1 ACOUSTIC 2 Acoustic simulator 2 ACOUSTIC 3 Acoustic simulator 3 DNAfx GiT Core...
- Page 46 Effects list Number Name Template US DLX 112 Fender® Deluxe reverb 112 US TWN 212 Fender® Twin reverb 112 US BASS 410 Fender® Bassman 410 SONIC 112 Fender® Super Sonic 112 BLUES 112 Fender® Blues deluxe 112 1960 412 Marshall® 1960A 412 EAGLE P412 Engl®...
- Page 47 Effects list Number Name Template JAZZ 212 Roland® JC120 212 UK 212 Vox® AC30 212 HWT 412 Hiwatt® Ap412 PV 5050 412 Peavey® 5150 412 REGAL TONE 110 Tone King® Falcon 110 TWO STONES 212 Two Rock® 212 CARDEFF 112 Two Rock®...
- Page 48 Effects list Number Name Template NOISE KILLER NOISE KILLER INTEL REDUCER Intelligent Noise Reduction NOISE GATE Digital noise gate Number Name Template GUITAR EQ 5 band graphic EQ for guitar METAL EQ 5 band graphic EQ for BASS guitar 6BAND EQ 6 band graphic EQ for Guitar CUSTOM EQ 3 band parametric EQ with adjustable frequencies and ±12Db boost/cut...
- Page 49 Effects list Number Name Template PHASER Based on the custom phaser effect STEP PHASER Square wave phase shifter FAT PHASER Low frequency phase shifter FLANGER Based on the custom flanger effect JET-FLANGER Based on the JET FLANGER TREMOLO Based on the custom tremolo effect STUTTER Choppy cut off filter VIBRATO...
- Page 50 Effects list Number Name Template HIGH PASS Static high frequency pass filter LOW PASS Static low frequency pass filter SLOW GEAR Auto volume swell LOFI Low rate sampling filter DNAfx GiT Core Multi Effects Unit...
- Page 51 Effects list DELAY Number Name Template DIGITAL Recreates the crystal-clear repeats of the 80’s delay units ANALOG Modelled after classic stompbox delays with BB chips REAL Realistic and natural echo TAPE Recreates swirly 70’s tape echo Digital Delay with modulated repeats REVERSE Backwards delay PINGPONG...
- Page 52 Effects list REVERB Number Name Template ROOM Small room reverb HALL Large room reverb CHURCH Huge room reverb PLATE Studio style plate reverb SPRING Classic spring reverb tank Reverb with modulation CAVE Spacious and atmospheric reverb DNAfx GiT Core Multi Effects Unit...
-
Page 53: Technical Specifications
Technical specifications Technical specifications Input connections Power supply Input socket for power adapter AUX IN 1 × 3.5-mm jack socket (stereo) INPUT 1 × 6.35-mm jack socket (mono) Expression pedal 1 × 6.35-mm jack socket (stereo) Output connections Audio 1 × 6.35-mm jack socket (stereo) 1 ×... - Page 54 Technical specifications Weight 507 g Ambient conditions Temperature range 0 °C…40 °C Relative humidity 20%…80% (non-condensing) Further information Amp modelling Drum computer Tuner included Expression pedal USB connection Headphone connection MIDI interface Line out Battery operation Power supply included DNAfx GiT Core Multi Effects Unit...
- Page 55 Plug and pin assignments Plug and pin assignments Introduction This chapter will help you select the right cables and plugs to connect your valuable equip‐ ment in such a way that a perfect sound experience is ensured. Please note these advices, because especially in ‘Sound & Light’ caution is indicated: Even if a plug fits into the socket, an incorrect connection may result in a destroyed power amp, a short circuit or ‘just’...
- Page 56 Plug and pin assignments 1/4" TS phone plug (mono, unbalanced) Signal Ground, shielding 1/4" TRS phone plug (stereo, unbalanced) Signal (left) Signal (right) Ground Three-pole 1/8" mini phone jack (stereo, unbalanced) Signal (left) Signal (right) Ground, shielding DNAfx GiT Core Multi Effects Unit...
-
Page 57: Protecting The Environment
Protecting the environment Protecting the environment Disposal of the packing material Environmentally friendly materials have been chosen for the packaging. These materials can be sent for normal recycling. Ensure that plastic bags, packaging, etc. are disposed of in the proper manner. Do not dispose of these materials with your normal household waste, but make sure that they are collected for recycling. - Page 58 When disposing of the device, comply with the rules and regulations that apply in your country. You can also return your old device to Thomann GmbH at no charge. Check the current conditions on www.thomann.de.
- Page 60 Musikhaus Thomann · Hans-Thomann-Straße 1 · 96138 Burgebrach · Germany · www.thomann.de...
Need help?
Do you have a question about the Harley Benton DNAfx GiT Core and is the answer not in the manual?
Questions and answers