Table of Contents
Advertisement
Advertisement
Table of Contents

Subscribe to Our Youtube Channel
Related Manuals for Centurion XTrac


Summary of Contents for Centurion XTrac
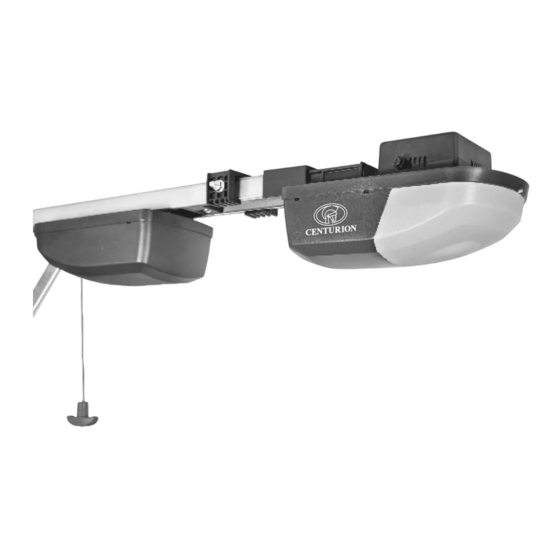
- Page 1 XTrac Installation manual SECTIONAL AND TIP-UP GARAGE DOOR OPENER...
- Page 2 50 countries worldwide CENTURION SYSTEMS (Pty) Ltd reserves the right to make changes to the products described in this manual without notice and without obligation of CENTURION SYSTEMS (Pty) Ltd to notify any persons of any such revisions or changes.
-
Page 3: Table Of Contents
Contents IMPORTANT SAFETY INSTRUCTIONS Product warranty and exclusions Assembly instructions Identify Garage Door type Identify installation method Assembly Installation instructions Header bracket mounting Towing bracket mounting Attaching Drive Rail to header bracket Mounting Drive Rail Assembly to ceiling Attaching Bent Towing Arm Connecting to Power Supply Engaging / Disengaging Settings and adjustments... - Page 4 5.17 Soft stop 5.18 Speed control 5.19 Maintenance Technical specifications Troubleshooting guide...
-
Page 5: Safety Instructions
/ or property damage The XTrac must only be installed on a properly balanced well functioning garage door. An improperly balanced or malfunctioning garage door could cause serious personal injury, death and / or property damage. - Page 6 The ceiling structure must be adequate to support the weight of the XTrac. It is entirely up to the installer to determine the structural suitability of the fixing points ...
- Page 7 The correct function of the Safety Obstruction Force System should be checked on a monthly basis Never use the XTrac unless the garage door is in full view and free from any object which may impede the movement of the garage door such as cars, children and or adults ...
- Page 8 In order for the Safety Obstruction Force system to function it must first encounter an obstruction in the form of an object / person on to which some force MUST be exerted. As a result the object / person / garage door may suffer DAMAGE AND OR INJURY ...
-
Page 9: Product Warranty And Exclusions
Centurion Systems. The warranty will cover the repair or replacement, at the discretion of Centurion Systems, of such faulty materials or parts free of charge provided that the equipment is returned to our workshop. -
Page 10: Assembly Instructions
The standard 3000mm Drive Rail will lift a door up to 2440mm high. (optional Drive Rail extension kit is available for doors over 2440mm high) XTrac is supported by the Drive Rail Hanger which is hung from the ceiling by appropriate hanging material ... -
Page 11: Assembly
2.3 Assembly 2.3.1 General assembly Open the packing carton and expose the XTrac components as depicted in Figure.2 Orientate the Drive Rail (Figure.2-A) so that the Terminal Bracket (Figure.3-G) faces towards the garage door Locate the Drive Unit (Figure.2-C) and slide it into the Drive Rail and at the same time insert the Drive Chain (Figure.1-B) into the Drive Unit. - Page 12 Towards Garage Door FIGURE 2. SECTIONAL UNIT ASSEMBLY DEPICTED Figure 3a Figure 3b FIGURE 3. Tensioning of the chain Page 8...
- Page 13 Once functionality selection and wire connection has been completed replace the cover The XTrac is now fully assembled and ready for installation Remove cover fixing screw under light cover FIGURE 5. ATTACHING STRAIGHT TOWING ARM...
-
Page 14: Installation Instructions
The Header Bracket carries ALL of the opening and closing thrust of the XTrac and as such must be securely fastened to a rigid, structural member of the garage. It is entirely up to the installer to determine the fixing method and the structural suitability of the fixing points. -
Page 15: Towing Bracket Mounting
3.3 Attaching Drive Rail to Header bracket With the garage door in the fully closed position - lay the assembled XTrac on the garage floor in line with the Centreline of the garage door so that the Control Box is furthest from the garage door ... - Page 16 Arcing Point of the garage door may cause the Drive Rail to flex excessively. (Figure. 9) b. The ceiling structure must be adequate to support the weight of the XTrac. It is entirely up to the installer to determine the structural suitability of the fixing points. 50mm or Less...
-
Page 17: Attaching Bent Towing Arm
Securely fix the arms together using two 8mm screws and nuts 3.6 Connecting to power supply Plug the XTrac into a properly earthed 220 to 240V AC power outlet Ensure that no excess power cord hangs below the Control Box 3.7 Engaging / Disengaging... - Page 18 Doing so may result in SERIOUS PERSONAL INJURY and or PROPERTY DAMAGE. b. Always disengage the XTrac with the garage door in the fully closed position. c. If attempting to disengage the XTrac from any position other than with the garage door fully closed ensure that there are no persons and or property near or directly under the path of the door.
-
Page 19: Settings And Adjustments
4. Settings and adjustments 4.1 Door travel adjustment The Drive Rail mounted Limit Prongs provide a one to one ratio between Limit Prong movement and garage door movement thereby ensuring 100% accuracy and ease of adjustment. Garage door fully open and fully closed positions can be easily adjusted by moving the Limit Prong to the desired location in order to increase or decrease garage door travel Door travel adjustment –... -
Page 20: Safety Obstruction Force Adjustment
V. switch power on at power supply. Functionality In order to learn the required run time and drive force values the XTrac will be required to complete five (manually activated) uninterrupted open and close cycles.(commencing from the Close Limit Point) ... - Page 21 If too little or too much force is required to make the XTrac Safety Reverse - turn the (green) “Offset adjustment Pin (Figure.19-G) five degrees in the appropriate direction - clockwise to increase force - anti-clockwise...
-
Page 22: Manual Mode
A Forced Learn may be initiated by holding down the Learn” Button (Figure.19-D) for two seconds – LED Indicator will begin to quick flash Cycle the XTrac through five complete uninterrupted strokes (commencing from the close limit point) in order for it to complete the learning process ... - Page 23 If too little or too much force is required to make the XTrac stop - rotate the (green) Open / Offset Adjustment Pin five degrees in the appropriate direction (clockwise to increase force, anti-clockwise to decrease force) and then repeat the previous testing steps Safety Obstruction Force Adjustment –...
-
Page 24: Options And Features
Control Box Covers. (Refer Section.5.6 for removal and replacement details) Connection Diagrams a. XTrac two wire safety beam (Figure 14A) b. CENTURION i5 or equivalent four wire Safety Beams (Figure.14B) c. 24VDC universal receiver (Figure 15) d. Wall switch (hard wired)(Figure 16) Two wire safety beams... -
Page 25: Back Jump
Replace the Control Box and Courtesy Lamp Covers 5.4 Dual powered XTrac The Dual Powered XTrac has built-in batteries which provide back-up power in the event of a power outage The batteries can provide up to 30 complete cycles of operation while the power... -
Page 26: Control Box
Down is imminent. 5.5 Control box The Control Box houses most of the controls from which the XTrac may be adjusted and functionality customized to suit individual requirements Most commonly used functionality controls are accessible from within the Courtesy Lamp Cover ... - Page 27 IV. remove the Control Box cover by pulling first outwards and then downwards at the finger recess points (Figure.18-B and C). Replacement of all components is the reversal of removal FIGURE 18. XTRAC CONTROL BOX FIGURE 19. XTRAC CONTROL BOX Page 23...
-
Page 28: Courtesy Lamp
5.6 Courtesy lamp The in-built Courtesy Lamp will switch on each time the XTrac is activated and then switch off automatically 90 seconds after receiving the last Hand Transmitter or run signal. In order to conserve remaining battery power the Courtesy Light will not function once battery voltage falls below 24V DC. -
Page 29: Door Service Monitor
Replace Control Box and Courtesy Lamp Covers 5.9 Remote controls The XTrac offers four menu levels pertaining to four different functions that can be activated either via a handheld remote transmitter or via the four-button wall pendant. Each menu level and function has a different effect upon the controller and the load which it controls. -
Page 30: Wireless Wall Switch
Proceed this way to learn any other transmitter in the system to operate Function One only. The system will remain in this learn mode for 10 seconds after the last remote or wall pendant is learned and automatically exit after this time. The function can be learned to any button, provided that the button has not yet been learned to another function. - Page 31 Function Four – Autoclose Override This function will allow the associated button to override the Autoclose function if has been selected, resulting in the door staying open. Operation The operation of this function is described as follows: With the door in the closed position, the Autoclose Override button must be pressed and held for at least three seconds to engage/activate this function ...
-
Page 32: Learn Button
Use the mounting template and mounting instructions provided with the switch The Wireless Wall Switch may be learned into be XTrac as per the procedure outlined on Section 5.9 "Remote controls" Important note: The wireless Wall Switch must be mounted within sight of the garage door and a reasonable distance away from moving parts. -
Page 33: Run Button
Press and hold in conjunction with “Learn” Button 5.14 Safety Beams The CENTURION i5 or other four wire Safety Beams may be connected to the XTrac. The installation of Safety Beams greatly enhances safety by constantly monitoring for persons or objects which may pass within the path of the moving garage door. -
Page 34: Safety Reverse
When commencing movement from any stationary position, the XTrac will slowly ramp up to full speed. This is in order to minimize start-up load on the XTrac and garage door and provide smooth and quiet operation 5.17 Soft stop ... - Page 35 Important Note: Using any other type of lubricant may cause the XTrac to malfunction! II. disengage the XTrac from the door (Figure.11) and then test the door to ensure that it meets with the requirements detailed on page 1, Items 3 and 4.
- Page 36 Radio receiver CENTURION code-hopping 433MHz Receiver code storage 22 transmitter buttons capacity Can operate off a solar supply, consult Centurion Systems for assistance Requires infrared safety beams to be fitted Specifications subject to change without prior notice Page 32...
- Page 37 Check that XTrac is engaged to door XTrac will not function at all No LED display indicates that XTrac has entered Shut-down Mode due to low battery voltage - check power supply (battery version only) Opener may have entered Holiday Lockout Mode ...
- Page 38 Installation Details Installation Date: Installer's Name: Installer's Address: Installation Checked By: Installer's Telephone Number: Notes Notes Page 34...
- Page 39 Notes Page 35...
- Page 40 Sharecall 0860-CENTURION (0860 236 887) Head Office: +27 11 699 2400 Sharecall Technical Support 0861 003 123 or +27 11 699 2481 from 07h00 to 18h00 (GMT+2) (Sharecall numbers applicable when dialed from within South Africa only) 0.07.A.0014_22072013 www.centsys.com...
Need help?
Do you have a question about the XTrac and is the answer not in the manual?
Questions and answers