Table of Contents
Advertisement
Advertisement
Table of Contents

Related Manuals for Centurion SDO-10


Summary of Contents for Centurion SDO-10
- Page 1 IMPORTANT SAFETY RECOMMENDATIONS 802-011-01 D - 1 -...
- Page 2 - 2 - SDOPD...
-
Page 3: Table Of Contents
CONTENTS Important Safety Recommendations ………………………………………..... Warranty Exclusions ………………………………………………………………. Assembly Instructions ………………………………………………………………. Identifying Garage Door Type ………………………………………………………………. Assembling Drive Pole and Power Head ………………………………………………………. Drive Chain Assembly & Tensioning ………………………………………………………. Drive Chain Tensioning…………………………………………………………………………. Installation Instructions ……………………………………………………………… Mounting Header Bracket ………………………….……………………………... Mounting Towing Bracket ………………………………………………………………... -
Page 4: Important Safety Recommendations
IMPORTANT SAFETY RECOMMENDATIONS FAILURE TO COMPLY WITH THE FOLLOWING SAFETY RECOMMENDATIONS MAY RESULT IN SERIOUS PERSONAL INJURY, DEATH AND / OR PROPERTY DAMAGE. 1. PLEASE READ CAREFULLY AND ADHERE TO ALL SAFETY AND INSTALLATION RECOMMENDATIONS 2. The installation of your new Automatic Garage Door Opener (herein after referred to as “AGDO”) must be carried out by a technically qualified or licensed person. -
Page 5: Warranty Exclusions
IMPORTANT SAFETY RECOMMENDATIONS 15. Never use the AGDO unless the garage door is in full view and free from any object which may impede the movement of the garage door such as cars, children and / or adults. 16. Never allow children to operate the AGDO. 17. -
Page 6: Assembly Instructions
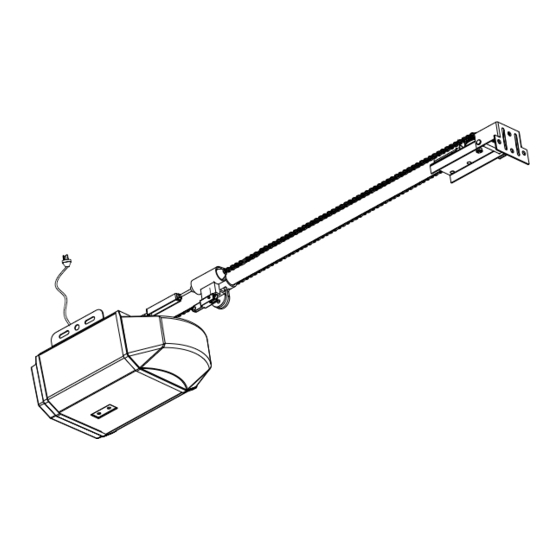
ASSEMBLY INSTRUCTIONS 1. Identifying Garage Door Type Identify the garage door type and then select the preferred installation type that is best suited to the application. Fig 1A Fig 1B Fig 1C 2. Assembling Drive Pole and Power Head ... -
Page 7: Drive Chain Assembly & Tensioning
ASSEMBLY INSTRUCTIONS Slide the Carriage on to the Drive Pole ensuring that the “Door” arrow on the Carriage faces towards the door. Slide the Terminal Bracket on to the end of the Drive Pole ensuring that the engaged end of the Drive Pole hits the stopper in the Terminal Bracket. -
Page 8: Installation Instructions
INSTALLATION INSTRUCTIONS 4. Mounting Header Bracket Determine the highest arcing point of the garage door (Fig.4) and mark this as a horizontal line on the structural wall (header) above the top edge of the garage door. (Fig.5) Determine the Garage door Center Line and mark a vertical line on the Header above the top edge of the Garage door. -
Page 9: Mounting Power Head To Ceiling
INSTALLATION INSTRUCTIONS 7. Mounting Power Head to Ceiling Raise the Power Head off the floor and rest it on a support high enough that the Drive Rail Assembly runs parallel to the ground. (Fig.7 depicts typical sectional type garage door installation for tip up door refer Fig.1B) ... -
Page 10: Adjusting Disengage Cord
SETTINGS & ADJUSTMENTS Fig 8 9. Adjusting Disengage Cord Unfurl the Red Disengage Cord and cut to length so that the end hangs approximately 1800mm above the garage floor. (Fig.9) Fig 9 10. Connecting to Power Supply Connect the AGDO to a properly earthed power supply using the Power Cord provided. ... -
Page 11: Settings And Adjustments
SETTINGS AND ADJUSTMENTS 11. Disengaging from Garage Door Pull down on the Red Coloured Disengage Cord (Fig.9) to disengage the AGDO from the Garage door. Important Notes: a. Never attempt to open/close the Garage door by pulling on the Disengage Cord. Doing so may result in SERIOUS PERSONAL INJURY, PROPERTY AND/OR AGDO DAMAGE. -
Page 12: Safety Obstruction Force Adjustment
SETTINGS & ADJUSTMENTS c. LED Indicator (Fig 11) will slow flash once the AGDO reaches the Open Limit position. 14. Safety Obstruction Force Adjustment Entering Safety Obstruction Force (SOF) Adjustment Mode Locate the Learn button (Fig 11) found on the rear cover of the AGDO. ... -
Page 13: Hand Transmitters
SETTINGS & ADJUSTMENTS With the garage door in the fully open position, press the Run button (Fig.11) so that the garage door begins to close. As the garage door is closing - slowly turn the Close Force (red) adjustment pin (Fig.11) in an anti- clockwise direction until the garage door stops and begins to reverse direction. -
Page 14: Options And Features
OPTIONS AND FEATURES 16. Auto Close Auto Close can enhance the security of your property by ensuring that your garage door is never unintentionally left open. Auto Close will automatically close the garage door; i. 3 sec after reaching the fully open position - provided that a person or object has passed through the Safety Beams within the Delay Time, or ii. -
Page 15: Learn Button
OPTIONS AND FEATURES 19. Learn Button The Learn button (Fig 11) is located on the rear cover of the AGDO and serves to initiate the functions as described in the following table; Function Action Reference Learn Hand Transmitter Codes Momentary press Sec.15 Delete Hand Transmitter Codes... - Page 16 OPTIONS AND FEATURES Mounting Locate the Safety Beam mounting brackets provided. Mount the bracket so that its bottom edge sits 125mm off the floor. Use the 2 mounting screws provided to fasten each mounting bracket to the wall. ...
-
Page 17: Thermal Overload
OPTIONS AND FEATURES 24. Thermal Overload In order to prevent overheating damage the AGDO is equipped with a internal thermal overload switch. In the event of continuous usage the AGDO may overheat and shut down. After a shut down the thermal overload switch will automatically reset after a 20 ~ 30 minute cooling period. -
Page 18: Trouble Shooting Guide
TROUBLE SHOOTING GUIDE Reference Symptom Suggested Remedies Page Item • Check that AGDO is connected to power supply • AGDO will not function at all • Check power point function by plugging-in an alternate appliance • Check that AGDO is engaged to door •... -
Page 19: Notes
NOTES - 19 - SDOPD...
Need help?
Do you have a question about the SDO-10 and is the answer not in the manual?
Questions and answers