Table of Contents
Advertisement
Quick Links
Advertisement
Table of Contents

Related Manuals for NewTek TriCaster 40


Summary of Contents for NewTek TriCaster 40
- Page 2 Revised – Dec. 3, 2013 Trademarks: NewTek, TriCaster, TriCaster 40,TriCaster XD, TCXD40, TCXD850, TCXD850 Extreme, TriCaster TCXD850 Extreme, TriCaster 850 Extreme, TriCaster Extreme, TriCaster 850, TCXD450, TCXD450 Extreme, TriCaster TCXD450 Extreme, TriCaster 450 Extreme, TriCaster Extreme, TriCaster 450, IsoCorder, TCXD300, TriCaster PRO, TriCaster STUDIO, TriCaster BROADCAST, TriCaster DUO, iVGA, SpeedEDIT, 3PLAY, 3PLAY 820, 3PXD820, LiveText, DataLink, LiveSet, LiveMatte, TimeWarp, VT, V[T5], Video Toaster, Toaster, 3D Arsenal, Aura, LightWave, LightWave 3D and LightWave CORE are trademarks of NEWTEK.
-
Page 3: Table Of Contents
TABLE OF CONTENTS Introduction ......................5 Getting Started ....................7 Connections ..............................7 2.1.1 Multiview ..............................8 2.1.2 Network ..............................8 2.1.3 A/V IO ..............................8 Registration ..............................9 2.2.1 Startup and Windows® Activation ......................9 2.2.2 TriCaster License and Registration ....................10 2.2.3 Online Registration ..........................10 2.2.4 Registering by Telephone ........................ - Page 4 Record, Grab ............................. 36 3.6.1 Record Configuration ......................... 36 Grab ................................38 Virtual Inputs ............................. 38 3.8.1 Positioner ............................39 3.8.2 Overlay ............................... 39 3.8.3 LiveSet Virtual Sets ..........................40 Audio Control ............................43 3.9.1 Audio Levels ............................44 3.10 Desktop Options ............................
- Page 5 LiveText ......................64 Project Files ............................... 64 6.1.1 Sessions, Projects and Display ......................64 6.1.2 Files/Filebin ............................65 6.1.3 Naming Stand-in Images ........................65 Files and File Management ................67 Manage ..............................67 7.1.1 Browse ............................... 67 7.1.2 Import Media ............................. 68 7.1.3 Export Media .............................
- Page 6 Graphics 1 ..............................79 Graphics 2 ..............................79 General ..............................79 A.9.1 Selection and Navigation ........................79 A.9.2 Misc..............................79...
-
Page 7: Introduction
LiveText™, progressive session formats, the Export module, some recording formats, White Balance, scopes, certain Multiview layouts and Aux output options, and still more – are exclusive to TriCaster 40 Version 2 (Version 1 users can contact their reseller or NewTek Sales to inquire about upgrading). -
Page 9: Getting Started
GETTING STARTED This chapter will tell you how to connect, configure and register your new TriCaster™ live production system. You’ll discover how to get both audio and video in and out of the system, and to adapt both input and output to suit your production environment and needs. -
Page 10: Multiview
2.1.2 NETWORK TriCaster can include screens from networked computers running NewTek’s iVGA™ client software, network output from applications such as LiveText™, or Apple® Airplay® media in your live productions. As well, an internet connection can serve for registration and updates, and of course for live streaming purposes. -
Page 11: Registration
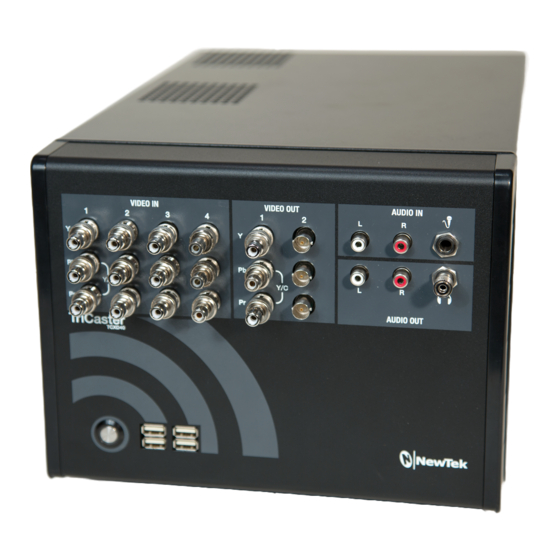
VIDEO IN Cameras or other analog video sources are connected to inputs in the VIDEO IN group. Connectors are organized in four columns supplying Switcher inputs numbered 1-4. Optional connection types for SD video source include composite, Y/C (S-Video) and component (Y, Pb, Pr). For HD sources, an HD component connection is required. VIDEO OUT Two independent video outputs are supplied. -
Page 12: Tricaster License And Registration
Hint: If the Serial number doesn’t appear automatically, and you can’t find it on your unit, you can obtain it from the registration webpage mentioned in the next section, or from NewTek’s Customer Support Desk (open seven days a week). -
Page 13: Registering By Telephone
2.2.4 REGISTERING BY TELEPHONE NewTek’s Customer Care center also handles registration requests by telephone, if that is more convenient (when opportunity permits, you should still visit the website to set up your account, allowing you to access to software updates). - Page 14 What broadcast standard is used in your locale? Is it PAL, common in Europe among other places, or perhaps NTSC, standard throughout North American regions? Are you using HD or SD cameras (or a mix of both)? How are your cameras connected? As you continue, you may make other adjustments: ...
- Page 15 Beneath the name is a field labeled Volume. Use the menu at right to choose which hard drive the session (and its associated content) is created and stored on. Note: External hard drives are not recommended for use as session drives. FORMAT AND OUTPUT CONSIDERATIONS Remember that for live production, TriCaster can supply SD output (for SD sessions), or both HD and SD in the case of HD sessions.
-
Page 16: Configure Sources
Figure 8 2.3.2 CONFIGURE SOURCES TriCaster’s supports many different live audio and video source types. Let’s consider how to configure these (see Section2.1 for more information on connecting audio and video sources). Figure 9 VIDEO Generally, you choose settings for TriCaster inputs and outputs in panels that you open by clicking conveniently located Configure buttons, identified by a gear icon (Figure 9). - Page 17 Below this you’ll see Proc Amp controls that let you adjust the color characteristics of this source. Every TriCaster video source has independent controls just like this. Of course internal sources, such as Media Players do not require a Connection Type setting. Hint: Network sources are selected right in their monitor’s titlebar, for quick access.
- Page 18 The Smoothness control lets you blend the foreground smoothly into transparent background. When overlaying the keyed source on another image, this helps produce a seamless composition. The Spill Suppression controls work in similar fashion, but operate on key color that is unintentionally reflected or ‘spilled’ onto the foreground subject.
- Page 19 The Mic controls govern the microphone (unbalanced, mic level, ¼”) input. For this source, a Trim knob is provided, allowing you to adjust the nominal level for different microphones. Note that the sound from this input is ‘mono-ed’ (sent to both internal audio channels) by default.
- Page 20 NETWORK Figure 18 TriCaster’s network source features are very powerful. You can use NewTek’s iVGA client to include displays from networked computers, selected NewTek 3Play™ instant replay systems, or an Apple AirPlay® source (such as an iPad® or iPhone®) in your productions.
-
Page 21: Configure Output
NETWORK AUDIO ® Some network video sources (notably 3Play output and Apple® AirPlay video clips) can include embedded sound. The Net 1 and Net 2 control groups in the External Audio tab (discussed a bit earlier in this section) let you the settings for these audio sources. - Page 22 MEDIA PLAYERS All three Media Players in TriCaster 40 (DDR, GFX1 and GFX2) support playback of common audio file formats such as MP3 or WAV. (The DDR also plays video clips with embedded sound). Each player has its own control group in the Internal Audio tab.
-
Page 23: Internet Streaming
STREAM The audio control group labeled Stream lets you control the audio you send to an online audience. There is a Source selection menu at the top of the Stream control group. This allows menu you select individual Media Players by name, Internal (a mix-down of all Media Player output), All (identical to the Master mix), or Solo (a mix of all soloed sources only). -
Page 24: The Live Desktop
THE LIVE DESKTOP TriCaster’s Live Desktop is really the production hub, home to the all of the controls, displays, modules and tools you will use to create and broadcast your live productions in realtime as events occur. OVERVIEW 1 - Monitoring 2 –... -
Page 25: Monitors
Figure 24 QR Code (Documentation) – click this button and scan a QR code with your mobile device (such as an ® iPad or Android® tablet) to download documentation. Eject (removable storage media ) and [x] (Exit button) STATUS BAR Figure 25 Figure 26... -
Page 26: Contextual Tools
Beneath these primary monitors are Stream, Record and Grab buttons, along with their Configuration (gear) buttons and time/counter fields (we’ll look at these features in Sections 3.6 and Chapter 4, respectively). A convenient Master Volume knob appears under Program, too. Figure 28 By default, the monitoring section at left provides individual monitors for all available video sources, including camera and network inputs and output from the internal Media Players. -
Page 27: Interactive Control
3.2.2 INTERACTIVE CONTROL The small video source monitors are actually interactive; click an (unselected) monitor to send it to the Switcher’s Preview row. Click it again to perform a Take, swapping it with the current Program row selection, and sending it to Program Output. Or Shift + click the monitor for the Preview row source to perform a Transition. -
Page 28: The Program And Preview Rows
Switcher Transitions Main Transition FX, Program, Preview Selectors Local Layer Controls Controls Figure 33 3.3.1 THE PROGRAM AND PREVIEW ROWS From top to bottom, the three Switcher rows are labeled FX, Program and Preview. Clicking a button in the Program or Preview row selects the active video source for that video layer. ... -
Page 29: Local Layer Controls
Two overlay layers, DSK 1 and DSK 2, are composed above the BKGD layer on Program output. DSK 2 appears ‘in front of’ DSK 1 – that is, closest to the viewer. FTB (Fade to Black) constitutes a final overlay layer – one that obscures all other layers when applied. Hint: DSK is short for Down Stream Keyer. - Page 30 TRANSITION CONFIGURATION Select an icon in the Transition Bin, and then click the Configure (gear) button at right above to configure the transition. The first time you click Configure, the only entry in the drop-down menu may be Browse. Selecting it opens a Media Browser to let you choose a transition (see Section 3.5 for Media Browser details).
-
Page 31: Main Layer Controls
Drag the double-headed arrow to relocate the DSK source vertically or horizontally within the frame. Constrain movement to one axis by holding down the Ctrl key before dragging, or by dragging on either of the two numeric controls below (click to enter a value by typing if you prefer). Hint: DSK layers automatically appear (temporarily) on Preview when the Position panel is open. -
Page 32: Common Features
Three different Media Players – the DDR, Graphics 1 and Graphics 2 – are located in tabbed panes at the bottom of the Live Desktop. The main difference between Media Players is the file formats they play. Supported media types include: ... - Page 33 PRESET BIN Another very useful feature shared by TriCaster’s Media Players is the Preset Bin, which provides quick and convenient access to multiple playlists. Presets also store the state of various Media Player controls. Figure 42 To display the preset bin, roll the mouse pointer to the edge of the screen in a tabbed Media Player (or the Audio Mixer tab).
- Page 34 Figure 43 Initially, In and Out Point handles at opposite ends of the Scrub-Bar mark the full limits of the file on disk. Dragging these handles edits the In and Out points (multi-selections are ignored). The (trimmed) duration is displayed in a timecode field just to the right. Hint: For longer durations, holding SHIFT while dragging In/Out handles increases precision.
-
Page 35: Speed
AUTOPLAY The Autoplay switch has several important effects. First, it automatically initiates playback when the associated Media Player is placed on Program Out by a Switcher operation (or by displaying the Media Player in a DSK channel or Virtual Input). The reverse transition occurs automatically as the end of play approaches. (In similar fashion, for a media player with Autoplay enabled, performing an Overlay Effect automatically begins playback.) Note: The reverse Overlay Transitions do not occur automatically as the end of play approaches. - Page 36 A list of sub-headings under each main heading in the Location List corresponds to sessions, or groups of content. Select a sub-heading to populate the right hand window – the File Pane. ADD MEDIA LOCATION & BROWSE Clicking Add Media Location opens a standard system selector. The folder you choose is added to the Media Browser’s Location List under the heading My Media Locations.
-
Page 37: Title
Right-click a file icon to open a menu providing Rename and Delete options (Delete really does remove content from your hard drive). 3.5.4 TITLE PAGES TriCaster™ title pages can be used in any of the Media Players (other than Sound, of course). -
Page 38: Record, Grab
STAND-IN IMAGES Images embedded in Title Pages may be locked, or they may be editable stand-ins. When you roll the mouse over an embedded image and a yellow border is displayed around the image, the image is a stand-in. Click stand-in images to open the File Browser, allowing you to select a replacement image file. - Page 39 The first thing you may want to do is enter a Base Name for captured files (this name increments numerically when you start and stop recording). ADD TO DDR Figure 56 Enable the Add to DDR Playlist switch to automatically insert newly captured clips at the end of the DDR playlist. These clips are available for immediate playback during your live production.
-
Page 40: Grab
In some cases, limitations of third party software may require you to choose the 4:2:0 setting. In addition, TriCaster supports two H.264 quality options. Note that the entry designated Web Quality invokes a fixed standard definition, 2 Mbit/sec capture profile suitable for online sharing (i.e., this format is always encoded in SD resolution, even in HD sessions). -
Page 41: Positioner
Figure 60 Virtual Inputs support two primary video sources. These two sources are labeled Input A and B. Selection is made using buttons in the lower part of the tabbed panel, corresponding to TriCaster’s Switcher sources. When a Virtual Input is displayed, Input A appears above (or, if you prefer, ‘in front of’) Input B by default. If Input A is fully opaque it completely hides Input B. -
Page 42: Liveset Virtual Sets
3.8.3 LIVESET VIRTUAL SETS This brings us to the LiveSet section of the Virtual Input tab. LiveSet allows you to achieve the look of a large, sophisticated studio setting (Figure 64) within a very small studio space (Figure 63) without the need for external equipment. - Page 43 VIDEO SOURCES Virtual Inputs provide LiveSet with a new standard of flexibility, allowing you to easily and flexibly assign inputs from the Virtual Input tab(s), without Switcher involvement*. *Hint: One special case is when you select FX as a LiveSet input. Conveniently, this allows you to use the Switcher to change the input without either interfering with other common Switcher operations or accessing the corresponding Virtual Input tab.
- Page 44 Note: Some LiveSets (e.g., double-box sets) do not support zooming. In such cases, the Zoom Presets and the Zoom T-Bar are inactive. ZOOM T-BAR Figure 68 The Zoom T-Bar is located beside the Zoom Presets. Dragging it vertically adjusts the virtual ‘camera distance’ for the active LiveSet, between 0-100%.
-
Page 45: Audio Control
The duration for the animated zoom is controlled by a menu beside the Animate Zoom switch. This works just like the similar Duration menu buttons in the Switcher’s Transitions section, providing instant access to three preset durations. Alternatively, click and drag in the neighboring numeric field to set a custom duration – or click the field once more to enter a value directly using the keyboard. -
Page 46: Audio Levels
3.9.1 AUDIO LEVELS TriCaster’s analog audio conforms to SMPTE RP-155. The maximum input/output level is +24 dBu. Nominal input level is +4 dBu (-20dB FS), and the sample rate is 48 kHz. Levels above 0dB are shown in red in the VU meters, to caution you that overly high levels can result in clipping in recordings. -
Page 47: Desktop Options
MASTER (AND PHONES) The main Program outputs (labeled PGM on TriCaster’s faceplate) are controlled by the Gain knob and Balance control in the Master sub-panel, located at far-right in the Audio Mixer tab. Just above this is a simple level control for the Phones output. -
Page 48: Administrator Mode
Register TriCaster – TriCaster shows a watermark on output before registration, so we encourage you to register early. Among other reasons, doing so will serve to identify the unit to NewTek as yours in case of theft, and will also allow you to check for software updates that may have been recently released. - Page 49 This way you can be sure the very latest release version of the software for your TriCaster is installed. Alternatively, you can go to the NewTek web site, click My Account, and use the login details you provided when registering your TriCaster to access your personal product page.
- Page 50 SETTINGS Regions and Language – Open the system language control panel. Advanced Keyboard – Open the system keyboard controls panel. Date and time – Open the system keyboard controls panel. Configure Network – Open the system network controls panel. ...
-
Page 51: Network Sources
3. Double-click the iVGA icon on the second computer to launch the application. After agreeing to the NewTek license (and a moment or two for the network connection to be established) the name of the remote computer is added (along any other networked systems with iVGA running on them) to the iVGA client list. - Page 52 Figure 74 When TriCaster recognizes qualified network sources, it adds them to a drop-down menu for quick selection (Figure 74). 4. Move your mouse pointer over a Network monitor in the All Monitors tabbed view. 5. Click the triangular menu button above the monitor to select a networked source (or change the current selection) from the menu that appears.
-
Page 53: Livetext
Hint: The original iVGA application has a Lower Hardware Acceleration option that may help in cases where a client application uses display technology that would otherwise not work with iVGA. In iVGA PRO‘s Region mode, use the marquee to magnify an area of the Windows display, which helps when fine detail is important for an application display on the screen. - Page 54 Here are a few hints that may help if you encounter issues in connection with using AirPlay® sources: The first time you connect to a network with the TriCaster, you must choose a network location. This is a standard Windows® process that automatically configures appropriate firewall and security settings for the type of network that you connect to.
-
Page 55: Streaming
STREAMING Live webcasting has dramatically altered the broadcast landscape. Information can be shared among audiences around the world with very small transmission costs, providing many creative and profitable opportunities. When it comes to taking advantage of this new medium, TriCaster™ places you in the forefront of all the excitement. Internet streaming connections involve a wide variety of attributes. -
Page 56: Web Browser
1 - Header 2 – Web Browser 3 – Footer The uppermost contains controls for creating and managing Connection presets, along with familiar web browser navigation tools. The large viewport beneath displays the current webpage, if any. Finally, the panel’s footer contains a status line and OK button. -
Page 57: Connection Options
Figure 80 Recall that this is not a general-purpose web browser. It is here to let you access the main account page you use for a specific Connection, rather than a ‘landing page’ for everyday browsing. The Home Page for one Connection will often be different than that of another. -
Page 58: Browser Based
Note: The steps involved in creating an account with a streaming service provider and configuring the stream vary widely, and cannot be dealt with in depth here. Generally, though, providers offer step by step information and support. And, of course, NewTek’s own TriCaster™ forum membership can generally be relied upon for helpful hands-on experience and advice. - Page 59 Figure 84 The first thing you might notice is the Resolution menu at left beneath the Home field (Figure 84). This selector lets you choose from a list of streaming profiles labeled to show their respective frame rate (fps), resolution and bandwidth settings.
-
Page 60: Windows Media Pull
Note: the nearby Delete button allows you to dispose of unused imports of this type. The default Resolution profiles cannot be deleted, however. Figure 87 The first time you configure a Flash stream, a webpage applet may pop-up up a configuration dialog (Figure 87) asking you to permit Flash to access your TriCaster audio and video devices. -
Page 61: Windows Media Push
(pre-arranged) host web address (Location), Username and Password. Note: The publishing point is placed at the end of the URL, following a forward slash (i.e., http://225.21.1.4:8080/NewTek) Enabling the Stream button then “pushes” the stream from your location, logging into the pre-arranged web address using the username and password you provided. -
Page 62: Audio Headroom
If you’re still struggling with the differences between Push and Pull streaming methods, you can find lots of online resources (in addition to excellent information available in NewTek’s user forums!) The popular web resource Wikipedia® hosts many articles on the subject, notably these two: http://en.wikipedia.org/wiki/Push_technology and http://en.wikipedia.org/wiki/Pull_technology... -
Page 63: Diagnostics And Troubleshooting
http://helpx.adobe.com/adobe-media-server/kb/mpeg-4-f4v-files-recorded.html Unconverted F4V files imported will not play in TriCaster’s DDR either. Conveniently, TriCaster can automate the conversion for you to a degree. If you locate the folder named Media\Clips\sessionname\SavedStreams on your primary session drive, you will see the “raw” (unprocessed) streaming file(s) and a batch file (.bat) that can be used to convert all files in that folder. -
Page 64: Firewalls
To enable port forwarding, you need three pieces of information: The login information for the router. Your router’s manual will have this information, which typically involves entering a specific IP number into your web browsers URL field, and perhaps also a password. ... -
Page 65: Finding Your External Ip Number
5.5.4 FINDING YOUR EXTERNAL IP NUMBER Again, the numbers assigned behind your router only work locally. In a Pull scenario, you need to supply the true external IP number (and port) for your TriCaster to viewers outside the LAN (Local Area Network.) You can find this number in several ways. -
Page 66: Livetext
LIVETEXT LiveText™ is a powerful title and CG application, allowing you to create title pages for use in the Live Desktop’s Media Players. Title pages can be still or motion pages, including scrolls and crawls. LiveText is a full-blown, powerful, professional character generation program also available as a standalone application. -
Page 67: Files/Filebin
Likewise when the project is SD, the SDI outputs will all be SD. As there are multiple connection options for analog SD video, please refer to the following table in this case: Row Number Analog BNC 1 Analog BNC 2 Analog BNC 3 Composite Note: It is possible to use LiveText’s File menu to open a project that does not correspond to the current session... - Page 68 When creating title pages for this purpose in LiveText, you may find it saves you time to add the string “_placeholder” somewhere in the filename of images you prepare for this purpose. For example, you might name an image "headshot_placeholder.png", or "_PLACEHOLDER_crest.jpg". Images named in this manner will automatically appear as stand-in images (unlocked) in the Title Pages you export to TriCaster using the Send to Live options in LiveText’s File menu.
-
Page 69: Files And File Management
FILES AND FILE MANAGEMENT This chapter will tell you how to connect, configure and register your new TriCaster™ live production system. You’ll discover how to get both audio and video in and out of the system, and to adapt both input and output to suit your production environment and needs. -
Page 70: Import Media
7.1.2 IMPORT MEDIA Clicking Import Media opens a custom import panel offering batch import of files for use in TriCaster’s Media Players. It even allows you to transcode files to appropriate high quality TriCaster-friendly file formats at the same time if you wish. Import Media’s quick processing makes this the fastest and most convenient way to pre- load a session with production assets. -
Page 71: Backup Session
TARGET, PRESET & DESTINATION Having prepared the file list, click the triangle button in the Target field to open a drop-down menu listing categories of device or application targets to choose from. Then select a specific encoding Preset in the next column. Export presets vary according to what is appropriate for a given session format. -
Page 72: Live File Operations
LIVE FILE OPERATIONS It is preferable to import content for use in a live session while ‘off the air’, to avoid interfering with TriCaster’s vital access to system resources. In a pinch, however, remember that you can import media files directly into Media Player playlists even during live production, as described in Section 3.5.1. -
Page 73: Care And Maintenance
ADD-ONS As time goes on, NewTek offers additional software to extend the power of your TriCaster. Figure 96 The icon labeled Add-Ons on the Home Page provides access to these tools. When you select it, links are displayed for installed software applications, allowing you to launch them (for example, Figure 96 shows links to Animation Store Creator and the Virtual Set Editor™... -
Page 74: Backup And Restore
BACKUP AND RESTORE This feature provides substantial protection against software issues and even hard drive problems. TriCaster ships with a complete (hidden) restore partition, permitting you to return it to ‘as-shipped’ state at any time. In addition, you can create ‘custom backups’ on another hard drive you connect, effectively cloning the entire system drive. -
Page 75: Tricaster Tips
(possibly including optional TriCaster expansion packs) will be overwritten, so use this function only if you truly find it necessary (a call to NewTek’s excellent Customer Support first may often be fruitful; see Section 8.5). When you do restore, remember to update the TriCaster software afterward. -
Page 76: Streaming
Choose either Home or Work. (See Section 4.4 for more tips.) NewTek’s optional LiveText standalone titling software offers a great way to offload management of titling chores to a second operator using a satellite workstation, and can even connect directly to many... -
Page 77: Imag And Latency
NewTek’s 3Play instant replay system can send output directly to TriCaster’s Switcher across a network, freeing up analog video inputs for other purposes. Some antivirus software can interfere with certain iVGA PRO features. In such cases, try disabling your protection briefly. -
Page 78: Third-Party Software
TriCaster’s Import Media feature (Section 7.1.2). CONTACTING CUSTOMER SUPPORT Visit the NewTek Website, at www.newtek.com and click the Support link in the main menu at the top of the page. This page lists the hours of operation and contact details. -
Page 79: A Keystroke Shortcuts
A KEYSTROKE SHORTCUTS A.1 SWITCHER… FX Row, Inputs 1 to Input 9 Alt + (1 – 0) Program Row, Inputs 1 to Input 14 F1 – F12 plus [Shift + F1- Preview Row, Inputs 1 to Input 14 1 – 0, -, =, and [Shift + 1-2] FTB (Fade to Black) Ctrl + b... -
Page 80: Record, Grab & Stream
Activate Zoom Preset 4 for Virtual Input selected on Alt + F4 Program Activate Zoom Preset 1 for Virtual Input selected on Alt + F5 Preview Activate Zoom Preset 2 for Virtual Input selected on Alt + F6 Preview Activate Zoom Preset 3 for Virtual Input selected on Alt + F7 Preview Activate Zoom Preset 4 for Virtual Input selected on... - Page 81 A.7 GRAPHICS 1 Stop Shift + k Play Shift + l (L) Go to previous playlist item Shift + j (J) Go to next playlist item Shift + ; (:, colon) Autoplay On/Off Shift + u (U) Loop On/Off Shift + ‘ (“, quotation) Single On/Off Shift + 1 (Q) A.8 GRAPHICS 2...
- Page 82 INDEX Title Pages, 34 Editing, 34 Stand-In Images, 35 Add-Ons, 70 Options Menu Administrator Mode, 45 Tabs Follow Preview Row, 44 Apple AirPlay™, 50 Tabs Follow Preview Row for Virtual Input, 44 Overlay Position, 27 Backup TriCaster. See TriCaster: Backup Record, 59 Switcher, 25 Take, 24...
- Page 83 Spell Check, 34 Titlebar, 21 Startup Screen TriCaster Export Media, 67 Backup, 46 System Utilities Defragment, 46 Restore TriCaster, 71 Register, 9, 45 Stop, 76 Restore, 46 Streaming Bitrate, 58 Capture, 59 Virtual Input Flash, 75 Overlay, 38 Port Forwarding, 60 Position, 38 Providers, 52, 57 Sources, 38...
- Page 84 Inno Setup is distributed WITHOUT ANY WARRANTY; without even the implied warranty of MERCHANTABILITY of FITNESS FOR A PARTICULAR PURPOSE. All other software with the TriCaster not expressly noted as free is proprietary and subject to NewTek's copyright rights or those of its licensors.
Need help?
Do you have a question about the TriCaster 40 and is the answer not in the manual?
Questions and answers