Table of Contents
Advertisement
Quick Links
Advertisement
Table of Contents

Subscribe to Our Youtube Channel
Related Manuals for Aquatica Digital A30D


Summary of Contents for Aquatica Digital A30D
- Page 1 INSTRUCTION FOR AQUATICA A30D Housing for the Canon 30D...
-
Page 2: Table Of Contents
Instruction for the AQUATICA A30D HOUSING Table of Contents Foreword Safety Precautions Overall View of Aquatica A5D Features Controls in detail Preparation of the Housing Preparation of the Port Preparation of the Lens Focus Gear installation Camera preparation and Installation... -
Page 3: Safety Precautions
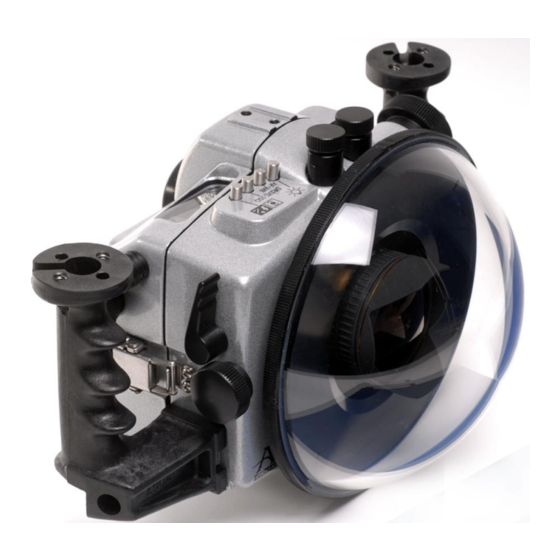
SAFETY PRECAUTIONS Improper transportation handling or use of this housing might cause a flooding or malfunction. Please read and follow the following precautions: Store and transport the housing in a sturdy, shock proof container and avoid travelling with the camera mounted inside the housing as impact forces especially on the external push buttons will be transferred to the camera. - Page 4 SHUTTER RELEASE LEVER MAIN DIAL INPUT KNOB METERING MODE SELECTOR / FLASH EXPOSURE COMPENSATION BUTTON DRIVE MODE / ISO SELECTOR BUTTON AF SELECTOR / WHITE BALANCE BUTTON LCD ILLUMINATOR BUTTON BULKHEAD FOR FLASH CONNECTOR SECOND BULKHEAD FOR FLASH CONNECTOR (OPTIONAL) FOCUS/ZOOM KNOB FOCUS / ZOOM RING CONNECTING GEAR LENS LOCK RELEASE KNOB...
-
Page 5: Features
FEATURES The Aquatica A30D is the world’s most technologically advanced underwater housing, ergonomically designed to place all the essential camera controls under your finger tips and features the following: Large ergonomic and easy to operate controls for most of the manual and computerized camera functions. -
Page 6: Controls In Detail
CONTROLS IN DETAIL SHUTTER RELEASE LEVER: Pulling the shutter release lever back part way activates the camera meter and autofocus. Pulling the lever back all the way fires the camera. MAIN DIAL KNOB: It rotates clockwise and counter clockwise. It can be use alone or in combination with other controls to select or set various camera functions or modes. - Page 7 CONTROLS IN DETAIL, CONTINUED VIEWFINDER: A full view of the illuminated camera viewfinder displays all necessary information. ACCESORIES MOUNTING HOLE: These are 1/4-20 TPI holes that are ready to accept TLC Base Brackets or TLC Base Ball for strobe arms or accessories. MODE DIAL KNOB: Rotate to change the exposure mode (P, Tv, Av, M...) and access camera user settings .
-
Page 8: Preparation Of The Housing
PREPARATION OF THE HOUSING 1. Attach Grip Bracket to the housing: The housing comes with two hand grips which should be installed on the sides of the housing with the supplied screws and Allen key. Occasionally remove the grips and lubricate the screws (see Care and Maintenance: of the housing.) Depending on which strobe system you are using, you can mount the necessary shoes or brackets onto the 1/4”-20 threaded holes on the top of the hand grips. -
Page 9: Preparation Of The Lens
PREPARATION OF THE LENS Depending on the lens used, there are a number of gear options possible. Using the right gear (s) and correctly mounting them on the lens is very important for a smooth housing operation. Use the following chart to determine which gear(s) to use and follow the installation directions for each gear carefully. -
Page 10: Camera Preparation And Installation
CAMERA PREPARATION AND INSTALLATION Set the Focus Mode Selector on the lens to the proper setting AF or MF if using a focus gear Important Note: Small “D” Clips and strap attachments that are used for the camera strap must be removed or moved out of the way before closing the housing. Remove the rubber eye cup from the camera before closing the housing Carefully place the camera on the saddle and ensure the camera is properly installed and aligned as follows:... -
Page 11: Closing Of The Housing
CLOSING OF THE HOUSING Before closing the housing always ensures that: The main O-ring on the front half of the housing is clean, lubricated and properly seated for a positive seal. The sealing surface on the rear half of the housing is clean and free from any scratches or physical damage. -
Page 12: Mounting And Attaching Flashes
The AQUATICA A30D Housing System features a bayonet mount. To mount the port or extension ring simply: Place the housing on its back on a soft steady surface. Place the port or extension ring inside the main port of the housing. Align one of the four alignment notches with the opening of the housing. -
Page 13: Focus Mode
Make sure to select the focus mode (manual or auto focus) on your camera prior to the dive. The location of the MF/AF selector on the lens prevent access trough the AQUATICA A30D Digital housing. AF: The camera will find, lock and hold focus as long as the shutter trigger is partially depressed. -
Page 14: Care And Maintenance
The ports should be removed and serviced after every dive. Of the Latches: The two latches of the AQUATICA A30D are designed to have a locking action to prevent accidental opening. Always ensure that the locking mechanism is secure. Watch for the build-up of corrosion or salt residue around the latches. - Page 15 AQUATICA or to an authorized AQUATICA service facility for this annual maintenance. Check the Web site www.aquatic.ca for the closest service center. An internal moisture alarm is available for your AQUATICA A30D housing (Product # 18796). This alarm is available through your authorized AQUATICA dealer and can be easily installed.
Need help?
Do you have a question about the A30D and is the answer not in the manual?
Questions and answers