Table of Contents
Advertisement
Quick Links
Advertisement
Table of Contents

Related Manuals for Aquatica Digital AD40x


Summary of Contents for Aquatica Digital AD40x
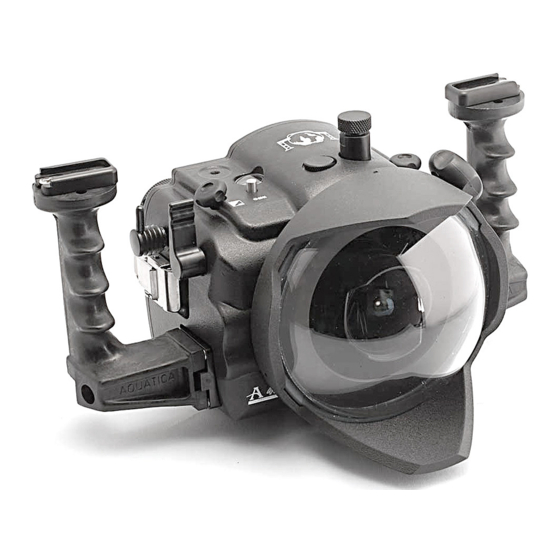
- Page 1 AD40x INSTRUCTION MANUAL FOR AQUATICA AD40x Housing for the Nikon D40 & D40x...
-
Page 2: Safety Precautions
AQUATICA Digital Camera Housing System for your underwater photography. The AQUATICA Digital Housing is the result of a long and continuing relationship with the most demanding underwater photog- raphers in the world. Each housing is handcrafted, quality checked and... - Page 3 AD40x 1. SHUTTER RELEASE LEVER 2. APERTURE & EXPOSURE COMPENSATION CONTROL KNOB 3. ACCESSORY MOUNTING HOLE (1/4” X 20) 4. SHOOTING INFORMATION BUTTON 5. MODE DIAL CONTROL WINDOW 6. MAIN BULKHEAD FOR FLASH CONNECTOR 7. OPTIONAL SECONDARY BULKHEAD FOR FLASH CONNECTOR 8.
-
Page 4: Controls In Detail
CONTROLS IN DETAIL 1. SHUTTER RELEASE LEVER: Pulling the shutter release lever back part way activates the camera meter and auto focus. Pulling the lever back all the way fires the camera. 2. APERTURE KNOB / EXPOSURE COMPENSATION KNOB: Rotates knob to engage . Use in combination with the command knob controls to select the exposure compensation or aperture in manual mode. - Page 5 Controls in detail, continued 21. DELETE BUTTON: Press to delete images, use multiple selector buttons to select and press the enter button to de- lete. 22. REAR VIEW DISPLAY WINDOW : allow viewing of menu and images 23. PLAYBACK ZOOM / INFO / RESET BUTTON: use for zooming in playback mode, to display info on the rear LCD and to reset camera to its defauls setting when used in conjunction with the top shooting information button (#4) 24.
-
Page 6: Preparation Of The Housing
FEATURES The Aquatica Digital housing series is issued from the world’s most technologically advanced underwater housing lineage, ergonomi- cally designed to place all the essential camera controls under your finger tips and features the following: A. A Lens Lock Release control that will activate the lens release button of camera from the outside of the housing. - Page 7 PREPARATION OF THE PORTS 1. Select the correct port: Depending on whether you’ve decided to shoot macro or wide angle photography, you will be installing either a flat Macro Port or a Dome Port. Refer to the lens selection chart on page 14 for the recommended port . Or visit our web site www.aquatica.ca for the latest updated chart of lenses, port and accessories.
-
Page 8: Preparation Of The Lens
PREPARATION OF THE LENS Depending on the lens used, there are a number of gear options possible. Using the right gear and correctly mounting it on the lens is very important for a smooth housing operation. Use the provided chart to determine which gear to use and follow the installation directions for each gear carefully. -
Page 9: Camera Preparation And Installation
CAMERA PREPARATION AND INSTALLATION 1. Set the exposure Mode Selector to one of the four following position on the camera. Manual, aperture prior- ity, shutter priority or programmed auto. modes that allows the built in flash of the camera to pop up are unus- able when the camera is in the housing, manual and aperture priority are the most used shooting mode under- water and mastering theses should be a priority for the underwater photographer. -
Page 10: Lens Installation
• The sealing surface on the Housing is clean and free of physical damage. The AQUATICA Digital Housing System features a bayonet mount. To mount the port or extension ring simply: 1. Place the housing on its back on a soft steady surface. -
Page 11: Mounting And Attaching Flashes
Base Ball that can hold a small dive light or a strobe arm. The AQUATICA Digital housing is comes with a standard single strobe connector, to this a second bulkhead con- nector for strobes can be added or the original one can be replaced with a Ikelite type bulkhead connector. -
Page 12: Using The Housing
TRANSPORTING THE AQUATICA Digital housing Store the AQUATICA Digital housing in a sturdy, shock proof container. When travelling by air, remove the port. This allows for equaliza- tion of the air pressure inside the housing to the external air pressure. Failure to do so may cause serious damage to your ports. Avoid travelling with the camera mounted in the housing. - Page 13 Of the Latches: The two latches of the AQUATICA Digital housing are designed to have a locking action to prevent ac- cidental opening. Always ensure that the locking mechanism is secure. Watch for the build-up of cor- rosion or salt residue around the latches. This will appear as a white material. Lubricate the latches with a small amount of WD-40 to remove the corrosion or salt residue build-up.
- Page 14 RECOMMENDED AQUATICA ACCESSORIES 18407 9.25” GLASS DOME 18405 8” ACRYLIC DOME 18426 FLAT MACRO PORT 20054 AQUA VIEW FINDER 18789 HOUSING BODY CAP EXTENSION RINGS 19216 HARD TRANSPORT CASE FOR AQUA VIEW FINDER 18790 PORT REAR CAP 18480 DOME SHADE F.E. 20023 MOISTURE ALARM ZOOM &...
-
Page 15: Warranty
WARRANTY PLEASE READ CAREFULLY One year Limited Warranty. Thank you for purchasing an AQUATICA manufactured product! Your AQUATICA housing is handcrafted by a small group of specially trained individuals - each of whom takes the most pride and satisfaction in offering you the best underwater camera housings in the world.
Need help?
Do you have a question about the AD40x and is the answer not in the manual?
Questions and answers