Table of Contents
Advertisement
Quick Links
Advertisement
Table of Contents

Related Manuals for Aquatica Digital D200


Summary of Contents for Aquatica Digital D200
- Page 1 DIGITAL U/W HOUSING FOR NIKON D200 OPERATING MANUAL...
-
Page 2: Safety Precautions
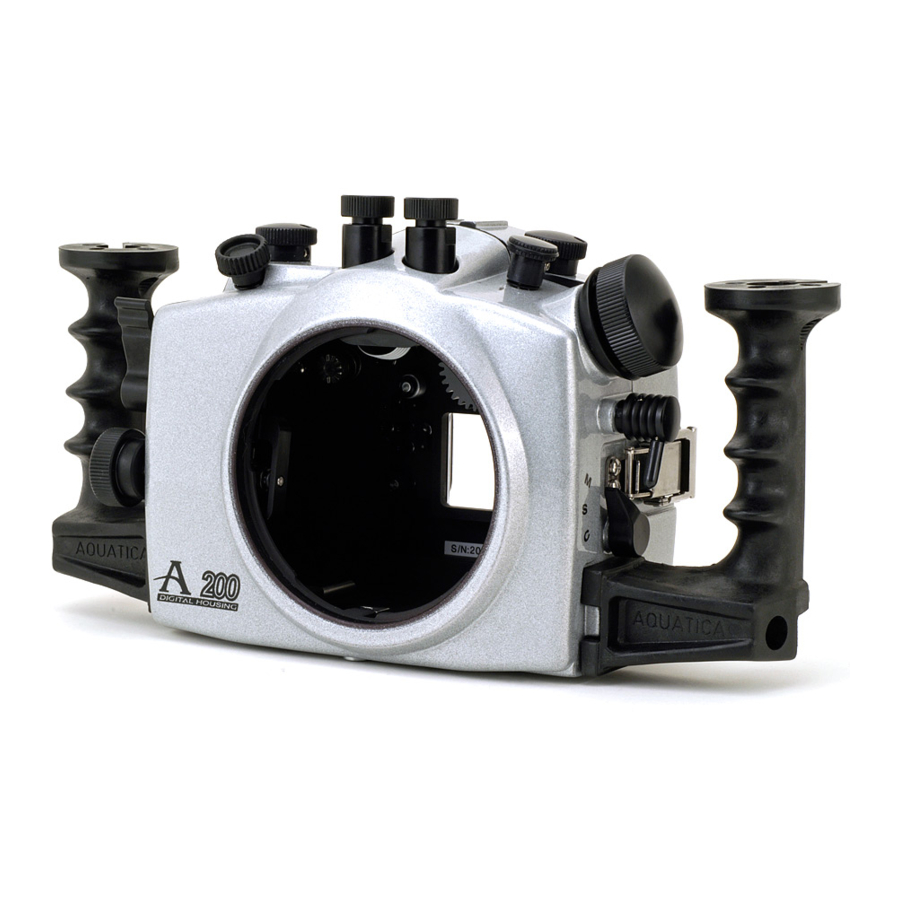
Nikon D200 DSLR. This manual assumes that the User is already familiar with the Nikon D200. If not, please read the Nikon instruction Manual before attempting to use the housing. - Page 3 SHUTTER RELEASE LEVER ON / OFF CONTROL SUB -COMMAND INPUT KNOB SUB -COMMAND INPUT KNOB EXPOSURE MODE SELECTOR / FORMAT BUTTON EXPOSURE COMPENSATION / RESET BUTTON NEW. EXPOSURE MODE & COMPENSATION KNOB FLASH EXPOSURE / MODECONTROL BULKHEAD FOR FLASH CONNECTOR SECOND BULKHEAD FOR FLASH CONNECTOR FOCUS/ZOOM KNOB FOCUS / ZOOM RING CONNECTING GEAR...
-
Page 4: Controls In Detail
CONTROLS IN DETAIL SHUTTER RELEASE LEVER : Pulling the shutter release lever back part way activates the camera meter and autofocus. Pulling the lever back all the way fires the camera. SUB-COMMAND INPUT / APERTURE KNOB : Rotates clockwise and counterclockwise. Use alone or in combination with other controls to select or set various camera functions or modes. - Page 5 METERING SELECTOR CONTROL : Center-Weighted or Matrix metering options. AF-ON BUTTON : Press to activate autofocus, refer to camera manual for a description of the different options. VIEWFINDER : A full view of the illuminated camera viewfinder displays all necessary information. MOUNTING HOLES FOR ACCESSORIES : Two 1/4"-20 TPI holes are supplied to accept TLC accessories.
- Page 6 The Aquatica Pro Digital housing serie is issued from the world's most technologically advanced underwater housing lineage, ergonomically designed to place all the essential camera controls under your finger tips and features the following: A Lens Lock Release control that will activate the lens release button of camera from the outside of the housing.
-
Page 7: Preparation Of The Housing
(see Care and Maintenance: of the housing.) Depending on which strobe system you are using, you can mount the necessary shoes or brackets onto the 1/4"-20 threaded holes on the top of the hand grips. The AQUATICA TLC strobe arm system is recommended. -
Page 8: Preparation Of The Ports
* The Nikkor 10.5 mm DX Fisheye does not require any extension ring. Refer to the Lens Chart on www.aquatica.ca for updating of lenses that can be used in the housing. These extension rings fit between the housing body and the Dome port to provide the optical correction needed for each lens. -
Page 9: Preparation Of The Lens
Rotate the focus ring several times to make sure it moves smoothly and the gear does not slip before closing the housing Refer to the Lens Chart on www.aquatica.ca WARNING: Never attempt to operate the camera in autofocus mode with the lens mounted focus gear engaged. -
Page 10: Camera Preparation And Installation
CAMERA PREPARATION AND INSTALLATION Set the Focus Mode Selector to the M position Important Note: “D” Clips that attach the strap should be removed or tucked away prior to installing the camera in the housing. Make sure the ON / OFF /ILLUMINATOR knob (key # 2) is pulled in the UP position. Remove the saddle from the housing and carefully place the camera on it and ensure the camera is properly installed and aligned as follows: The camera is properly aligned and secured against rotation or movement. -
Page 11: Lens Installation
CHANGING A LENS (REMOVING A LENS) The lens mounted gears may restrict the view and ease of access to the lens release button of camera. The AQUATICA Pro Digital Housing features a Lens Release Lever (key # 10) that is designed to trigger the lens release button of cam- era to allow easy removal of lens. -
Page 12: Mounting And Attaching Flashes
For example, Aquatica TLC makes a strobe arm mounting tray that will fit on the bottom of the housing. A 1/4"-20 threaded hole on top of the front half of the housing will accept an Aquatica bracket or Base Ball that can hold a small dive light or a strobe arm. -
Page 13: Care And Maintenance
Select the proper focus mode M / S / C with the focus mode selector prior to closing the housing. For more detailed information concerning the operation of the different focus modes consult the Nikon instruction book for the D200 camera. -
Page 14: Of The Latches
Of the Latches: The two latches of the AQUATICA Pro Digital housing are designed to have a locking action to prevent accidental opening. Always ensure that the locking mechanism is secure. Watch for the build-up of corrosion or salt residue around the latches. -
Page 15: Please Read Carefully
All AQUATICA products are guaranteed against defects in material or workmanship for (1) one full year from the date of purchase for consumer use. these same products when used commercially will carry a 90-day warranty.
Need help?
Do you have a question about the D200 and is the answer not in the manual?
Questions and answers