Aastra 6753i User Manual
Ip phone pointspan spn
Hide thumbs
Also See for 6753i:
- User manual (222 pages) ,
- Administrator's manual (80 pages) ,
- Installation manual (40 pages)
Table of Contents
Advertisement
Quick Links
Advertisement
Table of Contents

Subscribe to Our Youtube Channel
Related Manuals for Aastra 6753i


Summary of Contents for Aastra 6753i
- Page 2 Proprietary and Contents Section Aastra – 2735-007...
-
Page 3: 7Th Edition (March 3, 2010)
Proprietary and Contents Section 7th Edition (March 3, 2010) © Copyright 2010 Aastra. All rights reserved. Information in this manual may change with product revisions. Aastra may add features or enhancements to the product(s) and/or program(s) described in this manual at any time. -
Page 4: Revision History
Appearance section. Speed Dial Edit Feature available at later date. 2735-002 09.2007 Aastra Technical Update for 2.1.0.2145. Publications – B. Marsh 2735-001 06.2007 Aastra Technical Initial release of this Publications – B. publication. Marsh Firmware release 2.1.0.2145. Aastra – 2735-007... -
Page 5: 6753I Product
Aastra Telecom will not accept liability for any damages and/or long distance charges, which result from unauthorized and/or unlawful use. While every effort has been made to ensure accuracy, Aastra Telecom will not be liable for technical or editorial errors or omissions contained within this documentation. The information contained in this documentation is subject to change without notice. -
Page 6: Limited Warranty
Aastra Telecom warrants this product against defects and malfunctions during a one (1) year period from the date of original purchase. If there is a defect or malfunction, Aastra Telecom shall, at its option, and as the exclusive remedy, either repair or replace the telephone set at no charge, if returned within the warranty period. -
Page 7: Table Of Contents
Audience ........................xv Terms and Definitions ....................xv References ......................... xvi Chapter 1 Introduction ......................1 Overview ..........................1 The Aastra 6753i IP Phone ....................1 Phone Features ......................1 General Requirements ....................2 Headset/Handset Connection ..................2 Handset ........................2 Headset (Optional) .................... - Page 8 Idle State Display ....................4 Incomplete Configuration ..................4 No Service Message....................5 Network Disconnected ................... 5 6753i Keys and Functions ....................5 Key Description ......................6 Features and Key Labels ....................7 Line and Call Appearance Keys ................... 8 Top Keys as Line/Call Appearances ..............
- Page 9 Callers List and Redial List ..................34 Handle Calls Using the Speaker ..................34 Handle Calls Using a Headset................... 34 End a Call.......................... 35 Emergency Call Handling for Remote SIP Workers ............35 Chapter 5 Phone Features ....................37 Hold ..........................37 Aastra - 2735-007...
- Page 10 Message Desk Operator ....................45 Voice Mail ........................46 Callers List ........................46 Callers List Display ....................46 Callers List Functions ....................47 Missed Calls Indicator ....................48 Access Missed Calls .................... 48 Delete Entries in the Callers List ................48 Aastra – 2735-007...
- Page 11 Last Number Redial....................49 Redial List ........................49 Emergency Location Identification ................... 50 Hear your Emergency Location Identifier ..............51 CLASS Services Remote Access for SIP Stations and Trunks ........51 Appendix A Troubleshooting ....................53 Index ............................55 Aastra - 2735-007...
- Page 12 Proprietary and Contents Section Aastra – 2735-007...
- Page 13 Proprietary and Contents Section Table of Figures Figure 1. 6753i IP Phone ......................1 Figure 2. Headset and Handset Connections ................2 Figure 3. 6753i Keys and Functions ..................5 Aastra - 2735-007 xiii...
- Page 14 Aastra – 2735-007...
-
Page 15: About This Publication
About This Publication Overview This guide explains how to use your new 6753i IP phone. Not all features listed are available by default. Contact your system administrator to find out which features and services are available on your system. Your system administrator also has the ability to customize some features on this phone. -
Page 16: References
About This Publication References The following publications provide related information. Title Description Aastra Model 6753i Installation and set-up instructions, general features and Installation Guide functions, and basic options list customization. This publication is included with the telephone. Aastra – 2735-007... -
Page 17: Chapter 1 Introduction
Introduction Overview The 6753i IP telephone provides communications over an IP Network using the SIP IP telephony protocol. The 6753i has all the features of a regular business phone, allowing you to make and receive calls, transfer, conference and more. -
Page 18: General Requirements
Built-in-two-port, 10/100 Ethernet switch allowing you to share a connection with your computer. General Requirements The 6753i requires the following environment: A SIP-based IP PBX system or network installed and running with a SIP account created for the 6753i. -
Page 19: Chapter 2 Getting Started
Chapter 2 Getting Started Installation and Setup If your system administrator has not already setup your 6753i, please refer to the Aastra Model 6753i Installation Guide for basic installation and physical setup of the 6753i. Your system or network administrator manages the configuration and updates for the IP phones on the configuration server. -
Page 20: Language Packs
Configuration Complete When the configuration update is complete, the phone displays the following screens: Network Done Idle State Display The idle state screen displays when your 6753i startup process is completed. Line/Call Appearance Number 978-333-1002 Mon Mar 30 2:47 Incomplete Configuration If your phone displays an "Incomplete Config"... -
Page 21: No Service Message
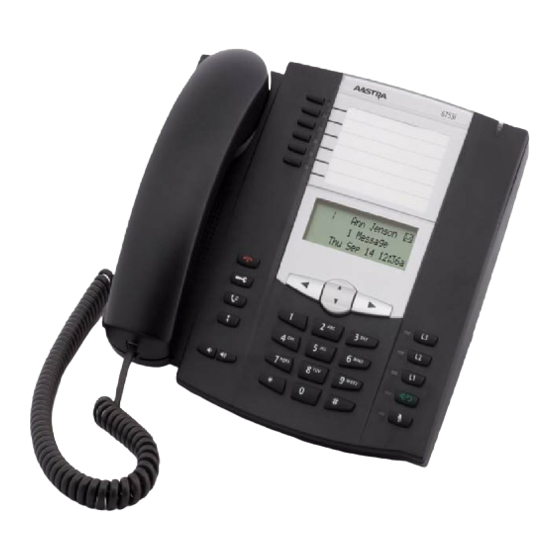
No Service Message Appendix A, No Service for information. Network Disconnected Appendix A, Network Disconnected for information. 6753i Keys and Functions Figure 3. 6753i Keys and Functions 6 Programmable Keys with Status Lamps Message Waiting Lamp Goodbye key Options Key Hold Key... -
Page 22: Key Description
Allow you to exit and enter a specific option in the Options list. If editing entries on the display, the LEFT arrow key erases the character on the left and the RIGHT arrow key sets (saves) the option. Aastra – 2735-007... -
Page 23: Features And Key Labels
There is a key card provided with the phone that provides label identification for these keys. Features and Key Labels The 6753i hard keys can be configured for any of the following features: Key Name Key Label Description... -
Page 24: Line And Call Appearance Keys
Line and Call Appearance Keys There can be up to 7 line/call appearances configured on the 6753i (if no features are configured on the available programmable keys). Usually you will have only one extension on your phone. L1 is usually your preferred line, with your main extension assigned to L1. -
Page 25: Status Lamps For Line And Call Appearances
The Message Waiting Indicator (MWI) lamp is located at the top right of the phone. MWI LED Status Description Slow Flash You have a new message (s). Rapid Flash You have an incoming call. Even Flash One or more calls are on hold. Aastra - 2735-007... -
Page 26: Volume Key
Set Speaker Volume: The speaker remains at this volume Press the Volume key until it is adjusted again. while on a call and talking on the Speaker. Call Timer This timer displays the elapsed time of a call. Aastra – 2735-007... -
Page 27: Mute
Mute is activated. If you place a muted call on hold, the phone automatically takes the call off mute when you reconnect to the call. Deactivate the Mute feature: Press the Mute key again. Mute is deactivated. Aastra - 2735-007... - Page 28 Chapter 2, Getting Started Aastra – 2735-007...
-
Page 29: Chapter 3 Customize Your Phone
The language option has been pre-defined as English. Phone Status IP and MAC Addresses Displays the IP and MAC addresses. LAN Port Displays LAN Port information. PC Port Displays PC port information. Firmware Info Displays the current firmware used by the phone. Aastra - 2735-007... -
Page 30: Access The Options List
Press to return to the previous screen without making changes. Press Cancel when the key is available. Exit the Options list: Press the Goodbye key or the Options The idle screen displays. key from any menu. Aastra – 2735-007... -
Page 31: Preferences Menu
Provides country-specific tone set options for call progress tones. (The US tone set is the default.) Go to Options > Preferences > Tones. Press Enter. The Ring Tone screen displays. displays. Press Next to go to Tone Set. Aastra - 2735-007... -
Page 32: Contrast Level
The Contrast Level screen displays. Contrast Level Next Enter The Contrast Level settings screen Press Enter. displays. Contrast Level Cancel Press until you reach the desired contrast level. Press Set. message displays and the change is saved. Aastra – 2735-007... -
Page 33: Auto Dial/Speed Dial Edit
Key lamps such as Voice Mail will be on steady, but are not programmable as Auto Dial softkeys. Press the Auto Dial key to edit. The edit screen displays. Enter the number including any access 82105555555 numbers. Cancel Save Aastra - 2735-007... -
Page 34: Live Dialpad
Next to go to Live Dialpad. The Live Dialpad screen displays and shows the current status. The default is Live Dialpad is Next Change Press the Change key to toggle message displays between OFF and ON. and the change is saved. Aastra – 2735-007... -
Page 35: Set Audio
Step Action Result Go to Options > Preferences. Press Enter. Press Next to scroll to Set Audio. The Set Audio screen displays. Set Audio Next Enter Press Enter. The Audio Mode screen displays. Audio Mode Next Enter Aastra - 2735-007... - Page 36 Next Enter Press Enter. The Headset Mic Volume settings screen displays. The checkmark indicates the current setting. Headset Mic Vol Medium Next Press Next to select the volume. Press Set. message displays and the change is saved. Aastra – 2735-007...
-
Page 37: Time And Date
Time Zone Next Enter Press Enter. The Country Code screen displays. US is the default. Country Code: * List Countries Cancel Press * to list the countries. A check mark appears next to the currently selected country. Aastra - 2735-007... - Page 38 Press to exit without change. Time Format: Sets the time format display (12h or 24h clock). Go to the Time Format option. The Time Format screen displays. Time Format: Next Change Aastra – 2735-007...
- Page 39 The checkmark indicates the current format setting. Date Format Tue Jul 24 Next Press Next to scroll to the desired date format. Press Set. message displays and the change is saved. Press to exit without change. Aastra - 2735-007...
- Page 40 If you do set the date manually, the phone will not try to synchronize with the Time Server until the next time the phone is restarted. Go to the Set Date option. The Set Date screen displays. Set Date Next Enter Aastra – 2735-007...
-
Page 41: Language
IP & MAC Addresses: Press Next to go to IP&MAC IP&MAC Addresses addresses. Next Enter Press Enter. The IP Address displays. IP Address: 10.20.107.28 Next Exit Press Next. The MAC address displays. MAC Address: 00085D1931D8 Next Exit Press Exit. Aastra - 2735-007... - Page 42 Next Enter The first of the Firmware Info screens Press Enter. displays. Press Next to scroll down to the Application: screen that actually displays the 2.1.0.2145 firmware load. Next Exit Boot ROM: 2.0.1.1055 =Next =Exit Press Exit. Aastra – 2735-007...
-
Page 43: User Password
Press Enter. Re-enter the new user password. Press Enter. The "Password Changed" message displays on the screen. Press Quit. Administrator Menu The options in this menu are configured by a system administrator and require an administrator password. Aastra - 2735-007... -
Page 44: Restart Phone
You can lock the phone to prevent it from being used or configured. While the phone is locked, only emergency 911 dialing is permitted. Step Action Result Lock the Phone: Go to Options > Phone Lock. The Phone Lock screen displays. Phone Lock Next Enter Aastra – 2735-007... - Page 45 The phone is unlocked. Enter your user password. The red status lamp at the top right of the phone turns off. If the user password has never been set up, press the Enter key without a password. Aastra - 2735-007...
- Page 46 Chapter 3, Customize your Phone Aastra – 2735-007...
-
Page 47: Chapter 4 Call Handling
Line/Call Appearance Number The phone automatically selects the 3282 next available line/call appearance. Dial Dial the number. Speaker Key: Press the Speaker key. Dial the number. Line/Call Appearance Key: Press a line/call appearance key. Dial the number. Aastra - 2735-007... -
Page 48: Receive A Call
Action Result Press Ignore The call is redirected to a pre-defined destination such as your voice mailbox. Connected Call The connected state screen displays when you are talking to someone on the phone. SMITH JOHN 3278 01:17 Aastra – 2735-007... -
Page 49: One Directory Number Assigned To Multiple Phones
Phone A goes back to the off-hook display or the idle state display. The Phone A red status lamp on that line indicates Phone B has control of the call. Aastra - 2735-007... -
Page 50: Callers List And Redial List
Depending on the audio mode selected from the Options list, a dial tone or an incoming call will be received on either the headset or the speaker. Also see Headset Volume in the Options list. Aastra – 2735-007... -
Page 51: End A Call
Place the handset back on hook if connected through the handset. Emergency Call Handling for Remote SIP Workers Emergency Call Handling (911 calling) is supported for Remote SIP Workers. Check with your system administrator if you have any questions. Aastra - 2735-007... - Page 52 Chapter 4, Call Handling Aastra – 2735-007...
-
Page 53: Chapter 5 Phone Features
Action Press the line key where the call is on You are reconnected to the call. hold. The Goodbye key will not retrieve a held call. The Hold key will not retrieve a held call. Aastra - 2735-007... -
Page 54: Automatic Hold
Chapter 5, Phone Features Automatic Hold The 6753i will automatically put your current call on hold when you press a new line key. Manage Multiple Calls on Hold Step Action Result Press to scroll through the call list information. Connect to an incoming call or re-connect to a call you placed on hold: Press the line key. -
Page 55: Transfer
Press the Xfer key. and the line lamp flashes slowly. Another line goes off-hook and you hear dial tone. Dial the number of the destination party. When the destination party answers the call: Talk to the destination party. Aastra - 2735-007... -
Page 56: Conference
Press the Line key of the call on hold The ringing line drops and you are while the destination is ringing. reconnected to the original party. Conference The 6753i supports up to three parties in a conference call. Establish the Conference Step Action Result Connect to the first party to include in the conference. -
Page 57: Release A Conferenced Party
The Call Forward feature allows you to temporarily redirect your incoming calls to another number. Each directory number on the phone must be forwarded separately. If you have more than one directory number on your phone, you must press the line key first. Aastra - 2735-007... -
Page 58: Multiple Call Forward Assignments
Multiple Call Forward Assignments If you have activated Call Forward on more than one line, the display provides the up and down navigation keys to scroll through the Call Forward list. John Smith 3382 Forwarded 06/27/07 11:19am Aastra – 2735-007... -
Page 59: Call Mark
From any phone on the system: Hear dial tone. Lift the handset. Press the Speaker key. No ringing is heard. Dial the Call Park number. You are immediately connected to the calling party. Aastra - 2735-007... -
Page 60: Call Pickup
Call Pickup The Call Pickup feature allows you to answer a call ringing at another extension. Your 6753i provides the following types of Call Pickup. Group - Your directory number is assigned to a Call Pickup group. You can answer the ringing extension of another member of the group using the Call Pkup key. -
Page 61: Hotline
A Message Desk Operator receives calls on behalf of other parties and forwards the calls to the original destination mailboxes. Step Action Result Answer the incoming call. Press the Msg. Desk key. Press the Goodbye key. The call is passed directly to the voice Aastra - 2735-007... -
Page 62: Voice Mail
When the Callers List is full, the oldest call records are deleted to accommodate the information of new callers. Callers List Display Display Description The "N" at the left of the screen indicates a new call you have not reviewed. Indicates an unanswered call. Indicates an answered call. Aastra – 2735-007... -
Page 63: Callers List Functions
The Callers list does not save changes. Press the Callers key. Press to scroll through the Callers List to find the entry you want to dial. Press the number(s) on the keypad that you want to add. Dial the number. Aastra - 2735-007... -
Page 64: Missed Calls Indicator
Chapter 5, Phone Features Missed Calls Indicator The 6753i displays the “<Number of> Missed Calls” in the idle state screen display. John Smith 2 Missed Calls 06/25/07 10:42am As the number of missed calls increments: The phone numbers associated with the calls are stored in the Callers List. -
Page 65: Exit The Callers List
There are 100 entries in the Redial List. The list provides the number dialed and the name (if known), the date/time the number was dialed, and the line used to dial the number. You cannot edit an entry in the Redial List. Aastra - 2735-007... -
Page 66: Emergency Location Identification
When a SIP phone enabled with ELIP places an emergency call, the Pointspan system searches a database to map the SIP phone’s IP address to an Emergency Location Identifier to be used as the calling party number. Aastra – 2735-007... -
Page 67: Hear Your Emergency Location Identifier
CLASS services are implemented. The following 3 CLASS features are available for SIP stations and trunks. CLASS Feature Turn ON Turn OFF Call Forward-All Selective Call Forward *63 for Access Anonymous Call Rejection *77 ON *87 OFF Aastra - 2735-007... - Page 68 Chapter 5, Phone Features Aastra – 2735-007...
-
Page 69: Appendix A Troubleshooting
Ethernet locally to your phone. See the section “Connecting to the Network and to Power” in the Aastra Model 6753i Installation Guide for details. Why is my speaker not If you press the Speaker key and the speaker lamp flashes... - Page 70 Registrar. For more information about registering your phone, see your system administrator. How do I restart the IP This setting is in the Options list. See Restart Phone phone? Appendix A. Aastra – 2735-007...
-
Page 71: Index
............. 49 date ................13, 21 line appearance ..............8 date format ................ 23 Line appearance keys ............6 daylight savings time ............22 line/call appearance Directory Lookup Service ..........xv status lamp ..............9 Aastra - 2735-007... - Page 72 ..............18 handset................. 10 set audio ............... 19 headset ................. 10 speed dial edit .............. 17 ringer ................10 time and date ..............21 speaker................. 10 tones ................15 Volume key ..............6, 10 preferred line ............... 8 Aastra – 2735-007...
Need help?
Do you have a question about the 6753i and is the answer not in the manual?
Questions and answers