Table of Contents
Advertisement
Quick Links
Advertisement
Table of Contents

Subscribe to Our Youtube Channel
Summary of Contents for Carba-Tec CTH-110L 1PH
- Page 1 Ver. 2008:001...
-
Page 2: Product Specifications
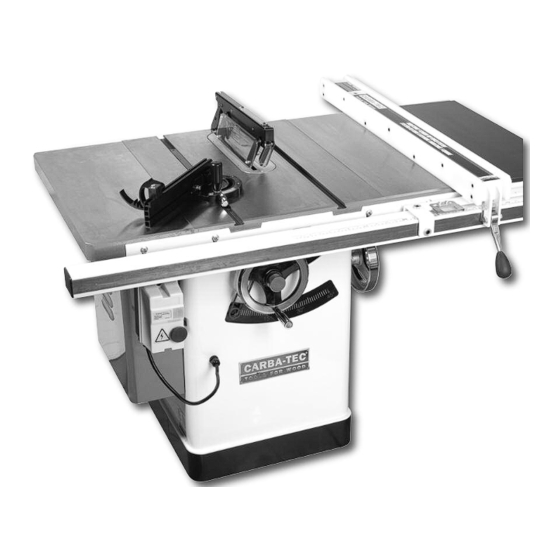
Product Specifications RIVING KNIFE TABLE EXTENSION BLADE GUARD FENCE RAIL MITRE GUAGE FENCE ASSEMBLY ON/OFF SWITCH WINDER HANDLE DUST CHUTE Model CTH-110L Left Blade Tilt 254 mm Blade Diameter 5/8” Arbor Diameter 79 mm Maximum Depth of Cut 54 mm Maximum thickness at 45 degrees 311 mm Minimum Front of table to Blade... - Page 3 The drawings, illustrations, photographs and specifications in this user manual represent your machine at time of ® print, however, changes may be made to your machine or this manual. Please refer to the CARBA-TEC website for ®...
-
Page 4: Section 1: Safety
Section 1: Safety WARNING Safety Instructions For Machinery 1 READ THE ENTIRE MANUAL BEFORE 11 DO NOT USE IN DANGEROUS ENVIRONMENTS. STARTING MACHINERY. DO NOT use machinery in damp, wet locations, or Machinery presents serious injury hazards to un- where any flammable or noxious fumes may exist. trained users. -
Page 5: Limited Liability
“kickback.” Limited Liability Carba-Tec Pty Ltd, its authorised agents, representatives, franchisees and associated com- panies, shall not be held liable in the event that the use of this machine, is contrary to any stan- dard, regulation, act, or generally acknowledged (or site specific) safe work practice, nor shall... -
Page 6: Safety Instructions For Table Saws
Safety WARNING Safety Instructions For Table Saws 1 SAFETY GUARDS. Always use the blade guard, 13 CUTTING CORRECT MATERIAL. This machine is splitter, or riving knife on “through-sawing” intended for cutting natural and man-made wood operations. The blade cuts completely through products, and some plastics. -
Page 7: Section 2: Set Up
For • Degreaser assistance with missing parts, contact your purchase • Rags point or Carba-Tec. • Phillips head Screwdrivers (various sizes) • Flat head Screwdrivers (various sizes) MAKE CERTAIN THAT THE SAW IS DISCON- •... -
Page 8: Hardware Recognition Chart
Hardware Recognition Chart www.carbatec.com.au... -
Page 9: Motor Cover Assembly
Assembly Instructions Motor Brace Disassembly A motor support brace has been installed for shipping purposes only. Remove this brace before assembling the saw. See Fig 1 Motor Cover Assembly Install motor cover by aligning holes in the motor cover with pins on the cabinet hinge. See Fig 2 Fig.1 Fig.2 Extension Wing Assembly... -
Page 10: Blade Guard Assembly
Assembly Instructions Blade Guard Assembly 1. Before installing the blade guard assembly, it is recommended that you make sure that the Riving Knife bracket is aligned properly and square to table. 2. To align the Riving Knife bracket, line a straight edge up against the face of the arbor flange (A) and the face of the Riving Knife bracket assembly (B). -
Page 11: Installing Blade
Assembly Instructions Installing Blade WARNING MAKE CERTAIN THAT THE SAW IS DISCONNECTED FROM THE POWER SOURCE. This machine is fitted with a 5/8” arbor. Please ensure any blade fitted has this sized arbor diameter, or has a correctly sized bush fitted to the blade to ensure a Fig.11 correct fit. -
Page 12: Table Insert Adjustment
Assembly Instructions Adjustments Aligning Blade Guard and Riving Knife Assembly 1. Raise blade guard away from the table and hold the anti-kickback fingers (A) out of the way. 2. Using an accurate straight edge, check to see that the straight edge rests against the Riving Knife (A) and against the face of the saw blade (B). -
Page 13: Mitre Gauge Adjustment
Assembly Instructions 5. If they are not the same, loosen the four socket head cap screws(A) that hold the table to the base. Two are shown in Fig. 17, there are two more on the opposite side of the machine. 6. - Page 14 Assembly Instructions Setting 45° and 90° Positive WARNING Stops MAKE CERTAIN THAT THE SAW IS DISCONNECTED FROM THE POWER SOURCE. The stops have been adjusted at the factory. After a period of use, or, after moving the saw to another location, the stops may no longer be set properly.
- Page 15 Assembly Instructions Mounting Rail and Fence Assembly With the extension wings properly aligned, the rail and fence assembly can now be mounted to the saw. 1. Attach the rear fence support (the ‘c’ section rail) to the back of the saw assembly using the 4 bolts provided.
- Page 16 Assembly Instructions Aligning Fence Assembly Align the fence to the table, ensuring the fence runs parallel to the mitre track. Also check that the face of the fence is 90° to the top of the table, and runs parallel to the table from front to back. See Fig 27. Use the screw adjusters on the fence assembly to adjust this fence to mitre track, and 90°...
-
Page 17: Section 3: Operations
Section 3: Operations Pre-Run Check Before you begin to use your Table Saw, you should give it a thorough inspection, making sure you ask yourself the following questions. 1. Is the blade mounted correctly? 2. Is the saw stable? Rear of machine Front of machine 3. -
Page 18: Blade Raising And Tilting Mechanism
Operations NOTICE The following section was designed to give instructions on the basic operations of this table saw. However, it is in no way comprehensive of every table saw application. It is strongly recommended that you read books, trade magazines, or get formal training to maximize the potential of your table saw and to minimize the risks. -
Page 19: Blade Selection
Operations Blade Selection Choosing the correct blade for the job is essential for the safe and efficient use of your table saw. Ignoring this important step could result in damage to the saw and serious injury to the operator. Below are the most common saw blades and their uses. - Page 20 Operations Crosscutting Crosscutting generally refers to cutting across the grain of the wood. In wood products without grain (i.e. MDF, particleboard) or in prodct with multiple grain directions (i.e. Plywood), crosscutting simply refers to cutting across the width of the stock. Crosscutting requires the use of the mitre gauge to position and guide the work.
- Page 21 Operations Ripping Ripping is the operation of making a lengthwise cut through a board, and the rip fence is used to position and guide the work. One edge of the work rides against the rip fence while the flat side of the board rest on the table.
-
Page 22: Dado Operations
Failure to follow these dierctions this specific dado table insert, please contact could result in serious injury. Carba-Tec for information. Do Not attempt to perform a Dado cut without a table insert fitted. Dado operations present very real hazards requiring proper procedures to avoid serious injury. -
Page 23: Section 4: Maintenance
There are specific products designed to keep you machinery protected and in good condition. Please talk to Carba-Tec if you require any information on these spaciality products. www.carbatec.com.au... -
Page 24: Section 5: Service
Section 5: Service Troubleshooting This section covers the most common processing problems encountered in sawing and what to do about them.. Symptom Possible Cause Corrective Action Saw will not start 1.Saw not plugged in 1.Plug in saw 2.Fuse blown or circuit breaker tripped 2.Replace fuse or reset circuit breaker 3.Cord damaged 3.Have cord replaced by a certified electrician... -
Page 25: Spare Parts
Spare Parts www.carbatec.com.au... - Page 26 Spare Parts www.carbatec.com.au...
- Page 27 Spare Parts www.carbatec.com.au...
- Page 28 Spare Parts www.carbatec.com.au...
- Page 29 Spare Parts www.carbatec.com.au...
- Page 30 Spare Parts www.carbatec.com.au...
- Page 31 Notes www.carbatec.com.au...
- Page 32 T T O O O O L L S S F F O O R R W W O O O O D D BRISBANE CARBA-TEC (Qld) Pty. Ltd. ABN 84 010 706 242 40 harries Road Coorparoo Qld 4151 Tel: (07) 3397 2577 Fax: (07) 3397 2785 orders@carbatec.com.au...
Need help?
Do you have a question about the CTH-110L 1PH and is the answer not in the manual?
Questions and answers