
Subscribe to Our Youtube Channel
Related Manuals for Keys Fitness StrenghtTrainer ST-OBA2


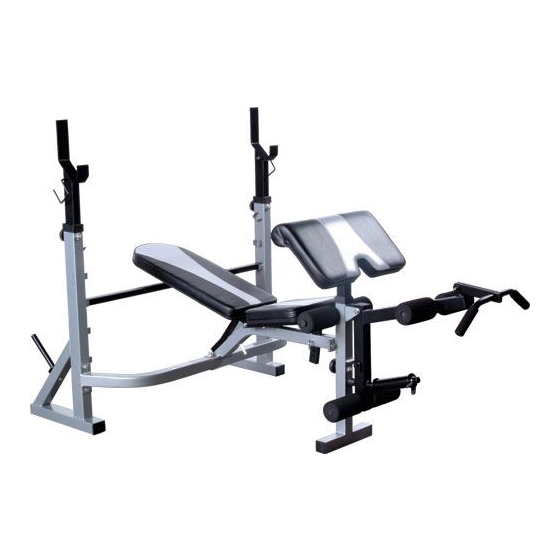
Summary of Contents for Keys Fitness StrenghtTrainer ST-OBA2
- Page 1 Owner’s Manual Read all precautions and instructions in this manual before using this equipment. 215-00080 08/06 Rev C ST-OBA2...
-
Page 2: Table Of Contents
Table of Contents Important Safety Information Before You Start Assembly Parts List Exploded View Warranty Information... -
Page 3: Important Safety Information
• This Strength Trainer unit should only be used on a level surface and is intended for indoor use only. Keys Fitness recommends an equipment mat be placed under the unit to protect the floor or carpet and for easier cleaning. -
Page 4: Before You Get Started
This manual will guide you through the assembly process. If at any time you are having trou- ble with the assembly or use of this product, then please contact us at our Keys Fitness Help line. We have trained service technicians on site to take care of you, our valued customer. -
Page 5: Assembly
Assembly #37-M10X140X1PC #38-M10X75X1PC #39-M10X70X6PCS #40-M10X25X2PCS #42-M8X40X8PCS #41-M8X20X4PCS You will need two adjustable wrenches for assembly or M10 and M8 wrenches. Assembly Hardware #43-20PCS(10/20mm) #44-12PCS(8/16mm) #45-10PCS(M10) #46-3PCS(M8) Tools Required... - Page 6 Assembly NOTE: Hand tighten bolts and nylon nuts until machine is fully assembled. 30 14 44 STEP 1: Place the left (#1) and right (#2) uprights on the floor as illustrated. The brackets welded down the side of each upright should be to the inside and facing each other. Attach each end of the cross bar (#3) to the front of each upright with two bolts M10x90 (#39), four washers 10 (#15) and two nylon nuts M10 (#10).
- Page 7 Assembly NOTE: Hand tighten bolts and nylon nuts until machine is fully assembled. STEP 2: Push each crutch (#9) down into the top of each upright so that the longer bar catch at the top of each crutch is to the rear of the bench.
- Page 8 Assembly NOTE: Hand tighten bolts and nylon nuts until machine is fully assembled. STEP 4: Attach the backrest tubes (#8) to the small welded tube across the top of the mainframe (#7). Push the backrest fixed bar (#16) into the hole of the backrest tubes as illustrated. Push a bolt M10x140 (#37) with a washer 10 (#43) through the hole of the backrest tube and then through the small welded tube across the top of the mainframe.
-
Page 9: Assembly
Assembly NOTE: Hand tighten bolts and nylon nuts until machine is fully assembled. 41 13 32 22 STEP 5: Attach the leg developer (#5) between the brackets on the front of the front base ( #4) with one bolt M10X75 (#38), two washers 10 (#43) and a nylon M10 (#45) nut. Push a roller tube (#13) through the upper and lower holes in the leg developer and through the tube welded to the back of the front base. -
Page 10: Parts List
Parts List Ref # Part # 223-00829 UPRIGHT, LEFT ST-OBA2 223-00830 UPRIGHT, RIGHT ST-OBA2 223-00831 CROSS BAR, ST-OBA2 223-00832 FRONT BASE, ST-OBA2 223-00833 LEG DEVELOPER, ST-OBA2 223-00834 ARM CURL OIST, ST-OBA2 223-00835 MAIN FRAME, ST-OBA2 223-00836 BACKREST TUBE, ST-OBA2 223-00837 CRUTCH, ST-OBA2 210-00173 BACKREST ADJUSTMENT BAR, ST-OBA2 210-00174 BACKREST FIXED BAR, ST-OBA2 210-00047 LONG LOCK PIN ST-OBA/ST-OBA2... -
Page 11: Exploded View
Exploded View... -
Page 12: Customer Service
To contact us for customer service or replacement parts, call 1-888-340-0482. CUSTOMER SERVICE If you have any questions regarding this or any Keys Fitness product, or if we may be of assistance in any way, please do not hesitate to call our toll free number 1-888-340-0482. - Page 13 Keys Fitness Products, L.P. 4009 Distribution Drive, Suite 250 Garland, Texas 75041 Customer Service: 1-888-340-0482...
Need help?
Do you have a question about the StrenghtTrainer ST-OBA2 and is the answer not in the manual?
Questions and answers