Table of Contents
Advertisement
Quick Links
1-888-340-0482
Monday-Friday
8:30-5:30 Central Time
Keys Fitness Products, L.P.
4009 Distribution Dr.
Suite 250
Garland, Texas 75041
OWNER'S MANUAL
QUESTIONS?
Call Our Toll Free
Keys Fitness Helpline
1-888-340-0482
Keys Fitness Products, L.P.
P.O. Box 551239
Dallas, Texas 75355-1239
Power Tower
CAUTION!
Please read the precautions and
instructions in this manual before
using this equipment. Please save
this manual for future reference.
Advertisement
Table of Contents

Related Manuals for Keys Fitness Power Tower ST-PT Series


Summary of Contents for Keys Fitness Power Tower ST-PT Series
- Page 1 1-888-340-0482 Monday-Friday 8:30-5:30 Central Time Keys Fitness Products, L.P. 4009 Distribution Dr. Suite 250 Garland, Texas 75041 OWNER’S MANUAL QUESTIONS? Call Our Toll Free Keys Fitness Helpline 1-888-340-0482 Keys Fitness Products, L.P. Please read the precautions and P.O. Box 551239 instructions in this manual before using this equipment.
-
Page 2: Limited Warranty
Please contact a Keys Fitness customer service representative for specifics on wear items. This Limited Warranty becomes VALID ONLY if the product is purchased through a Keys Fitness authorized dealer unless otherwise authorized by Keys Fitness in writing. -
Page 3: Before You Start
This is especially important for persons over the age of 35 and/or persons with pre- existing health problems. Keys Fitness Products LP assumes no responsibility for personal injury or property damage sustained by or through the use of this product. -
Page 4: Assembly Accessories
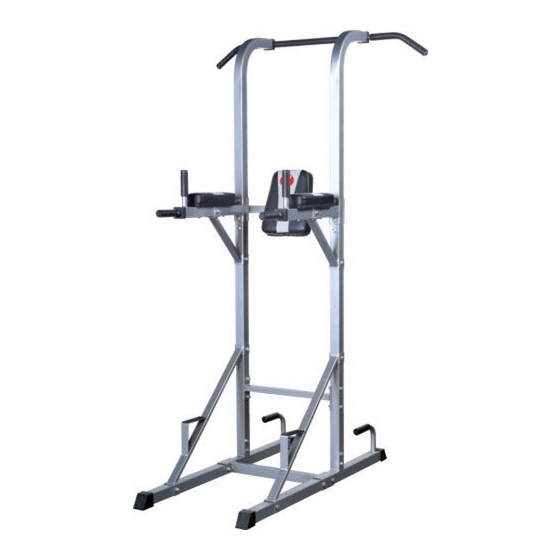
Assembly Accessories (No.3) (No.15) Upright Support Support (No.10) (No.13) Arm Pad Support Plate (No.4) Handle Arm (No.2) (No.34) Support Support (No.7) Angle Support (No.25) Small Support Plate (No.9) Padded Back Support (No.6) Support (No.5) Base Legs Assembly Accessories (No.29) (No.21) (2 ea) Bolt 3/8”... -
Page 5: Exploded View
Exploded View STPT Parts List Part NO. Item LAT BAR UPRIGHT SUPPORT FOR LAT UPRIGHT SUPPORT FOR DIP INSIDE BEARING COLLAR DIP HANDLE ARM BASE LEGS VKR CROSS SUPPORT ANGLE SUPPORT PADDED BACK SUPPORT ARM PAD RUBBER ENDCAP FOR 55MM SQUARE FOAM PADDING 22ID X 32OD X 140 U SUPPORT PLATE RUBBER HAND GRIP (32MM ID HOLE) - Page 6 Assembly of Power Tower REMOVE ALL SECURITY TAPE AND WRAPPING BEFORE BEGINNING. 1. Hand tighten bolts. Do not use wrenches at this time. • Slide rubber endcaps (11) onto each end of both base legs (5). • Slide foam padding onto each push-up bar. •...
- Page 7 3. Hand tighten bolts. Do not use wrenches at this time. 4. Hand tighten bolts. Do not use wrenches at this time. • Connect center cross support (15) to each upright support (3) with two support plates (13). • Connect both angle supports (7) to each base legs (5) and upright supports (3).
- Page 8 6. Hand tighten bolts. Do not use wrenches at this time. 5. Hand tighten bolts. Do not use wrenches at this time. • Connect dip handle arms (4) to upright supports with • Slide upright supports (2) onto each upright support (3) and connect.
- Page 9 8. NOW FIRMLY TIGHTEN ALL BOLTS USED IN 7. Hand tighten bolts. Do not use wrenches at this time. STEPS 1-8. • Connect support (6) to each dip handle arm (4) • Connect lat bar (1) into the supports (2). with support plates (13).
- Page 10 9. Tighten bolts firmly. 10. Tighten bolts firmly. • Connect handles (8) into each dip handle arm (4). • Connect arm pads (10) to the dip handle arms (4).
- Page 11 11. Tighten bolts firmly. • Connect padded back support (9) to the bracket on the cross support (6).
Need help?
Do you have a question about the Power Tower ST-PT Series and is the answer not in the manual?
Questions and answers