Table of Contents
Advertisement
Quick Links
Advertisement
Table of Contents

Related Manuals for SmartWitness SVC150GPS


Summary of Contents for SmartWitness SVC150GPS
- Page 1 Model: SVC150GPS USER GUIDE HD VEHICLE JOURNEY RECORDER Thank you for purchasing the SVC150GPS Journey Recorder. Please ensure that you read and understand this USER GUIDE before connecting and installing this Recorder. Please store the USER GUIDE in an easily accessible location.
-
Page 2: Safety Advice
SAFETY ADVICE CAUTION RISK OF ELECTRIC SHOCK DO NOT OPEN CAUTION: TO REDUCE THE RISK OF ELECTRIC SHOCK, DO NOT REMOVE COVER. NO USER-SERVICEABLE PARTS INSIDE. REFER SERVICING TO QUALIFIED SERVICE PERSONNEL. Please make sure you follow the safety advice/instructions given in the user guide. Caution RISK OF EXPLOSION IF BATTERY IS REPLACED BY AN INCORRECT TYPE. -
Page 3: Gps Reception
GPS Reception Activate the product in an area without large buildings to improve GPS reception. The commercial purpose GPS has the average range error of more than 15 meters and the range error could be more than 100 meters due to environmental conditions like buildings, roadside trees etc. The temperature range for optimum operation of the GPS receiver in your car is -10 ~ 50°C. - Page 4 CONTENTS Smart Witness SVC150GPS Power Cable Camera/Recording Unit (cigarette jack) including bracket SD Memory Card USB 2.0 SD Card Reader (Smart Witness Analysis Software is provided on the SD card Sticker for Windscreen mounting (double sided tape x1) Wire Splice clips (x5)
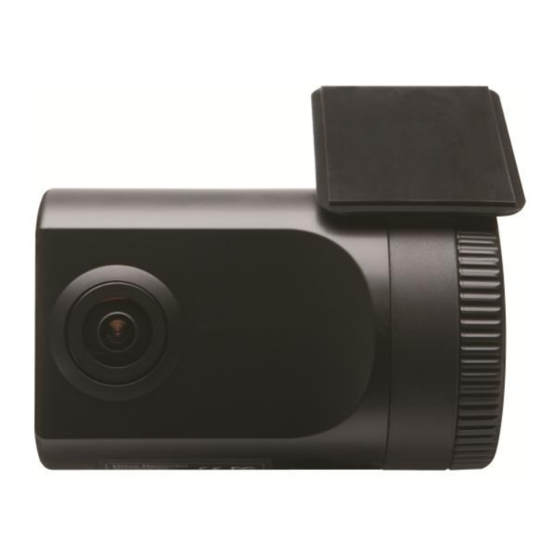
- Page 5 INTRODUCTION Bracket FRONT [Adhere tape on bracket] Camera Lens LEFT Internal Microphone DC Power In (DC 12~24V) RIGHT Video output SD Memory Card Slot...
- Page 6 INTRODUCTION BACK Internal GPS Antenna Record LED BLUE LED Record Button SD Card Overwrite LED RED LED Format Button NOTE: Formatting the SD memory card can be done using SD Card Format Button. However we recommend that you format the SD card using the Smart Witness Analysis Software on your PC.
-
Page 7: Installation
Please make sure to disconnect the power cable when inserting or ejecting the SD memory card. 2. Attach the SVC150GPS using the provided double sided tape. The surface must be clean and dry before you install. We recommend you to install the product behind the rear view mirror on the front windshield. - Page 8 Plug in the power. The provided power cord cable route should be from the left side of the SVC150GPS towards your power source. NOTE: When the impact is light like a minor bump in the road, the G- sensor may not recognize the impact and as a result it may not begin recording automatically.
- Page 9 For example, if you set normal recording frame as 15fps and parking mode frame as 1fps the SVC150GPS will record at 15fps whilst driving and it will record at 1fps after the car has been stationary for more than 5 minutes.
- Page 10 PC before you format the SD card. Built-in power backup (Super Capacitor) When power to the unit is interrupted, SVC150GPS creates the last file using the internal Super Capacitor. NOTE: When the SVC150GPS reverts over to the Super Capacitor for power it will automatically change to a 1fps recording rate.
-
Page 11: Operation
2. Blue LED & Red LED will be slowly blinking simultaneously and then the Blue LED will remain on. The Blue LED light means SVC150GPS is ready for the event recording. 3. The event recording will automatically begin by the G-sensor with one short “Beep”... -
Page 12: Live Display
To See Live Video Preview on LCD Monitor 1. Set your Video Out as NTSC or PAL. 2. Connect your video out cable from the SVC150GPS to a monitor with component video input (yellow stereo cable). NOTE: When recording resolution is 1280x960, live display speed is 1fps. - Page 13 SOFTWARE USER GUIDE Vehicle Journey Recorder Analysis Software Guide PC System Requirements Recommended PC specifications for Smart Witness Software: Windows 2000, Windows XP Windows Vista, Windows 7 Pentium 4 - 2.6GHz or higher 512MB or higher Interface SD Memory Card Reader Install 20MB or higher Free space Backup 2GB or higher...
-
Page 14: Software Installation
SOFTWARE INSTALLATION Smart Witness Analysis Software is on the provided SD card: 1. Insert the SD card into your PC (if your computer does not have SD card slot, use the USB SD card reader) and open “My computer 2. Right-click the “HDREC1” drive and select [Open] 3. -
Page 15: Connecting The Sd Memory Card
Connecting the SD Memory Card 1. Insert SD memory card into your PC’s SD card slot or a USB SD card reader. 2. Run “SmartWitness” 3. Select [File] and then click “Select Data Folder” or Click [OPEN] button [OPEN] button... - Page 16 Smart Witness Analysis Software Setting This setting is for the Analysis Software itself . To set the Video Recorder (i.e. resolution, frame rate, etc. refer to page 26). Click the Setting Button [Setting] button The ‘date’ formats and ‘speed’ unit will be set automatically according to the PC’s settings.
-
Page 17: Select File For Playback
Select file for playback When Record Method is set as “Event record” “Switch” means recording was activated by the Check Record button an event “G-Sensor” means recording was activated by the G- Sensor levels being triggered (i.e. an impact) Blank means a previous event file is more than 1 min. -
Page 18: File Loading
FILE LOADING Once click [Load] button, the [FileList] tab will be changed to the [PlayList] tab as below When Record Method set as “Event record” Select file(s) to playback Return to the [FileList] When Record Method set as “Normal record” Select file(s) to playback Return to the... -
Page 19: Icons On Playlist
ICONS ON PLAYLIST The file includes GPS data The file resolution is SXVGA (1280x960) The file resolution is VGA (640x480) The file was recorded by the G-Sensor This file was recorded by the Record button This file was recorded by the Normal (Continuous) record This file was recorded by the Parking mode. -
Page 20: Playback Screen
PLAYBACK SCREEN When Record Method set as “Normal record” Display frame/Total frames number Event area marking by G-sensor or button (5 seconds per each event) Playback position indicator Google Map location data Playback Icons This file recorded by Normal (Continuous) record This file recorded by G-Sensor This file recorded by Record button This file resolution is SXVGA (1280x960) - Page 21 PLAYBACK 7. Click [Play] button for playback. Click & Drag the white bar to move the Volume & Brightness playback position. Before 20seconds After 20seconds Compass (Moving Direction) Event Playback buttons x0.5, 1 x0.5, 1 Reverse Play x2, 4, 8, 16 x2, 4, 8, 16 Fast Forward Fast Reverse...
- Page 22 PLAYBACK PC Keyboard hot buttons: Function PC Keyboard hot buttons 1280x960 mode [Enter] Return to the previous mode: Enter Full screen mode [Alt+ Enter] Return to the previous mode: Enter Playback speed control [Ctrl + F] 0.5 to 1 Reverse playback speed control [Ctrl + B] 0.5 to 1 Pause / Play...
-
Page 23: Google Maps
Google Maps The route taken will be displayed on Google Maps at the lower right corner of the software user interface. Please Note: To see the route & position on the Google map, the GPS data should be recorded with video. - Page 24 VIDEO ZOOM HD Quality video image allows you to zoom in (up to x9) on a specific area: To Zoom-In: Click mouse left button on the screen To Zoom-Out: (return to original size) Click mouse right button on the screen Screen without zoom Zoom-In indicator Screen with x2 zoom...
-
Page 25: Thumb-Nail Function
THUMB-NAIL FUNCTION Click the button for 4x4 multi view (Thumbnail function): Click the thumbnail image to change the playback position. Click the right mouse button to change to single image payback mode. Click [Close] button to quit the playback. Click [Close] to finish the playback. - Page 26 Save as JPG & convert video to AVI file Pause the playback and click ‘Save Image’ icon to make a JPG file: ‘Save Image’ icon Click the ‘Save AVI’ icon to make an AVI file: ‘Save AVI’ icon...
-
Page 27: Printing An Event Report
Printing an event report Pause the playback and click the printer icon: Printer icon Type in the Title [Print Title] & any comments [Comment] using the keyboard. The ‘Print Comment’ window allows up to 7 lines total. -
Page 28: Make Report
Make Report Click [Print] button in the print preview windows to print the report. The File Name [Print Title], Comment [Print Comment], G-sensor Graph & Map will be printed on the first page. Click [ 2x2 ] and then click [Print] to print 4 images per page:... - Page 29 Backup Event/Log files Click [Backup Event/Log files] icon to backup the files to the PC. [Backup Event/Log files] icon Select [Event data] or [Normal data] and select [Log data] first, before clicking the [Backup Event/Log files] icon. Then the selected Event, Normal, and Log data files are backed up on Windows to your preferred destination.
-
Page 30: Drive Recorder Settings
Drive Recorder Settings Click [Recorder Setting] icon for setup. [Recorder Setting] icon NOTE: Backup the SD data first, before clicking initializing (i.e. formatting the SD card). The old data is removed when you save new settings. Record Method Event Record (Automatically starts Recording by G-sensor event or Record Button) Normal Record (Is always recording when powered by 12/24V) Record Mode... - Page 31 Drive Recorder Settings Vehicle ID Set vehicle ID and Driver name etc. Up to 50 characters. “Beep” sound ON/OFF when Event recordings are started Beep on record G-sensor Setting Check simple setting mode and then change the sensitivity. High sensitivity (8 or 9) means recordings will start at very low impact.
- Page 32 Date / Time SVC150GPS’s built-in GPS allows it to automatically synchronize it’s time. The time recording is done based on UTC timing and will then automatically convert this to the local time on the user’s PC (according to the PC time zone setting when playing back using the Smart Witness Analysis Software).
-
Page 33: Simple Mode Viewer
Simple Mode Viewer With this option, the video is maximized and a panel of video previews appears in the right side. Preview images To change it to Normal Mode Viewer: Click [Setting viewer program] icon Un-check Simple Mode and press [OK]... -
Page 34: Product Information
Product Information 15. Click [About] icon to check the product information. About icon... -
Page 35: Log File Playback
LOG FILE PLAYBACK 16. Select [LOG] windows and then check the log from the log list using mouse or click [Check All] button. Then click [Load] button. Log data Log data will be recorded during driving even if there are no events or video. -
Page 36: Specifications
SPECIFICATIONS Image sensor 1/4" CMOS Digital Sensor 1.2M pixels 170 ° Angle of View Video resolution 1280x960(SXVGA), 640x480(VGA) Frames per 30 frames @ 640x480, 15 frames @ 1280x960 second Recording By continuous, By impact, By emergency button before 20 (15, 10) sec after 20 (15, 10) sec, Recording time Continuous recording: Min 65min ~ Max 148hours Internal GPS... -
Page 37: Recording Times
RECORDING TIMES... -
Page 38: Technical Support And Warranty
Technical Support & Warranty TECHNICAL SUPPORT For Technical Support, please contact your local distributor. - Page 39 Optional Accessory (Permanent Power Cable) Model name: SVC100PPC The Permanent Power Supply Cable will allow you to hard wire the SVC150GPS unit to the fuse box of your vehicle. ① Recorder ② Fuse box (+) ③ Ground Connect (+) to the reserve Fuse.
- Page 40 Optional Accessory (Locking Device) Model: SVC100SEC The Locking cover can protect the SD card from unwanted removal or tampering. SVC100SEC includes: A locking cover, an end block with two-position lock, and barrel key. End block must be adhered with super glue. Before After...
- Page 41 Optional Accessory (Suction Cup Mount) Model: SVC100UMB The SVC100UMB Suction Cup Mount allows you to mount the Drive Recorder on your dashboard or windshield without an adhesive. Specifications Weight: 4.7 grams Tension Gauge: around 20 KG Size: 88.80mm(H) x 85.89mm(D)
- Page 42 Copy “SVC150_X.X.X.bin” file in to the SD card [program] folder. 2. Upgrade SVC150GPS 1. Insert the prepared SD card to SVC150GPS and turn on the power. 2. The Blue & Red LED will quickly blink while the unit is upgrading. It will also “Beep”...
- Page 43 Note: After installation of the new software, format the SD card. The new software will automatically be copied to [pcsw] folder at SD card. NOTE: To initialize the SD card. Run the ‘SmartWitness’ software and select [Setting Viewer program] and then click [Init SD card]...
- Page 44 MEMO...
- Page 45 Manufactured exclusively for: www.smartwitness.com Smart Witness is a Division of Xvision...
Need help?
Do you have a question about the SVC150GPS and is the answer not in the manual?
Questions and answers