
Related Manuals for SmartWitness KP2


Summary of Contents for SmartWitness KP2
- Page 1 INSTALLATION GUIDE DISTRACTION DETECTED Version 4.0 Last updated 4/06/2022...
-
Page 2: Table Of Contents
Prepare Your KP2 ................6 Not an Installer? ................12 Attach Your Camera to the Windshield ........7 LED & BUZZER SPECIFICATIONS ..........13 Connect the KP2 to Your Vehicle’s Power Source.....8 TECHNICAL SPECIFICATIONS ............ 14 HOW TO TEST YOUR INSTALLATION .........9... -
Page 3: Package Contents
*64GB SD Card (Pre-Installed) Power Cable 2 Square Adhesive *128GB SD Available (3-Wire Type) Cable Clips (x5) Upon Request Double-Sided 3M ™ Tape Nano SIM Card (Pre-Installed) Alcohol Prep Pad (x2) (One Adhered to Bracket, One Extra Pc.) SMARTWITNESS KP2 PRO INSTALLATION GUIDE... -
Page 4: Kp2 Feature Reference
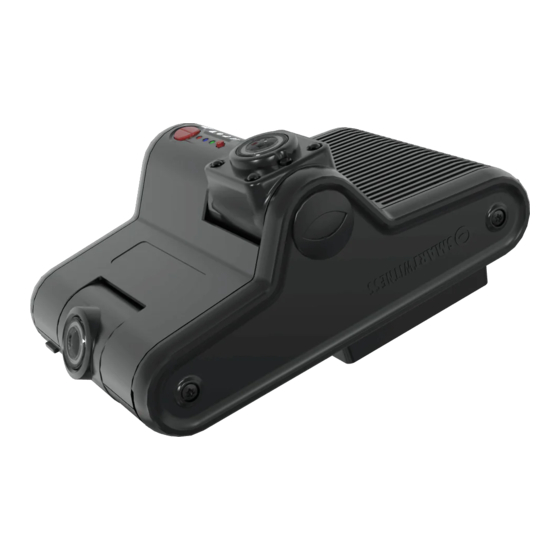
FEATURE REFERENCE Camera Lens FRONT Lens Angle Lock Windshield Bracket SIDE Unscrew the right-side bracket. Applied screws for design Remove the KP2 from the purpose only. bracket to adjust camera angle or insert/remove SIM/SD card. SMARTWITNESS KP2 PRO INSTALLATION GUIDE... - Page 5 Release Tab Nano SIM Slot (4FF) Micro SD Card Slot Memory SD Card Slot 2nd Camera (Model: KP2-DFC) BACK Ecall/Panic Button Bluetooth Pairing Button LED Types: Warning LED (RED) Record LED (BLUE) Network LED (GREEN) SMARTWITNESS KP2 PRO INSTALLATION GUIDE...
-
Page 6: How To Install Your Kp2
You’ll notice that both the microSD and SIM cards come pre-installed. See Diagram A. Keep the side panel open. It allows you to remove the KP2 from its mount and adjust the driver- and road-facing cameras. Prep the cameras for adjustments. -
Page 7: Attach Your Camera To The Windshield
Note: When installing the KP2 in a truck, FMCSA mandates that the device’s camera is in the top 2" of the windshield wiper sweep. Apply your KP2 to the windshield, and maintain pressure for at least 30 seconds. After mounting your KP2, use the Torx ®... -
Page 8: Connect The Kp2 To Your Vehicle's Power Source
YOUR KP2 Connect the KP2 to Your Vehicle’s Power Source If you are not a professional technician, click here to request installation from an approved SmartWitness installer. By continuing this process without a certified installer, you accept the ramifications of tampering with your vehicle’s power source. -
Page 9: How To Test Your Installation
Check the output of your power source or your ground (black wire) connection. If your KP2 install is operational, please move on to How to Calibrate Your G-Sensor. SMARTWITNESS KP2 PRO INSTALLATION GUIDE... -
Page 10: How To Calibrate Your G-Sensor
You’ll hear a beep, and the KP2 LED light will blink briefly to indicate that the G-sensor calibration has registered. You’ve completed the first steps of your KP2 installation. To adjust your settings, continue to How to Configure KP2 Settings. -
Page 11: How To Configure Kp2 Settings
IMEI label, and follow the walk-through featured below. 1. Ensure the IMEI code in the 2. Read the instructions to 3. Select your KP2 camera 4. If you adjust either camera, click app matches your device’s IMEI. understand more about your configuration. -
Page 12: Complete Your Installation/Support
COMPLETE YOUR INSTALLATION/SUPPORT You’ve finished your KP2 installation and device calibration. Your KP2 is ready to go. If you have any complications during the installation process or have any questions, please contact our support team at support@smartwitness.com or call us. -
Page 13: Led & Buzzer Specifications
Slow On and Off Communication Error Event Trigger G-Sensor, Panic Button, Alarm-In Beep No. 1 Beep No. 4 Over Speed (2 Times) ADAS Warning Beep PCW, FCW, HMW or Voice Warning Beep DSW, DFW, DPUW, DDW or Voice SMARTWITNESS KP2 PRO INSTALLATION GUIDE... -
Page 14: Technical Specifications
16GB eMMC + 2GB LPDDR3, MicroSD Card Storage Temp. -20°C~70°C Memory Support up to 256GB (FAT32) Certification/ FCC, CE, E-Mark, UKCA, RoHS, IC, PTCRB, GPS/GNSS Internal GPS/GLONASS/BeiDou Regulatory RCM, AT&T, Verizon and FirstNet G-Sensor Warranty Internal 3-Axis G-Sensor 2-Year Standard SMARTWITNESS KP2 PRO INSTALLATION GUIDE... - Page 15 © 2022 SmartWitness. All Rights Reserved. smw3016-NA_0422...
Need help?
Do you have a question about the KP2 and is the answer not in the manual?
Questions and answers