
Related Manuals for TSC TTP-244M Pro


Summary of Contents for TSC TTP-244M Pro
- Page 1 TTP-244M Pro/244ME Pro TTP-342M Pro/342ME Pro THERMAL TRANSFER / DIRECT THERMAL BAR CODE PRINTER SERVICE MANUAL...
-
Page 2: Table Of Contents
TTP-342M Pro/342ME Pro Bar Code Printer Service Manua TABLE OF CONTENT 1. FUNDAMENTAL OF THE SYSTEM ................3 1.1. Features of TTP-244M Pro/TTP-244ME Pro/TTP-342M Pro/342ME Pro ..... 3 Model Naming Rules ..................3 Overview ......................4 Basic Specifications ..................7 1.4-2... - Page 3 TTP-244M Pro/244ME Pro TTP-342M Pro/342ME Pro Bar Code Printer Service Manua 5. TROUBLESHOOTING ..................... 45 Error Messages .................... 45 Troubleshooting ................... 47 Calibrating the Gap Register ............... 49 Self Test ......................49 Clearing RAM ....................49 Diagnosis Operation Procedure ..............49 Cleaning the Print Head ................
-
Page 4: Bar Code Printer Service Manua L
TTP-342M Pro/342ME Pro Bar Code Printer Service Manua 1. FUNDAMENTAL OF THE SYSTEM 1.1. Features of TTP-244M Pro/TTP-244ME Pro/TTP-342M Pro/342ME Pro 1. The printer prints bar codes, characters, logos, etc., on various types of labels by direct thermal or thermal transfer method. -
Page 5: Overview
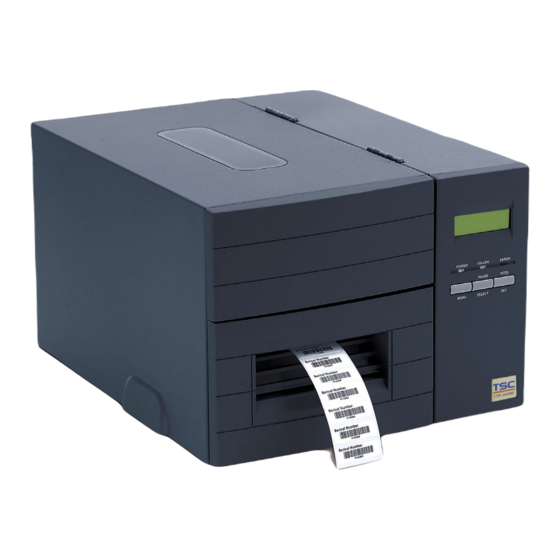
TTP-244M Pro/244ME Pro TTP-342M Pro/342ME Pro Bar Code Printer Service Manua 1.3 Overview Front View 1. Printer cover/ Release handle 2. Label dispense opening 3. Liner opening (Option function) 4. MENU button (Option for E series) 5. PAUSE/ SELECT button 6. - Page 6 TTP-244M Pro/244ME Pro TTP-342M Pro/342ME Pro Bar Code Printer Service Manua 1. Centronics interface (Option for E series) 2. USB interface 3. Label insert opening (For use with external labels) 4. RS-232C interface connector 5. SD card socket 6. Power switch 7.
- Page 7 TTP-244M Pro/244ME Pro TTP-342M Pro/342ME Pro Bar Code Printer Service Manua V1.0, V1.1 microSD 256 MB Transcend, Panasonic V1.0, V1.1 microSD 512 MB Panasonic V1.0, V1.1 microSD 1 GB Transcend, Panasonic V2.0 SDHC CLASS 4 microSD 4 GB Panasonic V2.0 SDHC CLASS 6 microSD 4 GB Transcend V1.0, V1.1...
-
Page 8: Basic Specifications
Maximum media width: 4.49” (114 mm) Adjustable label edge guide International character sets Print area:TTP-244M Pro/TTP-244ME Pro:4.09”W x 90”L;TTP-342M Pro/TTP-342ME Pro:4.09”W x 40”L User selectable bar code ratios and heights Printing on labels or ticket stock ... -
Page 9: Electronics/Communication Specifications
TTP-244M Pro/244ME Pro TTP-342M Pro/342ME Pro Bar Code Printer Service Manua 1.4-2 Electronics /Communication Specifications Electrical: CPU: ATMEL AT91SAM9260 32bit Stepping Motor: 24V 7.5 Degrees 4Ω DC Motor: DC 24V Memory: DRAM:8MB Flash Memory: 4MB Voltage: Switching Power, 100/240VAC, 50~60Hz... -
Page 10: Available Bar Codes
TTP-244M Pro/244ME Pro TTP-342M Pro/342ME Pro Bar Code Printer Service Manua 1.5 Available Bar Codes 1D bar code Code 39, Code 39C Code 93 Code 128 UCC Code 128, Subsets A, B, and C Codabar ... -
Page 11: Various Sensors And Switches
TTP-244M Pro/244ME Pro TTP-342M Pro/342ME Pro Bar Code Printer Service Manua 1.6 Various Sensors and Switches 1. Feed Gap Sensor The feed gap sensor detects the label/ticket gap to locate the position. The sensor is set to detect gaps along the center line of the label/ticket roll width across the length of the media. - Page 12 TTP-244M Pro/244ME Pro TTP-342M Pro/342ME Pro Bar Code Printer Service Manua 2. Black Mark Sensor The black mark sensor locates the position of the ticket by emitting infrared rays onto the black mark at the back side of the ticket. The sensor is positioned central to the ticket roll width on the mechanism.
-
Page 13: Supply Specifications
Label / Ticket Items Max. 114 mm Paper Width Min. 25.4 mm 6 ~ 2286 mm (For TTP-244M Pro/TTP-244ME Pro) Print Length (Pitch) 6 ~ 1016 mm (For TTP-342M Pro/TTP-342ME Pro) Thickness 0.06 mm~0.25 mm, Max 250 g/m Outer roll dia. 178 mm (1” core) Max. -
Page 14: Ribbon Sizes And Shapes
TTP-244M Pro/244ME Pro TTP-342M Pro/342ME Pro Bar Code Printer Service Manua 2.3 Ribbon Sizes and Shapes Item Specifications Ribbon shape Spool type Max. 110 mm Ribbon width Min. 25.4 mm Max. 110 mm Ribbon winding width Min. 25.4 mm Leader tape Polyester film, 3355 mm long... - Page 15 TTP-244M Pro/244ME Pro TTP-342M Pro/342ME Pro Bar Code Printer Service Manua , where L = Ribbon length D = Max. roll diameter d = Ribbon core outside diameter t = Ribbon thickness...
-
Page 16: Electronics
TTP-244M Pro/244ME Pro TTP-342M Pro/342ME Pro Bar Code Printer Service Manua 3. ELECTRONICS 3.1 Summary of Board Connectors Main board Connector Description Centronics port connector USB connector RS-232C connector LCD panel connector Multi-interface board connector/ GPIO interface board Micro processor... - Page 17 TTP-244M Pro/244ME Pro TTP-342M Pro/342ME Pro Bar Code Printer Service Manua Description Voltage Head open: High Head open detect Head close: Low Head open: High Head open detect Head close: Low Gap sensor connector Description Voltage Gap sensor receiver Power...
- Page 18 TTP-244M Pro/244ME Pro TTP-342M Pro/342ME Pro Bar Code Printer Service Manua Description Voltage power 3.3V Ribbon sensor With ribbon: High receiver No ribbon: Low Cutter/peel-off sensor connector Description Voltage Cutter motor wire A 0~24V Cutter position Right position: High sensor switch...
-
Page 19: Interface Pin Configuration
TTP-244M Pro/244ME Pro TTP-342M Pro/342ME Pro Bar Code Printer Service Manua Description Voltage Power 3.3V LED Green1 POWER LED Green2 ON-LINE LED Red ERROR Key 1 MENU KEY 2 PAUSE Key 3 FEED Power supply input (24V DC) connector Print head signal connector 3.2 Interface Pin Configuration... - Page 20 TTP-244M Pro/244ME Pro TTP-342M Pro/342ME Pro Bar Code Printer Service Manua Centronics SPP Mode Nibble In/Out Function A low on this line indicates that there are valid data at the host. When this pin is de-asserted, Strobe the +ve clock edge should be used to shift the data into the device.
-
Page 21: Replacement Of Main Board
TTP-244M Pro/244ME Pro TTP-342M Pro/342ME Pro Bar Code Printer Service Manua 3.3 Replacement of Main Board 1. Disconnect printer power. 2. Disconnect RS-232 cable and power cord. 3. Open the front panel. 4. Open the printer top cover. 5. Unfasten the two screws located at the lower edge of the lateral cover, the three screws fastening the lateral cover from inside the printer. - Page 22 TTP-244M Pro/244ME Pro TTP-342M Pro/342ME Pro Bar Code Printer Service Manua Screws Screws 9. Replace with the new mainboard. 10. Assemble the parts in the reverse order of that of disassembling.
-
Page 23: Print Density Selection
TTP-244M Pro/244ME Pro TTP-342M Pro/342ME Pro Bar Code Printer Service Manua 3.4 Print Density Selection As shown, on the lower edge of the mainboard JP47 is jumper to be used in the selection of print density. To select 200 dpi print density, cap jumper on positions 200DPI, as described in the instructions beside. -
Page 24: Replacement Of The Lcd Display
TTP-244M Pro/244ME Pro TTP-342M Pro/342ME Pro Bar Code Printer Service Manua 3.5 Replacement of the LCD Display 1. Refer to section 3.3 to detach the lateral cover. 2. Disconnect the connector to the LCD display. 3. Unfasten the 4 fixing screws on the LCD display. -
Page 25: Replacement Of The Keypad Board
TTP-244M Pro/244ME Pro TTP-342M Pro/342ME Pro Bar Code Printer Service Manua 3.6 Replacement of the Keypad Board 1. Refer to section 3.3 to detach the lateral cover. 2. Disconnect the connector to the keypad board. 3. Unfasten the 4 fixing screws on the keypad board. -
Page 26: Mechanism
TTP-244M Pro/244ME Pro TTP-342M Pro/342ME Pro Bar Code Printer Service Manua 4. MECHANISM 4.1 Cutter Installation (Option) 1. Turn off the printer power. 2. Open the top cover. 3. Detach the front panel by loosening four screws. Front Panel 4. Install the cutter mode front panel. - Page 27 TTP-244M Pro/244ME Pro TTP-342M Pro/342ME Pro Bar Code Printer Service Manua Cutter Mode Front Panel 5. Insert cutter module tenons in the cuts on the carriage, slide the cutter module to the right. Cutter Tenons Cuts 6. Fix the cutter module in place with the provided screw, plug in cutter...
- Page 28 TTP-244M Pro/244ME Pro TTP-342M Pro/342ME Pro Bar Code Printer Service Manua Screw Power Power Cord Connector Cord Clips 7. Refer to section 3.3 to disconnect all connectors on the mainboard. 8. Install the cutter driver IC which is attached to the package of cutter module at U505 on the main board.
-
Page 29: The Peel-Off Module Sensor Installation (Option)
TTP-244M Pro/244ME Pro TTP-342M Pro/342ME Pro Bar Code Printer Service Manua 4.2 The peel-off module sensor installation (Option) 1. Turn off the printer power. 2. Open the top cover. 3. Disconnect the gap sensor power connector below the carriage, detach the front panel. - Page 30 TTP-244M Pro/244ME Pro TTP-342M Pro/342ME Pro Bar Code Printer Service Manua 5. Put the peel-off sensor assembly in the peel-off sensor housing and the peel-off sensor receiver must be at the downside. 6. Assemble the detached parts in reverse order of the steps above.
-
Page 31: Replacement Of Printhead
TTP-244M Pro/244ME Pro TTP-342M Pro/342ME Pro Bar Code Printer Service Manua 4.3 Replacement of Printhead 4.3-1 Replacement of Printhead (For ROHM) 1. Turn off the printer power. 2. Open the top cover. 3. Open the front panel. 4. Dismantle label and ribbon. -
Page 32: Replacement Of Printhead (For Kyocera )
TTP-244M Pro/244ME Pro TTP-342M Pro/342ME Pro Bar Code Printer Service Manua 8. Tidy the cable so as not to interfere with the ribbon. 9. Assemble the detached parts in reverse order of the steps above. Note: Connector lock is to face up... - Page 33 TTP-244M Pro/244ME Pro TTP-342M Pro/342ME Pro Bar Code Printer Service Manua 2. Remove the screws. Screws 3. Replace the print head. 4. Reassemble the removed parts in the reverse order of removal. Note: 1. Tidy up the cable so that it does not protrude or interfere with the ribbon.
-
Page 34: Dc Motor Replacement
TTP-244M Pro/244ME Pro TTP-342M Pro/342ME Pro Bar Code Printer Service Manua 4.4 DC Motor Replacement 1. Turn off the printer power. 2. Disconnect RS-232 cable and power cord. 3. Open the front panel. 4. Open the top cover. 5. Detach the lateral cover by loosening its 5 fixing screws. - Page 35 TTP-244M Pro/244ME Pro TTP-342M Pro/342ME Pro Bar Code Printer Service Manua 9. Detach the ground wire on the mainboard. 10. Disconnect all mechanism connectors from mainboard. 11. Take out the mechanism. 12. Cut off the cable tie. Unfasten the 3 screws on the fixing tab of DC motor.
-
Page 36: Replacement Of Stepping Motor
TTP-244M Pro/244ME Pro TTP-342M Pro/342ME Pro Bar Code Printer Service Manua 4.5 Replacement of Stepping Motor 1. Turn off the printer power. 2. Disconnect RS-232 cable and power cord. 3. Open the front panel. 4. Open the printer top cover. - Page 37 TTP-244M Pro/244ME Pro TTP-342M Pro/342ME Pro Bar Code Printer Service Manua 13. Assemble the detached parts in the reverse order of the above steps.
-
Page 38: Installation Of Black Mark Sensor
TTP-244M Pro/244ME Pro TTP-342M Pro/342ME Pro Bar Code Printer Service Manua 4.6 Installation of Black Mark Sensor 1. Turn off the printer power. 2. Disconnect RS-232 cable and power cord. 3. Open the front panel. 4. Open the top cover. - Page 39 TTP-244M Pro/244ME Pro TTP-342M Pro/342ME Pro Bar Code Printer Service Manua 13. Assemble the detached parts in the reverse order of the steps above. Note: Black mark sensor connector is to be connected to J601...
-
Page 40: Replacement Of Ribbon Sensor (Receiver)
TTP-244M Pro/244ME Pro TTP-342M Pro/342ME Pro Bar Code Printer Service Manua 4.7 Replacement of Ribbon Sensor (Receiver) 1. Follow the instructions in Section 4.3 to take out the mechanism. 2. Open the print top cover. 3. Remove the screws, springs and spring bushing on both sides of the mechanism. - Page 41 TTP-244M Pro/244ME Pro TTP-342M Pro/342ME Pro Bar Code Printer Service Manua 4. The main mechanism is divided into upper mechanism and lower mechanism. 5. And ribbon sensor (receiver) is located in the upper mechanism. Remove the screws on the ribbon sensor cover.
-
Page 42: Replacement Of Ribbon Sensor / Gap Sensor (Transmitter)
TTP-244M Pro/244ME Pro TTP-342M Pro/342ME Pro Bar Code Printer Service Manua 4.8 Replacement of Ribbon Sensor / Gap Sensor (Transmitter) 1. Please follow the steps in Section 4.6 to separate the upper mechanism from the lower mechanism. 2. The ribbon sensor (transmitter) is located in the center of the lower mechanism. -
Page 43: Platen Replacement
TTP-244M Pro/244ME Pro TTP-342M Pro/342ME Pro Bar Code Printer Service Manua 4.9 Platen Replacement 1. Follow the instructions in Section 4.4 to remove the stepping motor. 2. Loosen the E-ring 1 to remove the 2 gears. 3. Lossen the E-ring 2 to remove the release lever arm. - Page 44 TTP-244M Pro/244ME Pro TTP-342M Pro/342ME Pro Bar Code Printer Service Manua 5. Remove the teflon and stripper rod. Teflon Tube 6. Remove the E-ring, the right side and left side platen bushes. Platen E-ring Platen bush (Left side) 7. Move the platen to the right of the mechanism.
-
Page 45: Replacement Of The Power Supply
TTP-244M Pro/244ME Pro TTP-342M Pro/342ME Pro Bar Code Printer Service Manua 4.10 Replacement of the power supply 1. Refer to section 3.3 to detach the lateral cover. 2. Disconnect the power supply on the mainboard. 3. Remove 2 screws on the back side of the machine and 1 screw inside the bottom of the machine. -
Page 46: Troubleshooting
TTP-244M Pro/244ME Pro TTP-342M Pro/342ME Pro Bar Code Printer Service Manua 5. TROUBLESHOOTING 5.1 Error Messages 1. Syntax Error The command format is incorrect. The serial port setting is incorrect. 2. Out of Range Numeric input is too large to be processed. - Page 47 TTP-244M Pro/244ME Pro TTP-342M Pro/342ME Pro Bar Code Printer Service Manua 9. Gap not Found Cannot detect label gap. Calibrate the label again. 10 Clock Access Error Can not read from / write to the real time clock.
-
Page 48: Troubleshooting
TTP-244M Pro/244ME Pro TTP-342M Pro/342ME Pro Bar Code Printer Service Manua 5.2 Troubleshooting The following guide lists some of the most common problems that may be encountered when operating the bar code printer. If the printer still does not function after all suggested solutions have been invoked, please contact the Customer Service Department of your purchased reseller or distributor for assistance. - Page 49 TTP-244M Pro/244ME Pro TTP-342M Pro/342ME Pro Bar Code Printer Service Manua Note: When the voltage is too low or when the printing covers a wide range on the label, the print density may become inadequate. At this, please lower the print speed to secure normal print quality.
-
Page 50: Calibrating The Gap Register
TTP-244M Pro/244ME Pro TTP-342M Pro/342ME Pro Bar Code Printer Service Manua 5.3 Calibrating the Gap Register 1. Install the label. 2. Turn on the printer power while pressing the PAUSE button, the printer will calibrate the transparency of the backing paper and adjust the gap register. -
Page 51: Cleaning The Print Head
TTP-244M Pro/244ME Pro TTP-342M Pro/342ME Pro Bar Code Printer Service Manua 5.7 Cleaning the Print Head The printer should be cleaned at regular intervals to retain high quality and optimum performance. The greater the usage of the printer, the more frequent the cleaning. -
Page 52: Update History
TTP-244M Pro/244ME Pro TTP-342M Pro/342ME Pro Bar Code Printer Service Manua UPDATE HISTORY Date Content Editor... - Page 54 9F., No.95, Minquan Rd., Xindian Dist., No.35, Sec. 2, Ligong 1st Rd., Wujie Township, New Taipei City 23141, Taiwan (R.O.C.) Yilan County 26841, Taiwan (R.O.C.) TEL: +886-2-2218-6789 TEL: +886-3-990-6677 FAX: +886-2-2218-5678 FAX: +886-3-990-5577 Web site: www.tscprinters.com E-mail: printer_sales@tscprinters.com TSC Auto ID Technology Co., Ltd. tech_support@tscprinters.com...
Need help?
Do you have a question about the TTP-244M Pro and is the answer not in the manual?
Questions and answers