Table of Contents
Advertisement
Installation Guide
XX224-30-00
V960B Series Network
Bullet Cameras
Vicon Industries Inc., 89 Arkay Drive, Hauppauge, New York 11788
Tel: 631-952-2288 Fax: 631-951-2288 Toll Free: 800-645-9116
24-Hour Technical Support: 800-34-VICON (800-348-4266) UK: 44/(0) 1489-566300
Vicon Industries Inc. does not warrant that the functions contained in this equipment will meet your requirements or that the
operation will be entirely error free or perform precisely as described in the documentation. This system has not been designed
to be used in life-critical situations and must not be used for this purpose.
www.vicon-security.com
Document Number: 8009-8224-30-00
Issued: 1011
Product specifications subject to change without notice.
Copyright © 2011 Vicon Industries Inc. All rights reserved.
Advertisement
Table of Contents

Related Manuals for Vicon V962B-IR922M


Summary of Contents for Vicon V962B-IR922M
- Page 1 24-Hour Technical Support: 800-34-VICON (800-348-4266) UK: 44/(0) 1489-566300 Vicon Industries Inc. does not warrant that the functions contained in this equipment will meet your requirements or that the operation will be entirely error free or perform precisely as described in the documentation. This system has not been designed to be used in life-critical situations and must not be used for this purpose.
-
Page 2: Table Of Contents
Contents 1. Product Features ..................... 3 2. Installation ..................... 6 2.1 Adjusting the Camera Direction ..............7 3. Accessing the Camera ..................7 3.1 Access from a Web Browser ................7 3.2 Accessing the Camera from the Internet ............9 ... - Page 3 12.5 DDNS ....................33 12.6 UPnP ....................34 13.1 User ..................... 36 12.2 Date & Time ..................37 13.3 Maintenance ..................38 13.4 Information .................... 40 Vicon Standard Equipment Warranty ..............43 ...
-
Page 4: Product Features
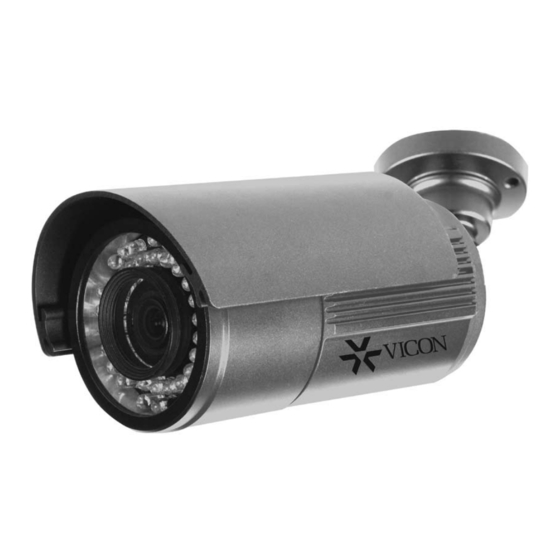
V962B-IR312M 1080P (2 MP) resolution camera with a 3.3-12 mm motorized varifocal lens; includes heater V962B-IR922M 1080P (2 MP) resolution camera with a 9-22 mm motorized varifocal lens; includes heater The optimal Power over Ethernet (IEEE 802.3af) supports power to the camera to be delivered via the network, eliminating the need for a power outlet and reducing installation costs. - Page 5 1. Network Connector The V960B connects to the network via a standard network cable and automatically detects the speed of the local network segment (10BaseT/100BaseTX Ethernet). This socket could also be used to power the V960B via Power over Ethernet (PoE). The camera auto-senses the correct power level when using a PoE (Class 2) switch, router or injector.
- Page 6 5. Power Connector 12 VDC or 24 VAC power connector 6. Micro SD Card Save snapshot images and video onto a Micro SD card. 7. Reset Button Press this button to restore the camera configuration to its factory default settings. 8.
-
Page 7: Installation
2. Installation Select a location for the installation of the V960B camera. Be sure the area around the selected location is clear of obstacles (such as steel beams, headers, pipes, electrical wiring, etc.) which would interfere with the mounting of the camera and that the location can support the weight of the unit [the V960B unit weighs 1.6 lb (0.74 kg)]. -
Page 8: Adjusting The Camera Direction
2.1 Adjusting the Camera Direction The camera body is set with bracket movement. Loosen the set screws to adjust camera view. Secure the set screws. 3. Accessing the Camera The V960B can be accessed with most standard operating systems and browsers. The recommended browser is Internet Explorer®... - Page 9 When you first access the camera you will be asked to download and install an Active X control from the camera to display a Live image. NOTE: The layout of the live view page in the camera may have been customized to meet specific requirements.
-
Page 10: Accessing The Camera From The Internet
3.2 Accessing the Camera from the Internet Once installed, the camera will be accessible on the Local Area Network (LAN). Then you must configure the router/firewall to allow incoming data traffic to access the camera from the Internet. For security reasons this is usually done on a specific port, using port forwarding. Please refer to the documentation for router/firewall for further instructions on port forwarding. -
Page 11: Live View
3.4 Live View Client PC Speaker (enable/disable) Client PC Microphone (enable/disable) Digital Zoom Snapshot Full Screen Video Stream Change (1 Stream <> 2 Stream) Play: Start Video Stream Stop: Stop Streaming NOTE: It is possible that not all the buttons described below will be visible unless the Live View page has been customized to display them. -
Page 12: How To Stream H.264
Multicasting is bandwidth-conserving technology that reduces bandwidth usage by simultaneously delivering a single stream of information to multiple network recipients. This technology is used primarily on delimited networks (intranets), as each user needs an uninterrupted data flow and should not rely on network routers. 3.6 How to Stream H.264 Deciding on the combination of protocols and methods to use depends on your viewing requirements and on the properties of your network. -
Page 13: Setup
4. Setup The V960B is configured from the Setup tab, which is available on the upper-left hand side in the web interface. This configuration could be performed by: - Administrators, who have unrestricted access to all settings under the Setup tab. - Users, who have access to the Video &... -
Page 14: Installation
5. Installation The following descriptions show examples of some of the features available with V960B . 5.1 Installation Mode Installation Mode allows use of the analog BNC output from the camera to connect the camera to a service monitor, in order to adjust the positioning of the camera and focus the lens. ON : Analog Output is enabled;... -
Page 15: Video Codec
6.1 Video Codec This section allows you to choose the compression codec for each of the video streams. Motion JPEG This format uses standard JPEG still images in the video stream. These images are then displayed and updated at a rate sufficient to create a stream that shows constantly updated motion. The Motion JPEG stream uses a considerable amount of bandwidth, but also provides excellent image quality and access to every individual image contained in the stream. - Page 16 Image Rate 2.5 ~ 30fps in normal mode (1 ~ 30fps in slow shutter mode) NOTE: If the slow shutter mode is turned on and the low light condition is met, the image rate automatically goes down. In this case, the image is half of the normal mode. Bitrate Control (CBR or VBR) When using H.264 compression, if there is only limited bandwidth available, a constant bit rate (CBR) is recommended, although this may compromise image quality.
- Page 17 Bandwidth Limit Limit the bandwidth that the V960B can use during a network connection. Max Bandwidth Specify the maximum bandwidth that the V960B can use during a network connection. < Output resolution table for 1080p (Full HD) model > First Stream Second Stream 1080p (1920 x 1080) 1.3MP (1280 x 1024)
-
Page 18: Camera
Camera This section allows you to adjust various camera settings. 6.2.1 Exposure Control Exposure Mode Select AUTO (indoor) for automatic exposure control at indoor conditions. Select AUTO (outdoor) for automatic exposure control at outdoor conditions. Select MANUAL to control camera exposure manually. To compensate for poor lighting conditions, you can adjust the Color level, Brightness, Sharpness, Contrast, Exposure control, and DC-Iris. -
Page 19: Day & Night Control
Slow Shutter Mode For low light conditions, turn ON slow shutter mode. Max AGC Gain For low light conditions, select HIGH value; otherwise select LOW. DC -Iris Control Turn OFF the DC-Iris lens setting when focusing the lens. NOTE: Follow the instructions in Chapter 2.3, and turn ON the DC -Iris function when finished. BLC Control (Back Light Compensation) The BLC adjusts the exposure of scenes with strong backlight in the center-bottom of the image. -
Page 20: Motorized Lens Adjustment
6.2.5 Motorized Lens Adjustment Adjust the lens (Zoom, Focus and Iris, if applicable) from this window. One Push Focus: Camera will automatically adjust the focus. Origin: Back to original factory default position. Note that the screen displayed may be slightly different than shown here due to the type of lens supplied with the camera. -
Page 21: Live
Audio Input Audio from a connected line-in source can be connected to the Audio in connector on the V960B camera. If there are problems with the sound input being too low or high, you can adjust the input gain for the microphone connected to the V960B. 8. -
Page 22: Sd Card
9. SD Card 9.1 Configuration SD Card Configuration This configuration page allows you to save video and still images to the Micro SD (SDHC) card. NOTE: This function cannot be used when Installation mode is turned ON. Set the first stream to 1280x720 or 1280x720 (wide) in the Video >... -
Page 23: Event
9.2 Event Event SD Writing You can configure the camera to store still images based on events such as Alarm In and Motion detection. NOTE: This function cannot be used when Installation mode is turned ON. Set the first stream to 1280x720 or 1280x720 (wide) in the Video >... -
Page 24: Periodical
SD Write Mapping Choose which types of events (Alarm In or Motion) will be recorded to the SD card by checking the desired event. Effective Period Decide whether to save all the events that are happening at all hours of the day (Always), or only the events that occur during specific times of the day. -
Page 25: Ftp
10. FTP 10.1 Configuration Server Configuration Enable/Disable the FTP function to download saved content from the SD Card remotely. When it is Enabled, the FTP client can download the saved content without removing the SD Card. Client Configuration Allows transmission of still images to remote sites, using the FTP server. Set the information for FTP transmission by inserting the IP address, Username and Password of the remote FTP Server. -
Page 26: Periodical
Event FTP Sending Allows transmission of still images to the FTP server at remote sites when an event occurs. NOTE: This function cannot be used when Installation mode is turned ON. Set the first stream to 1280x720 or 1280x720 (wide) in the Video > Codec section, and second stream to M-JPEG or ‘None’. -
Page 27: Event
11. Event 11.1 Alarm Port Alarm Input (dry contact) Used for connecting external alarm contacts and triggering specific alarm-based events. The input is typically connected to a motion detector or any other external security device, so that recording can be triggered and/or still images could be recorded and/or uploaded whenever the sensor is activated. Enable or Disable the alarm input and define it as Normally Open (N/O) or Normally Closed (N/C). -
Page 28: Motion
11.2 Motion Motion Detection Motion detection is used to generate an alarm whenever movement occurs within the video image. A total of 4 motion detection zones can be configured. Configuring Motion Detection Click Motion in the Event menu. Click Area1-4 button for the area to be defined and select the corresponding area for motion detection by clicking the relevant color box. -
Page 29: Mapping
11.3 Mapping Event Mapping It is possible to define conditions that would cause the camera to respond with certain actions. A triggered event happens as a result of an event which is mapped within this menu. This could be caused by motion detection or an external alarm input. Alarm Out events could be triggered by either Motion or Alarm In. -
Page 30: Network
12. Network 12.1 IP Setup IP Address Configuration The V960B supports both IP version 4 and IP version 6 (IPv6 will be supported as of v3.0). Both versions may be enabled simultaneously, and at least one version should always be enabled. When using IPv4, the IP address could be set automatically via DHCP, or a static IP address could be set manually. - Page 31 How to Assign an IP Address Default setting is set to “DHCP” and “UPnP” function is set to ON. If your network has a DHCP server and the UPnP function is enabled on your PC, you can find the camera in “My Network”. Execute the Discovery Tool (from the Installation CD);...
-
Page 32: Service Port
12.2 Service Port Service Port HTTP Port The default HTTP port number (80) could be changed to any port within the valid port range (1-65535). This is useful for simple port mapping. RTSP Port The RTSP protocol allows a connecting client to start an H.264 stream. Enter the RTSP port number to use. -
Page 33: Rtp
12.3 RTP RTP Port Range The IP address, port numbers, and Time-To-Live (TTL) value are for use for the video stream(s) in Multicast H.264 format. Only certain IP addresses and port numbers should be used for Multicast. 12.4 E-mail... -
Page 34: Ddns
You must turn Notification to ‘ON’ and then enter the host names or addresses for your mail servers in the fields provided to enable the sending of event and error email messages from the camera to predefined addresses via SMTP. Notes: Frequency: Mail server may register the sender to SPAM list when frequency is set to “1 Min”. -
Page 35: Upnp
12.6 UPnP Universal Plug & Play (UPnP) allows you to find the IP camera automatically on your network. - Page 36 In order to be able to detect the camera automatically, you must enable the UPnP function on both the camera and on your PC. Camera : Set UPnP to “ON” PC : Open “Control Panel” >”Network Connection” Select “Advanced” >”Optional Networking Components…” Select “Network Services”...
-
Page 37: User
13. System 13.1 User When you access the camera, the Configure Root Password dialog box appears. Enter the user name ADMIN and password 1234 to log in. To change the password or add a user, go to Setup > System > User. Fill in the User ID, Password and E-mail server. -
Page 38: Date & Time
12.2 Date & Time Date & Time Format Specify the formats for the date and time (12h or 24h) displayed in the Live View video streams. Network Time Server Synchronize the time from an NTP server every 60 minutes. Specify the IP address or host name of the NTP server you are using. -
Page 39: Maintenance
13.3 Maintenance System Name Choose a system name to identify the camera when using e-mail notifications. System Reboot Reboots the camera. Factory Default Resets the camera back to the original factory default settings. Save System and User Data System settings can be saved to a PC. Load Data The system settings can be reloaded in case of accidental factory reset or can be transferred to another camera if multiple units need to be installed with the same settings. - Page 40 4. If you suspect the firmware upgrade for the camera has failed, always wait at least 5-10 minutes before restarting the upgrade process. 5. Vicon reserves the right to charge for any camera repair which can be attributed to faulty upgrading by the user. Always read the upgrade instructions and firmware release notes before updating the firmware.
-
Page 41: Information
13.4 Information System Information After updating firmware, you can confirm the new F/W version here. -
Page 44: Vicon Standard Equipment Warranty
10. Any product sold as “special” or not listed in Vicon’s commercial price list: One year from date of original retail purchase. Date of retail purchase is the date original end-user takes possession of the equipment, or, at the sole discretion of the Company, the date the equipment first becomes operational by the original end-user. - Page 45 Vicon Industries Inc. Corporate Headquarters 89 Arkay Drive Hauppauge, New York 11788 631-952-2288 800-645-9116 Fax: 631-951-2288 Vicon Europe Headquarters Brunel Way Fareham, PO15 5TX United Kingdom +44 (0) 1489 566300 Fax: +44 (0) 1489 566322 Vicon Germany Kornstieg 3 D-24537 Neumuenster...
Need help?
Do you have a question about the V962B-IR922M and is the answer not in the manual?
Questions and answers