Bunn Dual Operating & Service Manual
Hide thumbs
Also See for Dual:
- Service manual (65 pages) ,
- Illustrated parts catalog (51 pages) ,
- Operating & service manual (8 pages)
Table of Contents
Advertisement
OPERATING & SERVICE MANUAL
27040.0000F 01/04 ©1996 Bunn-O-Matic Corporation
BUNN-O-MATIC CORPORATION
POST OFFICE BOX 3227
SPRINGFIELD, ILLINOIS 62708-3227
PHONE: (217) 529-6601 FAX: (217) 529-6644
E R
IN D
R
G R
I
G
H
T
L
E
R
F
M E
T
A R
/ W
O N
T
A R
S T
l
ga
1⁄2
1
l
1 ga
ga
l
1⁄2
E R
A T
T W
H O
T
A R
N
S T
U T
IO
C A
!
R
M E
A R
/ W
O N
O R
C T
L E
S E
Y
A D
R E
E R
N
N T
IO
C A
U T
D E
C A
R D
C A
D IS
!
IF :
E D
D
M P
TY
C K
H E
N E
E
R A
A TC
D R
Y
A M
IC
. C
C R
E D
H E
H FL
C TR
. S
D W
O IL
N H
IG
E LE
. B
E A
TE
E D
. H
D O
O S
S E
X P
. U
R E
N TS
M E
. O
Y
E LE
U R
IN J
T S
IO
N
E N
K S
AT
OR
N T
R IS
CO
RP
C O
L Y
IC
O T
M P
AT
E L
E H
-O
-M
N N
C O
NN
F U
A R
BU
T O
19
85
R E
IL U
F A
8
: 65
PN
DUAL
(Serial # DUAL010000 - Up)
ga
l
1
1⁄2
l
1 ga
l
ga
1⁄2
Y
A D
R E
O R
C T
L E
S E
www.bunnomatic.com
™
Advertisement
Table of Contents

Related Manuals for Bunn Dual


Summary of Contents for Bunn Dual
- Page 1 O IL E LE N TS E LE IN J R IS IL U : 65 OPERATING & SERVICE MANUAL BUNN-O-MATIC CORPORATION POST OFFICE BOX 3227 SPRINGFIELD, ILLINOIS 62708-3227 PHONE: (217) 529-6601 FAX: (217) 529-6644 27040.0000F 01/04 ©1996 Bunn-O-Matic Corporation www.bunnomatic.com...
- Page 2 SOLE OPTION AS SPECIFIED HEREIN, TO REPAIR, REPLACEMENT OR REFUND. In no event shall BUNN be liable for any other damage or loss, including, but not limited to, lost profits, lost sales, loss of use of equipment, claims of Buyer’s customers, cost of capital, cost of down time, cost of substitute equipment, facilities or services, or any other special, incidental or consequential damages.
- Page 3 USER NOTICES The notices on this brewer should be kept in good condition. Replace unreadable or damaged labels. 00658.0000 00831.0000 20201.5600 00656.0000 12364.0000 ELECTRICAL REQUIREMENTS CAUTION - The brewer must be disconnected from the power source until specified in Initial Set-Up. L2 RED L2 RED 120V A.C.
- Page 4 " water supply line. A tight coil of copper tubing in the water line will facilitate moving the brewer to clean the countertop. Bunn-O-Matic does not recommend the use of a saddle valve to install the brewer. The size and shape of the hole made in the supply line by this type of device may restrict water flow.
- Page 5 REFERENCE CHART MECHANICAL BYPASS WITH ADJUSTABLE NEEDLE VALVE BYPASS PERCENTAGE VS NUMBER OF FULL TURNS FROM MAXIMUM CLOCKWISE POSITION SINGLE & DUAL BREWERS NUMBER OF FULL TURNS NOTE: The factory bypass is set at 20% 27040 011904 Page 5...
-
Page 6: Adjusting Brew Volumes
INITIAL SET-UP (cont.) 8. Repeat step 7 until the proper water volume is achieved. 9. Repeat steps 5 through 8 for the remaining brew station. 10. The brewer is now ready for use in accordance with the coffee brewing instructions. ADJUSTING BREW VOLUMES CAUTION - Disconnect the power source from the brewer prior to the removal of any panel for the replacement or adjustment of any component. - Page 7 INITIAL SET-UP (cont.) COFFEE BREWING 1. Select the desired batch size. 2. Insert a BUNN ® filter into the funnel. 3. Pour the proper amount of fresh ground coffee into the filter and level the bed of grounds by gently shaking.
- Page 8 TROUBLESHOOTING A troubleshooting guide is provided to suggest probable causes and remedies for the most likely problems encountered. If the problem remains after exhausting the troubleshooting steps, contact the Bunn-O-Matic Technical Service Department. • Inspection, testing, and repair of electrical equipment should be performed only by qualified service personnel.
- Page 9 TROUBLESHOOTING (cont.) Problem Probable Cause Remedy Brew cycle will not start (cont.) 3. ON/OFF switch Refer to Service - ON/OFF switch for testing procedures. See page 32 4. Start switch Refer to Service - Start switch for testing procedures. See page 37 5.
- Page 10 TROUBLESHOOTING (cont.) Probable Cause Remedy Problem 1. Brew Selector switch Refer to Service - Selector switch for Beverage level will not adjust testing procedures. See page 16 (Selector switch in any position) 1. Solenoid valve Refer to Service - Solenoid valve for Water flows into tank continuously testing procedures.
- Page 11 TROUBLESHOOTING (cont.) Problem Remedy Probable Cause Water from tank is not hot (cont.). Refer to Service - Relay for testing 6. Relay (Brewers with Recovery procedures. See page 34 Booster) Server warmer is not hot. Refer to Service - ON/OFF switch for 1.
- Page 12 Water overflows filter. 1. Bypass valve #7. For test procedures see page 15 Refer to Initial Set-Up on Page 5 2. Needle Valve step #7 BUNN ® paper filters should be used 3. Type of paper filters for proper extraction. Check sprayhead 4.
- Page 13 A clean sprayhead should be used to Weak beverage (cont.) 3. Sprayhead properly wet the bed of ground cof- fee in the funnel. The BUNN ® paper filter should be 4. Funnel loading centered in the funnel and the bed of ground coffee leveled by gentle shak- ing.
-
Page 14: Table Of Contents
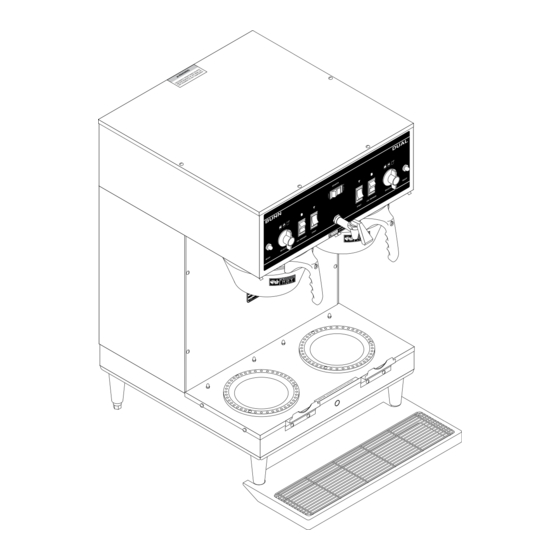
SERVICE The top cover is attached with four #4-40 slotted This section provides procedures for testing and head screws. replacing various major components used in this brewer should service become necessary. Refer to The front inspection panel is attached with five #6- Troubleshooting for assistance in determining the 32 slotted head screws. -
Page 15: Bypass Valve
SERVICE (cont.) 6. Connect the voltmeter lead ends to the bypass BYPASS VALVE valve coil terminals. Connect the brewer to the power source. With the selector switch in the 1 or 1-1/2 gallon position, place "ON/OFF" Switch in the "ON" position. Press and release the brew switch. The indication must be: a.) 120 volts ac for three wire 120/208 volt and three wire 120/240 volt models. -
Page 16: Brewer Selector Switch
SERVICE (cont.) 12. Reconnect the pink wire to the grind switch. BREW SELECTOR SWITCH 13. Disconnect the tan wire from the left or right selector switch and tan wire from interface socket. 14. Check for continuity across the tan wires. 15. - Page 17 SERVICE (cont.) WHI/VIO to Left or Right By-Pass Valve To Left or Right Timer WHI/RED to Left or Right Dispense Valve GRY to Left or Right Selector Switch to GRY Lead on Interface Socket PNK from Left Switch to Grinder Switch (Lower Left) PNK from Right Switch to Grinder Switch (Lower Right)
-
Page 18: Contactor Assembly
SERVICE (cont.) b.) 200 to 240 volts ac for two wire 200 or 240 volt CONTACTOR ASSEMBLY models. 5. Disconnect the brewer from the power source. If voltage is present as described, proceed to #6. If voltage is not present as described, refer to the Wiring Diagrams and check the brewer wiring har- ness. - Page 19 SERVICE (cont.) BLK T2 to Left Tank Heater RED L1 to Terminal Block BLK T2 to Right Tank Heater (Red Insert) CONTACTOR ASSEMBLY (cont.) RED T1 to Left Tank Heater BLK L2 to Terminal Block Test Procedures : RED T1 to Right Tank Heater (Black Insert) Electronic Control (Brewers w/Recovery Booster) 1.
-
Page 20: Control Thermostat
SERVICE (cont.) CONTROL THERMOSTAT b.) 200 to 240 volts ac for two wire 200 or 240 volt models. 4. Disconnect the brewer from the power source. If voltage is present as described, proceed to #5. If voltage is not present as described, refer to the Wiring Diagrams and check brewer wiring harness. - Page 21 SERVICE (cont.) CONTROL THERMOSTAT (cont.) Removal and Replacement: 1. Remove wires from the control thermostat. 2. Remove the thermostat capillary bulb by firmly pulling up on the capillary tube at the tank lid. This will disengage the grommet from the tank lid. BLU to Left &...
-
Page 22: Dispense Valve
SERVICE (cont.) 6. Check for continuity across the dispense valve coil DISPENSE VALVE terminals. If continuity is present as described, reconnect the wires to the dispense valve and proceed to #7 If continuity is not present as described, replace the dispense valve. - Page 23 SERVICE (cont.) ELECTRONIC CONTROL ASSEMBLY Location: The electronic control assembly (1) is located inside the lower left front on the component bracket of the brewer. Access will also be needed to the tempera- ture sensor (8), liquid level probe (7) located on the 1⁄2 1 ga 1⁄2...
- Page 24 PROBLEM: SERVICE (cont.) LIQUID LEVEL CONTROL OVERFLOWS ELECTRONIC CONTROL ASSEMBLY (cont.) DRAIN CUP BREW START- LOCK RETRY The water must be heated to the preset tempera- ture indicated by the glowing ready light before a brew cycle can be initiated. OVERFLOW If the ready light goes out during a brew cycle, the cycle will continue until it is completed.
- Page 25 SERVICE (cont.) ELECTRONIC CONTROL ASSEMBLY (cont.) 11. Move the probe away from the brewer housing. The indication must again be: 3. Disconnect brewer from the power source. a.) 208 volts ac for three wire 120/208 volt models and 240 volts ac for three wire120/240 volt If voltage was present as described, proceed to #4.
- Page 26 TANK HEATER (5) STILL BOILING REPLACE TRIAC (17) control of the system is operating properly. If voltage was not present as described, contact Bunn- O-Matic to order an electronic control assembly (1), REPLACE CONTROL ASSEMBLY (1) temperature sensor (8), and triac assembly (17) for P811 revaluation and proceed to #9.
- Page 27 If voltage was present as described, the temperature control of the system is operating properly. Return the new electronic control assembly (1) and temperature sensor (8) to Bunn-O-Matic for credit. t i l W a t e #7 BLU from Triac Assy...
-
Page 28: Electronic Control
SERVICE (cont.) ELECTRONIC CONTROL ASSEMBLY (cont.) Test Procedure: 1. Disconnect the brewer from the power source. 11. Install new triac/heat sink assembly on right tank 2. Remove all wires from the switch terminals. mounting bracket. 3. Place the selector switch in the left position. 12. -
Page 29: Level Control Board And Level Probe
SERVICE (cont.) If voltage is present as described, proceed to #5. LEVEL CONTROL BOARD AND LEVEL PROBE (Electro/ If voltage is not present as described, refer to the mechanical only) Wiring Diagrams and check brewer wiring harness. 5. Reconnect the violet wire to terminal 1. 6. - Page 30 SERVICE (cont.) LEVEL CONTROL BOARD AND LEVEL PROBE (Electro/ mechanical only) (cont.) T4 PNK to Probe 15. Move the probe's flat end to the brewer housing. T3 WHI to Terminal Block (White The indication must be 0. Insert on 120V Two Wire, 120/208V 16.
-
Page 31: Limit Thermostat
SERVICE (cont.) LIMIT THERMOSTAT If voltage is present as described, reconnect the black wire to the limit thermostat from the terminal block, the limit thermostat is operating properly. If voltage is not present as described, refer to the Wiring Diagrams and check brewer wiring harness. Removal and Replacement: 1. -
Page 32: On/Off Switch (Warmer)
SERVICE (cont.) ON/OFF SWITCH (Warmers) 6. Check for continuity across the center and lower left terminal with switch in the "ON" position. Continuity must not be present when switch is in the "OFF" position. If continuity is present as described, reconnect the black wire to the center terminal and the white/red wire on the left switch or the white/violet on the right switch 1⁄2... -
Page 33: Overflow Protection Switch
SERVICE (cont.) OVERFLOW PROTECTION SWITCH If voltage is present as described, proceed to #5. If voltage is not present as described, refer to the Wiring Diagrams and check brewer wiring harness. 5. Check for continuity across the overflow protec- tion switch red wires only until the plastic float is raised and check that continuity returns when the plastic float is again lowered. -
Page 34: Relay
SERVICE (cont.) RELAY (Brewers W/Recovery Booster) a.) 120 volts ac for three wire 120/208 volt models and three wire 120/240 volt models. NOTE - Electro/mechanically controlled brewers have b.) 200 to 240 volts ac for two wire 200 or 240 volt two relays and the electronically controlled have one. - Page 35 SERVICE (cont.) Relay (Brewers W/Recovery Booster) (cont.) 6. Check for continuity across the relay terminals 5 3. Check the voltage across the gray and white/green and 7 by manually closing relay contact. Continu- wire with left and right "ON/OFF" switch in the "ON" ity must not be present when contact is released.
-
Page 36: Solenoid
SERVICE (cont.) wires and proceed to #6. If continuity is not present as described, replace the SOLENOID VALVE (Inlet) solenoid valve. 6. Check the solenoid valve for coil action. Connect 1⁄2 1 ga 1⁄2 the brewer to the power source. Listen carefully in the vicinity of the solenoid valve for a "clicking"... -
Page 37: Start Switches (Brew)
SERVICE (cont.) If continuity is present as described, reconnect the START SWITCHES wires, the switch is operating properly. If continuity is not present as described, replace the switch. Removal and Replacement: 1. Remove all wires from the switch terminals. 2. Compress the clips inside the hood and gently push the switch through the opening. -
Page 38: Tank Heaters
SERVICE (cont.) tank heater(s). NOTE - If the tank heater remains unable to heat, TANK HEATERS remove and inspect the heater for cracks in the sheath. Electronic Models: 1. Disconnect the brewer from the power source. 2. Disconnect wires from heater(s). 3. -
Page 39: Timers (Early Models)
SERVICE (cont.) NOTE: ECA MODELS ONLY - Brewer must be at TIMERS (Early Models) operating temperature to perform step 5 or brew-lock must be bypassed. To bypass brew-lock disconnect white/orange wire and brown/black wire for right timer or orange wire and red/black wire for left timer from brew-lock of ECA and connect the harness leads together. - Page 40 SERVICE (cont.) Timers (Early Models)(cont.) WHI/RED TL1 to Left ON/OFF Switch WHI/VIO TL1 to Right ON/OFF Switch WHI/RED TL1 to Left Warmer Element WHI/VIO TL1 to Right Warmer Element WHI TL2 To Terminal Block and Warmer Element WHI TL2 To Terminal Block and Warmer Element (White Insert on 120/208V and 120/240V Three Pole (White Insert on 120/208V and 120/240V Three Pole Terminal Blocks)
- Page 41 SERVICE (cont.) Timers (Early Models)(cont.) WHI/RED TL1 to Left ON/OFF Switch WHI/VIO TL1 to Right ON/OFF Switch WHI/RED TL1 to Left Warmer Element WHI/VIO TL1 to Right Warmer Element WHI TL2 To Terminal Block and Warmer Element WHI TL2 To Terminal Block and Warmer Element (White Insert on120/208V or 20/240V Three (White Insert on 120/208V or 120/240V Three Pole Terminal Blocks)
-
Page 42: Digital Timer (Late Models)
SERVICE (cont.) 6. With a voltmeter, check the voltage across termi- TIMERS (Late Models) nals TL1 and TL4 when the "ON/OFF" switch is in the "ON" position. Connect the brewer to the power source. The indication must be 0 volts. If voltage is as described, proceed to #7. - Page 43 SERVICE (cont.) TIMERS (Late Models)(cont.) 1. Modifying brew volumes. To modify a brew vol- ume, first check that the SET/LOCK switch is in the “SET” position on the circuit board. To increase a brew volume, place the ON/OFF switch in the “ON” position, press and hold the START switch until three clicks are heard.
-
Page 44: Warmer Elements
SERVICE (cont.) 5. Check the continuity across the two terminals on the warmer element. WARMER ELEMENTS If continuity is present as described, reconnect the white or red and white/red wires on the left warmer element or the white or red and white/violet wires on the right warmer element. - Page 45 SCHEMATIC WIRING DIAGRAM DUAL BREWER (W/TWO-GRINDER INTERFACE) LIMIT THERMOSTAT BLK-12 BLK-12 BLK-12 RED-12 TANK HEATERS (TWO) RED-12 BLK-12 RED-12 N.O. READY INDICATORS N.O. OVERFLOW SW. & THERMOSTAT PROTECTION SW OPTIONAL RECOVERY BOOSTER LIQUID LEVEL K2 N.O. K3 N.O. BOARD PIN-20...
- Page 46 SCHEMATIC WIRING DIAGRAM DUAL-A & -B BREWER (W/TWO-GRINDER INTERFACE) GRN/YEL LIMIT THERMOSTAT BLK-12 BLK-12 BLK-12 RED-12 TANK HEATERS (TWO) BLK-12 RED-12 RED-12 N.O. READY INDICATORS N.O. OVERFLOW SW. & THERMOSTAT PROTECTION SW OPTIONAL RECOVERY BOOSTER LIQUID LEVEL K2 N.O. K3 N.O.
- Page 47 SCHEMATIC WIRING DIAGRAM DUAL BREWER ECA (W/TWO-GRINDER INTERFACE) OPTIONAL RECOVERY BOOSTER LIMIT BLU-12 RED-12 THERMOSTAT K1 N.O. BLK-12 BLK-12 BLU-12 TANK HEATERS (TWO) BLK-12 BLU-12 BLU-12 WHI-12 t° WHI/BRN TANK HEATER READY PIN 20 L.E.D. (PROBE) INTERLOCK ASSY BRN/BLK ELECTRONIC...
- Page 48 SCHEMATIC WIRING DIAGRAM DUAL-A & -B BREWER ECA (W/TWO-GRINDER INTERFACE) GRN/YEL OPTIONAL RECOVERY BOOSTER LIMIT BLU-12 RED-12 THERMOSTAT K1 N.O. BLK-12 BLK-12 BLU-12 TANK HEATERS (TWO) BLK-12 BLU-12 BLU-12 WHI-12 t° WHI/BRN TANK HEATER READY PIN 20 L.E.D. (PROBE) INTERLOCK...
- Page 49 SCHEMATIC WIRING DIAGRAM DUAL BREWER (W/ONE-GRINDER INTERFACE) LIMIT THERMOSTAT BLK-12 BLK-12 BLK-12 RED-12 TANK HEATERS (TWO) RED-12 BLK-12 RED-12 N.O. READY INDICATORS N.O. OVERFLOW SW. & THERMOSTAT PROTECTION SW OPTIONAL RECOVERY BOOSTER LIQUID LEVEL K2 N.O. K3 N.O. BOARD PIN-20...
- Page 50 SCHEMATIC WIRING DIAGRAM DUAL BREWER ECA (W/ONE-GRINDER INTERFACE) OPTIONAL RECOVERY BOOSTER LIMIT BLU-12 RED-12 THERMOSTAT K1 N.O. BLK-12 BLK-12 BLU-12 TANK HEATERS (TWO) BLK-12 BLU-12 BLU-12 WHI-12 t° WHI/BRN TANK HEATER READY PIN 20 L.E.D. (PROBE) INTERLOCK ASSY BRN/BLK ELECTRONIC...
- Page 51 SCHEMATIC WIRING DIAGRAM DUAL-A & -B BREWER (W/ONE-GRINDER INTERFACE) GRN/YEL LIMIT THERMOSTAT BLK-12 BLK-12 BLK-12 RED-12 TANK HEATERS (TWO) BLK-12 RED-12 RED-12 N.O. READY INDICATORS N.O. OVERFLOW SW. & THERMOSTAT PROTECTION SW OPTIONAL RECOVERY BOOSTER LIQUID LEVEL K2 N.O. K3 N.O.
- Page 52 SCHEMATIC WIRING DIAGRAM DUAL-A & -B BREWER ECA (W/ONE-GRINDER INTERFACE) GRN/YEL OPTIONAL RECOVERY BOOSTER LIMIT BLU-12 RED-12 THERMOSTAT K1 N.O. BLK-12 BLK-12 BLU-12 TANK HEATERS (TWO) BLK-12 BLU-12 BLU-12 WHI-12 t° WHI/BRN TANK HEATER READY PIN 20 L.E.D. (PROBE) INTERLOCK...
-
Page 53: Schematic Wiring Diagram
SCHEMATIC WIRING DIAGRAM WHI/VIO DUAL BREWER W/DIGITAL BREWER CONTROL 120V.A.C. 208 0R 240V.A.C. 120V.A.C. WHI/RED J1-1 WHI/RED RT ON/OFF SW RT WARMER WHI/RED WHI/RED OPTIONAL RT BREW RT BYPASS RT LIMIT T'STAT RT TANK HEATER TRIAC WHI/VIO WHI/GRN WHI/GRN LT ON/OFF SW...
Need help?
Do you have a question about the Dual and is the answer not in the manual?
Questions and answers