
Related Manuals for Akai ATT10U


Summary of Contents for Akai ATT10U
- Page 1 OperatorÕs manual PROFESSIONAL USB TURNTABLE ATT10U Bedienungsanleitung 4-14 (GB) 48-58...
- Page 2 These Operating Instructions accompany this product. They contain important information on setting up and using the device. You should refer to these instructions, even if you are buying this product for someone else. Please retain these Operating Instructions for future use! A list of the contents can be found in the Table of contents, with the corresponding page number, on page 49.
-
Page 3: Table Of Contents
Table of contents Page Introduction 1. Intended use 2. Delivery contents 3. Explanation of symbols 4. Safety instructions 5. Operating elements A) Top side B) Rear panel 6. Setup and connection A) Setup B) Connection C) Connecting to mains D) Replacing the cartridge 7. -
Page 4: Intended Use
1. Intended Use The turntable is intended to play garmophone records at 33 1/3, 45 or 78 rpm. It should be connected to a sound amplifer or a mixing desk with appropriate phono inputs or to computer with USB connection. After installing the included software, you can record or edit audio signals from the turntable to your personal computer. -
Page 5: Explanation Of Symbols
3. Explanation of symbols The following symbols must be observed: The lightning symbol with arrowhead within an equilateral triangle is intended to alert the user to the presence of uninsulated voltage within the device’s enclosure that may be of sufficient magnitude to constitute a risk of electrical shock to persons. -
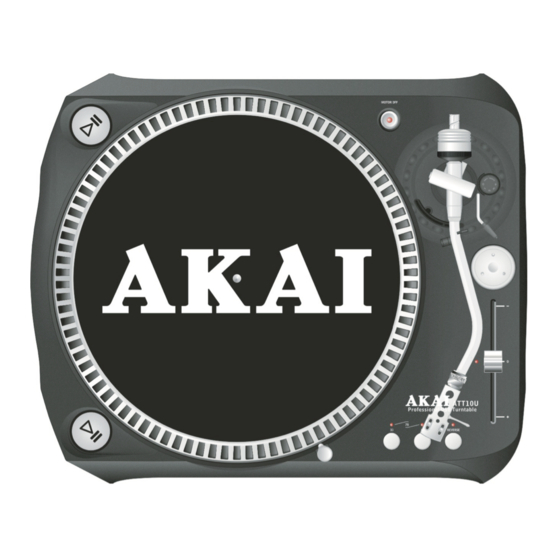
Page 6: Operating Elements
5. Operating elements (see fold-out, page 3) A) Top side “ ” buttons (both buttons have the same function) Platter Drive hub LED needle light Speed selection buttons (“33” and “45”) “REVERSE” button Headshell Pitch control slider Tone arm 10. Tone arm rest and clamp 11. -
Page 7: B) Connection
B) Connection Connecting to other audio devices Connect the phono outputs (16) of the turntable to the phono inputs of an ampliÞer or a mixing desk through the provided phono cable (red = right channel; white = left channel). Depending on the type of phono inputs of the connecting device, the “PHONO/ LINE” selection switch (17). -
Page 8: D) Replacing The Cartridge
D) Replacing the cartridge Replace the cartridge after roughly 400 hours of use. The cartridge included in the product is Audio- Technica AT3600L. ® Switch off the turntable. Secure the tone arm (9) to the tone arm rest with the clamp (10). Turn the fastening collar clockwise and then detach the headshell (7). -
Page 9: Operation
7. Operation A) Blancing the counterweight Make sure the turntable is level. Place the tone arm (9) between the platter (2) and the tone arm rest (10). Remove the stylus guard. Twist the counterweight (13) back and forth until the tone arm (9) hover perfectly horizontally Carefully support the tone arm (9) with a finger to avoid it falling and thus damage the stylus. -
Page 10: Maintenance
8. Maintenance Clean the stylus tip frequently, using a soft brush with a back to front motion only. The exterior of the turntable should be cleaned with a dry, clean and soft cloth only. Do not use carbon-containing cleaning agents, petrol, alcohol or similar substances for cleaning purposes. Before moving the turntable, unplug it from the mains socket and fasten the tone arm to the tone arm rest with the clamp. -
Page 11: Troubleshooting
9. Troubleshooting In purchasing the wireless camera system, you have acquired a reliable, state-of-the-art product. Problems and malfunctions may, however, still arise. For this reason, the following is a description of how you can eliminate possible malfunctions yourself. Always adhere to the safety instructions! Error Possible cause •... -
Page 12: Disposal
Tracking error angle: Start- and Stop-time: <1 s Time for speed alteration: <1 s Effective tone arm: 230.5 mm Cartridge weight: 6-10g Dimensions(LxWxH): 370 x 449 x 145 mm Weight: 3,8 kg For more information and warranty conditions, please visit: www.akai.eu...
Need help?
Do you have a question about the ATT10U and is the answer not in the manual?
Questions and answers