Table of Contents
Advertisement
Advertisement
Table of Contents

Subscribe to Our Youtube Channel
Related Manuals for DITTING KE 640


Summary of Contents for DITTING KE 640
-
Page 1: Operating Instructions
Operating Instructions KE 640 Grind-on-Demand“ ” KE 640 KE 640 Vario... - Page 2 Dear customer / service personnel the ”Single Espresso Grinder KE 640” is a fully automatic espresso coffee grinder of the proven Ditting quality. We have developed this product with over 80 years of experience in the manufacture of coffee grinders assuring you of high quality grind- ing of espresso and other types of coffee beans.
-
Page 3: Table Of Contents
Table of contents Page Page 1. Safety 8. Cleaning 1.1 Symbols 8.1 Cleaning with GRINDZ™ Grinder Cleaner 1.2 Safety Instructions 8.2 Cleaning the Grinder Placement Surface 1.3 Usage Purpose 8.3 Cleaning the Grinder Casing 1.4 Personnel Requirements 8.4 Cleaning the Hopper 2. -
Page 4: Safety
1.2 Safety Instructions failure to observe these instructions. Only whole roasted coffee beans may be ground in the KE 640. Children can not appreciate the dangers that can exist in the operation When unpacking please inspect whether the power supply (voltage) of electrical grinders. -
Page 5: Usage Purpose
2. Technical Data 1.3 Usage Purpose Only whole roasted coffee beans may be ground in the KE 640 grinder. Never use the grinder to grind other products or objects. Type KE 640, KE 640 Vario 1.4 Personnel Requirements Voltage/Frequency 200-230V / 50/60Hz No special requirements are necessary for the users of this grinder. -
Page 6: Description
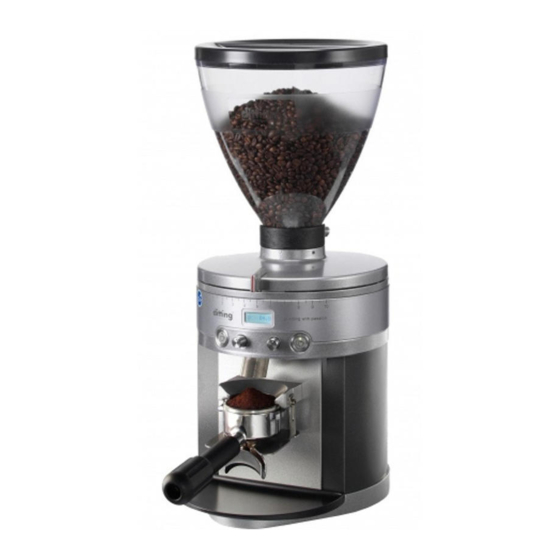
3. Description Main Components and Operating Elements The main components and operating elements are pictured in the il- lustration. Pos. 1 Hopper with lid Pos. 2 Lock screw for hopper Pos. 3 Grinding fineness adjustment* Pos. 4 Lock screw for grind adjustment lid Pos. -
Page 7: Safety Devices Of The Grinder
4. Safety Devices of the Grinder 5. Set-up and Basic Adjustment A grinding test run is carried out on each grinder in our factory. This is Thermal overload circuit breaker why you may find ground material residue in the grinding The motor of the grinder is protected by a thermal overload circuit mechanism! breaker, which interrupts the motor’s electric circuit in the event of... -
Page 8: Electrical Installation
5.3 Electrical installation In case the port-a-filter rest does not fit your espres- so machine’s port-a-filter, please contact us or your Protect your device with separate pre-fuses (not in- local dealer. We will be happy to send you a differ- cluded in the scope of delivery) according to the in- ent rest. -
Page 9: Grind Adjustment
6.1.1 Actuate the main switch on the rear of the grinder (pos. 19). 6.1.2 Open the hopper. Pour whole roasted espresso beans into the hopper from above. Never pour in coffee powder. Close the hopper. Rotation to the left = fine Rotation to the right = coarse 6.1.3 Check whether the hopper slide (pos.18) is open. -
Page 10: Quick Adjustment Of Grinding Time
6.4 Software menu Display 6.3 Quick Adjustment of Grinding Time (= amount of coffee) The factory settings for the grinding times are 2 seconds for the single shot and 4 seconds for the double shot. To enter the menu: In order to adjust the amount of ground espresso coffee individually Press and hold for 3 sec: follow the steps below: MENU... - Page 11 6.4.1 Adjust the grinding time (dosing) • Scroll down with the single button to the display reading SC. The • Simultaneously press and hold both buttons (pos. 8+10) for appr. 3 figure shows the total number of single shots that were ground on seconds.
- Page 12 Resetting the cleaning counter: Enter the menu by pushing and hold- A disc change should always be carried out by a ing both buttons for appr. 3 seconds. Scroll through the menu with trained service technician in order to assure correct the single pre-selection button (pos.
-
Page 13: Operating Faults
7. Operating faults Defect Cause Remedy Defect Cause Remedy The grinder hums but The spout is Set grinding fineness to The grinder does not The main plug is not Insert the main plug into the does not grind. clogged. “coarse” and trigger the start, the operating inserted. -
Page 14: Cleaning
8. Cleaning 8.2 Cleaning the grinder placement surface You should clean your espresso grinder regularly, just like your espresso machine. Grind-on-demand grinders in particular have to be Pull out the mains plug! kept clean and residue free in order to ensure dosing accuracy for every shot and every customer. -
Page 15: Service
9. Service 9.1.2 Switch off the grinder and pull the mains plug. Place the grinder on its side and unscrew the fastening screws. Store the screws and washers in a safe place. Re-position the grinder on its rubber feet. Always pull out the main plug from the socket before carrying out maintenance or cleaning work on the 9.1.3 Remove the lid’s safety screw (pos. - Page 16 9.1.6 Insert the new built-in grinder into the casing. Therefore turn the grind adjustment of the built-in grinder to the right red mark 2 for refitting the grinder’s lid. Check for the correct position of the flat spring in the built-in grinder’s spout. It has to extend into the 9.1.9 Replace the grinder’s lid on the grinder and adjust to the desired spout instead of laying on top of the spout tube.
-
Page 17: Grinding Disc Exchange
9.1.11. Replace the hopper in the bayonet, fasten the safety screw and 9.3 Recalibration of the grind adjustment open the hopper slider. Due to wear and tear fo the grinding discs or after exchanging them the Zero-grind-adjustment has to be recalibrated. 9.2 Grinding disc exchange The grinding discs should be exchanged if any of the following symp- •... -
Page 18: Spare Parts
• Insert the sealing ring again. If the sealing ring is damaged, it must be replaced. • Refit the hopper and fasten the safety screw. Open the hopper slide. 10. Spare Parts Spare parts are usually ordered from your customer service centre or your local dealer. -
Page 19: Wiring Diagram
11. Wiring Diagram 11.1 Diagram 100-115V 50/60Hz Page 16... -
Page 20: Diagram 200-230V 50/60Hz, 240V/50Hz
11.2 Diagram 200-230V 50/60Hz, 240V/50Hz Page 17... -
Page 21: Certificate
Maschinenbezeichnung : Espressomühle vicing, usage for purposes other than those intended, incorrect Maschinentyp : KE 640, KE 640 Vario installation, incorrect voltage, breakage, natural wear or for rea- sons beyond our sphere of influence. den Verfügungen der Maschinenrichtlinie 98/37/EG, der Nieder-... - Page 22 NOTES Page 19...
- Page 23 NOTES Page 20...
- Page 24 Ditting Maschinen AG Bramenstrasse 11 CH- 8184 Bachenbülach, Switzerland Tel.: +41 (0)44 864 1800 Fax: +41 (0)44 864 1801 info@dittingswiss.ch www.dittingswiss.ch October 2011 Subject to change without prior notice!
Need help?
Do you have a question about the KE 640 and is the answer not in the manual?
Questions and answers