Table of Contents
Advertisement
Quick Links
Download this manual
See also:
User Manual
Advertisement
Table of Contents

Related Manuals for Digital Projection HIGHlite 660 Series


Summary of Contents for Digital Projection HIGHlite 660 Series
-
Page 1: User Manual
USER MANUAL INSTALLATION AND QUICK-START GUIDE CONNECTION GUIDE OPERATING GUIDE HIGHlite 660 Series REFERENCE GUIDE High Brightness Digital Video Projector Rev G July 2014 112-668G... - Page 2 NOTE: this symbol indicates that there is some important information that you should read. Product revision Because we at Digital Projection continually strive to improve our products, we may change specifications and designs, and add new features without prior notice.
- Page 3 Digital Projection HIGHlite 660 Series Introduction Notes Congratulations on your purchase of this Digital Projection product. Your projector has the following key features: • Full range of digital and legacy analog inputs • Control of most aspects of the projector’s operation via LAN and RS232 •...
-
Page 4: Table Of Contents
Digital Projection HIGHlite 660 Series CONTENTS INSTALLATION AND QUICK-START GUIDE Adjusting the image................17 ......1 ..................17 Orientation WHAT’S IN THE BOX? ..............3 ................... 17 Keystone CONNECTING THE POWER SUPPLY ..........4 ....................17 Picture PROJECTOR OVERVIEW ............... 5 Front and rear views ................ - Page 5 Digital Projection HIGHlite 660 Series CONTENTS (continued) Lamps menu ..................54 USING THE PROJECTOR ............. 31 Main menu ..................31 Setup menu ..................55 Lens menu ..................32 ................55 Reset Default Settings ....................32 ................56 Zoom Input Configuration ....................
- Page 6 Digital Projection HIGHlite 660 Series CONTENTS (continued) SCREEN REQUIREMENTS ............82 POSITIONING THE IMAGE ............106 Fitting the image to the DMD™ ............82 Maximum offset range ............... 108 ............82 1080p images displayed full width INPUT CONNECTIONS ............... 109 ............
- Page 7 Digital Projection HIGHlite 660 Series CONTENTS (continued) APPENDIX B: SUPPORTED SIGNAL INPUT MODES ....121 APPENDIX C: GLOSSARY OF TERMS ........124 Rev G July 2014...
- Page 8 Digital Projection HIGHlite 660 Series This page is intentionally left blank.
-
Page 9: Installation And Quick-Start Guide
INSTALLATION AND QUICK-START GUIDE HIGHlite 660 Series High Brightness Digital Video Projector Rev G July 2014... -
Page 10: Connecting The Power Supply ............................................. 4
Digital Projection IN THIS GUIDE Installation and Quick-Start Guide HIGHlite 660 Series IN THIS GUIDE What’s In The Box? ..................... 3 Connecting The Power Supply ................ 4 Projector Overview ..................... 5 Front and rear views ....................Control panel indicators ..................... -
Page 11: What's In The Box
Digital Projection WHAT’S IN THE BOX? Installation and Quick-Start Guide HIGHlite 660 Series What’s In The Box? Notes Make sure your box contains everything listed. If any pieces are missing, contact your dealer. Only one remote will be supplied with the projector. For more... - Page 12 Digital Projection CONNECTING THE POWER SUPPLY Installation and Quick-Start Guide HIGHlite 660 Series Connecting The Power Supply Notes Lift the cable lock up, push the mains connector in firmly and push the lock down to secure the cable. Use only the power cable provided.
-
Page 13: Projector Overview
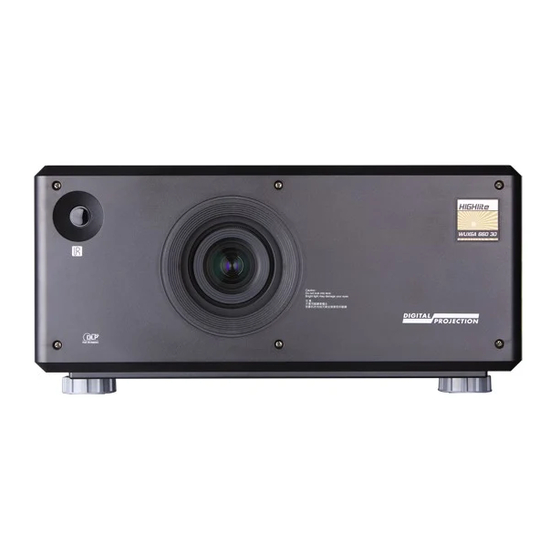
Digital Projection PROJECTOR OVERVIEW Installation and Quick-Start Guide HIGHlite 660 Series Projector Overview Notes Front and rear views Front infrared window Lens Air outlet Adjustable feet Control panel Rear infrared window Front view Connection panel Power switch and power connection... -
Page 14: Control Panel Indicators
Digital Projection PROJECTOR OVERVIEW Installation and Quick-Start Guide HIGHlite 660 Series Control panel indicators Notes During startup all LEDs light up at the same time to indicate the Power indicator projector is carrying out a self-test. Behavior Meaning The projector is switched off. -
Page 15: Remote Control
Digital Projection REMOTE CONTROL Installation and Quick-Start Guide HIGHlite 660 Series Remote Control Notes The projector is equipped with one of the remote control devices shown here. The device on the left (105-023 Rev B) was introduced in June 2013; a projector purchased before that date is equipped with the device on the right, 105-023 Rev A. -
Page 16: Remote Control 105-023 Rev B
Digital Projection REMOTE CONTROL Installation and Quick-Start Guide HIGHlite 660 Series Remote control 105-023 Rev B Notes Transmit indicator Flashes when the remote control sends a signal to the projector. Only the controls shown highlighted Lights solidly when the projector is in LENS ADJUSTMENT mode. - Page 17 Digital Projection REMOTE CONTROL Installation and Quick-Start Guide HIGHlite 660 Series Remote control 105-023 Rev B - continued from previous page Notes Lens controls Adjust position, zoom and focus. Only the controls shown highlighted are used on this projector. PIP ON/OFF When in PIP mode, display or hide the PIP image.
-
Page 18: Remote Control 105-023 Rev A
Digital Projection REMOTE CONTROL Installation and Quick-Start Guide HIGHlite 660 Series Remote control 105-023 Rev A Notes Transmit indicator Flashes when the remote control sends a signal to the projector. Only the controls shown highlighted Lights solidly when the projector is in LENS ADJUSTMENT mode. -
Page 19: Positioning The Screen And Projector
Digital Projection POSITIONING THE SCREEN AND PROJECTOR Installation and Quick-Start Guide HIGHlite 660 Series Positioning The Screen And Projector Notes Install the screen, ensuring that it is in the best position for viewing by your audience. Always allow the projector to... -
Page 20: Changing The Lens
Digital Projection CHANGING THE LENS Installation and Quick-Start Guide HIGHlite 660 Series Changing The Lens Notes Inserting a new lens Before changing the lens, Remove the six screws securing the front cover to the body of always make sure the projector the projector. -
Page 21: Removing The Lens
Digital Projection CHANGING THE LENS Installation and Quick-Start Guide HIGHlite 660 Series Removing the lens Notes Remove the six screws securing the front cover to the body of the projector. Remove the front cover from the projector. Before changing the lens,... -
Page 22: Operating The Projector
Digital Projection OPERATING THE PROJECTOR Installation and Quick-Start Guide HIGHlite 660 Series Operating The Projector Notes Switching the projector on Connect the power cable between the mains supply and the projector. Switch on at the switch next to the power connector. -
Page 23: Selecting An Input Signal Or Test Pattern
Digital Projection OPERATING THE PROJECTOR Installation and Quick-Start Guide HIGHlite 660 Series Selecting an input signal or test pattern Notes Input signal Connect an image source to the projector. For full details of how to use the controls and the menu system, see... -
Page 24: Adjusting The Lens
Digital Projection OPERATING THE PROJECTOR Installation and Quick-Start Guide HIGHlite 660 Series Adjusting the lens Notes The lens can be adjusted using the Lens menu, or: Zoom When any of the three lens • adjustment buttons is pressed, Press ZOOM... -
Page 25: Adjusting The Image
Digital Projection OPERATING THE PROJECTOR Installation and Quick-Start Guide HIGHlite 660 Series Adjusting the image Notes Orientation • Main Menu This can be set from the Setup menu. Setup Select the orientation which suits the positioning of the projector. Lens shift works from the audience’s perspective, regarless of projector orientation. - Page 26 Digital Projection Installation and Quick-Start Guide HIGHlite 660 Series This page is intentionally left blank.
-
Page 27: Connection Guide
CONNECTION GUIDE HIGHlite 660 Series High Brightness Digital Video Projector Rev G July 2014... - Page 28 Digital Projection IN THIS GUIDE Connection Guide HIGHlite 660 Series IN THIS GUIDE Signal Inputs And Outputs ................21 Control Connections ..................23 Rev G July 2014...
-
Page 29: Signal Inputs And Outputs
Digital Projection SIGNAL INPUTS AND OUTPUTS Connection Guide HIGHlite 660 Series Signal Inputs And Outputs Notes Component For a complete listing of pin When using RGsB or RGBS: • configurations for all signal and Set Component Colour Space in the Setup/Input... - Page 30 Digital Projection SIGNAL INPUTS AND OUTPUTS Connection Guide HIGHlite 660 Series Signal Inputs And Outputs (continued) Notes Composite 1 (CVBS 1) For a complete listing of pin configurations for all signal and Connect a Composite Video input signal to the BNC Wiring connector.
-
Page 31: Control Connections
IR sensor within range of the operator. Service port The Service port is used to download, via USB, firmware updates issued from time to time by Digital Projection. Rev G July 2014... - Page 32 Digital Projection Connection Guide HIGHlite 660 Series This page is intentionally left blank.
-
Page 33: Operating Guide
OPERATING GUIDE HIGHlite 660 Series High Brightness Digital Video Projector Rev G July 2014... - Page 34 Digital Projection IN THIS GUIDE Operating Guide HIGHlite 660 Series IN THIS GUIDE Using The Menus ....................27 Segmentation ........................Menus and sub-menus ..................... Blend Width ........................Drop-down lists ......................Black Level Uplift ......................Sliders ........................Reduce Black Level Uplift Width ..................
-
Page 35: Using The Menus
Digital Projection USING THE MENUS Operating Guide HIGHlite 660 Series Using The Menus Notes Use the buttons on the projector control panel or on the remote control, to access the menu system. Some menu items may not be • To open or close the on-screen display (OSD), press... -
Page 36: Drop-Down Lists
Digital Projection USING THE MENUS Operating Guide HIGHlite 660 Series Drop-down lists Notes To use a drop-down list: Navigate to the drop-down list in the menu and Some menu items may not be press available due to settings in other menus. -
Page 37: Sliders
Digital Projection USING THE MENUS Operating Guide HIGHlite 660 Series Sliders Notes To use a slider, press the LEFT RIGHT arrow buttons to adjust it. Some menu items may not be available due to settings in other menus. These will be grayed out on the actual menu. -
Page 38: Editing Fields
Digital Projection USING THE MENUS Operating Guide HIGHlite 660 Series Editing fields Notes Some features require a text or numeric field to be edited. To edit a field, first select it using the LEFT RIGHT arrow buttons, then press Some menu items may not be... -
Page 39: Using The Projector
Digital Projection USING THE PROJECTOR Operating Guide HIGHlite 660 Series Using The Projector Notes See also Using The Menus earlier Menu Map in this guide and later in Main menu this guide. • Input Selection Main Menu Select an input source from the drop-down list. -
Page 40: Lens Menu
Digital Projection USING THE PROJECTOR Operating Guide HIGHlite 660 Series Lens menu Notes Zoom Main Menu To move the lens in or out: Lens Select Zoom In Zoom Out , then press When the image is the desired size, select... -
Page 41: Image Menu
Digital Projection USING THE PROJECTOR Operating Guide HIGHlite 660 Series Image menu Notes • Brightness Contrast Gamma Saturation Set the slider or select from the drop-down list as required, to improve the quality of the image. Main Menu Image •... -
Page 42: Color Menu
Digital Projection USING THE PROJECTOR Operating Guide HIGHlite 660 Series Color menu Notes Gamut Main Menu Peak gives you the brightest possible image. Color Choose HDTV for high definition standards and SDTV for standard definition standards. A value between selects the relevant color temperature. -
Page 43: Geometry Menu
Digital Projection USING THE PROJECTOR Operating Guide HIGHlite 660 Series Geometry menu Notes Aspect Ratio Main Menu Choose between Source Fill Display Fill & Crop, Anamorphic and TheaterScope Geometry Some devices (eg certain DVD players) pack a 16:9 image into a 4:3 aspect ratio. In such cases to display the image correctly, choose the Anamorphic aspect ratio. -
Page 44: Size & Position
Digital Projection USING THE PROJECTOR Operating Guide HIGHlite 660 Series Size & Position Notes • Enable • to choose: Setting Main Menu Geometry , in which case these settings will be applied to all signals on all inputs. Global Size & Position Per Mode , in which case these settings will be applied only to the current input signal. -
Page 45: Geometry Engine
Digital Projection USING THE PROJECTOR Operating Guide HIGHlite 660 Series Geometry Engine Notes Choose from Keystone Cornerstone Rotation Warp • is set to , set the sliders to correct Geometry Engine Keystone H Keystone V Keystone Main Menu for any distortion caused by the projector being in a different horizontal or vertical plane to the Geometry screen. - Page 46 Digital Projection USING THE PROJECTOR Operating Guide HIGHlite 660 Series Geometry Engine (continued) Notes Keystone settings Main Menu Geometry Projector to the left The projector is positioned If possible, position the projector to the left of the screen. facing the screen at a right angle to To correct, apply a positive avoid geometry corrections.
- Page 47 Digital Projection USING THE PROJECTOR Operating Guide HIGHlite 660 Series Geometry Engine (continued) Notes Main Menu Geometry Some items on this menu may • is enabled if is set to Keystone or Rotation. Pincushion / Barrel Geometry Engine be unavailable depending on the Geometry Engine setting.
- Page 48 Digital Projection USING THE PROJECTOR Operating Guide HIGHlite 660 Series Geometry Engine (continued) Notes Main Menu Geometry Some items on this menu may be unavailable depending on the Geometry Engine setting. • is set to Rotation, set the slider to rotate the image on the screen.
- Page 49 Warp Map Geometry Engine setting. Using DP Warp Generator, an external Digital Projection computer application, up to eight customised warp maps can be created and uploaded to the projector. If Geometry Engine is set to Warp, and any warp maps have been uploaded, you can select from the drop-down list.
- Page 50 Digital Projection USING THE PROJECTOR Operating Guide HIGHlite 660 Series Geometry Engine (continued) Notes Main Menu Geometry Cornerstone Cornerstone Cornerstone is selected from the main Geometry page, you can use the sliders to stretch the image from each of the four corners.
-
Page 51: Edge Blend Menu
Digital Projection USING THE PROJECTOR Operating Guide HIGHlite 660 Series Edge Blend menu Notes When several projectors are used to create a large tiled image, the edges need to be blended to avoid the overlaps appearing brighter than the rest of the image. The Edge Blend menu is available only... -
Page 52: S-Curve Value
Digital Projection USING THE PROJECTOR Operating Guide HIGHlite 660 Series S-Curve Value Notes • In the regions where two or more projectors overlap, the brightness of the signal is decreased to blend the images. controls the steepness of this decrease. - Page 53 Digital Projection USING THE PROJECTOR Operating Guide HIGHlite 660 Series S-Curve Value (continued) Notes When images overlap, the area of overlap receives light from all overlapping sources. Without S-Curve, the overlapping edges would be brighter than the rest of the image, as shown in Fig. 1.
-
Page 54: Blending
Digital Projection USING THE PROJECTOR Operating Guide HIGHlite 660 Series Blending Notes This setting enables s-curve blending, or displays an align pattern to help define overlaps between segments. Main Menu Blending Edge Blend This menu is available only when Edge Blend is not used. -
Page 55: Segmentation
Digital Projection USING THE PROJECTOR Operating Guide HIGHlite 660 Series Segmentation Notes Segmentation can be used if the same image is fed into each projector. • , every projector in the array will display the whole image. Segmentation Main Menu Edge Blend •... - Page 56 Digital Projection USING THE PROJECTOR Operating Guide HIGHlite 660 Series Segmentation (continued) Notes An example array: Main Menu Edge Blend For additional information, see Edge Blend And Black Level Uplift the Reference Guide. Image source DVD player, Blu-Ray, computer, etc.
-
Page 57: Blend Width
Digital Projection USING THE PROJECTOR Operating Guide HIGHlite 660 Series Blend Width Notes Use this to set the width of the blended regions. Top Blend Region To apply the settings in these menus, use the Apply command at Bottom Blend Region the bottom of each page. -
Page 58: Reduce Black Level Uplift Width
Digital Projection USING THE PROJECTOR Operating Guide HIGHlite 660 Series Reduce Black Level Uplift Width Notes Use this to correct for stray light from the pond of mirrors, the DMD’s inactive outermost mirrors. Main Menu Edge Blend Reduce Black Level Uplift Width... - Page 59 Digital Projection USING THE PROJECTOR Operating Guide HIGHlite 660 Series Reduce Black Level Uplift Width (continued) Notes A detailed view of one of the projectors in a Main Menu two-projector array: Edge Blend Reduce Black Level Uplift Width Black level uplift region This image occupies the left half of a two-projector array.
- Page 60 Digital Projection USING THE PROJECTOR Operating Guide HIGHlite 660 Series Reduce Black Level Uplift Width (continued) Notes In the Reduce Black Level Uplift Main Menu menu, settings correspond Width Edge Blend Reduce Black Level Uplift Width to coordinates within the unblended regions.
-
Page 61: Pip Menu
Digital Projection USING THE PROJECTOR Operating Guide HIGHlite 660 Series PIP menu Notes Two images can be combined, in three different ways using this feature. The PIP menu is available only when Setup > System > Configuration is set to... -
Page 62: Lamps Menu
Digital Projection USING THE PROJECTOR Operating Guide HIGHlite 660 Series Lamps menu Notes Operation to choose between Lamp 1 + Lamp 2 Lamp 1 Lamp 2 Auto 1 . In the Auto 1 mode, the lamp usage will be spread evenly over the two lamps, over time. -
Page 63: Setup Menu
Digital Projection USING THE PROJECTOR Operating Guide HIGHlite 660 Series Setup menu Notes • Orientation Depending on how the projector is mounted, select the appropriate setting from the drop-down Main Menu Setup list. • Latency Affects interlaced sources only. For fastest response, the... -
Page 64: Input Configuration
Digital Projection USING THE PROJECTOR Operating Guide HIGHlite 660 Series Input Configuration Notes This menu allows adjustment of various technical parameters specific to each of the signal inputs: • should normally be set to except when you are having problems with a long... -
Page 65: Network
Digital Projection USING THE PROJECTOR Operating Guide HIGHlite 660 Series Network Notes The fields at the bottom of the menu show the current settings. • if the IP Address is to be assigned by a DHCP server, or if it is to be set here. -
Page 66: On Screen Display
Digital Projection USING THE PROJECTOR Operating Guide HIGHlite 660 Series On Screen Display Notes • Select a display Language from the drop-down list. • The menus will disappear if no buttons are pressed within the selected from the drop- Timeout Main Menu down list. -
Page 67: System
Digital Projection USING THE PROJECTOR Operating Guide HIGHlite 660 Series System Notes • Configuration : switch between Edge Blend Main Menu Setup • to set an address for the remote control. IR Address System The other settings in this menu are provided mainly to allow control from the Virtual OSD. -
Page 68: Setting Up An Ir Address
Digital Projection USING THE PROJECTOR Operating Guide HIGHlite 660 Series Setting up an IR address Notes The projector and the remote control need a matching IR address: a two-digit number Main Menu between 00 and 99. Setup System The default IR address is 00. This is also a master address, which, if assigned to a remote, will work regardless of the value assigned to the projector. -
Page 69: Information Menu
Digital Projection USING THE PROJECTOR Operating Guide HIGHlite 660 Series Information menu Notes This menu gives information about lamp operating times, software and hardware configuration, input source and network settings. Please note that the values shown in the menus on this page are examples and may differ significantly on your OSD. -
Page 70: Menu Map
Digital Projection MENU MAP Operating Guide HIGHlite 660 Series Menu Map Notes Main Menu Sub Menus Some of the information in this menu map is summarised. See the actual Input Selection menu on the projector for full detail. Composite 1, Composite 2, S-Video, Component, VGA, 3G-SDI, DVI, HDMI, Test Pattern... -
Page 71: Image
Digital Projection MENU MAP Operating Guide HIGHlite 660 Series Notes Main Menu Sub Menus Some of the information in this menu Image map is summarised. See the actual Brightness (slider, value range -50 ~ 50 [0]) menu on the projector for full detail. -
Page 72: Geometry
Digital Projection MENU MAP Operating Guide HIGHlite 660 Series Notes Main Menu Sub Menus Some of the information in this menu Geometry map is summarised. See the actual Aspect Ratio Source, Fill Display, Fill & Crop, Anamorphic, TheaterScope menu on the projector for full detail. -
Page 73: Edge Blend
Digital Projection MENU MAP Operating Guide HIGHlite 660 Series Notes Main Menu Sub Menus Some of the information in this menu Edge Blend map is summarised. See the actual Array Width (slider, value range 1 ~ 4) menu on the projector for full detail. -
Page 74: Pip
Digital Projection MENU MAP Operating Guide HIGHlite 660 Series Notes Main Menu Sub Menus Some of the information in this menu map is summarised. See the actual Option Off, PIP, PAP, POP menu on the projector for full detail. Input CVBS 1, CVBS 2, S-Video, Component, VGA, 3G-SDI, DVI, HDMI... -
Page 75: Setup
Digital Projection MENU MAP Operating Guide HIGHlite 660 Series Notes Main Menu Sub Menus Some of the information in this menu Setup map is summarised. See the actual Orientation Desktop Front, Desktop Rear, Ceiling Front, Ceiling Rear menu on the projector for full detail. -
Page 76: Information
Digital Projection MENU MAP Operating Guide HIGHlite 660 Series Notes Main Menu Sub Menus Some of the information in this menu Information map is summarised. See the actual Lamps menu on the projector for full detail. Lamp 1 Hours, Lamp 1 Starts, Lamp 2 Hours, Lamp 2 Starts... -
Page 77: Reference Guide
REFERENCE GUIDE HIGHlite 660 Series High Brightness Digital Video Projector Rev G July 2014... - Page 78 Digital Projection IN THIS GUIDE Reference Guide HIGHlite 660 Series IN THIS GUIDE The DMD™ ......................72 DMD™ resolution 1080p, 1.6:1 images ............... DMD™ resolution 1080p, 1.66:1 images ..............Aspect Ratios Explained ................74 Aspect ratio examples for DMD™ resolution 1080p ..........
- Page 79 Digital Projection IN THIS GUIDE Reference Guide HIGHlite 660 Series IN THIS GUIDE (continued) LAN connection ......................Edge Blend And Black Level Uplift ............119 Appendix A: Lens Part Numbers ..............120 Appendix B: Supported Signal Input Modes .......... 121 Appendix C: Glossary Of Terms ..............
-
Page 80: The Dmd
Digital Projection THE DMD™ Reference Guide HIGHlite 660 Series The DMD™ Notes A DMD™ (Digital Micromirror Device™) is a true digital light modulator which utilises an array of up to 2.3 million moving aluminium mirrors, with each one representing a pixel in the final projected image. The outermost micromirrors in the array remain inactive and are not used in constructing the image. - Page 81 Digital Projection THE DMD™ Reference Guide HIGHlite 660 Series The DMD™ (continued) Notes Depending on the voltage polarity applied, each mirror will either tilt to the left to produce a bright pixel or to the right for a dark pixel. When light is applied to the complete DMD™, only the light redirected from a mirror tilting to the left is projected.
-
Page 82: Aspect Ratios Explained
Digital Projection ASPECT RATIOS EXPLAINED Reference Guide HIGHlite 660 Series Aspect Ratios Explained Notes The appearance of a projected image on the screen depends on a combination of the following: • The DMD™ resolution: • 1080p with a 1920 x 1080 resolution, corresponding to an aspect ratio of 16:9 •... -
Page 83: Aspect Ratio Examples For Dmd™ Resolution 1080P
Digital Projection ASPECT RATIOS EXPLAINED Reference Guide HIGHlite 660 Series Aspect ratio examples for DMD™ resolution 1080p Notes Source: 4:3 Unused screen areas Cropped parts of the image Aspect Ratio: Source Aspect Ratio: Fill Display, Anamorphic Aspect Ratio: Fill & Crop... - Page 84 Digital Projection ASPECT RATIOS EXPLAINED Reference Guide HIGHlite 660 Series Aspect ratio examples for DMD™ resolution 1080p (continued) Notes Source: 16:9 (native resolution) Aspect Ratio: Source / Fill Display / Fill & Crop Rev G July 2014...
- Page 85 Digital Projection ASPECT RATIOS EXPLAINED Reference Guide HIGHlite 660 Series Aspect ratio examples for DMD™ resolution 1080p (continued) Notes Source: 16:10 Unused screen areas Cropped parts of the image Aspect Ratio: Source Aspect Ratio: Fill Display Aspect Ratio: Fill & Crop...
-
Page 86: Aspect Ratio Examples For Dmd™ Resolution Wuxga
Digital Projection ASPECT RATIOS EXPLAINED Reference Guide HIGHlite 660 Series Aspect ratio examples for DMD™ resolution WUXGA Notes Source: 4:3 Unused screen areas Cropped parts of the image Aspect Ratio: Source Aspect Ratio: Fill Display Aspect Ratio: Anamorphic Aspect Ratio: Fill & Crop... - Page 87 Digital Projection ASPECT RATIOS EXPLAINED Reference Guide HIGHlite 660 Series Aspect ratio examples for DMD™ resolution WUXGA (continued) Notes Source: 16:9 Unused screen areas Cropped parts of the image Aspect Ratio: Source Aspect Ratio: Fill Display Aspect Ratio: Fill & Crop...
- Page 88 Digital Projection ASPECT RATIOS EXPLAINED Reference Guide HIGHlite 660 Series Aspect ratio examples for DMD™ resolution WUXGA (continued) Notes Source: 16:10 (native resolution) Aspect Ratio: Source / Fill Display / Fill & Crop Rev G July 2014...
-
Page 89: Aspect Ratio Example: Theaterscope
Digital Projection ASPECT RATIOS EXPLAINED Reference Guide HIGHlite 660 Series Aspect ratio example: TheaterScope Notes TheaterScope setting is used in combination with an anamorphic lens to restore 2.35:1 images packed into a 16:9 frame. Such images are projected with black lines at the top and bottom of the 16:9 screen to make up for the difference in aspect ratios. -
Page 90: Screen Requirements
Digital Projection SCREEN REQUIREMENTS Reference Guide HIGHlite 660 Series Screen Requirements Notes Fitting the image to the DMD™ If the source image supplied to the projector is smaller than the DMD™ resolution, the image will not fill the DMD™. The following examples show how a number of common formats may be displayed, depending on your DMD™... -
Page 91: 1080P Images Displayed Full Height
Digital Projection SCREEN REQUIREMENTS Reference Guide HIGHlite 660 Series 1080p images displayed full height Notes 4:3 = 1.33:1 = 1440 pixels 16:10 = 1.6:1 = 1728 pixels 1.66:1 (Vista) = 1792 pixels 16:9 = 1.78:1 = 1920 pixels (native resolution) -
Page 92: Wuxga Images Displayed Full Width
Digital Projection SCREEN REQUIREMENTS Reference Guide HIGHlite 660 Series WUXGA images displayed full width Notes full width = 1920 pixels WUXGA images displayed with a height of 1080 pixels 4:3 = 1.33:1 = 1440 pixels 16:10 = 1.6:1 = 1728 pixels 1.66:1 (Vista) = 1792 pixels... -
Page 93: Wuxga Images Displayed Full Height
Digital Projection SCREEN REQUIREMENTS Reference Guide HIGHlite 660 Series WUXGA images displayed full height Notes Only WUXGA or UXGA images can fill the full height of the DMD™, using all 1200 pixels without scaling. UXGA = 4:3 = 1.33:1 = 1600 pixels WUXGA = 16:10 = 1.6:1 = 1920 pixels... -
Page 94: Diagonal Screen Sizes
Digital Projection SCREEN REQUIREMENTS Reference Guide HIGHlite 660 Series Diagonal screen sizes Notes Screen sizes are sometimes specified by their diagonal size (D). When dealing W = width with large screens and projection distances at different aspect ratios, it is more convenient to measure screen width (W) and height (H). -
Page 95: Fitting The Image To The Screen
Digital Projection SCREEN REQUIREMENTS Reference Guide HIGHlite 660 Series Fitting the image to the screen Notes It is important that your screen is of sufficient height and width to display images at all the aspect ratios you are planning to use. -
Page 96: Positioning The Screen And Projector
Digital Projection SCREEN REQUIREMENTS Reference Guide HIGHlite 660 Series Positioning the screen and projector Notes For optimum viewing, the screen should be a flat surface perpendicular to the floor. The bottom of the screen should be 1.2 m The projector should be installed... -
Page 97: Choosing A Lens
Digital Projection CHOOSING A LENS Reference Guide HIGHlite 660 Series Choosing A Lens Notes A number of lenses are available. Which lens you choose depends on the screen size, image aspect ratio, throw distance and light output. For information about individual lens... -
Page 98: Choosing A Lens By Calculation
Digital Projection CHOOSING A LENS Reference Guide HIGHlite 660 Series Choosing a lens by calculation Notes Basic calculation Identify the required lens by calculating the throw ratio. The basic calculation on this page does not take into consideration A throw ratio is the ratio of the throw distance to the screen width: DMD™... -
Page 99: Basic Calculation Example
Digital Projection CHOOSING A LENS Reference Guide HIGHlite 660 Series Basic calculation example Notes Calculate the throw ratio using the formula. INFORMATION YOU NEED FOR THIS CALCULATION The basic calculation on this page Your screen is 4.5m wide and you wish to place the projector does not take into consideration approximately 11m from the screen. -
Page 100: Full Lens Calculation
Digital Projection CHOOSING A LENS Reference Guide HIGHlite 660 Series Full lens calculation Notes Introducing TRC The choice of lens will affect the image size and will address discrepancies between the DMD™ resolution and the source. When an image fills the height of the DMD™ but not the width, it uses less than 100% of TRC can only be applied if greater the DMD™... - Page 101 Digital Projection CHOOSING A LENS Reference Guide HIGHlite 660 Series Calculating TRC Notes To calculate TRC, use the following formula: DMD™ aspect ratio TRC can only be applied if greater TRC = Source aspect ratio than 1. If TRC is 1 or less, disregard...
- Page 102 Digital Projection CHOOSING A LENS Reference Guide HIGHlite 660 Series Calculating the throw ratio with TRC Notes For TRC > 1, amend the basic throw ratio formula as follows: Throw distance TRC can only be applied if greater Throw ratio = Screen width x TRC than 1.
-
Page 103: Full Lens Calculation Example
Digital Projection CHOOSING A LENS Reference Guide HIGHlite 660 Series Full lens calculation example Notes INFORMATION YOU NEED FOR THESE CALCULATIONS Your screen is 4.5m wide; you wish to place the projector approximately 11m from the screen. You use a WUXGA projector;... -
Page 104: Lens Charts
Digital Projection CHOOSING A LENS Reference Guide HIGHlite 660 Series Lens charts Notes How to use the lens charts The lens charts on the following pages provide a quick For information about individual lens guide to the type of lens needed for a particular projector. -
Page 105: How To Find The Right Lens Chart
Digital Projection CHOOSING A LENS Reference Guide HIGHlite 660 Series How to find the right lens chart Notes Charts are shown in order of DMD resolution, as follows: • 1080p For information about individual lens • WUXGA Appendix A part numbers, see the end of this document. -
Page 106: Wuxga (1920 X 1200 Pixels)
Digital Projection CHOOSING A LENS Reference Guide HIGHlite 660 Series WUXGA (1920 x 1200 pixels) Notes Full width images For information about individual lens Formats that fit the width of the DMD™ without applying a throw ratio correction (TRC) include:... -
Page 107: Dmd™ Resolution 1080P / Wuxga, Full Dmd™ Width Images
Digital Projection CHOOSING A LENS Reference Guide HIGHlite 660 Series DMD™ resolution 1080p / WUXGA, full DMD™ width images Notes For 1080p, full width images are 2.35:1 (Scope), 1.85:1 (Flat) 1.78:1 (native). For WUXGA, full width images are all of the above, plus 1.66:1 (Vista) and 1.6:1 (native). -
Page 108: Dmd™ Resolution 1080P, 1.25:1 Images
Digital Projection CHOOSING A LENS Reference Guide HIGHlite 660 Series DMD™ resolution 1080p, 1.25:1 images Notes This chart has a TRC of 1.42, for 6 m (19.7 ft) 0.77 : 1 fixed lens use with the following images: 1.16 : 1 fixed lens 1.45 - 1.74 : 1 zoom lens... -
Page 109: Dmd™ Resolution 1080P, 1.33:1 Images
Digital Projection CHOOSING A LENS Reference Guide HIGHlite 660 Series DMD™ resolution 1080p, 1.33:1 images Notes This chart has a TRC of 1.33, for 6 m (19.7 ft) 0.77 : 1 fixed lens use with the following images: 1.16 : 1 fixed lens 1.45 - 1.74 : 1 zoom lens... -
Page 110: Dmd™ Resolution 1080P, 1.6:1 Images
Digital Projection CHOOSING A LENS Reference Guide HIGHlite 660 Series DMD™ resolution 1080p, 1.6:1 images Notes This chart has a TRC of 1.11, for 6 m (19.7 ft) 0.77 : 1 fixed lens use with the following images: 1.16 : 1 fixed lens 1.45 - 1.74 : 1 zoom lens... -
Page 111: Dmd™ Resolution 1080P, 1.66:1 Images
Digital Projection CHOOSING A LENS Reference Guide HIGHlite 660 Series DMD™ resolution 1080p, 1.66:1 images Notes This chart has a TRC of 1.07, for 6 m (19.7 ft) 0.77 : 1 fixed lens use with the following images: 1.16 : 1 fixed lens 1.45 - 1.74 : 1 zoom lens... -
Page 112: Dmd™ Resolution Wuxga, 1.25:1 Images
Digital Projection CHOOSING A LENS Reference Guide HIGHlite 660 Series DMD™ resolution WUXGA, 1.25:1 images Notes This chart has a TRC of 1.28, for 6 m (19.7 ft) 0.77 : 1 fixed lens use with the following images: 1.16 : 1 fixed lens 1.45 - 1.74 : 1 zoom lens... -
Page 113: Dmd™ Resolution Wuxga, 1.33:1 Images
Digital Projection CHOOSING A LENS Reference Guide HIGHlite 660 Series DMD™ resolution WUXGA, 1.33:1 images Notes This chart has a TRC of 1.2, for use 6 m (19.7 ft) 0.77 : 1 fixed lens with the following images: 1.16 : 1 fixed lens 1.45 - 1.74 : 1 zoom lens... -
Page 114: Positioning The Image
Digital Projection POSITIONING THE IMAGE Reference Guide HIGHlite 660 Series Positioning The Image Notes The normal position for the projector is at the centre of the screen. However, you can set the projector above or below the centre, or to one side, and adjust the image using the Lens shift feature (known as rising and falling front) to maintain a geometrically correct image. - Page 115 Digital Projection POSITIONING THE IMAGE Reference Guide HIGHlite 660 Series Positioning The Image (continued) Notes Any single adjustment outside the ranges specified on the following page may result in an unacceptable level of distortion, particularly at the corners of the image, due to the image passing through the periphery of the lens optics.
-
Page 116: Maximum Offset Range
Digital Projection POSITIONING THE IMAGE Reference Guide HIGHlite 660 Series Maximum offset range Notes The maximum offset range available with no distortion or vignetting is dependent on which lens is used. Shifting the lens beyond its undistorted limits may be physically possible, however you may experience some vignetting or distortion. -
Page 117: Input Connections
Digital Projection INPUT CONNECTIONS Reference Guide HIGHlite 660 Series Input Connections Notes To get the best possible image from a source it is important to use the highest quality connection. The following lists show the inputs sorted by highest quality connection first. -
Page 118: Edid On The Dvi And Vga Inputs
Digital Projection INPUT CONNECTIONS Reference Guide HIGHlite 660 Series EDID on the DVI and VGA inputs Notes If you are using a computer DVI card or another source that obeys the EDID protocol, the source will automatically configure itself to suit the projector. -
Page 119: Control Connections
Digital Projection CONTROL CONNECTIONS Reference Guide HIGHlite 660 Series Control Connections Notes LAN connection For further information on using a The projector’s features can be controlled via a LAN connection, using a standard internet browser package. network connection to control the projector, see the Protocol Guide. -
Page 120: Rs232 Connection
Digital Projection CONTROL CONNECTIONS Reference Guide HIGHlite 660 Series RS232 connection Notes Null-modem cable Computer Projector RS232 Back panel with control connections Rev G July 2014... -
Page 121: Wiring Details
Digital Projection WIRING DETAILS Reference Guide HIGHlite 660 Series Wiring Details Notes Signal inputs and outputs For full details of all input settings, Input Configuration in the Input 1: VGA Operating Guide. 15 way D-type connector VGA: pin view of female connector... -
Page 122: Input 2: Hdmi
Digital Projection WIRING DETAILS Reference Guide HIGHlite 660 Series Input 2: HDMI Notes 19 way type A connector TMDS Data 2+ For full details of all input settings, TMDS Data 2 Shield Input Configuration in the HDMI: pin view of panel connector TMDS Data 2- Operating Guide. -
Page 123: Input 3: Dvi
Digital Projection WIRING DETAILS Reference Guide HIGHlite 660 Series Input 3: DVI Notes 24 way D-type connector Pin 1 TMDS data 2− Digital red− (link 1) High-bandwidth Digital Content Pin 2 TMDS data 2+ Digital red+ (link 1) Protection (HDCP) is supported on... -
Page 124: Input 4: 3G-Sdi
Digital Projection WIRING DETAILS Reference Guide HIGHlite 660 Series Input 4: 3G-SDI Notes 75 ohm BNC 3G-SDI signals are very high 3G-SDI connector speed digital signals which require better quality coaxial cable than Input 5: Composite 1 conventional analogue video. The data rate is 3 Gigabits per second. -
Page 125: Control Connections
Digital Projection WIRING DETAILS Reference Guide HIGHlite 660 Series Control connections Notes Service port USB type B socket For full details of all network Pin 1 VCC (+5 V) Network settings, see in the Operating Guide. Pin 2 Data− Pin 3... -
Page 126: Rs232
Digital Projection WIRING DETAILS Reference Guide HIGHlite 660 Series RS232 Notes 9 way D-type connector 1 unused Only one remote connection (RS232 2 Received Data (RX) or LAN) should be used at any one time. RS232: 3 Transmitted Data (TX) -
Page 127: Edge Blend And Black Level Uplift
Digital Projection EDGE BLEND AND BLACK LEVEL UPLIFT Reference Guide HIGHlite 660 Series Edge Blend And Black Level Uplift Notes setting is used to improve the Edge Blend appearance of multi-projector displays, by blending overlapping edges to present a seamless image. -
Page 128: Appendix A: Lens Part Numbers
Digital Projection APPENDIX A: LENS PART NUMBERS Reference Guide HIGHlite 660 Series Appendix A: Lens Part Numbers Notes Throw ratios Lens extension (±2%) Throw distance range Part number The Throw ratio for a particular lens 0.77 : 1 fixed lens 80 mm (3.2 in) -
Page 129: Appendix B: Supported Signal Input Modes
Digital Projection APPENDIX B: SUPPORTED SIGNAL INPUT MODES Reference Guide HIGHlite 660 Series Appendix B: Supported Signal Input Modes Notes SDTV 480i 720 x 480 59.94 15.73 ü ü ü 576i 720 x 576 50.00 15.63 ü ü ü EDTV... - Page 130 Digital Projection APPENDIX B: SUPPORTED SIGNAL INPUT MODES Reference Guide HIGHlite 660 Series Notes COMPUTER VGA59 640 x 480 59.94 31.47 ü ü VGA60 640 x 480 60.00 31.50 ü ü MACI 640 x 480 66.67 35.00 ü ü VGA72 640 x 480 72.81...
- Page 131 Digital Projection APPENDIX B: SUPPORTED SIGNAL INPUT MODES Reference Guide HIGHlite 660 Series Notes COMPUTER (continued) SXGA50 1280 x 1024 49.84 1057 52.68 ü ü SXGA60 1280 x 1024 60.02 1066 63.98 ü ü SXGA75 1280 x 1024 75.02 1066 79.98...
-
Page 132: Appendix C: Glossary Of Terms
Digital Projection APPENDIX C: GLOSSARY OF TERMS Reference Guide HIGHlite 660 Series Appendix C: Glossary Of Terms Notes 1080p HDTV resolution which corresponds to 1920 x 1080 pixels (a widescreen aspect ratio of 16:9). Anamorphic lens A special lens which, when used with the TheaterScope aspect ratio, allows watching 2.35:1 content packed in a 16:9 source. - Page 133 Digital Projection APPENDIX C: GLOSSARY OF TERMS Reference Guide HIGHlite 660 Series Brightness (optical) Notes Describes how ‘bright’ an image that is projected onto a screen appears to an observer. See Chrominance. Chrominance Also known as ‘C’, this is the component, or pair of components, of an...
- Page 134 Digital Projection APPENDIX C: GLOSSARY OF TERMS Reference Guide HIGHlite 660 Series ColorMax Notes A method of accurately color-matching projectors together. Component video A three or four wire video interface that carries the signal split into its basic components or...
- Page 135 Digital Projection APPENDIX C: GLOSSARY OF TERMS Reference Guide HIGHlite 660 Series Deinterlacing Notes interlaced progressive The process of converting video signals into ones. DHCP (Dynamic Host Configuration Protocol) A network protocol that is used to configure network devices so that they can communicate on an IP network, for example by allocating an IP address.
- Page 136 Digital Projection APPENDIX C: GLOSSARY OF TERMS Reference Guide HIGHlite 660 Series HDTV (High Definition Television) Notes resolution SDTV and EDTV. It can be transmitted in various formats, notably 1080p A television system with a higher than and 720p. Hertz (Hz) Cycles per second.
- Page 137 Digital Projection APPENDIX C: GLOSSARY OF TERMS Reference Guide HIGHlite 660 Series Letterboxing Notes Black margins at the top and bottom of the image. Letterboxing appears when a wider image is packed into a narrower frame without changing the original aspect ratio.
- Page 138 Digital Projection APPENDIX C: GLOSSARY OF TERMS Reference Guide HIGHlite 660 Series Pr, Pb Notes Color difference Component Video signals used with ‘Y’ for analog inputs. They provide information about the signal color. Not to be confused with Progressive scanning A method of updating the image in which the lines of each frame are drawn in a sequence, without interlacing.
- Page 139 Digital Projection APPENDIX C: GLOSSARY OF TERMS Reference Guide HIGHlite 660 Series SPDIF Notes Sony/Philips Digital Interface. A digital audio interface standard. Synchronization A timing signal used to coordinate an action. TheaterScope aspect ratio used in conjunction with a special anamorphic lens to display 2.35:1 images packed into a 16:9 frame.
- Page 140 Digital Projection APPENDIX C: GLOSSARY OF TERMS Reference Guide HIGHlite 660 Series Vertical Scan Rate Notes synchronization The rate at which the frames of the incoming signal are refreshed. The rate is set by the vertical from the source and measured in Hertz.
Need help?
Do you have a question about the HIGHlite 660 Series and is the answer not in the manual?
Questions and answers