Table of Contents
Advertisement
Available languages
Available languages
Quick Links
Download this manual
See also:
Instruction Manual
Advertisement
Chapters
Table of Contents

Related Manuals for Luvion Platinum 2


Summary of Contents for Luvion Platinum 2
- Page 1 LUVION Premium Babyproducts P L A T I N U M INSTRUCTION MANUAL HANDLEIDING...
-
Page 2: Table Of Contents
......................... INTRODUCTION Thank you for purchasing the Luvion Platinum 2. Now you can see and hear your baby or even more babies/children by using up to three additional camera’s. Please retain the original dated sales receipt for your administration. For service – and warranty issues you will always be asked for a copy of the receipt. -
Page 3: Contents Of Package
LUVION Premium Babyproducts Batteries Charge the battery of the parent unit for some hours until it’s fully loaded. The battery is fully loaded when the charging light colours green. We advise you always to use the main power for the baby unit. Should there be no main power around, we advise you to use non-rechargable batteries. -
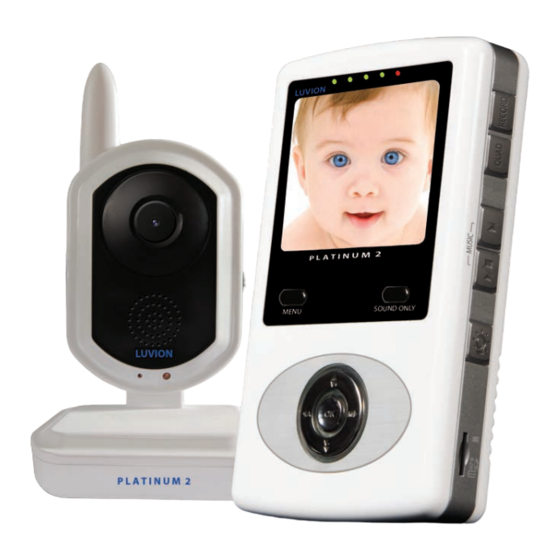
Page 4: Front View
OVERVIEW OF PARENT UNIT (MONITOR) Side View Side View LUVION P L A T I N U M 2 MENU SOUND ONLY MENU SOUND ONLY Front View... - Page 5 LUVION Premium Babyproducts OVERVIEW OF BABY UNIT (CAMERA) P L A T I N U M 2 Side View Front View Side View Back View...
-
Page 6: Overview Of Parent Unit
DC in Connect the included DC 5V power adapter to power and/or charge the parent unit. Battery compartment Screw open this compartment to replace the battery. Only replace this battery with an official Luvion Platinum 2 battery. Menu button Press this button to enter the main menu. -
Page 7: Overview Baby Unit
LUVION Premium Babyproducts nightlight on the baby unit. When the nightlight is turned on the nightlight icon will appear on screen. 19. Micro SD card slot Place a Micro SD card in this slot for video and audio recording. When an SD card is placed in the parent unit the SD card icon will appear on screen. -
Page 8: Getting Started
GETTING STARTED Parent unit (monitor) Determine whether you will be using the docking station, or connecting the cables directly to the parent unit before installation. Carefully unpack the parent unit. Place the parent unit in a place that has clear reception with the baby unit. Plug the DC 5V power adapter into the DC 5V input at the side of the parent unit. -
Page 9: Using The System
LUVION Premium Babyproducts Power adapter Connect the DC 5V power adapter to the DC 5V input at the back of the baby unit. Plug the power adapter in the wall socket. Batteries Remove the battery pack cover off the base of the baby unit. Place 4AA batteries into the battery pack. -
Page 10: Menu Options
6. Sound indicator When the volume has been decreased to mute, the mute icon will be displayed on the screen. Use the button to increase the volume. 7. Talk indicator This icon appears when the talk button is pressed. You can now talk through the baby unit. - Page 11 LUVION Premium Babyproducts MAIN MENU The main menu contains 4 submenus: - Pairing - Use the pairing menu to add (extra) baby units to the parent unit or to reconnect the baby unit with the parent unit. - Brightness - In this submenu you can adjust brightness of the screen.
- Page 12 AUTOMUTE Auto mute is a feature where you can choose between a so called “open channel”, or for the sound activated option. Using the sound activated mode, you will only hear you baby when there is a certain amount of sound. The sensitivity of for this level of sound detection can be adjusted on the side of the baby unit.
- Page 13 LUVION Premium Babyproducts 3. Temperature display Select the temperature unit you want to use. You can choose between degrees Celsius or degrees Fahrenheit. Note: Because the temperature sensor is located next to the (warm) camera, the measured temperature can deviate slightly from the room temperature.
-
Page 14: Baby Unit Pairing
BABY UNIT PAIRING The system comes with a baby unit that has already been paired with the parent unit. These units will communicate with each other once they are switched on. The pairing function gives each baby unit a seperate channel on the parent unit (with a maximum of 4 baby units) this is necessary for configuring additional baby units. -
Page 15: Sd Card Recording
LUVION Premium Babyproducts SD CARD RECORDING The system is designed for SD Card recording. Before recording, you need to insert an SD Card into the SD Card slot. The system supports SD Cards of up to 32 GB. Note: To use the recording function, make sure an SD Card is inserted in the SD Card slot. -
Page 16: Troubleshooting
5. Press MENU button on the parent unit to exit the playback function. TROUBLESHOOTING If you have any problems with the Platinum 2, there is often a quick and simple solution. Please try the following: Problem Solution No video from the baby 1. - Page 17 LUVION Premium Babyproducts Power consumption 400mA Max without charging 800mA with charging Operating temp range -10° ~ 60° C (14°F ~ 140°F) Operating humidity 0 ~ 85% RH Baby unit Transmit frequency range 2.400GHz~2.485GHz Data rate 2 Mbps Transmitting power...
-
Page 18: Voorwoord
SPECIFICATIES........................VOORWOORD Hartelijk dank voor de aanschaf van deze Luvion Platinum 2 beeldbabyfoon. Vanaf nu kunt u uw baby horen én zien en/of zelfs meerdere kinderen monitoren. Zorgt u ervoor dat u altijd uw originele aankoopbewijs bewaart. Voor garantiegevallen zal u altijd gevraagd worden om een kopie van uw aankoopbewijs. -
Page 19: Pakket Inhoud
LUVION Premium Babyproducts Demonteer nooit zelf de ouder- of babyunit. Dit dient door gekwalificeerd personeel te gebeuren. Accu/batterijen Laad de accu van de ouder unit voor het eerste gebruik helemaal op. Dit duurt enkele uren. Als de accu volledig opgeladen is dan kleurt het LED oplaadlampje groen. - Page 20 OVERZICHT VAN DE OUDERUNIT (MONITOR) Zijaanzicht Zijaanzicht LUVION P L A T I N U M 2 MENU SOUND ONLY MENU SOUND ONLY Vooraanzicht...
- Page 21 LUVION Premium Babyproducts OVERZICHT VAN DE BABYUNIT (CAMERA) P L A T I N U M 2 Zijaanzicht Vooraanzicht Zijaanzicht Achteraanzicht...
-
Page 22: Overzicht Van Uw Ouderunit
DC 5 voedingsadapter Hiermee kunt u de monitor via de voedingsadapter opladen. Accu compartiment Schroef dit compartiment open om de accu te vervangen. Vervang de accu alleen met een echte Luvion Platinum 2 accu. Menuknop Druk op deze knop om in het menu te gaan. -
Page 23: Overzicht Van Uw Babyunit
LUVION Premium Babyproducts In de Quad modus, zal op het scherm cam1, cam 2, cam 3 en cam 4 verschijnen voor ieder camera kanaal. Als er voor een kanaal geen signaal is van een baby unit of het signaal te zwak is dan zal de boodschap “out of range”... -
Page 24: Klaarmaken Voor Gebruik
KLAARMAKEN VOOR GEBRUIK Ouderunit Beslis of u de ouderunit gaat gebruiken met of zonder het dockingstation. Haal de ouderunit voorzichtig uit de verpakking. Plaats de ouder unit (eventueel met het dockingstation) op een plaats waar u goed bereik heeft met de babyunit. Verbindt de DC 5V voedingsadapter met de DC 5V aansluiting aan de zijkant van de ouderunit of de achterkant van het dockingstation. -
Page 25: Gebruik
LUVION Premium Babyproducts De babyunit kan zowel worden gevoed door de meegeleverde voedingsadapter, als door 4AA batterijen (niet bijgesloten). Voedingsadapter Verbind de DC 5V voedingsadapter met de DC 5V aansluiting aan de achterkant van de babyunit. Stop de stekker van de voedingsadapter in het stopcontact. -
Page 26: Menu Opties
5. Overwrite indicator Als de overwrite functie geactiveerd is dan zal dit icoontje op het beeldscherm verschijnen. 6. Geluid indicator Als het volume verlaagd is tot mute, dan zal het mute icoontje op het scherm verschijnen. Gebruik de knop om het volume te verhogen. 7. - Page 27 LUVION Premium Babyproducts knopjes om te navigeren in het menu. Druk de OK knop in om een verandering op te slaan. MAIN MENU Het hoofdmenu bevat 4 submenu’s - Pairing - Gebruk het pairing menu om (extra) babyunits te koppelen aan de ouderunit.
- Page 28 AUTOMUTE Auto mute is een functie waarbij u kunt kiezen voor een zgn. “open kanaal” of voor de “geluids activerende optie”. Bij de geluids activerende optie hoort u alleen de baby indien deze een bepaalde hoeveelheid geluid maakt. De hoogte (gevoeligheid) van dit geluid kunt u zelf aan de zijkant van de babyunit bepalen.
- Page 29 LUVION Premium Babyproducts 3. Temperature display Kies hier de temperatuureenheid die u wilt gebruiken. U heeft de keuze uit graden Celcius of graden Fahrenheit. Let op: Doordat de temperatuur sensor dicht bij de (warme) camera geplaatst is, kan de temperatuur iets afwijken van de daadwerkelijke temperatuur in de babykamer.
-
Page 30: Baby Unit Pairing
BABY UNIT PAIRING Het systeem wordt geleverd met een babyunit die al ‘gepaird’ is met de ouderunit. Deze units zullen met elkaar communiceren op het moment dat ze ingeschakeld zijn. De ‘pairing’ functie geeft iedere babyunit een apart kanaal op de ouderunit (maximaal 4 babyunits per ouderunit) dit is nodig om extra babyunits te kunnen aansluiten. -
Page 31: Micro Sd Kaart Opname
LUVION Premium Babyproducts SD KAART OPNAME Het systeem is ontworpen voor SD kaart video opname. Voordat er video kan worden opgenomen moet er een SD kaart in de SD kaart opening geplaatst worden. Het systeem ondersteunt Micro SD kaarten tot 32 GB. -
Page 32: Probleem & Oplossing
5. Druk op de MENU knop op de ouder unit om de playback functie te verlaten. PROBLEEM & OPLOSSING Als u problemen ervaart met de Platinum 2, dan is er vaak een snelle en simpele oplossing. Probeer a.u.b. de volgende oplossingen. - Page 33 LUVION Premium Babyproducts Resolutie H: 320 V: 240 Kijkhoek H: 120° V: 100° A/V Uitgang / Resolutie QVGA 320x240 / 30FPS Alarmgevoeligheid 80dB ±10% (1M) Voedingsspanning 5V DC ±5% Energieverbruik 400mA Max zonder opladen 800mA met opladen Gebruikstemperatuur -10° ~ 60° C (14°F ~ 140°F)
Need help?
Do you have a question about the Platinum 2 and is the answer not in the manual?
Questions and answers