Lifescan OneTouch Ultra Owner's Booklet
Blood glucose monitoring system
Hide thumbs
Also See for OneTouch Ultra:
- Owner's booklet (138 pages) ,
- User manual (2 pages) ,
- Quick reference manual (2 pages)
Table of Contents
Advertisement
Advertisement
Table of Contents

Related Manuals for Lifescan OneTouch Ultra


Summary of Contents for Lifescan OneTouch Ultra
- Page 1 Ultra Ultra Ultra Blood Glucose Monitoring System...
- Page 2 OneTouch ® Ultra ® System Owner’s Booklet...
- Page 3 • 24-hour customer service by highly trained professionals who are ready to answer your questions about meter operation, self-monitoring and diabetes in general • LifeScan.com, offering online access to information about our products and services as well as diabetes care •...
-
Page 4: Table Of Contents
Table of Contents Downloading Test Results to a About Your New System Personal Computer The Complete OneTouch ® Ultra ® Blood Glucose Monitoring System Comparing Meter and OneTouch ® Ultra ® Blood Glucose Meter Laboratory Results OneTouch ® Ultra ® Meter Display OneTouch ®... -
Page 5: About Your New System
About Your New System The OneTouch ® Ultra ® System uses the latest blood glucose monitoring technology. It measures the glucose content of a blood sample by means of an electrical current produced in the test strip and sent to the meter for measurement. Test results are “plasma-calibrated.”... - Page 6 mg/dL milligrams/deciliter no decimal point The OneTouch ® Ultra ® Blood Glucose Monitoring System consists of the OneTouch ® Ultra ® Blood Glucose Meter, OneTouch ® Ultra ® Test Strips (may be sold separately), and the OneTouch ® Ultra ® Control Solution.
- Page 7 The OneTouch ® Ultra ® System is intended for use outside the body (in vitro diagnostic use). It should be used only for testing fresh capillary whole blood samples for glucose (sugar). It should not be used for the diag- nosis of diabetes or for testing newborns.
-
Page 8: Important Information
Important Information ◗ Severe dehydration resulting from excessive water loss may cause false low results. If you believe you are suffering from severe dehydration, consult a healthcare professional immediately. ◗ Test results below 70 mg/dL mean low blood glucose (hypoglycemia). Test results greater than 240 mg/dL mean high blood glucose (hyperglycemia). -
Page 9: The Complete Onetouch
® ® he Complete OneTouch Ultra Blood Glucose Monitoring System ® ® ® OneTouch Ultra Meter OneTouch UltraSoft Sterile Lancets ® ® Owner’s Booklet OneTouch Ultra Control Solution ® ® Quick Start Guide OneTouch Ultra Test Strips (may be sold separately) Quick Reference Guide Carrying Case ®... -
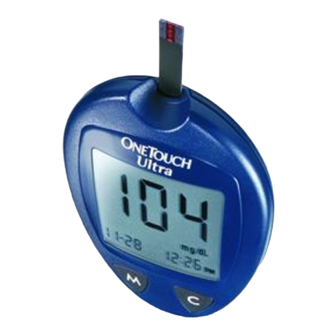
Page 10: Onetouch Ultra Blood Glucose Meter
® ® OneTouch Ultra Blood Glucose Meter DISPLAY TEST PORT Symbols, simple Insert the OneTouch ® Ultra ® messages, and test Test Strip here. results appear here. M BUTTON C BUTTON Used to turn meter Used to: ◗ on to enter: change date, time and ◗... -
Page 11: Onetouch Ultra Meter Display
® ® OneTouch Ultra Meter Display Indicates a control solution test result. CODE Appears with the code number of the test strips. BLOOD DROP SYMBOL Tells you when to apply the DECIMAL POINT sample. Appears in test results only when unit of measure is set to mmol/L. - Page 12 KETONES? Appears when a Indicates a test test result is above result stored in 240 mg/dL to sug- memory. gest ketone testing. TEST RESULT AREA Test results are displayed here. MG/DL Unit of measure. Milligrams per deciliter (mg/dL) is the standard in your region.
-
Page 13: Onetouch Ultra Test Strips
® ® OneTouch Ultra Test Strips The OneTouch ® Ultra ® System measures the amount of glucose in whole blood. Blood is applied to the TOP EDGE of the OneTouch ® Ultra ® Test Strip. With the FastDraw design of the OneTouch ®... -
Page 14: Important Test Strip Information
Important Test Strip Information ◗ Store test strip vials in a cool, dry place below 86˚F (30˚C). Keep away from direct sunlight and heat. Do not refrigerate. ◗ Store test strips in their original vial only. To avoid damage or contamination, do not transfer test strips to any other place. -
Page 15: Before Testing
Before Testing Checking the Meter Display Ultra Each time you turn on the OneTouch ® ® Meter either by inserting a test strip or pressing the M button, all segments of the display will appear briefly. This tells you that the system is performing several self-checks to confirm that the meter is working properly. - Page 16 STEP 1 Enter the Code Mode. Insert a test strip to turn on the meter. Push it all the way in until it will go no further. Avoid bending the test strip. The display check will appear. Then the code number is displayed for three seconds. (The first time you use the meter, three dashes Q will appear, meaning that there is no code stored in the memory.) If three...
- Page 17 STEP 3 Code the Meter. Press the C button to select the correct code. Each time you press and release the C button, the number will increase by one. To move more quickly, press and hold the C button. After selecting the correct code number, it will flash for three seconds and then appear solid for three seconds.
-
Page 18: Checking The System
Checking the System NOTE: Refer to additional information in the OneTouch ® Ultra ® Control Solution package. OneTouch ® Ultra ® Control Solution is used to check that the meter and the test strips are working together as a system and that you are performing the test correctly. -
Page 19: Important Control Solution Test Information
Important Control Solution Test Information ◗ Use only OneTouch ® Ultra ® Control Solution. ◗ Check the expiration date on the control solution vial. Record the discard date (date opened plus three months) on the vial label. Do not use after expiration or discard date, whichever comes first. ◗... -
Page 20: How To Do A Control Solution Test
How to do a control solution test: STEP 1 Insert Test Strip. Insert a test strip, contact bars end first and facing up, into the test port. Push it all the way in until it will go no further. The meter will turn on and the display check will appear briefly. - Page 21 STEP 2 Apply Control Solution. To ensure an accurate result: ◗ Shake the vial well ◗ Discard the first drop ◗ Wipe the dispenser tip Hold the drop to the narrow channel in the top edge of the test strip. When the confirma- tion window is full, the meter will begin to count down from 5 to 1 second.
-
Page 22: Comparing Control Solution Results
CAUTION: If you continue to get control solution test results that fall outside of the range printed on the vial, the system may not be working properly. Do not use the meter. Call LifeScan Customer Services at 1 800 227-8862. -
Page 23: Testing Your Blood
Testing Your Blood Read this section and the test strip package insert carefully before testing. Make sure you have all items needed to test. ◗ Meter ◗ Test Strips ◗ Sampler ◗ ™ Optional UltraClear ◗ Sterile Lancet... -
Page 24: Preparing The Onetouch ® Ultrasoft
® Preparing the OneTouch UltraSoft Sampler Depth Adjustment Knob Puncture Settings Ejection/Cocking Control Lancet with UltraClear Release Button Protective Disk (For Arm Sampling) Depth Indicator Lancet Point Protective Disk CAUTION: To reduce the chance of infection: ◗ Never share a lancet or the OneTouch ®... - Page 25 STEP 1 Insert a Lancet. Turn the cap counterclockwise to remove it. Insert the lancet into the lancet holder and push down firmly until it is fully seated. Do not twist the lancet. Twist the protective disk until it separates from the lancet. Replace the OneTouch ®...
- Page 26 STEP 2 Cock the Sampler. Slide the ejection/cocking control back until it clicks. If it does not click, the sampler may have been cocked when the lancet was inserted. The sampler is now ready for use. STEP 3 Wash Your Hands and the Puncture Site.
-
Page 27: Fingertip Blood Sampling
Fingertip Blood Sampling The OneTouch ® Ultra ® System requires a very small blood drop to per- form a test. You may obtain it from a fingertip or arm. (See page 23 for information on obtaining a blood sample from the arm.) Choose a dif- ferent puncture site each time you test. -
Page 28: Arm Blood Sampling
Arm Blood Sampling The arm has fewer nerve endings than the fingertip so you may find that obtaining a blood sample from the arm may be much less painful than using the fingertip. The technique for arm sampling is different from fingertip sampling. - Page 29 STEP 3 Massage the Area. To increase blood flow to the puncture site, massage the area gently. For individuals who experience difficulty in getting sufficient blood for a test, rubbing the area more vig- orously or the brief application of heat may be helpful.
- Page 30 If bruising occurs, you may choose to lance a fingertip instead. If you are having difficulty obtaining blood from the arm, call LifeScan Customer Services at 1 800 227-8862 for assistance. Important information about arm testing ◗ Under certain conditions, blood glucose test results obtained using samples taken from your arm may differ significantly from fingertip samples.
-
Page 31: Step-By-Step Test Procedure
Step-by-Step Test Procedure STEP 1 Insert Test Strip. Insert a test strip, contact bars end first and facing up, into the test port. Push it in until it will go no further. The meter will turn on and the display check will appear briefly. - Page 32 STEP 2 Apply Sample. Obtain a round drop of blood using the OneTouch ® UltraSoft Adjustable Blood Sampler. The blood sample must be at least 1 µL in volume ( actual size) to fill the confirmation window. When the symbol appears on the display, touch and hold the drop of blood to the narrow channel in the top edge of the test strip.
- Page 33 If you have trouble filling the test strip, contact LifeScan Customer Services for assistance. If the confirmation window is not full, you Æ...
-
Page 34: Used Lancet Disposal
STEP 3 Accurate Results in Just 5 Seconds. Your blood glucose test result will appear after the meter counts down from 5 to 1. Blood glucose test results are automatically stored in the meter memory. You may also record them in the logbook provided with your system. -
Page 35: Special Messages
STEP 2 Eject the Lancet. Point the sampler down and away. Push forward on the ejection/cocking control and eject the lancet directly into a container for sharp objects. Return the ejection/cocking control to the middle position. Replace the cap. Special Messages The OneTouch ®... - Page 36 If your blood glucose test result is above 600 mg/dL, h1 will appear on the meter display. This indi- cates severe hyperglycemia (high blood glucose). You should recheck your blood glu- cose level. If h1 again appears on the display, call your health- care professional immediately.
-
Page 37: Using The Meter Memory
Using the Meter Memory Your OneTouch ® Ultra ® Meter stores the 150 most recent blood glucose and control solution test results with date and time in its memory. It also provides you with 14- and 30-day averages of your blood glucose test results. - Page 38 STEP 2 Recall Test Results. The most recent test result with date and time will appear. Press and release the C button and the next most recent test result will appear. The meter will recall up to your last 150 test results in order from the most recent to the oldest.
-
Page 39: Downloading Test Results To A Personal Computer
Downloading Test Results to a Personal Computer Transferring test results with date and time from the meter memory to your personal computer requires OneTouch Diabetes Management Software with the accompanying LifeScan Interface Cable. (OneTouch Software is available separately.) STEP 1 Install OneTouch Software. - Page 40 Pressing the M button will also turn the meter off. To learn more about OneTouch Diabetes Management Software or to obtain a LifeScan Interface Cable separately, contact the LifeScan Data Management Line at 1 800 382-7226 or visit us at www.LifeScan.com.
-
Page 41: Comparing Meter And Laboratory Results
Comparing Meter and Laboratory Results OneTouch ® Ultra ® Meter test results and laboratory test results are both expressed in plasma-equivalent units. However, your meter result may differ somewhat from your laboratory result due to normal variation. Meter results can be affected by factors and conditions that do not affect laboratory results in the same way. - Page 42 While at the lab: ◗ Make sure that the meter test and the lab test are performed within 15 minutes of each other. ◗ Wash your hands before obtaining a blood sample. ◗ Use only fresh capillary blood obtained from the fingertip. You may still have a variation from the result because blood glucose levels can change significantly over short periods, especially if you have recently eaten, exercised, taken medication, or experienced stress.
-
Page 43: Setting The Meter
Setting the Meter Time and Date The OneTouch ® Ultra ® Meter comes with the time, date, and unit of measure preset. However, if you need to change the time, or if you remove the battery, you may need to enter the setting mode and reset. To set the time, you must enter the setting mode. - Page 44 STEP 3 Set the Time Format. The meter can display the time in either an AM/PM (12-hour) format or a 24:00 (24-hour) format. The AM/PM format is preset in the meter. If you wish to display the time in the 24:00 format, press the C button. With the pre- ferred time format on the display, press the M button and the year set- ting will start flashing.
- Page 45 STEP 5 Set the Month. Press and release the C button until the correct month appears. To move faster, hold the C button down. With the correct month on the display, press the M button and the day segment will start flashing. STEP 6 Set the Day.
- Page 46 NOTE: You must move through the hour, minutes, time format, year, month and day to turn off the meter and exit the setting mode.
-
Page 47: Caring For Your O
Meter does not require special maintenance or cleaning. Take care to avoid getting dirt, dust, blood, control solution, or liquids inside the meter through the test port or data port. LifeScan recommends that you store the meter in its carrying case after each use. -
Page 48: Battery
Battery Your OneTouch ® Ultra ® Meter comes with a pre-installed 3.0 V (#2032 or equivalent) lithium battery. The battery will provide you with enough power to perform about 1,000 tests. When replacing the battery, use only a 3.0 V (#2032 or equivalent) lithium battery. The meter will alert you when the power is getting low by displaying two different messages: symbol appears on the display... - Page 49 STEP 1 Open the battery compartment. Milpitas, CA 95035 USA Deutschland: (0800) 7077007 Push up on the tab and pull the battery Österreich: (00800) 70000777 www.lifescan.de 3-Volt-Lithium-Batterie AW 060-368-04A compartment cover toward you. Blutzucker-Messgerät Zur Selbstkontrolle AW 060-368-12A...
- Page 50 AW 060-368-12A STEP 3 Place the cover. Milpitas, CA 95035 USA Deutschland: (0800) 7077007 Österreich: (00800) 70000777 www.lifescan.de 3-Volt-Lithium-Batterie Place the cover over the battery compartment. AW 060-368-04A Push down until you hear the tab click into place. Blutzucker-Messgerät...
-
Page 51: Display Messages And Problem-Solving Guide
Improper use may cause an inaccurate result without pro- ducing an error message or a symbol. In the event of a problem, refer to the information under ACTION. Assistance is available from LifeScan Customer Services 24 hours a day, seven days a week. - Page 52 MESSAGE WHAT IT MEANS ACTION This is the code number Make sure that this code stored in the meter. number matches the code number on the vial of the test strips you are using. The system is ready You may now apply the to accept a blood sample.
- Page 53 MESSAGE WHAT IT MEANS ACTION A blood glucose test result None required. in mg/dL. A blood glucose test result Follow the instructions with a suggestion to check of your healthcare your ketone levels. professional regarding ketone testing.
- Page 54 MESSAGE WHAT IT MEANS ACTION You should recheck your You may have a very high glucose level and if blood glucose level, exceed- call your healthcare ing 600 mg/dL. professional immediately. You may have a very low Treat this condition blood glucose level, immediately according lower than 20 mg/dL.
- Page 55 MESSAGE WHAT IT MEANS ACTION A control solution test None required. result stored in the memory. There is no test result None required. stored in this place in the memory. Average of the last 14 days No action required. √ ) means that 64 tests were performed within the period.
- Page 56 MESSAGE WHAT IT MEANS ACTION Do not use the meter. Error message that indicates Contact LifeScan that there is a problem with Customer Services at the meter. 1 800 227-8862 for a replacement meter. Error message could be Repeat the test with a caused either by a used test new test strip.
- Page 57 If the error mes- ating temperature range sage appears again, (43–111°F / 6–44°C). contact LifeScan Customer Services at 1 800 227-8862. 2. If you were testing in a 2. There may be a problem normal or warm environ- with the test strip.
- Page 58 27-28 on blood application and repeat the test with a new test strip. If the error mes- sage appears again, contact LifeScan Customer Services at 1 800 227-8862. Error message that indicates Repeat the test with a that the meter has detected a new test strip.
- Page 59 MESSAGE WHAT IT MEANS ACTION Flashing time means the meter You must reset the time, has lost power and entered time format and date. See the setting mode. “Setting the Meter,” pages 38–41. The meter has detected that Repeat the test after the the temperature is below the meter and test strips have system operating range.
- Page 60 If the meter does not display a message after inserting a test strip: POSSIBLE CAUSE WHAT TO DO Need battery Replace the battery. No battery or battery Check that the battery is incorrectly installed correctly installed with the positive side up. “+”...
-
Page 61: Specifications
Specifications Result Range: 20 to 600 mg/dL Calibration: Plasma-equivalent Sample: Fresh capillary whole blood Sample Size: Minimum 1 microliter Test Time: 5 seconds Assay Method: Glucose oxidase biosensor Power Source: One replaceable 3.0 V (#2032 or equivalent) lithium battery Battery Life: 1,000 tests or about one year at three tests per day Glucose Units: mg/dL Memory: 150 blood glucose and control solution tests Automatic Shutoff: Two minutes after last user action... -
Page 62: Guarantee
Guarantee The makers guarantee that the OneTouch ® Ultra ® Meter shall be free of defects in material and workmanship for a period of three years. This guarantee is valid from the date of purchase. The guarantee extends only to the original purchaser and is not transferable. -
Page 63: Index
LifeScan Interface Cable ........ - Page 64 Messages, Special ..........46 Meter Display .
- Page 65 Notes...
- Page 66 Source: Krall, L.P., and Beaser, R.S.: Joslin Diabetes Manual. Philadelphia: Lea and Febiger (1989), 138. Meter Serial No. ___________________ Important phone numbers: LifeScan Customer Services (24 hours a day, 7 days a week): English 1 800 227-8862 Español 1 800 381-7226 ___________ ______________...
- Page 67 LifeScan Customer Services toll-free numbers: (24 hours a day, 7 days a week) U.S.A. English 1 800 227-8862 Español 1 800 381-7226 Visit the LifeScan Web site: www.LifeScan.com © LifeScan, Inc. 2002 Milpitas, CA 95035 2/03 Patent Nos. 5,708,247 and 5,951,836. AW 06017505A...
Need help?
Do you have a question about the OneTouch Ultra and is the answer not in the manual?
Questions and answers