Table of Contents
Advertisement
Quick Links
Advertisement
Table of Contents

Related Manuals for Kathrein UFC 861si


Summary of Contents for Kathrein UFC 861si
- Page 1 Operating Manual Twin-PVR Cable Receiver UFC 861si with hard disk and Ethernet...
-
Page 2: Foreword
For shorter breaks, you can use the remote control to switch the receiver to standby, which uses only a minimal amount of energy. We wish you good reception and much pleasure using your new PVR-Cable receiver. Your KATHREIN team... -
Page 3: Table Of Contents
... 2 FOREWORD ... 3 CONTENTS IMPORTANT INFORMATION SAFETY INSTRUCTIONS - IMPORTANT INFORMATION RECEIVER FEATURES/SCOPE OF SUPPLY CONTROLS, DISPLAYS AND CONNECTIONS ... 8 CONNECTION AND SETUP ... 11 REMOTE CONTROL ... 13 FIRST INSTALLATION ... 18 MENU TREE OPERATING INSTRUCTIONS ON-SCREEN DISPLAYS (OSD) ... -
Page 4: Important Information
If receiver is not shipped correctly the warranty on the hard disk will be voided. Any modifi cations to the receiver software, or the use of applications not provided by Kathrein, will invalidate the warranty! You will have to bear the costs yourself for dispatching and repairing any receiver that requires attention due to modifi... -
Page 5: Safety Instructions - Important Information
SAFETY INSTRUCTIONS - IMPORTANT INFORMATION... -
Page 6: Receiver Features/Scope Of Supply
The „File Sharing“ feature is enabled using the programme “MFServer”, which is integrated in the PVR Manager. The programme can be downloaded free of charge from the Kathrein website. The multi-function control on the front panel allows complete on-unit control. -
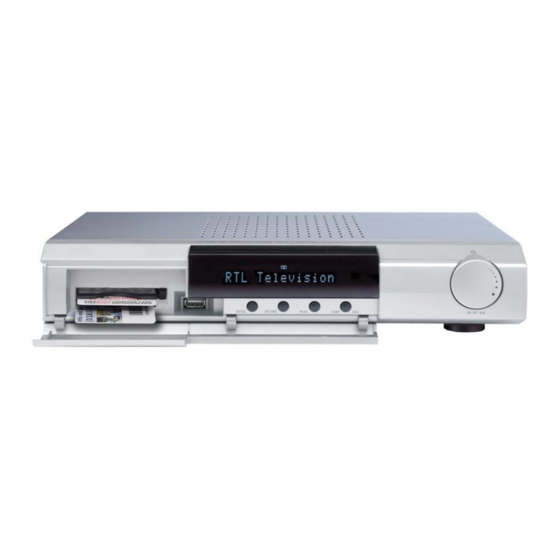
Page 7: Controls, Displays And Connections
CONTROLS, DISPLAYS AND CONNECTIONS This section provides a brief description of all the controls, displays and connections. The button symbols presented here can also be found in the description of the operating steps. VIEW OF FRONT PANEL (FLAP FOLDED DOWN) VIEW OF REAR PANEL Front panel controls and displays Common Interface for two CA modules for... -
Page 8: Connecting The Unit (Sat-If Connections)
The following section is intended specifi cally for specialist dealers. You need not refer to this section unless you are carrying out the installation yourself. The “Connection Examples” section provides a sample confi guration. Do not connect the receiver to the power supply until all installation work has been properly carried out. Refer to the information in the “Safety Instructions”... -
Page 9: Audio Connection
INFORMATION ABOUT ANTENNA CONNECTION AND “LOOP THROUGH” OPERATION To enable you to utilise all the reception and recording properties of your UFC 861 twin-PVR cable receiver, such as 1. recording one programme and at the same time viewing any other programme or zapping through the channels, and 2. -
Page 10: Inserting Batteries In The Remote Control
INSERTING BATTERIES IN THE REMOTE CONTROL Remove the cover on the rear of the remote control. Insert the two supplied batteries into the remote control. Ensure correct polarity of the batteries; the + and – markings are indicated inside the battery compartment. Slide the cover back into the housing until it locks in place. -
Page 11: Remote Control
Sound on/off Number input for channels, timers etc. Access main menu Exit menus (red) Access Favourites list (green) Picture-in-picture from 2 tuner or hard disk Volume Exit menu - back to TV picture Fast rewind Playback Hard disk contents Pause (freeze- frame) Time-shift (red) -
Page 12: Remote Control Rc
For operating the fi rst receiver (address 1), press , for the second receiver for the fourth receiver + (red) = Kathrein UFD 5xx code for remote control RC 400 The RC 600 and RC 650 remote controls cannot be replaced! REMOTE CONTROL... -
Page 13: First Installation
Before using your unit for the fi rst time, read the “Safety Instructions” and “Connection and Setup” sections. The “Connection Examples” section provides a sample confi guration. Do not connect the receiver to the power supply until all installation work has been properly carried out. - Page 14 FIRST INSTALLATION The following display appears: Use the buttons here to select the settings for your TV set. Refer to the operating instructions for your television set! Video Output Here select the type of video signal at the Scart socket or HDMI socket. Select the signal that your TV set can process.
- Page 15 Perform the settings by pressing the Channel Search Use the buttons to select whether you: - All: Free and encrypted channels - Only FTA channels: Only non-encrypted channels, such as ZDF in Germany - Only encrypted channels: Only encrypted channels, such as ARENA should be searched for.
- Page 16 Here press the buttons to select the time mode: • Manual or • Auto (receiver takes time from preset channel) “Manual” time setting Use the buttons to make the settings. Set Local Time Press the button to set the variance from UMTC (Universal Mean Time Coordinate;...
- Page 17 Select today's date here. Press the display a calendar. Select the day using the cursor buttons ( ). If the right month and year are not displayed, you can select as follows: • Previous month ( (red) button) • Next month ( (green) button) •...
-
Page 18: Menu Tree
MENU TREE... -
Page 19: Operating Instructions
MENU CONCEPT The structure of the menu concept is based on logical operating sequences. The programme showing on the current selected channel always appears in the top right-hand corner of the screen. You will fi nd detailed descriptions of the selected menu items in the relevant sections of the operating manual! Note: The selected menus, sub-menus and positions, as well as the parameters to be set, are each... -
Page 20: Alphanumeric Inputs
ALPHANUMERIC INPUTS To enter channel, favourites and satellite names, use the key pad that is displayed (see screenshot on the right). Select the desired letters/symbols using the number keys on your remote control. Press the button to delete the last position or press the (red) button to delete the entire name. -
Page 21: On-Screen Displays (Osd)
ON-SCREEN DISPLAYS (OSD) CHANNEL INFORMATION TV CHANNEL INFORMATION Signal strength Channel name Selected channel list The channel information is displayed for a few seconds (confi gurable on the “User Preference” menu under “Appearance settings”) every time you change channel, or can be displayed permanently by pressing the button. -
Page 22: Error Message
ON-SCREEN DISPLAYS (OSD) ERROR MESSAGE “No signal” indicates an error in the reception system or in the receiver settings, or a cable network fault. Check the RF connection at the receiver and at the antenna socket. If you have changed the receiver settings, compare them against the basic settings (provided you made a note of them as suggested). - Page 23 ON-SCREEN DISPLAYS (OSD) Sort options (accessed by pressing the - Press the (red) button to access the alphabetical listing. It shows all the channels sorted alphabetically, or the ones beginning with the selected initial letter. - Press the (green) button to sort the channels by provider, or to view the channels from a specifi c provider.
-
Page 24: Inserting The Smartcard And The Ca Module
IMPORTANT INFORMATION Always follow the operating instructions from your Pay-TV provider and the instructions supplied with the Smartcard and the CA module! Smartcards and CA modules are not included with this product! The cards and modules are issued by the respective Pay TV providers, and contain the subscriber data and details of the channels for which the subscriber has paid. - Page 25 The identity of the Conditional Access module in the CI slot of the UFC 861 and the identity of the Smartcard in the CA module and/or in the Smartcard reader can be found under “System Parameters” in the “Main Menu”, and confi rmed by pressing the The screenshots below depend on the specifi...
-
Page 26: Multiple Decoding
MULTIPLE DECODING If your CA module and/or your Smartcard in the Smartcard reader is capable of decoding multiple channels, you can press the buttons to select whether the module should always decode only one channel (Off) or multiple channels (On). If you select “Off”, when making an unencrypted recording of an encrypted channel you cannot at the same time view an encrypted channel through the same CA module or the same Smartcard in the Smartcard reader. -
Page 27: Setting System Parameters
SETTING SYSTEM PARAMETERS The selected menus, sub-menus and positions, as well as the parameters to be set, are each highlighted in colour. The menus are largely self-explanatory. Also note the bars at the bottom of the on-screen display! These provide information what to do next. -
Page 28: Tv Settings
SETTING SYSTEM PARAMETERS TV SETTINGS Press the button to access the “TV Settings” menu. The following display appears: AV SETTINGS VIDEO OUTPUT Select the type of video signal at the Scart socket here. Select the signal that your TV set can process. Refer to the operating instructions for your television set! •... - Page 29 SETTING SYSTEM PARAMETERS TV ASPECT RATIO Here select the TV picture format. Either • 4:3 format, • 16:9 or DISPLAY FORMAT Select the screen display mode here: • for TV type “4:3”: “Pan & Scan” or “Letter-Box” • for TV type “16:9”: “Automatic” or “Always 16:9” SEPARATE CHANNEL VOLUME Choose whether the volume setting is to be applied to all channels here (selection: Off), or whether you want to set the volume for each channel separately (selection: On).
-
Page 30: Time Setup
SETTING SYSTEM PARAMETERS TIME SETUP Press the button to access the “Time Setup” menu. Depending on the setting (“Manual” or “Auto”), you see the following: TIME MODE Select the type of time mode here: • Manual or • Auto (receiver takes time from preset channel) TIME MODE MANUAL LOCAL TIME OFFSET Set the variance from UMTC (Universal... -
Page 31: Time Setting
SETTING SYSTEM PARAMETERS TIME SETTING Choose between “Automatic” and “Winter” time. In the example on the previous page, “Automatic” was selected. Select the current date here. Press the button to display a calendar. Select the day using the cursor buttons ( ). - Page 32 SETTING SYSTEM PARAMETERS TIME SETTING Choose between “Automatic” and “Winter” time. In the example on the previous page, “Automatic” was selected. CHANNEL TIME SETUP If you have selected automatic time mode, set the channel here from which you want the receiver to get the time.
-
Page 33: Receiver Management
SETTING SYSTEM PARAMETERS RECEIVER MANAGEMENT Press the button to access the “Receiver Management” menu. The following display appears: SYSTEM INFORMATION Press the button to view the current software version. Press the FACTORY SETTING When you press the button you are asked whether you want to reset all settings to their factory defaults. Use the buttons to select “OK”... -
Page 34: Remote Control Code
SETTING SYSTEM PARAMETERS CHANGE RECEIVER NAME Press the button and enter the unit ID here. This is useful for identifi cation in case of theft. The alphanumeric input procedure is as described in the “Alphanumeric Inputs” section. In the example shown here the ID “UFC 861” has been assigned. REMOTE CONTROL CODE Use the buttons to select one of the four existing remote control codes. -
Page 35: Hard Disk Management
HARD DISK MANAGEMENT Press the button to access the “HDD Management” menu. The following display appears: FORMAT RECORDING LIST When you press the button you are asked whether you want to delete all recordings. Use the buttons to select “OK” and start the reset by pressing the All the recordings on the hard disk are irrevocably deleted! FORMAT MP3 ARCHIVE When you press the... -
Page 36: Usb Device Settings
SETTING SYSTEM PARAMETERS FORMAT PHOTO ARCHIVE When you press the button you are asked whether you want to delete all photos/images. Use the buttons to select “OK” and start the reset by pressing the All the photos on the hard disk are irrevocably deleted! USB DEVICE SETTINGS If the button is pressed, the receiver displays the principal data on the storage medium currently... - Page 37 SETTING SYSTEM PARAMETERS Use the buttons to select the transponder frequency and type of partitioning. You have the following options: - Option 1: Type of formatting FAT 32, complete hard disk (for Windows XP, MAC, Linux user) - Option 2: Type of formatting EXT3, max. 100 GB partitions (for Linux and experienced Windows users) - Option 3: Type of formatting FAT 32, three 32 GB partitions, the remainder of the storage volume formatted as for option 2 (for Windows 2000 and earlier Windows versions) Formatting irrevocably deletes all data on the storage medium!
-
Page 38: Ethernet Settings
SETTING SYSTEM PARAMETERS ETHERNET SETTINGS These settings should not be made unless the receiver is linked into a network or is linked to a PC/laptop using a crossed over network cable. The Ethernet interface used in the receiver is a 10/100 base T Ethernet interface. - Page 39 If you wish to connect your receiver to a PC or laptop, the DHCP setting must be “Off”. Note: Refer manual and the instructions on this subject available on the Internet under “www.kathrein.de” “Service” → “Software and Downloading” → “Receiver” → “UFS 822”. DHCP “On” (DHCP server/router) Use the buttons to select the “Get IP...
-
Page 40: User Settings
USER SETTINGS Select the “User Preference” menu using the menu button , the buttons on the main menu and Use the buttons to select further options. If there is another sub-menu layer, press the button to open it. If there are no more sub-menus, make the settings using the buttons or the numeric pad. -
Page 41: Access Control
USER SETTINGS LANGUAGE SETTINGS See “Operating Instructions” section under “Language Selection - OSD”. On this menu you can select the language for the menu, the subtitles, the audio and the programme. SLEEP TIMER Use the buttons to select the time after which you want the UFC 861 to automatically switch off (standby). - Page 42 USER SETTINGS LOCK RECEIVER Use the buttons (On/Off) to choose whether use of the receiver should be protected by a four- digit PIN. When switching the unit on from Standby you are then prompted to enter the PIN. If the PIN is not entered the receiver cannot be operated.
-
Page 43: Display Settings
CHANGE PIN Press the button to replace the old PIN with a new one. Enter the new (four-digit) PIN. For security you must repeat the new PIN code once again. On the screen which then appears use the select “OK” and confi rm the changed PIN by pressing the Keep your password in a safe place, so that you always have access to your channels should you ever forget it. - Page 44 USER SETTINGS PLAYBACK INFO BANNER TIMEOUT Use the buttons to select the time after which you want the on-screen playback information is automatically cancelled. You can choose between 5, 8, 10, 12 and 15 seconds, or “Hide”. DISPLAYING THE VOLUME BAR Use the buttons (On/Off) to specify whether the volume bar is displayed when adjusting the volume.
-
Page 45: Pvr Settings
PVR SETTINGS On this menu you can make settings for your recordings and for time-shifting. AUTOMATIC TIME-SHIFT Use the buttons to select whether automatic time-shifting is enabled or disabled. When you select “On” the receiver automatically (in the background) starts recording the programme you are viewing as soon as you switch to the channel. -
Page 46: Dynamic Si Handling
USER SETTINGS STANDARD RECORDING TIME Use the buttons here to select the standard recording time. If you forget to stop a recording you started manually, it is automatically stopped by the receiver when the standard recording time elapses. You can choose between 30 minutes and 4 hours, in 30 minute increments. SAVE When you have made all the settings, press the button to save them. -
Page 47: Videotext (Teletext)
VIDEOTEXT (TELETEXT) This symbol in the channel information shows you whether Videotext/Teletext is available for the selected channel. When you press the button, the receiver processes the videotext/Teletext service data for your TV set to display, even when the signal is encrypted. During the scan, the page which is being searched for is displayed in the top left-hand corner with the time and date displayed at the top right. -
Page 48: Edit Channel Lists
Select the “Edit Channel Lists” menu using the menu button This menu is password-protected and can only be accessed by entering the password. The factory default password is “0000”. The factory pre-programmed channel lists can be changed on this menu. You can organise and sort your preferred TV and radio channels, such as all English-language channels or those that broadcast with no commercial breaks. -
Page 49: Tv Channel List
EDIT CHANNEL LISTS TV CHANNEL LIST LOCK CHANNELS Select the channel you want to lock using the cursor buttons ( ) and press the button to activate the lock. Press again to unlock the channel. You can also sort the channels fi rst, according to the following criteria: •... -
Page 50: Rearrange Channels
• By favourites list ( (yellow) button) • By alphabetical or numerical sequence ( (blue) button) Select the sort order you want to apply using the REARRANGE CHANNELS Select the channel you want to move, using the cursor buttons ( You can now move the channel to the intended channel number using the cursor buttons, then press again to insert it there. -
Page 51: Radio Channel List
EDIT CHANNEL LISTS DELETE CHANNELS Select the channel you want to delete using the cursor buttons ( ) and press the button to mark it as deleted. The channel name is underlined in red. Press the button again to cancel your channel selection for deletion (this will only work as long as you have not yet quit the menu by pressing button). -
Page 52: Tv Favourites Lists
EDIT CHANNEL LISTS The functions on the “Edit Radio Channels” menu are controlled in the same way as those on the “Edit TV Channels” menu. TV FAVOURITES LISTS Press the button to access the “Edit TV Favourites” menu. The following display appears: CREATE FAVOURITES LIST Press the button to access the menu. -
Page 53: Radio Favourites List
EDIT CHANNEL LISTS Note: Only the favourites list is deleted; the channels in the favourites list are retained. ADD/REMOVE CHANNELS (FAVOURITES LIST) Press the button to access the menu. Use the buttons to select the favourites list to/from which you want to add or delete channels and confi rm your selection with the button. -
Page 54: Channel Switch Between Main Picture And Pip
TWIN FUNCTIONS The UFC 861 is equipped with two tuners, enabling you to perform two separate functions at the same time, including: • Picture-in-Picture (PIP), • Time-shift and • One-touch recording can be performed at the same time. PICTURE-IN-PICTURE (PIP) The picture-in-picture function permits simultaneous viewing of two programmes. -
Page 55: One-Touch Recording
TWIN FUNCTIONS Press the (green) button a second time to view a picture played back from the hard disk in the PIP window (see screenshot example on the next page): • If the programme is currently being recorded, the PIP is framed in red •... -
Page 56: Time-Shift
TIME-SHIFT If you cannot catch the beginning of a programme because you are occupied with something else, or if you have to break off watching whilst a programme is being transmitted, you can watch it in time-shift mode. Press the button to activate this function. -
Page 57: Calling Up The Epg
ELECTRONIC PROGRAMME GUIDE (EPG) CALLING UP THE EPG The EPG is accessed by pressing the menu item), regardless of which EPG view you had been in beforehand. “CURRENT” VIEW The EPG automatically displays the “Current” (Now showing) view when fi rst accessed, highlighting the current selected channel and the current programme. -
Page 58: Channel List
ELECTRONIC PROGRAMME GUIDE (EPG) Press the button to view the upcoming programme schedules in 15-minute blocks. Press the to return step-by-step to the start point (current time), or press the Quit the EPG by pressing either the CHANNEL LIST Press the (yellow) button to access the schedule for the channel to which you are currently tuned in the EPG. -
Page 59: Programmes Sorted By Category
ELECTRONIC PROGRAMME GUIDE (EPG) PROGRAMMES SORTED BY CATEGORY You can use the buttons to view the following programmes on the Highlights menu by category (e.g. Series, Sport, News, Magazine/Reportage, Kids ...). Within each category you can scroll line-by-line or page-by-page as usual using the cursor buttons ( ). -
Page 60: Search Memory
ELECTRONIC PROGRAMME GUIDE (EPG) Use the buttons to enter a space or to delete the last letter entered. Press the button to start the search. The results found are displayed at the left in the main display box. If the programmes found do not fi t on one page, you can scroll page-by-page as well as line-by-line as usual using the cursor buttons ( Press the button to start a new search. -
Page 61: Detailed Information
ELECTRONIC PROGRAMME GUIDE (EPG) Press the button to load the search term into the memory. Now select the memory location using buttons. Press the There are two ways of using a search term that is stored in the memory. 1. You must have opened the search function. Press the Use the buttons to select the desired search term. - Page 62 ELECTRONIC PROGRAMME GUIDE (EPG) When you call up additional information in the EPG using the button, you will be shown the fi rst page of the programme’s description. Use the buttons to scroll up and down the various pages of detailed information. The third page displays the upcoming episodes (such as of a series;...
-
Page 63: Programming A Recording
ELECTRONIC PROGRAMME GUIDE (EPG) PROGRAMMING A RECORDING You can programme a recording from the various views of the EPG (“Current”, “Programme list”, “Highlights” and “Detailed information”) and from within their various sub-menus. When programming recordings, the EPG automatically adapts to the actual SAT IF input signal mode (Single Mode/Loop Through/Double Tuner). - Page 64 ELECTRONIC PROGRAMME GUIDE (EPG) • Recording status (once, daily, weekly, user-defi ned, series) - selected using the • Date (advanced day-by-day) - selected using the • Start time (advanced minute-by-minute) - selected using the numeric pad. • End time (advanced minute-by-minute) - selected using the numeric pad •...
- Page 65 ELECTRONIC PROGRAMME GUIDE (EPG) Example of user-defi ned recording: Example of series recording: Note: If every episode of a series is programmed to be recorded using the “Series recording” function, the EPG locates the series in question in the updated schedules and automatically programmes recording of them.
-
Page 66: Timer List
ELECTRONIC PROGRAMME GUIDE (EPG) TIMER LIST The timer list (recording schedule) is accessed by pressing the (red) button. The timer list shows all the programmed recordings. You can use the buttons to toggle back and forth between the master timer list and the “once”... -
Page 67: Important Additional Information
ELECTRONIC PROGRAMME GUIDE (EPG) IMPORTANT ADDITIONAL INFORMATION • The button does not become active until 15-20 seconds after the picture appears on the TV. • Updating of the EPG is only started if the EPG data is more than 36 hours old. •... -
Page 68: Audio Settings
SETTING THE VOLUME The required volume level can be set using the indicator is displayed on the screen to show the set volume. MUTING Press the button to mute the sound. “Mute” is displayed. Press the button again to restore the sound. OPTIONS MENU FOR AUDIO AND SUBTITLES Press the (yellow) button to call up the audio menu for selecting the sound and language. - Page 69 AUDIO SETTINGS Example: You can for instance create a favourites list with the name “Dolby Digital” in the “Edit Channel Lists”, “Edit TV Favourites” menu. By setting “Dolby Digital” in the “Favourites” function mentioned above you can also select channels that broadcast using Dolby Digital and save them in the “Dolby Digital” favourites list.
-
Page 70: Record
The UFC 861 offers you the following options for recording a programme: - Time-shift Allowing you to include the background recordings made up to that point to be included in your recording - Record direct to hard disk Allowing you to start recording immediately or later - Timer recording (see EPG) Allowing you to coordinate your recordings and plan them well ahead, also providing a range of options such as the series timer... - Page 71 When recording starts, only data of the current programme recorded. programme running before you switched channels is not recorded. Note: The “Decoding” line is shown only when recording an encrypted channel. You can start recording the programme as from the point you switched to the channel in question simply by pressing the button, or you can simply wait the 5 seconds for automatic recording to begin.
-
Page 72: Recording Direct To Hard Disk Immediately/Later
Decoding Here you can use the (selection “On”) or encrypted (selection “No”) on the hard disk. Selecting “On” means depending on the setting in the menu “System parameters” “Common Interface” “Multiple decoding”, you may not be able to view any other encrypted channels that use to same CA module for decoding (see Chapters “System parameters”... -
Page 73: Setting Bookmarks During The Recording
Duration/End You can specify the duration of a recording regardless of when it starts. The receiver automatically retrieves the end time of the programme you are currently viewing from the EPG data (where available) and inserts it in the “Duration” fi eld. Otherwise the end time is based on the default duration you set on the “User Preference”... -
Page 74: Recording List
Select the “Recording List” menu using the menu button You can also call up the Recording List directly from TV screen, using the appears (example): You can use the button to call up a list of the available recordings, from which by pressing the buttons you can select the desired recording and call it up by pressing button. -
Page 75: Play Recordings (Folder View)
RECORDING LIST FOLDER VIEW Press the button to switch from the normal view to the folder view. Now use the buttons to select between the normal view and the folder view. Furthermore, you will be able to specify which folder your fu- ture recordings are to be saved to (in the second line). - Page 76 RECORDING LIST PLAY RECORDING (NORMAL VIEW) Use the (blue) button to choose between TV and radio recordings within the recording list. By pressing the (green) button, you can sort recordings according to the following criteria: - Date of recording (ascending) - Duration of recording (descending) - Duration of recording (ascending) - Channel (descending)
-
Page 77: Remote Control Buttons And Their Functions In Playback Mode
During playback you can keep the channel information info-box permanently on-screen by pressing button, and press it again to view the accompanying EPG data (see example below). Press the button to cancel the on-screen displays. With accompanying EPG data. Use the buttons to scroll through the EPG data. - Page 78 - After playback has been paused using the winding. Every time the There are 7 steps, step 7 being the slowest (slow motion is available only for forwards winding!) buttons (left/right cursor buttons) - 30-second jumps forwards and backwards (can be changed using the - Pressing the button continuously achieves larger jumps (receiver performs the jump only when the button is released) buttons (up/down cursor buttons)
-
Page 79: Edit Recordings/Folders
DECODING A RECORDING You can record encoded programmes even when the CA module with the Smartcard is not inserted. However, to view what you have recorded the CA module with Smartcard must be inserted in the Common Interface on the receiver. You can also decode a recording after having recorded it, so as to be able to view it in future without the CA module/Smartcard combination. - Page 80 - USB - Merge - Change Type (deletion block) - Lock At the bottom of the screen, you will also view the option “Create New Folder” (access with Note: Recordings in progress will be displayed in red print and cannot be edited until recording has been completed.
-
Page 81: Create New Folder
RECORDING LIST CREATE NEW FOLDER Press the button to create a new folder. The following screen appears: Use the on-screen keypad (with the number keys on your remote control) to give the folder a name. Press to confi rm your entry. A new folder is created. Press the button to cancel. - Page 82 MOVE (RECORDINGS TO A FOLDER) Use the buttons to select the recording to be moved and confi rm by pressing the The recording will be marked with a white “+” symbol on a red background and the selection cursor will auto- matically jump to the next recording, enabling further recordings to be selected for transfer in the exact same way.
- Page 83 Also note the bars at the bottom of the on-screen display! These provide information what to do next. The receiver automatically starts playing back the recording. You now have several options for specifying the range to be copied (see example bar): To set the exact times for the start and end markers of the copy range as quickly as possible you can use various buttons as aids: - Use the...
- Page 84 Copy the range marked “End” as follows: - Move to the start of the range you want to copy and press the to set the start point marker of the range to be copied. Then press the mark the full range to the end of the recording Copy the complete recording as follows: - Press the (green) button twice to select the complete recording...
- Page 85 The receiver automatically starts playing back the recording. You now have several options for specifying the range to be cut (see example bar): To set the exact times for the start and end markers as quickly as possible you can use various buttons as aids: - Use the buttons to rewind or fast forward at up to 24 times playback speed (you can only fast...
- Page 86 MERGE You can use this function to merge together two or more recordings on one channel. Make sure you have also selected “Merge” with the Use the buttons to select the recordings you want to merge and also press the The following display appears (example): merged recording...
- Page 87 RECORDING LIST Use the buttons to select “OK” and pres the button to start merging the recordings. The receiver merges the two recordings. The newly created single recording is assigned the name of the fi rst recording you selected for merging. DELETION BLOCK You can use this function to protect recordings from being deleted when automatic hard disk management is active (see “User Preference”...
-
Page 88: Setting Bookmarks
BOOKMARKS You can use this function to divide recordings into chapters, or to fi nd specifi c sequences in a recording very quickly. SETTING BOOKMARKS Start a recorded programme by pressing the wish to set a bookmark, press the as often as you like. After you have set all you bookmarks, switch to the “Chapters”... -
Page 89: Deleting Bookmarks
DELETING BOOKMARKS Use the buttons in the “Chapters” menu to select the bookmark to be deleted. Then press (red) button. Use the again by pressing the button. To delete all bookmarks, press the select “OK” within the message that is displayed, and confi rm again by pressing the RECORDING LIST buttons to select “OK”... -
Page 90: Multimedia/Games
MULTIMEDIA/GAMES Select the “Multimedia/Games” menu using the menu button , the buttons on the main menu . The following display appears (example): Select the function you want, using the buttons and confi rm with the button. The following displays appear (examples only):... -
Page 91: Mp3 Player
MP3 PLAYER Use the buttons to select the desired directory and press the and access its subfolders. In the above example the fi rst directory listed is the local hard disk of the UFC 861 (Local HDD). The second directory is a USB memory stick. You can also access an external hard disk via the USB port on the UFC 861 and open fi... - Page 92 The MP3 player automatically starts playing the fi rst fi le you selected. You now have the following options: - Use the buttons to skip to the next/previous track - Use the buttons to rewind or fast forward through the current selected track - Use the button to pause playback, and the - Use the...
- Page 93 Select the folder or fi le you want by pressing the end. You now have the following options: - Press the (green) button to delete the folder/fi le you selected - Press the (blue) button to move the fi les (such as from the hard disk to an external storage device or vice versa).
-
Page 94: Photo Album
PHOTO ALBUM The UFC 861 can only open photos in JPEG format (fi le suffi x: jpg/jpeg) created mode! Use the buttons to select the desired directory and press the and access its subfolders. In the above example the fi rst directory listed is the local hard disk of the UFC 861 (Local HDD). - Page 95 The slide show starts automatically with the fi rst selected photo. You now have the following options: - Press the button to show the slide show help bar (see screenshot above, lower part) - Press the button to stop the slide show and then use the through the individual photos.
- Page 96 ORGANISING PHOTO FILES You can organise the fi les on the “JPEG Files” menu. For this, press the display appears (example): Select the folder or fi le you want by pressing the end. You now have the following options: - Press the (green) button to delete the folder/fi...
- Page 97 MULTIMEDIA/GAMES GAMES At present there are no games available for the UFC 861. APPLICATIONS Applications are not yet available in the current software version.
-
Page 98: Vlc Streaming
VLC STREAMING Streaming of VLC data can only be performed if the VLC Media Player (tested with version 0.8.6b and 0.8.6.c) is installed on your PC/laptop! Media Player downloaded free of charge from the following Internet page: “http://www.videolan.org” Use the buttons to select the desired directory, and press the access its subfolders. -
Page 99: External Recordings
EXTERNAL RECORDINGS The only recordings that can be played back are those that have format “*.ts” recorded UFC 861. Use the buttons to select the desired directory and press the access its subfolders. In the above example you see the USB stick on the USB 2.0 host output as the fi rst directory, and the enabled folder on the PC/laptop as the second directory. -
Page 100: Installation Menu
INSTALLATION MENU Select the “Installation” menu using the menu button , the buttons on the main menu and Use the buttons to select further options. If there is another sub-menu layer, press the button to open it. If there are no more sub-menus, make the settings using the buttons or the numeric pad. -
Page 101: Automatic Search
FIRST INSTALLATION: See “First Installation” section. Only make changes to this menu when settings or circumstances on/relating to your reception system have changed. You made the settings for the antenna during fi rst installation. The settings should be made by a specialist engineer. AUTOMATIC SEARCH Select FTA and/or CI: Use the... - Page 102 INSTALLATION MENU After completion of the search, you will see the following message (example): Pressing the button loads the newly found channel into the channel list. Press the button to return to the TV picture.
-
Page 103: Manual Search
MANUAL SEARCH Start frequency: Use the buttons to select the start frequency for the search. End frequency: Use the buttons to select the end frequency for the search. Network Search: Use the buttons to select the setting for the network search. If you set the network scan to “On”, the networking of the transmission channels enables additional transmission channels that have not yet been saved to be located. -
Page 104: Advanced Channel Search
ADVANCED CHANNEL SEARCH Frequency: Use the numeric keypad to input the frequency on which the channel being searched for should be transmitted. Symbol: Use the numeric keypad to input the symbol rate. QAM mode: Use the buttons to select the correct type of modulation (16, 32, 64, 128 or 256 QAM). Network Search: Use the buttons to select the setting for the network search. -
Page 105: Connecting Up The Video/Pvr
CONNECTING UP THE VIDEO/PVR For details on how to connect your external recorder to the receiver refer to the connection diagram provided at the end of this manual and the instructions for the external recorder. VIDEO/PVR RECORDER RECORDING For VCR recording, the UFC 861 must be switched on or the timers must be pre-programmed and the receiver be set to the channel to be recorded. -
Page 106: Software And Programme List Update
SOFTWARE AND PROGRAMME LIST UPDATE Thanks to digital technology, you can receive cable network updates of the software and channel list for your receiver (depending on the respective cable network provider). The “On Air Download” sub-menu on the “Installation” menu tells you whether new software or programme lists are available. Press to access the main menu and use the buttons and... -
Page 107: Current Software Version
SOFTWARE AND PROGRAMME LIST UPDATE TRANSPONDER INFORMATION Here the channel information is displayed. CURRENT SOFTWARE VERSION The current software version is displayed here. DOWNLOAD INFORMATION TEXT Use the buttons to select whether you want to download the latest information text. The information text is displayed during the software download, providing details of the new features offered by the software update. - Page 108 SOFTWARE AND PROGRAMME LIST UPDATE The receiver starts downloading. On the next screen you see the following: - The number of modules being downloaded - The elapsed time - The current operation - The information text, if previously selected When the software has been successfully downloaded the receiver asks you whether you want to upgrade the operating software:...
- Page 109 Follow all on-screen instructions! Check the time setting following a software update! You can also download the updates from the Internet. The address is: http://www.kathrein.de You will fi nd the software under “Service” → “Software and Download” → “Receiver” →→ “UFC 861”...
-
Page 110: Backup Operation
OPERATING FROM THE FRONT PANEL BACKUP OPERATION If you have misplaced your remote control, or if the batteries are fl at, you can still operate your receiver from the front panel. Because there are no numbered buttons, no password/PIN-protected functions can be displayed. -
Page 111: Technical Appendix
²) Display of information only if broadcast by the programme provider ³) CA modules and smartcards are not supplied ) Software for PC can be downloaded from the Kathrein website TECHNICAL APPENDIX is fi tted with two independent reception and signal processing systems,... - Page 112 MBit/s GByte > 100 (depending on data rate and changes of Std. V/Hz °C mm/kg UFC 861si 20210116/Silver 2 x 47-862 44-83 QAM 16, 32, 64, 128, 256 DVB-C standard CCIR 601 (720 x 576 lines) MPEG-1 and MPEG-2 compatible 1.7-7...
-
Page 113: Scart Socket Assignment
ACCESSORIES 1 infrared remote control (RC 660) 2 batteries 1.5 V, type: LR 03, size: AAA (micro) 1 Scart cable 1 operating manual SCART SOCKET ASSIGNMENT Signal Audio right output Audio right input Audio left output Audio earth Blue earth Audio left input Blue signal Switching voltage... -
Page 114: Connection Examples
CONNECTION EXAMPLES HiFi system Dolby Digital system TECHNICAL APPENDIX “Loop-Through” connection required for two operation Network PC/Laptop Digital sound AV 3 optical... -
Page 115: Dhcp (Receiver): Off
TECHNICAL APPENDIX CONNECTION EXAMPLES FOR THE NETWORK FUNCTION DHCP (Receiver): OFF IP-Adresse: IP address: 192.168.0.11 192.168.0.11 Crossed over network cable Gekreuztes Netzwerkkabel IP address: IP-Adresse: 192.168.0.10 192.168.0.10 PC/Laptop PC/Laptop... - Page 116 TECHNICAL APPENDIX DHCP (Receiver): OFF TCP/IP address: TCP/IP-Adresse: 192.168.0.12 192.168.0.12 Network cable Netzwerkkabel Switch/HUB Switch/HUB Network cable Network cable Netzwerkkabel Netzwerkkabel PC/Laptop PC/Laptop PC/Laptop PC/Laptop TCP/IP address: TCP/IP address: TCP/IP-Adresse: TCP/IP-Adresse: 192.168.0.10 192.168.0.11 192.168.0.10 192.168.0.11...
- Page 117 TECHNICAL APPENDIX DHCP (Receiver): OFF TCP/IP address: TCP/IP address: TCP/IP-Adresse: TCP/IP-Adresse: 192.168.0.12 192.168.0.13 192.168.0.12 192.168.0.13 Network cable Network cable Netzwerkkabel Netzwerkkabel DHCP-Server, Router DHCP sensor, router (z. B. Fritzbox) (e.g. Fritzbox) Network cable Network cable Netzwerkkabel Netzwerkkabel PC/Laptop PC/Laptop PC/Laptop PC/Laptop TCP/IP address: TCP/IP address:...
-
Page 118: Dhcp (Receiver): On
TECHNICAL APPENDIX DHCP (Receiver): ON TCP/IP-Adresse: TCP/IP address: automatic automatisch Network cable Netzwerkkabel DHCP-Server, Router DHCP sensor, router (z. B. Fritzbox) (e.g. Fritzbox) Broadcast path Funkstrecke PC/Laptop PC/Laptop... - Page 119 TECHNICAL APPENDIX DHCP (Receiver): ON TCP/IP address: TCP/IP-Adresse: automatic automatisch Netzwerkkabel Network cable DHCP-Server, Router DHCP sensor, router (z. B. Fritzbox) (e.g. Fritzbox) Broadcast Funkstrecke path PC/Laptop PC/Laptop PC/Laptop PC/Laptop...
- Page 120 TECHNICAL APPENDIX DHCP (Receiver): ON TCP/IP-Adresse: TCP/IP-Adresse: TCP/IP address: TCP/IP address: automatic automatisch automatisch automatic Network cable Network cable Netzwerkkabel Netzwerkkabel DHCP sensor, router DHCP-Server, Router (e.g. Fritzbox) (z. B. Fritzbox) Broadcast Funkstrecke path PC/Laptop PC/Laptop PC/Laptop PC/Laptop...
-
Page 121: Symbol Rate
SHORT TECHNICAL GUIDE DVB MPEG-2 DVB is the abbreviation for Digital Video Broadcasting. DVB-S refers to the transmission method (C = cable). MPEG is the abbreviation for Moving Picture Experts Group, a working group that formulates internationally applicable standards for the digital compression of video and audio. MPEG-2 has established itself as the standard for compression of digital TV signals. - Page 122 GLOSSARY AC 3 Audio output AV programme slot Decoder DHCP Eb/No [dB] Eb/No ratio IP address LED display Mute Pay TV PCMCIA Receiver Scart cable Smartcard Standby S-VHS Symbol rate Time-shift function Timer function VCR connection SHORT TECHNICAL GUIDE Output for Dolby Digital signal Audio output on the receiver Preferred programme slot on TV set for Scart input Conditional Access (for decoding of encrypted programmes)
-
Page 123: Troubleshooting/Service
If, despite studying this operating manual, you still have questions about getting started with the unit or using it correctly, or if unexpected problems occur, please contact your specialist dealer. The Kathrein customer hotline is also at your disposal. Phone: +49 900/1122240 * (0.89 EUR per minute on land lines of Deutsche Telekom AG) -
Page 124: Subject Index
... 69 AC 3 ... 41 ACCESS CONTROL ... 43 CHANGE PIN LOCK INSTALLATION MENU ... 42 LOCK RECEIVER LOCK RECEIVER MANAGEMENT ... 42 SET AGE LIMIT ... 113 ACCESSORIES ADVANCED CHANNEL SEARCH ... 20 ALPHANUMERIC INPUTS ... 97 APPLICATIONS ... - Page 125 ... 43 DISPLAY SETTINGS CHANNEL INFO BANNER TIMEOUT CHANNEL INFORMATION POSITION ... 44 DISPLAY BRIGHTNESS DISPLAYING THE VOLUME BAR DISPLAY IN STANDBY MODE (STANDBY VFD) PLAYBACK INFO BANNER TIMEOUT RADIO BACKGROUND IMAGE ... 10 DISPOSAL INSTRUCTIONS DOWNLOAD INFORMATION TEXT ... 45 PVR SETTINGS ...
- Page 126 ... 26 MULTIPLE DECODING ... 68 MUTING ONE-TOUCH RECORDING OPTICAL DIGITAL OUTPUT ... 21 OPTIONAL CHANNELS OPTIONS MENU FOR AUDIO AND SUBTITLES ... 75 FOLDER VIEW CREATE NEW FOLDERS AND SAVE RECORDINGS TO FOLDER ... 94 PHOTO ALBUM ORGANISING PHOTO FILES PICTURE-IN-PICTURE (PIP) ...
- Page 127 ... 50 SKIP CHANNELS ... 52 TV FAVOURITES LISTS ADD/REMOVE CHANNELS (FAVOURITES LIST) CREATE FAVOURITES LIST ... 52 DELETE FAVOURITES LIST RENAME FAVOURITES LIST ... 28 TV SETTINGS ... 28 AV SETTINGS ... 29 OSD POSITION SETUP ... 29 TV STANDARD UPDATE OPERATING SOFTWARE UPDATE OPERATING SOFTWARE ...
- Page 128 Internet: http://www.kathrein.de KATHREIN-Werke KG • Anton-Kathrein-Straße 1 - 3 P.O. Box 100 444 • 83004 Rosenheim • GERMANY...
Need help?
Do you have a question about the UFC 861si and is the answer not in the manual?
Questions and answers