Jura XS95 Manual
Hide thumbs
Also See for XS95:
- Manual (64 pages) ,
- Instructions for use manual (28 pages) ,
- Instructions for use manual (28 pages)
Table of Contents

Related Manuals for Jura XS95


Summary of Contents for Jura XS95
- Page 1 The IMPRESSA X 95/X 90 One Touch Manual The ‘IMPRESSA Manual’ has been awarded the seal of approval by the independent German Technical Inspection Agency, TÜV SÜD, due to its easy-to-understand style, its thoroughness and coverage of safety aspects.
-
Page 2: Important Safeguards
Important Safeguards IMPORTANT SAFEGUARDS These safeguards apply for machines with UL safety test (see rating plate and chapter 10, ‘Technical data’). Follow the basic safety When using electrical appliances, basic safety precautions should precautions always be followed, to reduce the risk of fire, electric shock, and/or injury to persons, including the following: Read all instructions. - Page 3 A short power supply cord is provided to reduce the risk resulting from becoming entangled in or tripping over a long cord. Your IMPRESSA has a 3-pin grounded plug. b. Longer extension cords are available and may be used if care is exercised in their use.
- Page 4 Important Safeguards Keep your hands and the cord away from hot parts of the appliance during operation. Never clean with scouring powders or hard implements. NEVER DO Never fill instant coffee, chocolate mix etc. into the grinder or (or you will void your ground coffee funnel (grinder by-pass).
- Page 5 Important Safeguards...
-
Page 6: Table Of Contents
Table of contents Your IMPRESSA Xs95/Xs90 One Touch IMPORTANT SAFEGUARDS Control elements Proper use For your safety The IMPRESSA X 95/X 90 One Touch Manual Symbol description ............................12 IMPRESSA X 95/X 90 One Touch Connector System ............................14 © JURA on the Internet ............................14 Knowledge Builder ............................14... - Page 7 Table of contents Permanent settings in programming mode Products ................................36 Energy-saving mode ..........................38 Time and weekday ............................39 Programmable switch-on and switch-off time ..................40 Automatic switch-off ...........................41 Rinses ................................42 Unit amount of water / time format ......................43 Language ..............................44 Maintenance Maintenance tips ............................45 Rinsing the machine ...........................45 Changing the filter ............................46 Cleaning the machine ..........................48...
-
Page 8: Control Elements
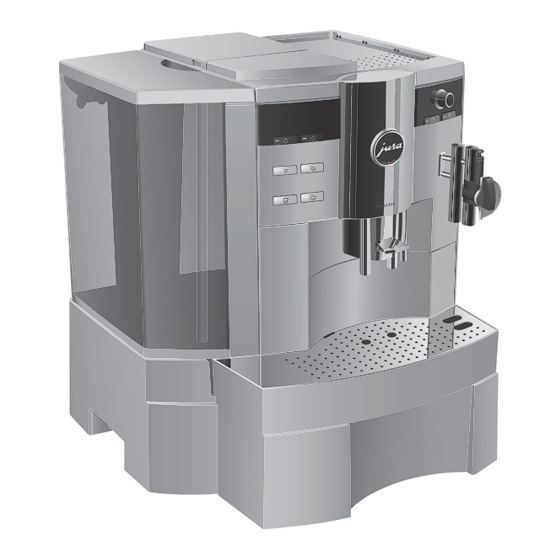
Control elements Control elements Figure: IMPRESSA X 95 One Touch Bean container cover Fineness of grind switch Bean container with aroma preservation Cup tray cover Cover of filler funnel for pre-ground coffee Water tank with handle Filler funnel for pre-ground coffee... - Page 9 Control elements Front left Front right Display ö Selector switch Professional Cappuccino Frother Rotary Switch cover f Rotary switch Easy Cappuccino Frother On/off button Hot water portion symbol Maintenance button Hot water symbol 1 Espresso button Cappuccino button 2 Espressi button Milk portion symbol 1 Coffee button Milk symbol...
-
Page 10: Proper Use
Never open and repair the machine yourself. Do not modify the machine in any way that is not described in the IMPRESSA Manual. The machine contains live parts. If opened, there is a danger of serious injury. - Page 11 Protect your IMPRESSA from environmental influences such as rain, frost and direct sunlight. Do not put the IMPRESSA, cable or connections in water. Do not put the IMPRESSA or any individual parts in the dish- washer. Turn your IMPRESSA off at the power switch before starting any cleaning operation.
-
Page 12: The Impressa X S 95/X S 90 One Touch Manual
CAUTION the machine to become damaged. Symbols used Information and tips to make things easier for you as you use your IMPRESSA. References to the online JURA website, where you can find interesting further infor- mation: www.jura.com. Prompt to take action. This symbol means that you are being prompted to perform... -
Page 13: Impressa
This development also calls for a solution for small shops, offices and catering establish- ments. All demands are more than met by the IMPRESSA X 95/X One Touch which prepares twelve different products – including the trend beverage latte macchiato –... -
Page 14: Connector System
Cappuccino / latte macchiato JURA on the Internet Visit us on the Internet. @ At www.jura.com you will find interesting and up-to-date information on your IMPRESSA and on every aspect of cof- fee. Knowledge Builder You can familiarize yourself with your IMPRESSA X... -
Page 15: Preparing And Using For The First Time
IMPRESSA without any problems. You will prepare your IMPRESSA step-by-step for your first coffee experience. Setting up Keep the packaging for your IMPRESSA. It should be used to protect the machine during transportation. When setting up your IMPRESSA, please note the following: Set the IMPRESSA down on a horizontal surface that is not sensitive to water. -
Page 16: First-Time Use
Precondition: The water tank and bean container are full. T Insert the mains plug into a power socket. 3 T Switch on the IMPRESSA using the power switch on the back of the machine. The on/off button Q lights up (standby). -
Page 17: Using And Activating Filter
(see Chapter ‘JURA contact details / Legal information’). Using and Your IMPRESSA no longer has to be descaled if you are using CLARIS activating filter filter cartridges. @ You can also try out the ‘Using and activating filter’ operation online. -
Page 18: Determining And Adjusting The Degree Of Water Hardness
The filter is now COFFEE READY activated. Determining and The harder the water is, the more frequently the IMPRESSA needs to adjusting the degree be descaled. It is therefore important to adjust the water hardness. of water hardness... - Page 19 The water hardness can be adjusted on a continuous scale between 1° dH and 30° dH. This can also be deactivated, which means that the IMPRESSA will not let you know when it has to be descaled. E However, if you are using the CLARIS filter cartridge and have activated it, you will not be able to adjust the water hard- ness.
-
Page 20: Adjusting Grinder
The coffee will be prepared and the fineness of grind is adjusted. Switching on When the IMPRESSA is switched on, a prompt for the rinse operation automatically appears which is initiated by pressing the mainte- nance button. -
Page 21: Switching Off (Standby)
COFFEE READY is ready to use. Switching off (standby) When you switch your IMPRESSA off, the spouts with which a coffee speciality or milk have been prepared are rinsed. T Place a receptacle under the coffee spout and the frother. -
Page 22: Familiarising Yourself With The Control Options
3 Familiarising yourself with the control options 3 Familiarising yourself with the control options With the IMPRESSA, you can prepare an excellent coffee or milk spe- ciality at the touch of a button. You also have the option of adjusting the coffee strength and temperature, as well as the amount of water to your personal taste. -
Page 23: One-Off Settings Before And During Preparation
3 Familiarising yourself with the control options One-off settings before It is possible to make various settings before and during preparation. and during preparation These one-off settings are always follow the same model and are not stored. Changing the coffee The coffee strength of Coffee à... -
Page 24: Entering A Permanent Setting For The Amount Of Water For A Cup Size
3 Familiarising yourself with the control options T Open the cover of the Rotary Switch. o T Press the 1 Coffee button. and the pre-set coffee strength is displayed. 1 COFFEE The brewing operation starts and the coffee flows into the cup. -
Page 25: Permanent Settings In Programming Mode
3 Familiarising yourself with the control options Permanent settings in You can easily adjust your IMPRESSA to your personal coffee blends programming mode and specialities. You can navigate through the easy-to-understand programme steps and make permanent settings simply by turning and pressing the Rotary Switch. - Page 26 3 Familiarising yourself with the control options Programme item Subitem Explanation T Keep track of all prepared coffee and milk INFORMATION specialities and view the maintenance status. T Select the unit of the amount of water and SETTINGS ML/OZ the time format. 24HRS/AM PM T Select the desired language.
-
Page 27: Viewing Information And Maintenance Status
The bar shows the current maintenance status. When the bar is filled completely, your IMPRESSA will request the respective maintenance programme. k T Press the Rotary Switch to exit the programme item. -
Page 28: Preparation At The Touch Of A Button
4 Preparation at the touch of a button 4 Preparation at the touch of a button In this chapter you will find out how to prepare coffee and milk spe- cialities and hot water without making further settings. E You can stop the machine at any time while a coffee or milk product or hot water is being prepared. -
Page 29: Coffee À La Carte
ENJOY appears on the display. is then dis- COFFEE READY played. Cappuccino Your IMPRESSA prepares a cappuccino at the touch of a button. It is not necessary to move the cup. Cappuccino with the Professional Cappuccino Frother Precondition: is displayed. - Page 30 4 Preparation at the touch of a button T Place a cup under the frother. T Turn the selection lever of the frother to the milk foam position p. p T Press the Cappuccino button. and the coffee strength are displayed. CAPPUCCINO The milk foam is then prepared.
-
Page 31: Latte Macchiato
4 Preparation at the touch of a button Latte macchiato Your IMPRESSA prepares a latte macchiato at the touch of the button. It is not necessary to move the glass. Latte macchiato with the Professional Cappuccino Frother Precondition: is displayed. -
Page 32: Pre-Ground Coffee
E If you did not fill the machine with a sufficient amount of pre- ground coffee, is displayed NOT ENOUGH PRE-GROUND and the IMPRESSA stops operation. -
Page 33: Hot Milk And Milk Foam
4 Preparation at the touch of a button All coffee specialities with pre-ground coffee are prepared following this model. Example: This is how to prepare a cup of coffee using pre-ground coffee. T Place a cup under the coffee spout. T Open the cover of the filler funnel for pre-ground coffee. - Page 34 4 Preparation at the touch of a button T Place a cup under the frother. T Turn the selection lever of the frother to the milk foam position p. E If you want to heat the milk, set the selection lever of the frother to the milk position t.
-
Page 35: Hot Water
4 Preparation at the touch of a button Hot water Hot water can be prepared in two ways: Hot water portion a The pre-set amount of water flows into the cup. Hot water m Water flows out of the hot water spout until preparation is interrupted by pressing any button. -
Page 36: Permanent Settings In Programming Mode
5 Permanent settings in programming mode 5 Permanent settings in programming mode Products With the programme item you can enter individual PRODUCTS settings for all coffee and milk specialities as well as hot water. The following permanent settings can be made: Product Amount Coffee strength... - Page 37 5 Permanent settings in programming mode Example: Proceed as follows to change the amount of milk of latte macchiato from , the pause from 16 SEC 20 SEC 30 SEC and the amount of water from 40 SEC 45 ML 40 ML Precondition: is displayed.
-
Page 38: Energy-Saving Mode
All coffee and milk products, as well as hot water, can be prepared without having to wait. SAVE LEVEL 1 Your IMPRESSA is only continuously ready for use for coffee products and hot water. The machine has to heat up before milk preparation. -
Page 39: Time And Weekday
5 Permanent settings in programming mode Example: Proceed as follows to change the energy-saving mode from SAVE NO SAVE LEVEL 1 Precondition: is displayed. COFFEE READY T Open the cover of the Rotary Switch. k T Keep the Rotary Switch pressed until MAINTENANCE appears. -
Page 40: Programmable Switch-On And Switch-Off Time
Set the required switch-on time. MACH. OFF Set the required switch-off time. ON/OFF Set the weekdays on which IMPRESSA should switch on and off automatically. E The programmable switch-on only works when the machine is switched on at the power switch (standby). -
Page 41: Automatic Switch-Off
T Press the Rotary Switch to exit programming mode. COFFEE READY Automatic switch-off By instructing your IMPRESSA to automatically switch itself off, you can cut down your energy consumption. If this function is activated, your IMPRESSA switches off automatically after the last action on the machine. -
Page 42: Rinses
5 Permanent settings in programming mode T Open the cover of the Rotary Switch. k T Keep the Rotary Switch pressed until MAINTENANCE appears. g T Turn the Rotary Switch until is dis- OFF AFTER 1 H played. k T Press the Rotary Switch to enter the programme item. OFF AFTER 1 H g T Turn the Rotary Switch until is dis-... -
Page 43: Unit Amount Of Water / Time Format
5 Permanent settings in programming mode k T Press the Rotary Switch to confirm the setting. appears briefly on the display. CONFIRMED w CAPP RINSE NOW g T Turn the Rotary Switch until is displayed. EXIT k T Press the Rotary Switch to exit the programme item. RINSES g T Turn the Rotary Switch until is displayed. -
Page 44: Language
5 Permanent settings in programming mode Language You set the language when you used the machine for the first time. Example: To change the language from ENGLISH DEUTSCH (example), proceed as follows. Precondition: is displayed. COFFEE READY k T Keep the Rotary Switch pressed until MAINTENANCE appears. -
Page 45: Maintenance
Wipe the surface of the machine with a damp cloth. Rinsing the machine When the IMPRESSA is switched on, a prompt to perform a rinse operation appears after heating, or this is automatically started. It can be set in programming mode whether the switch-on rinse needs to be activated manually or whether the machine automati- cally activates the switch-on rinse (see Chapter 5 ‘Permanent set-... -
Page 46: Changing The Filter
T Press the Rotary Switch to initiate the rinse operation. MACHINE RINSING Rinsing stops automatically and your IMPRESSA is then once more ready for use. Changing the filter E After 50 litres of water have flowed through, the filter will cease to work. - Page 47 E The water may be slightly discoloured. This is not harmful to health and does not affect the taste. Filter rinsing stops automatically after approx. 500 ml. The IMPRESSA heats up and is once again ready to use. Manual filter change You can initiate the ‘Changing the filter’ operation manually.
-
Page 48: Cleaning The Machine
T), as is described under ‘Replacement following a prompt’. Cleaning the machine After 220 coffee preparations or 80 switch-on rinses, the IMPRESSA will prompt you to clean it. If the wrong cleaning agent is used, the machine could be damaged CAUTION and/or traces of detergent could be left behind in the water. - Page 49 EMPTY TRAY T Empty the drip tray and coffee grounds container and put them back into the machine. The cleaning operation is now complete. The IMPRESSA is ready for use again. Manual cleaning You can initiate the ‘Cleaning the machine’ operation manually.
-
Page 50: Descaling The Machine
6 Maintenance Descaling the machine The IMPRESSA builds up deposits of limescale over time and auto- matically prompts you to descale it when necessary. The degree of calcification depends on the degree of hardness of your water. If the descaling agent comes into contact with the skin or eyes, this can cause irritation. - Page 51 6 Maintenance E If you want to descale the machine at a later point in time, turn the Rotary Switch until is displayed. Exit the START NO maintenance programme by pressing the Rotary Switch. The prompt ‘Decalcify machine’ remains on the display. c T Press the maintenance button.
-
Page 52: Rinsing The Cappuccino Frother
E This chapter applies to the Professional and Easy Cappuccino cappuccino frother Frothers. Each time milk has been prepared the IMPRESSA displays a prompt for Cappuccino rinsing. It can be set in programming mode whether the rinsing prompt is displayed immediately or 10 minutes after preparation (refer to... -
Page 53: Cleaning The Cappuccino Frother
6 Maintenance Rinsing following a prompt Precondition: COFFEE READY RINSE CAPPUCCINO displayed and the maintenance button c lights up. T Place a receptacle under the frother. E If you are using the Professional Cappuccino Frother, turn the selection lever to the steam position n. c T Press the maintenance button. - Page 54 T Empty the other receptacle and place it under the frother once more. c T Press the maintenance button. , the frother and pipe are rinsed CAPPUCCINO CLEANS with fresh water. appears on the display. Your IMPRESSA COFFEE READY is once more ready to use.
-
Page 55: Disassembling And Rinsing The Professional Cappuccino Frother
6 Maintenance Cleaning the cappuccino If milk has been prepared, but the cappuccino frother has not been frother after a prompt cleaned, the prompt is displayed when CLEAN CAPPUCCINO the machine is switched off. The maintenance programme can be started by pressing the maintenance button c. Precondition: is displayed and the CLEANER FOR CAPPU. -
Page 56: Cleaning The Bean Container
Descaling the water Limescale deposits may form in the water tank. To ensure correct tank function of your IMPRESSA, you should descale the water tank from time to time. T Remove the water tank. T If you use a CLARIS filter cartridge, remove this. -
Page 57: Display Messages
RINSE CAPPUCCINO rinsing. After 220 preparations or T Clean the machine (see COFFEE READY 80 switch-on rinses, the Chapter 6, ‘Maintenance – CLEAN MACHINE IMPRESSA will prompt you to Cleaning the machine’). clean it. -
Page 58: Change Filter
COFFEE READY no cleaning has been carried Chapter 6, ‘Maintenance – CLEAN NOW out yet. Cleaning the machine’). The IMPRESSA is prompting T Descale the machine (see COFFEE READY you to descale it. Chapter 6, ‘Maintenance – DECALCIFY MACHINE Descaling the machine’). -
Page 59: Troubleshooting
8 Troubleshooting 8 Troubleshooting Problem Cause/Result Action Grinder is making a very There are foreign objects T Contact customer support in your loud noise. in the grinder. country (see Chapter ‘JURA contact details / Legal information’). The frother does not The cappuccino frother T Rinse and clean the cappuccino produce enough milk foam... - Page 60 Other messages – T Turn the IMPRESSA off at the power ERROR are displayed. switch. Contact customer support in your country (see Chapter ‘JURA contact details / Legal information’).
-
Page 61: Transport And Environmentally Neutral Disposal
9 Transport and environmentally neutral disposal 9 Transport and environmentally neutral disposal Transport / Keep the packaging for your IMPRESSA. It should be used to protect Emptying the system the machine during transportation. In order to protect the IMPRESSA from frost during transportation, the system must be emptied. -
Page 62: Technical Data
10 Technical data 10 Technical data Voltage 220–240 V AC, 50 Hz 120 V AC, 60 Hz 220–240 V AC, 50 Hz 220 V AC, 50 Hz Power 1450 W F 1250 W S D F G Safety test Energy 40 Wh SAVE NO Energy... -
Page 63: Index
Index Index Easy Cappuccino Frother Disassembling and rinsing 55 Aroma preservation cover 8 Emptying the system 61 Automatic switch-off 41 Energy-saving mode 38 Entering a default setting for the amount of Bean container water for a cup size 24 Aroma preservation cover 8 Errors Cleaning 56 Troubleshooting 59... - Page 64 Index Descaling 50 Time and weekday 39 Rinsing 45 Unit amount of water / Time format 43 Setting up 15 Prompt to take action Switching off (stand-by) 21 Symbols used 12 Switching on 20 Maintenance 45 Rinses 42 Maintenance tips 45 Rinsing Milk Cappuccino frother 52...
-
Page 68: Jura Contact Details / Legal Information
2006/95/EC – Low Voltage Directive 2004/108/EC – Electromagnetic Compatibility Technical changes We reserve the right to make technical changes. The illustrations used in the IMPRESSA XS95/XS90 One Touch Manual show the IMPRESSA XS95 One Touch model. Your IMPRESSA could incorpo- rate minor changes. Feedback Your opinion is important to us! Use the contact link at www.jura.com.
Need help?
Do you have a question about the XS95 and is the answer not in the manual?
Questions and answers