Table of Contents
Advertisement
Quick Links
Download this manual
See also:
Instruction Manual
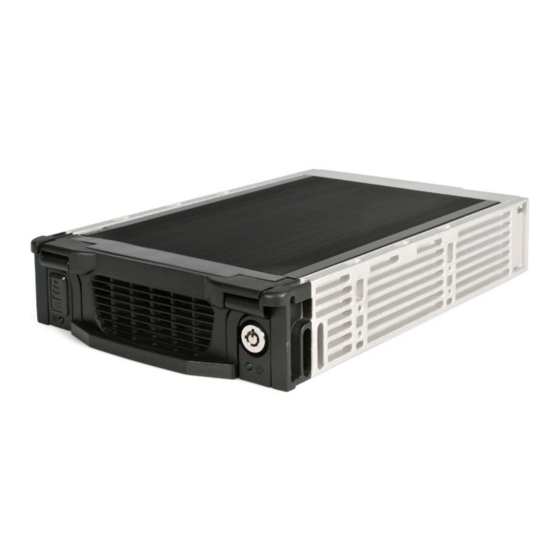
Aluminum 5.25in Bay to 3.5in SATA HDD
Mobile Rack
DRW115SAT / DRW115SATBK
DE: Bedienungsanleitung - de.startech.com
FR: Guide de l'utilisateur - fr.startech.com
ES: Guía del usuario - es.startech.com
IT: Guida per l'uso - it.startech.com
NL: Gebruiksaanwijzing - nl.startech.com
PT: Guia do usuário - pt.startech.com
For the most up-to-date information, please visit: www.startech.com
Manual Revision: 10/04/2012
*DRW115SATBK shown
*actual product may vary from photos
Advertisement
Table of Contents

Related Manuals for StarTech.com DRW115SAT


Summary of Contents for StarTech.com DRW115SAT
- Page 1 DE: Bedienungsanleitung - de.startech.com FR: Guide de l'utilisateur - fr.startech.com ES: Guía del usuario - es.startech.com IT: Guida per l'uso - it.startech.com NL: Gebruiksaanwijzing - nl.startech.com PT: Guia do usuário - pt.startech.com For the most up-to-date information, please visit: www.startech.com Manual Revision: 10/04/2012...
- Page 2 StarTech.com. Where they occur these references are for illustrative purposes only and do not represent an endorsement of a product or service by StarTech.com, or an endorsement of the product(s) to which this manual applies by the third-party company in question. Regardless of any direct acknowledgement elsewhere in the body of this document, StarTech.com hereby...
-
Page 3: Table Of Contents
Table of Contents Introduction ....................1 Packaging Contents ..........................1 System Requirements ..........................1 Installation ....................2 Installing Hard Drive in the Caddy ...................... 2 Installing the Bay in the PC ........................3 Installing the Caddy in the Bay ......................3 Removing the Drive Drawer ........................4 Swap Manager Software ...............4 To convert a dynamic disk to a basic disk: .................. -
Page 4: Introduction
Introduction This high quality Removable SATA Hard Drive Drawer/Mobile Rack delivers a professional-grade SATA hot-swap solution, allowing you to quickly swap Serial ATA hard drives in and out of a computer without having to open the computer case. Simply install the (included) drive bay into a 5.25in drive bay on the host computer, then mount a 3.5in SATA HDD in the (removable) caddy. -
Page 5: Installation
Installation Installing Hard Drive in the Caddy WARNING! Hard drives and storage enclosures require careful handling, especially when being transported. If you are not careful with your hard disk, lost data may result. Always handle your hard drive and storage device with caution. Be sure that you are properly grounded by wearing an anti-static strap when handling computer components or discharge yourself of any static electricity build-up by touching a large grounded metal surface (such as the computer case) for several seconds. -
Page 6: Installing The Bay In The Pc
Installing the Bay in the PC WARNING! Computer parts can be severely damaged by static electricity. Be sure that you are properly grounded before opening your computer case. StarTech. com recommends that you wear an anti-static strap when installing any computer component. -
Page 7: Removing The Drive Drawer
Removing the Drive Drawer 1. Insert the key and turn clockwise to unlock the drive drawer. 2. Lift the handle and gently pull the caddy out of the bay. NOTE: Do not unlock the drawer when the hard drive is in use (See “Monitoring Your Hard Disk Drive and Drawer”... -
Page 8: To Install The Swap Manager Software
To install the Swap Manager Software: 1. Insert your Swap Manager CD into your CD drive. 2. AutoPlay should automatically launch and display all of the folders on the CD. If not, open “My Computer” and double-click on the CD/DVD drive. 3. -
Page 9: Troubleshooting Swap Manager
Troubleshooting Swap Manager If you have installed a new drive but there is no new icon listed in Swap Manager, first make sure that you have clicked the Swap In icon to let Swap Manager know that there is a new drive. If that does not work, check the following: • Make sure that the hardware is properly installed and that all cables are properly connected and firmly seated. -
Page 10: Specifications
Specifications Number of Drive Bays Host Interface SATA (pass through) 1 x 7-pin SATA data male Host Connectors 1 x 15-pin SATA power male 1 x 4-pin LP4 Molex male 1 x Power LEDs 1 x Fan Failure Compatible Hard Drives 3.5in SATA Fans 2 x 40mm (ball bearing) -
Page 11: Technical Support
Limitation of Liability In no event shall the liability of StarTech.com Ltd. and StarTech.com USA LLP (or their officers, directors, employees or agents) for any damages (whether direct or indirect, special, punitive, incidental, consequential, or otherwise), loss of profits, loss of business, or any pecuniary loss, arising out of or related to the use of the product exceed the actual price paid for the product. - Page 12 StarTech.com is an ISO 9001 Registered manufacturer of connectivity and technology parts. StarTech.com was founded in 1985 and has operations in the United States, Canada, the United Kingdom and Taiwan servicing a worldwide market.
Need help?
Do you have a question about the DRW115SAT and is the answer not in the manual?
Questions and answers