Table of Contents
Advertisement
Quick Links
Marshall Electronics
Warranty
Marshall Electronics warranties to the first consumer that this QVW-2710 LCD monitor will, under normal use, be free from defects
in workmanship and materials, when received in its original container, for a period of one year from the purchase date. This
warranty is extended to the first consumer only, and proof of purchase is necessary to honor the warranty. If there is no proof of
Model No. QVW-2710
purchase provided with a warranty claim, Marshall Electronics reserves the right not to honor the warranty set forth above.
Therefore, labor and parts may be charged to the consumer. This warranty does not apply to the product exterior or cosmetics.
Misuse, abnormal handling, alterations or modifications in design or construction void this warranty. It is considered normal for a
minimal amount of pixels, not to exceed three, to fail on the periphery of the display active viewing area. Marshall Electronics
27" Quad-Viewer Monitor with 4K Format Support
reserves the option to refuse service for display pixel failure if deemed unobtrusive to effective use of the monitor by our
technicians. No sales personnel of the seller or any other person is authorized to make any warranties other than those described
above, or to extend the duration of any warranties on behalf of Marshall Electronics, beyond the time period described above. Due
to constant effort to improve products and product features, specifications may change without notice.
Operating Instructions
32
Advertisement
Table of Contents

Related Manuals for Marshall Electronics QVW-2710


Summary of Contents for Marshall Electronics QVW-2710
-
Page 1: Operating Instructions
Warranty Marshall Electronics warranties to the first consumer that this QVW-2710 LCD monitor will, under normal use, be free from defects in workmanship and materials, when received in its original container, for a period of one year from the purchase date. This warranty is extended to the first consumer only, and proof of purchase is necessary to honor the warranty. - Page 2 Intentionally Left Blank...
- Page 3 Intentionally Left Blank Dimensions...
-
Page 4: Table Of Contents
Front Controls ............................7 Rear Inputs ............................8 Burn-In Warning Compatible Input Formats........................9 The QVW-2710 uses a high quality LCD panel. Screen Layouts ...........................10 However, if a static image is left on the screen for 48 On Screen Menu..........................12 hours, there may be a 10 to 20 minute recovery period for the panel. -
Page 5: Installation And Accessories
The QVW-2710 supports VESA standard 200 mm hole pattern accessories. Additionally, a desktop This submenu will give you access to Software versions for each of the key components of the system. stand is available for this product. Please contact your local dealer or Marshall Electronics for further information. -
Page 6: Monitor Front
Use this setting to choose the color of the IMD Fixed String text (see below). Available colors are red, green, and yellow. This setting does not affect text color when using IMD text via the Image Video or TSL v4.0 protocols (text color is set via the protocols). -
Page 7: Front Controls
Front Controls ■ IMD Baud Rate Use this setting to choose the baud rate. The baud rate must be set in conjunction with the controlling device. Available baud rates are 300, 600, 1200, 2400, 4800, 9600, 19200, 38400, 57600, 115200. The TSL v4.0 protocol is fixed at 38400 baud for correct functionality, but this can be changed on the monitor for custom purposes. -
Page 8: Rear Inputs
VOLUME or MUTE functions on the You can use the Ethernet port to access the MEI The QVW-2710 OSD tally can be controlled in a variety of different ways. Use the Tally Source setting to choose how tally monitor. -
Page 9: Compatible Input Formats
23.98, 23.98sF, 24, 24sF, 25, 25sF, 29.97, 29.97sF, 30, 30sF The QVW-2710 features an In-Monitor Display (IMD) with the ability to display on-screen text and tally in three colors. IMD text, color, and alignment can be assigned to each input locally using menu options (see below). -
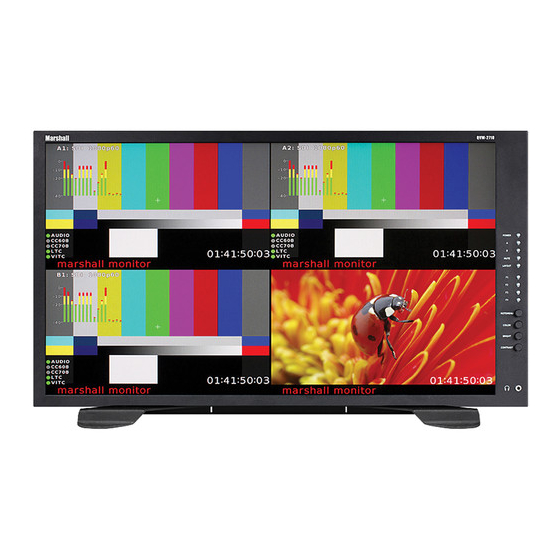
Page 10: Screen Layouts
Audio Config Submenu The QVW-2710 can display 4 different input sources simultaneously. Each source is scaled and positioned to fit the desired layout. There are a total of 4 different layouts illustrated below. Each press of the Layout Button will switch to the Use the Audio Configuration submenu to configure Audio channel selection for the headphone jack, audio level and on next available layout. - Page 11 ■ Anc. Monitor Use the Ancillary Monitor menu option to enable or disable on screen audio, closed caption and timecode presence indicators. When enabled, Audio, CC608, CC708, LTC and VITC indicators are shown on the screen. A green circle will appear next to each data type if it is present in the SDI stream.
-
Page 12: On Screen Menu
■ OSD Tally On Screen Menu Use this setting to choose how tally is displayed on the screen. The available OSD Tally options depend on the Tally Source selected in the IMD Configuration submenu. Access and navigate the main menu using the RotoMenu™ knob: When the Tally Source is set to Standard (contact closure), OSD Tally can be set to Off, RGY, RG, or GR: •... -
Page 13: Marker Setup Submenu
To modify a channel, enter a specific submenu (Marker Setup) and a specific function in that submenu (Marker Enable) by highlighting it with the RotoMenu and pressing the knob to confirm your selection. OSD Configuration Submenu Your current position in the menu is indicated by the white highlighted box. When you have selected the desired function, you are given the option of modifying one channel or All channels. -
Page 14: Video Configuration Submenu
■ ■ Marker Enable User-Definable Function Buttons Enable or disable on screen markers for each individual channel. Use the Function 1 – Function 4 menu items to define each function button on the front panel of the monitor. The following options are available for each button: ■... -
Page 15: System Configuration Submenu
Allow the monitor to warm up for at least 5-10 minutes. System Configuration Submenu Display SMPTE split-field color bars on the monitor using an external source. Enable Monochrome mode. Use the System Configuration submenu to control various system parameters such as GPI, function button settings and User definable presets. - Page 16 Color Configuration Submenu Use the Color Configuration submenu to adjust the Red, Green and Blue Offset and Gain values of all four input channels. ■ 4K Mode Use this setting to enable the 4K Mode, which synchronizes all four inputs to allow the monitor to display a 4K signal. When in 4K mode, all functions in the menu will be available, and controls for COLOR, BRIGHTNESS and CONTRAST will work on all four quadrants simultaneously.
Need help?
Do you have a question about the QVW-2710 and is the answer not in the manual?
Questions and answers