Table of Contents
Advertisement
Quick Links
OPERATING MANUAL
BEDIENUNGSANLEITUNG
MODE D'EMPLOI
MANUAL DE FUNCIONAMIENTO
MANUALE DI ISTRUZIONI
ΕΓΧΕΙΡΙΔΙΟ ΛΕΙΤΟΥΡΓΙΑΣ
MANUAL DE INSTRUÇÕES
РУКОВОДСТВО ПО ЭКСПЛУАТАЦИИ
KULLANIM KILAVUZU
CENTRAL REMOTE CONTROLLER
UTY-DMMYM
UTY-DMMGM
UTY-DMMXM
KEEP THIS OPERATION MANUAL FOR FUTURE REFERENCE
P/N9380221012-03
Advertisement
Table of Contents

Related Manuals for Fujitsu UTY-DMMYM


Summary of Contents for Fujitsu UTY-DMMYM
- Page 1 OPERATING MANUAL BEDIENUNGSANLEITUNG MODE D’EMPLOI MANUAL DE FUNCIONAMIENTO MANUALE DI ISTRUZIONI ΕΓΧΕΙΡΙΔΙΟ ΛΕΙΤΟΥΡΓΙΑΣ MANUAL DE INSTRUÇÕES РУКОВОДСТВО ПО ЭКСПЛУАТАЦИИ KULLANIM KILAVUZU CENTRAL REMOTE CONTROLLER UTY-DMMYM UTY-DMMGM UTY-DMMXM KEEP THIS OPERATION MANUAL FOR FUTURE REFERENCE P/N9380221012-03...
-
Page 2: Table Of Contents
OPERATING MANUAL 6-3-5. 10 °C heat setting ..........13 6-3-6. Economy setting..........14 PART NO. 9380221012-03 CENTRAL REMOTE CONTROLLER 7. FUNCTION SETTING Contents 7-1. About the Function setting........14 1. INTRODUCTION 7-2. Switching to the “Function” screen ....14 7-3. Function setting ..........15 1-1. Safety precautions ..........2 7-3-1. -
Page 3: Introduction
1. INTRODUCTION • Do not use fire near this unit or place a heating apparatus nearby. It may cause malfunction. 1-1. Safety precautions • Do not touch the switches with sharp objects. Doing so • The “SAFETY PRECAUTIONS” indicated in the manual con- will cause injury, trouble, or electric shock. -
Page 4: Name Of Parts
Ex.) “Function” screen 1-3. Name of parts Function Mo 10:00AM CAUTION 10 °C Heat (All) Disable • Press the button lightly with a finger. It may cause a Economy (All) Disable failure if pressed with excessive force. O.U. low noise Disable •... -
Page 5: About The Menu Button
1-3-3. About the Menu button 1-3-6. About the Enter button · · This button is pressed while the “Monitor” screen is This is used for the decision of a selected item or confi rming displayed, it switches to the “Submenu” screen. For the the setting. -
Page 6: Initialization
Select a language with the [Cursor button] on the 2. INITIALIZATION “Language” screen displayed when the start-up is com- pleted normally. 2-1. Initial settings Language (When starting for the fi rst time) English Deutsch Français CAUTION Español Italiano Ελληνικά • To protect the compressor, turn on the power of the air conditioning system 12 hours or more before the start of operations. - Page 7 Set the “hour” and “min”. When setting is completed, select “Yes” with [Cursor Switch the setting item by [Cursor button (Left/Right)], button (Left/Right)], and press [Enter button]. and set with [Cursor button (Up/Down)]. (“Min” can be set quickly if the button is pressed con- When correcting a setting, set it again as it returns to tinuously.) the “Language”...
-
Page 8: Preparation
Notice 3. PREPARATION Following error message blinks on the Display panel if power on of the outdoor unit is forgotten or the power to CAUTION the indoor units is disconnected. • To protect the compressor, turn on the power of the air conditioning system 12 hours or more before the start of operation. -
Page 9: About The Key Lock
3-3. About the key lock 4. MONITOR SCREEN A locking function is provided to prevent careless operation 4-1. About the Monitor screen by children or outsiders. Release the lock on the “Monitor” screen when operating. Refer to [4. MONITOR SCREEN] for Setting status of functions or operating status of each indoor the “Monitor”... -
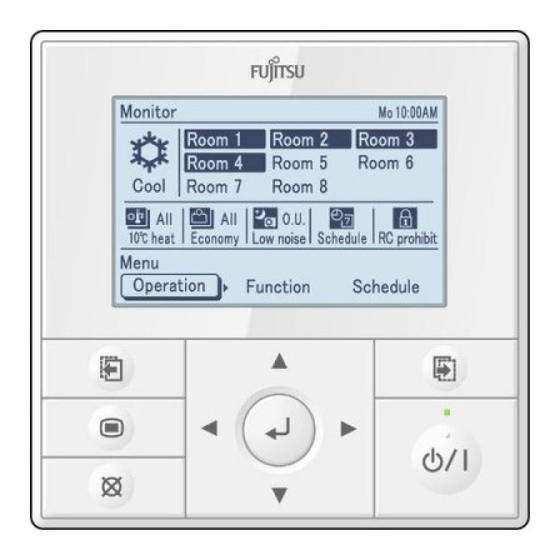
Page 10: Indoor Units Display
4-1-3. Function display 4-1-2. Indoor units display Monitor Mo 10:00AM Monitor Mo 10:00AM Room 1 Room 2 Room 3 Room 1 Room 2 Room 3 Room 4 Room 5 Room 6 Room 4 Room 5 Room 6 Cool Room 7 Room 8 Cool Room 7... -
Page 11: On/Off Button Operation
6. OPERATION SETTING 5. ON/OFF BUTTON OPERATION 6-1. About the Operation setting 5-1. Operation with On/Off button These can vary the operation or operation settings. Available The operation starts when the [On/Off button] is pressed settings or operations are as follows. once while all indoor units are stopped. -
Page 12: Switching To The "Operation" Screen
After setting, screen returns to the “Operation (unit 6-2. Switching to the “Operation” screen select)” screen. To terminate the setting, press the [Cancel button] to return to the Monitor screen. When selecting “Operation” from the Menu on the “Monitor” screen with [Cursor button (Left/Right)] and [Enter button] is pressed, “Operation (unit select)”... -
Page 13: Operation Setting
“Operation” screen is displayed. The screen consists of 6-3. Operation setting 2 pages, and can be switched by pressing the [Screen switch button (Left/Right)]. 6-3-1. On/Off operation Operation Mo 10:00AM Select “On-Of f” with [Cursor button (Left/Right)], and set Room 1 “On”... -
Page 14: Room Temperature Setting
Notice Other operation setting items can be set continuously. When setting the operating mode for each indoor unit, To complete the setting, press the [Enter button], then it setting combinations are restricted. Possible setting returns to the “Operation (unit select)” screen. combinations are as follows: Possible setting Conditions... -
Page 15: Economy Setting
Notice 7. FUNCTION SETTING • When “10 °C Heat” is set to “On” at the operating indoor unit, the operation stops and starts the 10 °C 7-1. About the Function setting heat operation. (“On-Off” turns to “Off”). Functions relating to the operation can be set. Available set- •... -
Page 16: Function Setting
7-3-2. Economy (All) setting 7-3. Function setting 7-3-1. 10 °C heat (All) setting Select “Economy (All)” with the [Cursor button (Up/ Down)] and press the [Enter button]. Select “10 °C Heat (All)” with the [Cursor button (Up/ Down)] and press the [Enter button]. Function Mo 10:00AM 10 °C Heat (All) -
Page 17: Outdoor Unit Low Noise Operation Setting
7-3-3. Outdoor unit low noise operation “Hour” of “Start time” is highlighted. Set the “Hour” with the [Cursor button (Up/down)]. setting O.U. low noise Mo 10:00AM Select “O.U. low noise” with the [Cursor button (Up/ O.U. low noise Enable Down)] and press the [Enter button]. Time setting Function Mo 10:00AM... -
Page 18: Schedule Select
7-3-4. Schedule select If there are inapplicable days in the schedule timer operation, select “Day off” with the [Cursor button (Up/ Down)] and press the [Enter button]. Select “Schedule select” with the [Cursor button (Up/ Down)] and press the [Enter button]. Schedule select Mo 10:00AM Schedule... -
Page 19: Schedule Setting
8. SCHEDULE SETTING 8-2. Switching to the “Schedule” screen If “Schedule” is selected with the [Cursor button (Left/ 8-1. About the Schedule setting Right)] from the “Monitor” screen menu, and the [Enter button] is pressed, the “Schedule (unit select)” screen is displayed. -
Page 20: Schedule Setting
Note When Schedule name is selected, proceed to [8-3-2. Setting of Enable/Disable of schedule]. If selected indoor units are set up individually, it is neces- sary to set each individually. As other methods, after all 8-3-2. Setting of Enable/Disable of indoor units are set by the same schedule, each indoor unit is changed in the setting or deleted. -
Page 21: Selection Of The Day Of The Week
8-3-3. Selection of the day of the week When the selection of the day of the week is completed, press the [Enter button]. Reversed display is released, and only the selected The day of the week for schedule timer operation can be days of the week are displayed. - Page 22 “Hour” is highlighted. Set the “Hour” with the [Cursor “On/Off” is highlighted. Set “On” or “Off” with the [Cursor button (Up/Down)]. button (Up/Down)]. Schedule 1 Mo 10:00AM Schedule 1 Mo 10:00AM Room 1 Room 1 Enable Mo Tu We Th Fr Enable Mo Tu We Th Fr 6:00 AM...
-
Page 23: Submenu Setting
When setting the next time, it moves to “2” when the 9. SUBMENU SETTING [Cursor button (Right)] is pressed. 9-1. About the Submenu setting Schedule 1 Mo 10:00AM Settings other than operation can be made. Following can be Room 1 set. -
Page 24: Date/Time Setting
9-3-2. Time setting 9-3. Date/Time setting Select “Time” with the [Cursor button (Up/Down)] and Select “Date/Time” with the [Cursor button], and press press the [Enter button]. the [Enter button]. “Date and Time” screen is displayed. Date and time Fr 10:00AM Submenu Fr 10:00AM Date... -
Page 25: Summer Time (Daylight Saving Time) Setting
9-3-4. Change display format setting 9-3-3. Summer time (Daylight saving time) setting Select “Change display format” with the [Cursor button (Up/Down)] and press the [Enter button]. Notice Date and time Set only for users in an area where summer time (daylight Fr 10:00AM saving time) is applicable. -
Page 26: Screen Setting
9-4-2. Brightness setting 9-4. Screen setting Select “Brightness” with the [Cursor button (Left/Right)], Select “Screen” with the [Cursor button] and press the and set with the [Cursor button (Up/Down)]. [Enter button]. “Screen” screen is displayed. Screen Mo 10:00AM Submenu Mo 10:00AM Automatic Brightness Contrast... -
Page 27: Prohibition Setting
Reversed display is released when the [Enter button] is 9-5. R.C. prohibition setting pressed. (If set to “All units”, the same setting is displayed in each indoor unit). Select “R.C. prohibit” with the [Cursor button] and press the [Enter button]. When setting other indoor units, repeat the same pro- “R.C. -
Page 28: Initial Setting
9-6-2. Temperature unit setting 9-6. Initial setting Select “Temp. unit” with the [Cursor button (Up/Down)] Select “Initial” with the [Cursor button], and press the and press the [Enter button]. [Enter button]. “Initial” screen is displayed. Initial Mo 10:00AM Mo 10:00AM Submenu Language Language... -
Page 29: Others
If the problem persists after performing these checks, or if you 10. OTHERS notice burning smells, stop operation immediately, turn off the electrical breaker, and consult with authorized service person- 10-1. Troubleshooting nel. Notice WARNING • In the event of a malfunction (burning smell, etc.), For an error displayed on the indoor unit or the standard immediately stop operation, turn off the electrical breaker remote controller, refer to the operating manual and the...
Need help?
Do you have a question about the UTY-DMMYM and is the answer not in the manual?
Questions and answers