Table of Contents
Advertisement
REMOTE CONTROLLER
(WIRED TYPE)
INSTALLATION MANUAL
PART No. 9373328445
For authorized service personnel only.
Installation by endusers or not qualifi ed persons can cause harm to
personal safety, can cause severe damage to building and product, can
lead to improper function or reduced lifetime of the equipment.
CONTENTS
1. SAFETY PRECAUTIONS .........................................................................1
2. MAIN UNIT AND ACCESSORIES ............................................................1
3. ELECTRICAL REQUIREMENT ................................................................1
4. SELECTING AN INSTALLATION LOCATION ..........................................2
5. INSTALLING THE REMOTE CONTROLLER ...........................................2
6. SETTING THE REMOTE CONTROLLER ................................................5
7. TEST RUN ................................................................................................9
8. ERROR CODES .......................................................................................9
1. SAFETY PRECAUTIONS
• The "SAFETY PRECAUTIONS" indicated in the manual contain impor-
tant information pertaining to your safety. Be sure to observe them.
• For details of the operation method, refer to the operating manual.
• Request the user to keep the manual on hand for future use, such as for
relocating or repairing the unit.
Indicates a potentially or imminently hazardous situ-
ation which, if not avoided, could result in death or
WARNING
serious injury.
Installation of this product must be done by experienced service techni-
cians or professional installers only in accordance with this manual.
Installation by nonprofessional or improper installation of the product
may cause serious accidents such as injury, water leakage, electric
shock, or fi re. If the product is installed in disregard of the instructions in
this manual, it will void the manufacturer's warranty.
Installation must be performed in accordance with regulations, codes,
or standards for electrical wiring and equipment in each country, region,
or the installing place.
Do not operate this unit when your hands are wet. Touching the unit with
wet hands will cause an electric shock.
When children can approach the unit or touch the unit, take preventive
measures.
Dispose of the packing materials safely. Tear and dispose of the plastic
packing bags so that children cannot play with them. There is the dan-
ger of suffocation if children play with the original plastic bags.
Indicates a potentially hazardous situation that may
result in minor or moderate injury or damage to
CAUTION
property.
When detecting the room temperature using the remote controller,
please set up the remote controller according to the following conditions.
If the remote controller is not well set, the correct room temperature will
not be detected, and thus the abnormal conditions like "not cool" or "not
heat" will occur even if the air-conditioner is running normally. :
• A location with an average temperature for the room being air condi-
tioned.
• Locate where is not be affected by infl ow of outside air such as caused
by opening and closing a door.
• Not directly exposed to the outlet air from the air conditioner.
• Out of direct sunlight.
• Away from the infl uence of other heat sources.
Do not install the unit in the following areas:
• Do not install the unit near a source of heat, steam, or fl ammable gas.
Otherwise, fi re could result.
• Area fi lled with mineral oil or containing a large amount of splashed oil
or steam, such as a kitchen. It will deteriorate plastic parts, causing the
parts to fall.
• Area containing equipment that generates electromagnetic interfer-
ence. It will cause the control system to malfunction, and cause er-
roneous operation.
• Install the unit in a well-ventilated place avoiding rains and direct sun-
light.
[Original instructions]
Do not touch the switches with sharp objects. Doing so will cause injury,
trouble, or electric shock.
Do not expose this unit directly to water. Doing so will cause trouble,
electric shock, or heating.
Do not set vessels containing a liquid on this unit. Doing so will cause
heating, fi re, or electric shock.
2. MAIN UNIT AND ACCESSORIES
The following installation parts are supplied. Use them as required.
Wired remote controller
Installation manual
(This manual)
Operating manual
3. ELECTRICAL REQUIREMENT
When connecting the remote controller use the following wiring.
* Use shielded cable in accordance with local rules for remote controller
cable.
Select a fl exible cable that can be bound using cable ties from over the
cable sheath inside this unit.
Maximum connectable number of remote controllers by cable size and the
length.
AWG
16
18
20
22
*L: Total cable length, *S: Cable size
Name and shape
Q'ty
1
1
1
Cable type
Size
Sheathed cable
0.33 to
1.25 mm²
Shielded cable*
Cable size
L* ≤ 100 m
mm²
VRF RAC VRF RAC VRF RAC
1.25
4
0.75 (1.25 > S* ≥ 0.75)
4
0.5 (0.75 > S* ≥ 0.5)
4
0.3 (0.5 > S* ≥ 0.3)
4
Name and shape
Q'ty
CD-ROM
1
Screw (M4 × 16mm)
2
For installing the remote
controller
Cable tie
1
For binding remote
controller and remote
controller cable
Remarks
Non polar 2 core,
Twisted pair
Max. connectable number of
remote controllers
101 m < L*
251 m < L*
≤ 250 m
≤ 500 m
2
4
2
4
2
2
4
2
2
2
2
2
2
2
2
2
1
1
1
1
En-1
Advertisement
Table of Contents

Related Manuals for Fujitsu Airstage UTY-RNRYZ3


Summary of Contents for Fujitsu Airstage UTY-RNRYZ3
-
Page 1: Table Of Contents
REMOTE CONTROLLER Do not install the unit in the following areas: • Do not install the unit near a source of heat, steam, or fl ammable gas. (WIRED TYPE) Otherwise, fi re could result. • Area fi lled with mineral oil or containing a large amount of splashed oil INSTALLATION MANUAL or steam, such as a kitchen. -
Page 2: Selecting An Installation Location
The detection location of the room tempera- A sensor of the indoor 4. SELECTING AN INSTALLATION ture can be selected from the following 2 unit (inside) LOCATION methods. The temperature sensor of the indoor unit or the remote controller can be used to detect the room temperature. - Page 3 5.2.2. Remove the front case CAUTION When opening the remote controller, remove the connector from the Do not set the DIP switch or rotary switch of this unit except as specifi ed front case. The cables may break if the connector is not removed and in this manual or the operating manual supplied with the air conditioner.
- Page 4 B. When attaching to the wall directly: There are 2 methods to connect the remote controller cable to the indoor unit. One is the connection using connecting cable (Included in the indoor Wall unit), and the other is the connection the remote controller cable is con- nected to the exclusive terminal block of the indoor unit.
-
Page 5: Setting The Remote Controller
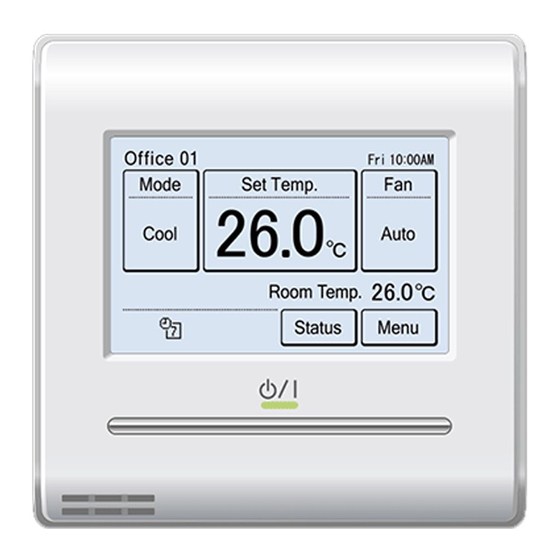
6.2.3. R.C. Master/Slave Setting 6. SETTING THE REMOTE CONTROLLER (a) If the remote controller is a single R.C. Master / Slave Setting connection, this setting is omitted. Pro- 6.1. Initialization procedure Master ceed to “6.2.4. Data and Time Setting”. After remote controller installation work is complete, perform initialization Slave (b) If a remote controller has multiple con- using the following procedures before starting to use the system. - Page 6 6.3. Initial setting Time Format Fri 10:00AM Display Format Setting Fri 10:00AM Confi gure settings required at the time of installation. 12:00–11:59 AM/PM Date Format Day/Month/Year This unit has two kinds of passwords; pass- 00:00–11:59 AM/PM Password Verification Time Format Enter Current Password word for administrators and password for 00:00–23:59...
- Page 7 6.3.7. Password Setting (administrator password) Set or change the administrator password. Display Item Setting Room Temp. Display Item Setting Touch the [Password Setting] on the “Initial Setting” screen. The Visible Filter Sign [Visible] Filter Sign [Visible] “Password Setting” screen is displayed. Room Temp.
- Page 8 6.4.6. R.C. Address Setting The “Maintenance” screen is displayed. Touch [Next Page] or [Previous Page] to switch between screens. Addresses will be automatically set when initially starting up this unit. In (Items that indoor unit does not support are not displayed.) such a case, do not change the remote controller address for the indoor unit, and keep it at the initial setting of 0.
-
Page 9: Test Run
7. TEST RUN 6.4.8. Function Setting This procedure changes the function settings used to control the indoor • Refer to the indoor unit installation manual. unit according to the installation conditions. Incorrect settings can cause For how to carry out a test run, refer to 6. 4. Maintenance (Other Settings) the indoor unit to malfunction.
Need help?
Do you have a question about the Airstage UTY-RNRYZ3 and is the answer not in the manual?
Questions and answers