Jacobsen Greens King IV Plus Safety & Operation Manual
Hide thumbs
Also See for Greens King IV Plus:
- Parts & maintenance manual (138 pages) ,
- Safety, operation and maintenance manual (118 pages) ,
- Service manual (110 pages)
Table of Contents
Advertisement
Quick Links
Safety & Operation Manual
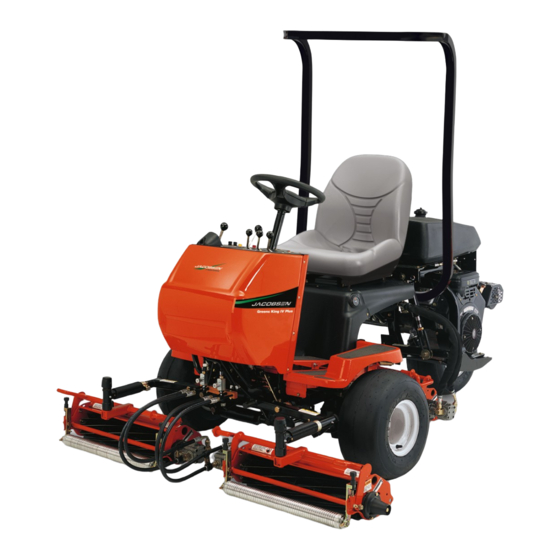
Greens King IV Plus with ROPS
62304 – Kubota D722-E3B Engine
WARNING: If incorrectly used this machine can cause severe
injury. Those who use and maintain this machine should be
trained in its proper use, warned of its dangers and should
read the entire manual before attempting to set up, operate,
adjust or service the machine.
GB
United
Kingdom
WARNING
4212747-GB-Rev A
When Performance Matters.
™
Advertisement
Table of Contents

Related Manuals for Jacobsen Greens King IV Plus


Summary of Contents for Jacobsen Greens King IV Plus
- Page 1 4212747-GB-Rev A Safety & Operation Manual Greens King IV Plus with ROPS 62304 – Kubota D722-E3B Engine WARNING WARNING: If incorrectly used this machine can cause severe injury. Those who use and maintain this machine should be trained in its proper use, warned of its dangers and should read the entire manual before attempting to set up, operate, adjust or service the machine.
-
Page 2: Table Of Contents
This manual contains safety and operating instructions The serial plate is attached to the frame, near the battery. for your new Jacobsen machine. This manual should be Jacobsen recommends you record these numbers below stored with the equipment for reference during operation. -
Page 3: Safety
Only accessories 20. Never use your hands to search for oil leaks. attachments approved by Jacobsen. Hydraulic fluid under pressure can penetrate the skin and cause serious injury. 7. Stay alert for holes in the terrain and other hidden hazards. -
Page 4: Important Safety Notes
Adjustments and maintenance should always be performed by a qualified technician. If additional information or service is needed, contact your Authorized Jacobsen Dealer who is kept informed of the latest methods to service this equipment and can provide prompt and efficient service. -
Page 5: Decals
DECALS DECALS DECALS _________________________________________________________________ Familiarize yourself with the following decals. They are critical to the safe operation of the machine. REPLACE DAMAGED DECALS IMMEDIATELY. 4181865 REV B • Read operator's manual. Do not allow untrained • Before you clean, adjust, or repair this equipment, operators to use machine. - Page 6 DECALS Familiarize yourself with the following decals. They are critical to the safe operation of the machine. REPLACE DAMAGED DECALS IMMEDIATELY. WARNING WARNING Read manual for service. Torsion Read manual for service. To prevent spring under extreme tension. cuts, do not turn reel by hand. Use Clamp may turn suddenly.
- Page 7 DECALS IMPORTANT DO NOT USE STARTING ASSIST FLUIDS Use of starting assist fluids in the air intake system may be potentially explosive or cause a “runaway” engine condition. This could result in serious engine damage. 4181861 IMPORTANT Cette machine utilise de l’huile hydraulique biodégradable Greens Care 46.
- Page 8 DECALS Familiarize yourself with the following decals. They are critical to the safe operation of the machine. REPLACE DAMAGED DECALS IMMEDIATELY. 8-12 p.s.i. (55-83 kPa) Tire Pressure Brake 2812066 Reel Switches Wiring 4141266 Engine Oil Pressure 3002309 Diesel Fuel Noise Level Normal Operation Fast...
- Page 9 DECALS Left Reel Center Reel Right Reel Reel Forward Rotation Parking Brake Traction Disengaged Lever Transport Reel Off Neutral Reverse Reel Reverse Rotation Parking Brake Engaged Charging Interlock System Fuse System Fuse en-9...
-
Page 10: Controls
CONTROLS CONTROLS ICONS ___________________________________________________________________ Circuit Breaker Read Manual Mow/Lift Treadle Engine Throttle Lower Raise Fast Slow Parking Brake Service Foot Brake Hour Meter Fuel Engaged Disengaged Diesel Reel Switch Engine Reel Rotation Traction Lever Forward Reverse Start Enable Disable Forward Transport Headlight Neutral... - Page 11 CONTROLS Reel Control Lever Throttle Parking Brake Lever Glow Plug Fuse Traction Lever Glow Plug Switch Temperature Gauge (Diesel) Accelerator Pedal Volt Meter Brake Pedal Ignition Switch Tilt Control Mechanics (Backlap) Switch W Mow/Lift Pedal Light Switch (Optional) Hour Meter Lights Fuse (Optional) Seat Control Lever Charging Circuit Fuse...
-
Page 12: Control Descriptions
CONTROLS CONTROL DESCRIPTIONS__________________________________________________ A. Reel Control Levers - Used to operate the cutting N. Engine Oil Pressure Light - Indicator will light if units. Push lever(s) forward for forward rotation. Pull engine oil pressure drops below a safe level. Stop lever(s) back for Reverse rotation. -
Page 13: Operation
OPERATION OPERATION DAILY INSPECTION ________________________________________________________ 2. Check the fuel supply, radiator coolant level, crankcase oil, and air cleaner indicator. All fluids CAUTION must be at the Full level mark with engine cold. The daily inspection should be performed only when 3. -
Page 14: Operating Procedures
Each condition will require certain adjustments or to prevent injuries. precautions. Only use accessories and attachments 10. Slow down and use extra care on hillsides. Read approved by Jacobsen. Section 5.7. Use caution when operating near drop 5. Never direct... -
Page 15: Starting
OPERATION STARTING________________________________________________________________ IMPORTANT: Do not use starting assist fluids. Use of such fluids in the air intake system may be potentially explosive or cause a “Runaway” engine condition and could result in serious engine damage. 1. Make sure fuel shut off valve is completely open and the tow valve is closed. -
Page 16: To Drive / Transport
OPERATION TO DRIVE / TRANSPORT____________________________________________________ Read and follow all safety notes contained in this manual 1. Disengage all drives and raise implements to the when driving or transporting mower. Refer to Section 5.3 transport position when driving to and from the area for general operating instructions. - Page 17 OPERATION How to calculate a slope: Tools Required: Level (A), either 1 yard, or 1 meter long. Tape measure (B). With the level (A) positioned horizontally, measure the distance (C) with tape measure (B). Use the chart to calculate either the slope angle or the % grade of the slope (D).
-
Page 18: Mowing
OPERATION MOWING_________________________________________________________________ 3. Lower the reels as the front grass catchers cross the edge of the green. At the end of the pass, raise WARNING the reels as the grass catchers cross the edge of the green. To prevent serious injuries, keep hands, feet, and 4. -
Page 19: Towing / Trailering
OPERATION TOWING / TRAILERING _____________________________________________________ If the mower experiences problems and must be shut down and removed from the area, it should be loaded onto a trailer for transport. If a trailer is not available, the unit can be towed slowly short distances. NOTICE Do not exceed 2 MPH (3.2 KPH) while towing. -
Page 20: 5.10 Daily Maintenance
OPERATION 5.10 DAILY MAINTENANCE _____________________________________________________ Important: For more detailed maintenance information, 5. Store fuel according to local, state, or federal adjustments, and maintenance/lubrication charts, see ordinances and recommendations from your fuel the Parts & Maintenance manual. supplier. 1. Park the mower on a flat, level surface. Fully lower WARNING the implements to the ground, engage parking brake, stop the engine, and remove key from ignition switch. -
Page 21: Quality Of Cut
QUALITY OF CUT QUALITY OF CUT QUALITY OF CUT TROUBLESHOOTING _______________________________________ It is recommended that a “test cut” be performed to 1. Mowing (Ground) Speed. evaluate the mower’s performance before beginning 2. Reel Bearing Condition and Pre-Load (End Play) repairs. Adjustment. -
Page 22: Marcelling
QUALITY OF CUT MARCELLING ____________________________________________________________ Marcelling, like washboarding, is a cyclical pattern of varying cutting heights, resulting in a wave-like cut appearance. In most cases, the wave tip-to-tip distance is 2 in. (5 cm) or less. TN0220 NOTE: Arrow indicates direction of travel. Probable Cause Remedy Mowing (ground) speed is too fast. -
Page 23: Step Cutting
QUALITY OF CUT STEP CUTTING____________________________________________________________ Step cutting occurs when grass is cut taller on one side of a reel than the other or one cutting unit to another. This is usually caused by mechanical wear or an incorrect roller or HOC (height-of-cut) adjustment. TN0221 NOTE: Arrow indicates direction of travel. -
Page 24: Scalping
QUALITY OF CUT SCALPING _______________________________________________________________ Scalping is a condition in which areas of grass are cut noticeably shorter than the surrounding areas, resulting in a light green or even brown patch. This is usually caused by an excessively low height-of-cut (HOC) setting and/or uneven turf. -
Page 25: Stragglers
QUALITY OF CUT STRAGGLERS ____________________________________________________________ Stragglers are scattered blades of uncut or poorly cut grass. TN0223 NOTE: Arrow indicates direction of travel. Probable Cause Remedy Bedknife improperly adjusted. Adjust reel-to-bedknife setting. Dull reel or bedknife cutting edges. Sharpen or replace reel blade and bedknife as necessary. Mowing (ground) speed is too fast. -
Page 26: Streaks
QUALITY OF CUT STREAKS ________________________________________________________________ A streak is a line of uncut grass. This is usually caused by a nicked or bent bedknife. TN0224 NOTE: Arrow indicates direction of travel. Probable Cause Remedy Damaged bedknife. Replace bedknife. Damaged or unevenly worn reel. Inspect reel. -
Page 27: Windrowing
QUALITY OF CUT WINDROWING ____________________________________________________________ Windrowing is the deposit of clippings concentrated at one end of cutting unit(s) or between two cutting units, forming a line in the direction of travel. TN0225 NOTE: Arrow indicates direction of travel. Probable Cause Remedy Grass is too tall. -
Page 28: Rifling Or Tramlining
QUALITY OF CUT RIFLING OR TRAMLINING __________________________________________________ Rifling or tramlining is a pattern of varying cutting heights, resulting in a wave-like cut appearance, usually due to heavy contact points across a reel and/or bedknife. NOTE: Arrow indicates direction of travel. Probable Cause Remedy Reel and/or bedknife unevenly worn. - Page 29 NOTES NOTES en-29...
- Page 32 World Class Quality, Performance and Support Equipment from Jacobsen is built to exacting standards ensured by ISO 9001 and ISO 14001 registration at all of our manufacturing locations. A worldwide dealer network and factory trained technicians backed by Genuine Parts provide reliable, high-quality product support.
Need help?
Do you have a question about the Greens King IV Plus and is the answer not in the manual?
Questions and answers