Table of Contents
Advertisement
I
I
I
Leica Camera AG
Oskar-Barnack-Straße 11
35606 SOLmS
DEutSCHLAND
I
I
telefon +49 (0) 6442-208-0
telefax +49 (0) 6442-208-333
www.leica-camera.com
LEICA GEOVID HD-B
Anleitung / Instructions
Notice d'utilisation / Gebruiksaanwijzing
Istruzioni / Instrucciones / Bruksanvisning
Инструкция по эксплуатации
Advertisement
Table of Contents

Related Manuals for Leica GEOVID HD-B


Summary of Contents for Leica GEOVID HD-B
- Page 1 LEICA GEOVID HD-B Anleitung / Instructions Notice d’utilisation / Gebruiksaanwijzing Istruzioni / Instrucciones / Bruksanvisning Инструкция по эксплуатации Leica Camera AG Oskar-Barnack-Straße 11 35606 SOLmS DEutSCHLAND telefon +49 (0) 6442-208-0 telefax +49 (0) 6442-208-333 www.leica-camera.com...
- Page 2 USEU bALL US1/EU1 (yds/m) US2/EU2 (yds/m) HOLd Markenzeichen der Leica Camera Gruppe Trademark of the Leica Camera Group Marque du Groupe Leica Camera US12/EU12 (yds) (1MOA) ® = Registriertes Warenzeichen Änderungen in Konstruktion und Ausführung vorbehalten. ® = Registered Trademark Design subject to alterations without notice.
-
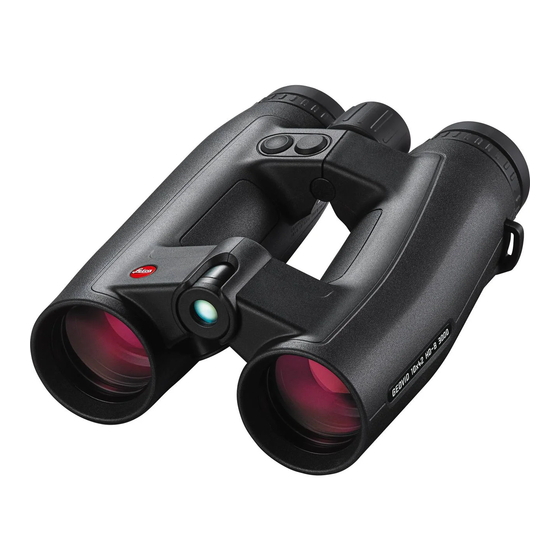
Page 3: Designation Of Parts
11. Cover for battery compartment / memory card slot (closed) 12. Battery compartment 13. Memory card slot 14. Objective lens Warning notice As with any binoculars, avoid looking directly at bright sources of light when using the Leica Geovid HD-B, to prevent eye injury. -
Page 4: Foreword
DISpOSAL OF ELECTRICAL AND FOREWORD ELECTRONIC EQUIpMENT Dear Customer, (Applies within the EU, and for other Throughout the world, the Leica name stands for premium quality, accurate precision mechanics, European countries with segregated waste collection systems) optimum reliability and long service life. -
Page 5: Table Of Contents
....... 34 Leica Info Service..........52 Adjusting the eye spacing ........34 Leica Customer Service ........53 Focusing / diopter compensation ......35 Appendix / Ballistics tables ........210 Basic information on menu system ......36 Setting the unit of measure ........ -
Page 6: Applications
ATTACHING THE CARRYING STRAp AND THE AppLICATIONS EYEpIECE COVER The Leica Geovid HD-B binoculars have a robust magnesium housing, allowing them to be used even under adverse conditions. There’s no need to worry about moisture - they are absolutely waterproof to a depth of 5m and the internal optics do not become fogged thanks to a nitrogen filling. -
Page 7: Inserting And Changing The Battery
Notes: INSERTING AND CHANGING THE BATTERY • Cold conditions impair the battery performance. The Leica Geovid HD-B draws its power supply from a Therefore, at low temperatures the binoculars 3 Volt lithium button cell (type CR2). should be kept as close to the body as possible and 1. -
Page 8: Battery Charge Level
35) shorten the battery life. A used battery is indicated by a flashing measured value and reticule display. When flashing starts, around another 50 measurements are possible, but with a continuously reduced range. Leica recommends the use of branded batteries. -
Page 9: Adjusting The Eyepiece Cups / Using With And Without Glasses
ADJUSTING THE EYEpIECE CUpS / USING WITH ADJUSTING THE EYE SpACING AND WITHOUT GLASSES Bending the binoculars about the hinged axes (9) The eyepiece cups (1) can easily be adjusted by individually adjusts the eye spacing. The right and left turning them, and lock securely in the selected field of vision should merge into a circular image. -
Page 10: Focusing / Diopter Compensation
4. When the reticule appears, while continuing to view with both eyes, adjust the right diopter On the Leica Geovid HD-B binoculars, the focus is set compensation dial (red index) so that the reticule for objects different distances away using the central can be seen in focus in the right optical system. -
Page 11: Basic Information On Menu System
SETTING THE UNIT OF MEASURE The Leica Geovid HD-B can be set to either the imperial unit system commonly used in the USA (US) Note: or the metric system (EU) i.e. yards and inches /... -
Page 12: Range Measurement
RANGE MEASUREMENT 2. Aim at the object while the reticule is lit. 3. Press the main / release button (7). a. The reticule disappears briefly during the measurement. b. The measured value is displayed. As long as the reticule is still lit, a new measurement can be started at any time by pressing the main / release button again. -
Page 13: Scan Mode
SCAN MODE The Leica Geovid HD-B binoculars can be used to measure continuously (scan mode). Hold down the main / release button (7) on the 2nd press. After around 2.5 seconds, the binoculars switch to scan mode and then carry out measurements continuously. -
Page 14: Measurement Range And Accuracy
MEASURING RANGE AND ACCURACY In sunlight and with good vision, the following ranges The measuring range of the Leica Geovid HD-B is up to and accuracies can be achieved: ±1825m/2000yds. The maximum range is achieved with high reflective target objects and a visual range of Range Approx. -
Page 15: Displaying The Atmospheric Conditions
– Atmospheric pressure 1 0 3 0 Note: If the housing of the Leica Geovid HD-B initially has a significantly different temperature than its surroundings, e.g. when taking it outside, it can take up to 30 minutes before the internal sensor can... -
Page 16: Calculating The Ballistics Curve
DETERMINING THE BALLISTICS CURVE To adjust the equivalent horizontal range calculation When using the ballistics function on the Leica Geovid (EHR, see p. 44), the point of aim (HOLd, see p. 44) or HD-B, particularly at ranges of > 300m / 300 yards, the reticule adjustment (MOA, see p. -
Page 17: Setting The Zeroing Distance
SETTING THE ZEROING DISTANCE 4. Repeatedly press the main / release button to select the relevant ballistics curve, i.e. Start with step 1 if you have not yet opened the menu – US12 system and with step 3 if you have already set the –... -
Page 18: Displaying The Set Ballistics Curve And Zeroing Distance
Advanced Ballistic Compensation (AbC) on the Leica To check your settings, e.g. if the hunting situation has Geovid HD-B allows you to display one of the following changed or you have not used the binoculars for some three ballistic values after measuring the range: time, you can quickly display the three values at any –... -
Page 19: Equivalent Horizontal Range
By displaying the point of aim, the Leica Geovid HD-B • Regardless of whether or not you use this can provide valuable support when used in hunting, ensuring that shots are as accurate as possible. -
Page 20: (Click / Moa Adjustment)
Taking into account the measured range, the 1. Press and hold (≥2s) the secondary / menu button trajectory of the bullet and the set zeroing distance (8). (see p. 42), the Leica Geovid HD-B can display the • appears. US.EU required adjustments, i.e. -
Page 21: Displaying And Checking The Set
2 x 12 programmed values at any time. ballistics curves on the Leica Geovid HD-B you can To do this, briefly press the secondary / menu button use your own custom ballistics curves. These are (8) twice. - Page 22 C. Retrieving the ballistics curve from the memory card If a memory card containing a ballistics curve is inserted in the binoculars, this curve can be retrieved in exactly the same way as described under "Setting the ballistics curve" on p. 41. • In this case, when you press the main / release button (7) appears first.
- Page 23 • When using ballistics curves from the memory card, ranges up to 925m/1000yds are displayed. • The range of microSD cards is too large for Leica Camera AG to be able to completely test all available types for compatibility and quality.
-
Page 24: Maintenance / Cleaning
Attention: MAINTENANCE / CLEANING Your Leica Geovid HD-B binoculars do not require any The housing may not be opened. special care. Coarse dirt particles, such as sand, should be removed with a fine hair brush or blown SpARE pARTS away. Marks such as fingerprints on the front lens and... -
Page 25: Troubleshooting
TROUBLESHOOTING problem Cause Remedy A circular image is not obtained when a. The user's pupils are aligned with the a. Correct the eye position. viewing. eyepiece exit pupil. b. Correct the adjustment: If wearing b. The position of the eyepiece cup glasses, twist the eyepiece cups;... -
Page 26: Technical Data
TECHNICAL DATA Magnification Lens diameter 42mm Exit pupil 5.2mm / " 4.2mm / " Twilight number 18.3 20.5 Geometric luminous intensity 27.5 17.6 Field of vision (at 1,000m) / Approx.128m /142yds / 7.3° Approx. 113m /125yds / 6.5° Objective field of view Exit pupil longitudinal distance 18mm / 45/64“... -
Page 27: Leica Academy
Our various seminars allow participants to discover the The Leica information service can provide you with an Leica values and the fascination of expert use of Leica answer to any technical application questions relating products, all in a practical, contemporary form. The... - Page 28 This equipment has been tested and found to comply with the Model: Geovid HD-B limits for a Class B digital device, pursuant to Part 15 of the Responsible party/ Leica Camera Inc. FCC Rules. These limits are designed to provide reasonable Support contact: 1 Pearl Court, Unit A...
- Page 29 TABELLE 1: FLECKSCHUSS-ENTFERNUNG 100M / TABLE 1: ZEROING RANGE 100M / TABLEAU 1: DISTANCE DU TIR DANS LE MILLE100M / TABEL 1: VLEKSCHOTAFSTAND 100M / TABELLA 1: DISTANZA DI AZZERAMENTO 100M / TABLA 1: DISTANCIA DE TIRO IDEAL 100M / TABELL 1: INNSKYTNINGSAVSTAND 100M ТАБЛИЦА 1: РАССТОЯНИЕ ДЛЯ ТОЧНОГО...
- Page 30 TABELLE 2: FLECKSCHUSS-ENTFERNUNG 200M / TABLE 2: ZEROING RANGE 200M / TABLEAU 2: DISTANCE DU TIR DANS LE MILLE 200M / TABEL 2: VLEKSCHOTAFSTAND 200M / TABELLA 2: DISTANZA DI AZZERAMENTO 200M / TABLA 2: DISTANCIA DE TIRO IDEAL 200M / TABELL 2: INNSKYTNINGSAVSTAND 200M ТАБЛИЦА 2: РАССТОЯНИЕ ДЛЯ ТОЧНОГО...
- Page 31 TABELLE 3: FLECKSCHUSS-ENTFERNUNG GEE (GÜNSTIGSTE EINSCHIESS-ENTFERNUNG) / TABLE: 3 ZEROING RANGE GEE (MOST FAVORABLE ZEROING RANGE) / TABLEAU 3: DISTANCE DU TIR DANS LE MILLE GEE (DISTANCE DE TIR LA PLUS FAVORABLE) / TABEL 3: VLEKSCHOTAFSTAND GEE (OPTIMALE INSCHIETAFSTAND) / TABELLA 3: DISTANZA DI AZZERA- MENTO GEE (DISTANZA DI TIRO PIù...
- Page 32 TABELLE 4: FLECKSCHUSS-ENTFERNUNG 100Y / TABLE 4: ZEROING RANGE 100YDS / TABLEAU 4: DISTANCE DU TIR DANS LE MILLE 100Y / TABEL 4: VLEKSCHOTAFSTAND 100Y / TABELLA: 4 DISTANZA DI AZZERAMENTO 100Y / TABLA 4: DISTANCIA DE TIRO IDEAL 100 Y / TABELL 4: INNSKYTNINGSAVSTAND 100Y / ТАБЛИЦА 4: РАССТОЯНИЕ ДЛЯ ТОЧНОГО ВЫСТРЕЛА...
- Page 33 TABELLE 5: FLECKSCHUSS-ENTFERNUNG 200Y / TABLE 5: ZEROING RANGE 200YDS / TABLEAU 5: DISTANCE DU TIR DANS LE MILLE 200Y / TABEL 5: VLEKSCHOTAFSTAND 200Y / TABELLA: 5 DISTANZA DI AZZERAMENTO 200Y / TABLA 5: DISTANCIA DE TIRO IDEAL 200 Y / TABELL 5: INNSKYTNINGSAVSTAND 200Y / ТАБЛИЦА 5: РАССТОЯНИЕ ДЛЯ ТОЧНОГО ВЫСТРЕЛА...
- Page 34 TABELLE 6: FLECKSCHUSS-ENTFERNUNG 300Y / TABLE 6: ZEROING RANGE 300YDS / TABLEAU 6: DISTANCE DU TIR DANS LE MILLE 300Y / TABEL 6: VLEKSCHOTAFSTAND 300Y / TABELLA: 6 DISTANZA DI AZZERAMENTO 300Y / TABLA 6: DISTANCIA DE TIRO IDEAL 300 Y / TABELL 6: INNSKYTNINGSAVSTAND 300Y / ТАБЛИЦА 6: РАССТОЯНИЕ ДЛЯ ТОЧНОГО ВЫСТРЕЛА...
Need help?
Do you have a question about the GEOVID HD-B and is the answer not in the manual?
Questions and answers