Dimplex SP820 Installation And Operating Instructions Manual
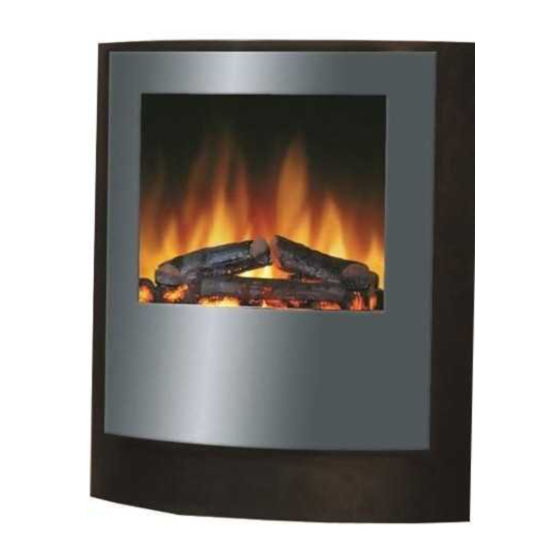
Wall fire
Hide thumbs
Also See for SP820:
- Instructions manual (44 pages) ,
- Instruction (44 pages) ,
- User manual (8 pages)
Advertisement
Wall Fire SP8
Model No: SP820
Dimensions
(millimetres)
THESE INSTRUCTIONS SHOULD BE READ CAREFULLY AND RETAINED FOR FUTURE REFERENCE.
Important Safety Advice:
When using electrical appliances, basic precautions
should be followed to reduce the risk of fire, electric
shock, and injury to persons, including the following:
If the appliance is damaged, check immediately
with the supplier before installation and operation.
Do not use this heater in the immediate
surroundings of a bath, shower or swimming pool
Do not use outdoors.
This heater must not be located immediately
above or below a fixed socket outlet or connection
box.
Do not cover or obstruct in any way the heat outlet
grille located underneath the heater. Overheating
will result if the heater is accidentally covered.
In the event of a fault unplug the heater.
Unplug the heater when not required for long
periods.
The supply cord must be placed on the right hand
side of the heater away from the heat outlet
underneath the heater.
Although this heater complies with safety
standards, we do not recommend its use on deep
pile carpets or on long hair type of rugs.
This appliance is not intended for use by children
or other persons without assistance or
supervision if their physical, sensory or mental
capabilities prevent them from using it safely.
Children should be supervised to ensure that they
do not play with the appliance.
The appliance must be positioned so that the plug
is accessible.
If the supply cord is damaged it must be replaced
by the manufacturer or service agent or similarly
qualified person in order to avoid a hazard.
578
100
min.
FRONT
.
Installation and Operating Instructions
675
fixed
300 min.
socket
outlet
Electrical
WARNING – THIS APPLIANCE MUST BE EARTHED
This heater must be used on an AC ~ supply only and the
voltage marked on the heater must correspond to the supply
voltage.
Do not switch the appliance on until properly installed. Please
read all the safety warnings and operating instructions.
General
Unpack the heater carefully and retain the packaging for
possible future use, in the event of moving or returning the
fire to your supplier.
Contents of Carton.
SP8 Heater.
Wall fixing bracket.
Three fixing screws and three wall plugs.
Remote control and batteries ( 3 AAA's type).
Spare bulb.
Do not connect the heater to an electricity supply until it is
installed on a wall correctly. - see 'Installation'.
A choice of 1kW or 2kW heat output is provided by the fan
heater, which is concealed underneath the unit.
The heater can be used remotely or manually. - see
'Operation'.
General features of remote control are:
Heat output can be increased or decreased
according to your particular requirements.
The illumination of fuel effect can be increased or
decreased.
Programmable timer.
Please note: Used in an environment where background
noise is very low, it may be possible to hear the fan which
operates the flame effect. This is normal and should not be
a cause for concern.
08/19116/0
181
controls
SIDE
Fig. 1
Issue 0
Advertisement
Table of Contents

Related Manuals for Dimplex SP820


Summary of Contents for Dimplex SP820
-
Page 1: Installation And Operating Instructions
Installation and Operating Instructions Wall Fire SP8 08/19116/0 Issue 0 Model No: SP820 Dimensions (millimetres) min. controls fixed 300 min. socket outlet FRONT SIDE Fig. 1 THESE INSTRUCTIONS SHOULD BE READ CAREFULLY AND RETAINED FOR FUTURE REFERENCE. Electrical Important Safety Advice: WARNING –... -
Page 2: Installation
Installation Do not connect appliance until properly fixed to the wall and the Instruction leaflet is read fully. This model is designed to be permanently fixed to a wall at a minimum height of 300mm. The wall bracket must be fitted horizontally and the cable routed to the bottom right of the heater as in Fig 1. -
Page 3: Manual Operation
Manual Operation The Standby Switch (Switch 1) must be first turned ‘ON’ and the AUTO/MAN (Switch 2) switch set to ‘MANUAL’ to operate the manual controls - see Fig 6. Note : When the fire is put in Manual mode the first time the flame effect will come on indicated by the Bottom neon coming on for 3 seconds - see Fig 7. -
Page 4: Remote Control Operation
Operating Instructions Remote Control Operation Switching ON/OFF General The heater can be switched on by pressing the enter The remote control consists of 5 control buttons and a LCD buttons. display with a visible area of 40x40mm. The heater can be switched off by moving the cursor to the OFF menu item. - Page 5 Replacing the remote control The new remote control must be set up as follows: Press switch 1 to ON . Press switch 2 to AUTO (see Fig. 6). Press switch 3 to O for more than 3 seconds until all three LED’s are on (see Fig.
-
Page 6: Lamp Replacement
Lamp Replacement WARNING – ALWAYS DISCONNECT FROM THE POWER SUPPLY BEFORE REMOVING LAMPS. The front window assembly will need to be removed in order to change lamps. Warning! The front window assembly is heavy and easily damaged !. The front window assembly is fixed with two screws on top and is supported underneath by the chassis. - Page 7 Fig. 12 Remove the defective lamp by unscrewing it (see Fig. 12). Replace with a 60W E14 SES Clear Candle bulb, rotating it. Take care not to over-tighten the lamp. Steps for reassembling the heater Refit the rotisserie making sure that the rubber grommet is carefully pushed into the slotted hole on the axial bracket (see Fig.
-
Page 8: After Sales Service
Hampshire. SO30 2DF Republic of Ireland Tel. 01 8424833 [c] Glen Dimplex UK Limited All rights reserved. Material contained in this publication may not be reproduced in whole or in part, without prior permission in writing of Glen Dimplex UK Limited.
Need help?
Do you have a question about the SP820 and is the answer not in the manual?
Questions and answers