Advertisement
KOBALT® and the K Design® are registered
trademarks of LF, LLC. All Rights Reserved.
ATTACH YOUR RECEIPT HERE
Serial Number
Questions, problems, missing parts? Before returning to your retailer, call our customer
service department at 1-888-3KOBALT (1-888-356-2258), 8 a.m. - 8 p.m., EST,
Monday - Friday.
AB14858B
Purchase Date
ITEM #0232741
AIRLESS PAINT
SPRAYER
MODEL #SGY-APS41
Français p. 34
Español p. 69
kobalttools.com
Advertisement
Table of Contents

Related Manuals for Kobalt SGY-APS41


Summary of Contents for Kobalt SGY-APS41
- Page 1 AIRLESS PAINT SPRAYER MODEL #SGY-APS41 Français p. 34 Español p. 69 KOBALT® and the K Design® are registered trademarks of LF, LLC. All Rights Reserved. ATTACH YOUR RECEIPT HERE Serial Number Purchase Date Questions, problems, missing parts? Before returning to your retailer, call our customer service department at 1-888-3KOBALT (1-888-356-2258), 8 a.m.
-
Page 2: Table Of Contents
TABLE OF CONTENTS ......................2 Package Contents ....................... 3 Safety Information ....................... 4 Preparation .........................10 Understanding Airless Paint Sprayer Components ............11 .... -
Page 3: Package Contents
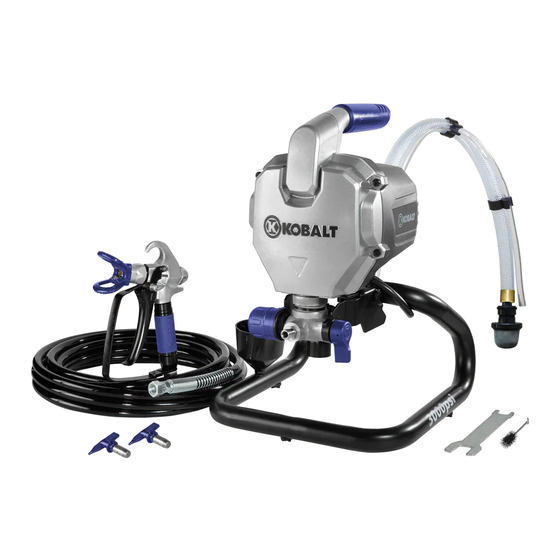
PACKAGE CONTENTS PART DESCRIPTION QUANTITY Airless Paint Sprayer Suction Tube Prime Tube Spray Gun Housing Internal Gun Filter Pressure Control Knob Fluid Outlet Prime Spray Valve Switch Inlet Screen Spray Guard High Pressure Fluid Hose Spray Tip Single Seal Tip Pressure Release Button Wrench Inlet Screen Holder... -
Page 4: Safety Information
SAFETY INFORMATION Please read and understand this entire manual before attempting to assemble, operate or maintain this product. If you have any questions, please call our Customer Service Department at 1-888-3KOBALT, 8:00 a.m. – 8:00 p.m. EST, Monday – Friday. SAVE THESE INSTRUCTIONS –... - Page 5 SAFETY INFORMATION WARNING PAINT SPRAYER HAZARDS WHAT COULD HAPPEN HOW TO PREVENT IT Certain materials that can be used with sprayers Always use a face mask/respirator and protective may cause skin irritation if they come in direct clothing when spraying. contact with skin.
- Page 6 SAFETY INFORMATION WARNING RISK OF FIRE OR EXPLOSION WHAT COULD HAPPEN HOW TO PREVENT IT This tool is capable of generating Wiping or cleaning rags and other flammable waste materials that may have been used on the tool must be placed in a tightly closed sparks which can result in ignition metal container, and disposed of in a proper manner.
- Page 7 SAFETY INFORMATION WARNING RISK OF ENTANGLEMENT WHAT COULD HAPPEN HOW TO PREVENT IT Tools and hoses can become entangled in hair, Remove any jewelry or loose objects which may clothing, jewelry and other loose objects, resulting become entangled with the tool. in severe injury.
- Page 8 SAFETY INFORMATION WARNING RISK OF PERSONAL INJURY WHAT COULD HAPPEN HOW TO PREVENT IT This tool can propel liquids, loose/broken Do not attempt to stop leaks with any body parts. If accessories or other objects throughout the work machine is leaking, turn off and unplug, and set to area.
- Page 9 SAFETY INFORMATION WARNING RISK OF PERSONAL INJURY WHAT COULD HAPPEN HOW TO PREVENT IT Wrenches and adjusting keys that are left attached Always remove and secure adjusting keys and to the tool may fly off and increase the risk of wrenches before operating the tool.
-
Page 10: Preparation
SAFETY INFORMATION WARNING RISK OF PERSONAL INJURY WHAT COULD HAPPEN HOW TO PREVENT IT Improperly maintained tools and accessories can Maintain the tool and accessories with care. Do not cause serious injury. abuse hoses or connectors. Keep hoses away from heat, oil and sharp edges. Always check hoses for weak or worn connections before each use and make certain that all connections are secure. -
Page 11: Understanding Airless Paint Sprayer Components
UNDERSTANDING AIRLESS PAINT SPRAYER COMPONENTS 1. The suction tube (B) draws material for spraying from the container holding the material. 2. The prime tube (C) dispenses material during the flushing, priming, and cleaning stages. It must remain in the waste pail during use. 3. - Page 12 UNDERSTANDING AIRLESS PAINT SPRAYER COMPONENTS Coating Selection Tip Hole Size Stains Enamels Oil-based Interior Exterior Acrylics primers latex latex (expressed as diameter, based and paints paints paints 0.011 in. (0.28 mm) 0.013 in. (0.33 mm) 0.015 in. (0.38 mm) 0.017 in. (0.43 mm) 0.019 in.
- Page 13 ASSEMBLY INSTRUCTIONS to spray gun housing (D). Hand tighten, making sure connections are properly secure. Fully tighten using wrench (O). Be sure to use the correct spray tip (L) for the particular painting application. See table on "Coating Selection" to determine the proper tip size.
- Page 14 ASSEMBLY INSTRUCTIONS 4. Turn nut on spray guard (J), then remove spray guard (J) and spray tip (L) from spray gun housing (D). 5. Adjust pressure control knob (F) to lowest PSI (below roll) by turning counterclockwise. Prime/ Roll Spray Spray Clean SPRAY...
- Page 15 ASSEMBLY INSTRUCTIONS 7. Separate prime tube (C) from suction tube (B) and place prime tube (C) into a waste pail. 8a. For Water-Based Paint: If outdoor garden hose connection with water supply is available, unscrew inlet screen (I) turning clockwise at the end of the suction tube (B).
- Page 16 ASSEMBLY INSTRUCTIONS 9. Plug airless paint sprayer (A) into grounded outlet. Turn on power switch. 10. Slowly turn pressure control knob (F) clockwise to prime/clean position. Prime/ Roll Spray Spray Clean 11. Once motor is running, allow fluid to flow through sprayer system and out through the prime tube (C) into a waste pail for at least 45 seconds.
-
Page 17: Operating Instructions
ASSEMBLY INSTRUCTIONS 12. Once flushed fluid is clear, turn pressure control knob (F) to the lowest pressure setting, and turn off power switch. See Figure 5. Turn prime spray valve switch (H) to spray position. See Figure 6. Slowly turn pressure control knob (F) to clockwise to prime/clean position. - Page 18 OPERATING INSTRUCTIONS Turn pressure control knob (F) to the lowest pressure SPRAY setting. 1. Turn prime spray valve switch (H) to prime position, PRIME releasing the pressure in the machine (See Figure 1). Prime/ Roll Spray Spray Clean 2. Separate prime tube (C) from suction tube (B) and place prime tube into a waste pail (See Figure 2).
- Page 19 OPERATING INSTRUCTIONS 4. Turn on power switch. 5. Slowly turn pressure control knob (F) clockwise until motor begins to run. Allow paint to flow through sprayer system and out through the prime tube (C) for 15 seconds. 6. Turn down pressure control knob (F) and turn off sprayer. Prime/ Roll Spray...
- Page 20 OPERATING INSTRUCTIONS SPRAY 7. Turn prime spray valve switch (H) to spray po sition. Adjust pressure control knob (F) to lowest PSI (below Counterclockwise roll). PRIME Clockwise Prime/ Roll Spray Spray Clean 8. Turn safety lock (S) on spray gun to locked position. Lock clockwise 9.
- Page 21 OPERATING INSTRUCTIONS 10. Unlock the safety lock (S). Counterclockwise 11. Turn power switch on. Slowly, turn pressure control knob (F) clockwise until motor begins to run or until prime/clean setting. Release the trigger while the paint sprays into the waste pail. Let the paint run for 15 seconds. Let go of trigger.
- Page 22 OPERATING INSTRUCTIONS 13. Reconnect spray guard (J), spray tip (L) and single seal tip (M) making sure connection is properly secured. Adjust the spray tip (L) so the arrow on tip housing is backwards, and unlock the safety lock (S). Continue spraying into waste pail 5-10 seconds to make sure the hole in the tip is not jammed.
-
Page 23: Spraying Techniques
OPERATING INSTRUCTIONS 2. Hand tighten nut on spray guard (J). Unlock safety lock and continue to spray. SPRAYING TECHNIQUES Before you begin, clean the surface area to remove any debris or dirt buildup for optimal results. Protect and cover any surfaces that you do not intend to spray. How to Set Proper Spray Pattern If you do not have much experience using a paint sprayer, practice by using water and spraying on a system and that the surface is completely dry. - Page 24 SPRAYING TECHNIQUES The spray gun should be held 12-14 inches away from the surface and held at a 90° angle from the surface area. Incorrect Incorrect Correct Correct Correct Correct Incorrect Incorrect Thin coat Thin coat Heavy coat Heavy coat Thin coat Thin coat 12”- 14”...
-
Page 25: Care And Maintenance
CARE AND MAINTENANCE ALWAYS wear proper eye protection during cleanup process. Tools Recommended for Cleaning (not included): Three to four 5 gallon buckets, soft (non-wire) bristle brush, cleaning rags, clean water, paint drop cloth, plastic bag, rubber band, respirator or dust mask, id (for after use storage) This device is designed to work with water-based and oil-based paints, as well as stains. - Page 26 CARE AND MAINTENANCE Water-Based Paint: . For long- suited for your sprayer. Oil-Based Paint: Follow cleaning stages exactly. When cleaning after using oil-based paint or stains, using mineral spirits or a cleaning mixture is recommended. Consult your local retailer for additional information on the cleaning solvent materials best suited for proper cleaning.
- Page 27 CARE AND MAINTENANCE Note: Paint from Prime Tube” and before proceeding to “Removing Excess Paint from High Pressure Spray Hose”. Removing Excess Paint from High Pressure Spray Hose 1. Make sure safety lock is in locked position. Note: Remove spray guard (J), single seal tip (M), and spray tip (L). Unscrew safety screw at base of handle housing using hex key (R) to release handle housing, making the cleaning process easier.
- Page 28 CARE AND MAINTENANCE 5. Using cleaning brush (Q), thoroughly brush suction tube (B), inlet screen (I), and prime tube (C) until all heavy paint or stain residue is removed. 6. After components have dried, insert the single seal tip into the spray guard housing with the metal end facing down.
-
Page 29: Troubleshooting
CARE AND MAINTENANCE STAGE 3: Long-Term Storage Make sure unit is completely clean by following Stages 1 and 2 of the Care and Maintenance section. For long-term storage of your sprayer, DO NOT leave water in the sprayer system. The use of mineral 1. - Page 30 TROUBLESHOOTING PROBLEM POSSIBLE CAUSE CORRECTIVE ACTION Pump does not prime. 1. Prime spray valve is set to 1. Set prime spray valve to prime spray position. position. 2. Sprayer is turned off. 2. Turn sprayer on. 3. Prime tube is clogged. 3.
-
Page 31: Warranty
TROUBLESHOOTING PROBLEM POSSIBLE CAUSE CORRECTIVE Pressure is not building 1. Machine has been in use for 1. Press the pressure release button up properly and sprayer extended periods of time and/ and hold down for 3 seconds, or multiple pressure settings allowing the pressure in the system spraying properly. -
Page 32: Exploded View
EXPLODED VIEW 31 32 33 34 35 36 37 38 39 40 PART DESCRIPTION PART DESCRIPTION Spray Gun Plunger Pole High Pressure Fluid Hose Plunger Spring Base Frame Copper Washer Screw M6x25 Retainer Ring Housing Cover O-ring (2.4x1.8) Big Copper Bushing Shield Retainer Ring Pump Body... - Page 33 O-ring Wrench Felt Piston Seat Connector Plastic Bristle Cleaning Brush Guide Copper Bushing Piston Printed in China Lock Sleeve White Seal KOBALT® and the K Design® are registered Black Seal trademarks of LF, LLC. All Rights Reserved. Switch Lever kobalttools.com...
Need help?
Do you have a question about the SGY-APS41 and is the answer not in the manual?
Questions and answers