Table of Contents
Advertisement
Advertisement
Table of Contents

Related Manuals for HotSpring Limelight


Summary of Contents for HotSpring Limelight
- Page 2 Limelight Collection ® Watkins Manufacturing Corporation congratulates you on your decision to enjoy the finest spa available... Welcome to the growing family of Hot Spring spa owners. Before you begin reviewing the manual, please take a moment to register your warranty. By doing so will help assist us in contacting you for any important product notification, and help ensure that you and others can enjoy quality products for years to come.
-
Page 3: Table Of Contents
Table of Contents Table of Contents SafeTy InforMaTIon system Mode ..............30 clean Menu ..............30 Important safety Instructions ........1 Tools Menu ..............30 Important spa Instructions ..........3 Audio Menu (optional) ............ 31 SPa SPeCIfICaTIonS ........4 display Inversion ............. 33 InSTaLLaTIon InSTrUCTIonS SPa Care and MaInTenanCe site Preparation ............5 draining the Water ............ -
Page 4: Safety Information
WarnIng: • To reduce the risk of injury, do not permit children to use this spa unless they are closely supervised at all times. • To reduce the risk of injury, lower water temperatures are recommended for young children. Children are especially sensitive to hot water. • Make sure you always lock the child resistant locks after using the spa for your children’s safety. Every HotSpring spa is equipped with a ® locking cover that meets the AsTM F1346-91 standard for safety covers. • Test the water temperature with your hand before allowing your children to enter the spa to be sure that it’s comfortable. Children are especially sensitive to hot water. - Page 5 copper wire. The wire must be equivalent in size to the circuit conductors supplying the equipment. In addition, a bonding terminal (pressure wire connector) is provided on the outside of the control box for bonding to local ground points. To reduce the risk of electric shock, this connector should be bonded with a No.
-
Page 6: Important Spa Instructions
UnCLean WaTer • Keep the water clean and sanitized with correct chemical care. The recommended levels for your Hot Spring ® spa are: - Free Available chlorine (FAc): 3.0-5.0 ppm - Total Alkalinity: 40-120 ppm - Water pH: - calcium Hardness: 50-150 ppm 7.2-7.6 (Refer to Water Quality and Maintenance section for complete instructions.) ImpORTaNT: Turn on the jet pump for a least ten minutes after adding ANy spa water chemicals into the filter compartment. • Clean the filter cartridge monthly to remove debris and mineral buildup which may affect the performance of the hydromassage jets, limit the flow, or trip the high limit thermostat which will turn off the entire spa. -
Page 7: Spa Specifications
SpA SpEcIFIcATIONS 9' 2" 230v system, 230 Gleam ™ 1,270 7,258 38" 7' 7" gallons lbs. lbs. (Model GLM) volt, 50 or 70 amp lbs. per square 4,000 seats 8 square single phase GFcI 3,292 2.79m 2,082 feet 97 cm foot Adults protected circuit... -
Page 8: Installation Instructions
INSTALLATION INSTRUcTIONS WARNING WARNING SITE PREPARATION You probably have a spot picked out for your new spa, whether it’s indoors or outdoors, on a patio or on a deck. Just make sure you check the following: Lowering the top of the spa • Always put your spa on a structurally sound, level surface. A filled spa can weigh a great deal. Make to deck level substantially certain that the location you choose can support the weight of your filled spa. increases the potential of accidental entry. -
Page 9: Spa Leveling Instructions
In addition to the previous information, properly clean and maintain your spa as follows: • Follow all procedures in this Owner’s Manual and printed instructions on all water care (chemical) products packaging. • Test the water regularly to ensure proper levels of sanitizers, pH, and other water care requirements. • Drain, clean, and refill your spa with fresh water on a regular schedule, and in accordance with this owner’s manual. • Clean the filter(s) at least once per month. • Check to make sure you have proper circulation throughout your spa water system. • Have spa users bathe before entering the spa water. SPa LeveLIng InSTrUCTIonS ® In order for your Hot Spring spa to operate properly, and the internal plumbing to drain completely, the spa must be level. WaRNING: Watkins Manufacturing corporation recommends that a structural engineer or contractor be consulted prior to placing the spa on an elevated deck, or platform. -
Page 10: Controls And Equipment
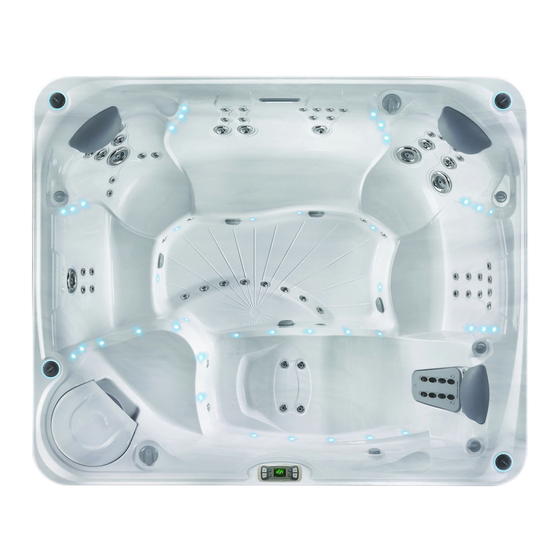
cONTROLS ANd EqUIpMENT glEAM ™ MOdEl (glM) overHead vIeWS A. combination XL Hydromassage jets B. combination Hydromassage jets c. direct Hydromassage jets d. secondary suction e. spa pillow F. Moto-Massage ® G. Filter compartment H. control panel I. Air lever for direct Hydromassage jets J. -
Page 11: Pulse Model (Pls)
® PUlSE MOdEl (PlS) overHead vIeWS A. combination XL Hydromassage jets B. combination Hydromassage jets c. direct Hydromassage jets d. secondary suction e. spa pillow F. Filter compartment G. control panel H. Air lever for direct Hydromassage jets I. diverter lever J. -
Page 12: Flair Model (Flr)
® FlAIR MOdEl (FlR) overHead vIeWS A. combination XL Hydromassage jets B. combination Hydromassage jets c. direct Hydromassage jets d. secondary suction e. spa pillow F. Filter compartment G. control panel H. Air lever for direct Hydromassage jets I. diverter lever J. -
Page 13: Bolt Model (Blt)
bOlT ™ MOdEl (blT) overHead vIeWS A. combination XL Hydromassage B. combination Hydromassage jets c. direct Hydromassage jets d. secondary suction e. spa pillow F. Filter compartment G. control panel H. Air lever for direct Hydromassage jets I. Heater jet / ozone (optional accessory) J. -
Page 14: Glow Model (Glw)
® glOW MOdEl (glW) overHead vIeWS A. combination XL Hydromassage jets B. combination Hydromassage jets c. direct Hydromassage jets d. secondary suction e. spa pillow F. Filter compartment G. control panel H. Air lever for direct Hydromassage jets I. cup holder J. -
Page 15: Electrical Requirements And Precautions
ELEcTRIcAL REqUIREMENTS ANd pREcAUTIONS ® your Hot Spring spa has been carefully designed to give you maximum safety against electric shock. connecting the spa to an improperly wired circuit will negate many of the spa’s safety features. Improper wiring may also cause electrocution, risk of fire, and other risks of injuries. Please read and follow the electrical installation requirements and instructions for your specific spa model completely! SERVICE NOTE: The Hot Spring spa is equipped with a power indicator which, in addition to showing the spa has power to it, has a diagnostic function as well. - Page 16 spas Hot Spring ® 230 Volt permanently connected models WARNING! THE EXACT PHYSICAL LOCATION OF THE TERMINALS ON THE GFCI BREAKER WILL VARY BETWEEN MANUFACTURERS. CONNECTING THE HOT WIRE TO THE NEUTRAL TERMINAL WILL CAUSE IRREVERSIBLE DAMAGE TO THE CONTROL BOX. FACTORY WIRED HEATER...
- Page 17 An electrical subpanel containing two GFcI breakers is included with each spa. We recommend that this subpanel be used to supply power and protect the spa. This subpanel requires a 70 amp, single phase, 230 volt, four wire service (two line, one neutral, one ground). The ground wire must never be less than #10 AWG.
- Page 18 gLeaM (ConverTed) ImpORTaNT: If you ever need to move or relocate your Hot spring spa, it is essential that you understand and apply these installation requirements. your Hot Spring spa has been carefully engineered to provide maximum safety against electric shock. Remember, connecting the spa to an improperly wired circuit will negate many of its safety features.
-
Page 19: 115/230 Volt Converted Model
115/230 VOlT CONVERTIblE MOdEl (bOlT™ MOdEl) This model can be converted to 230 volt operation with the addition of a subpanel and a control box wiring change. consult your dealer before attempting to convert from 115 volt operation to 230 volt operation. Any damage to the spa from improper conversion is not covered under the warranty. - Page 20 ® IMPoRTANT: should you ever find the need to move or relocate your Hot Spring spa, it is essential that you understand and apply these installation requirements. your Hot Spring spa has been carefully engineered to provide maximum safety against electric shock. Remember, connecting the spa to an improperly wired circuit will negate many of its safety features.
- Page 21 WIrIng ConneCTIonS ImpORTaNT: Fill the spa with water before turning on the power once your spa has been filled with water, turn it on and test all the circuit breakers. Each breaker should be tested prior to each use. Here’s how: 1. Push the “TesT” button on each GFcI breaker, and observe it click off. 2.
-
Page 22: Operating Instructions
OpERATING INSTRUcTIONS ® ® ® ® The Hot Spring Gleam , Pulse , Flair and Glow are 230 volt permanently connected models that use a continuous heating system, this ™ means that the heater may turn on while the jet pump is operating which keeps your water hotter longer when the jets are in use. When the Bolt is configuration for 115 volt, either the heater, or the jet pump can operate, but they can’t work at the same time. In a 115 volt ™... -
Page 23: Diverter System
4. Adjust Total Alkalinity (TA) to 80 ppm, calcium Hardness (cH) to 100 ppm, then spa water pH to between 7.2 and 7.6 These procedures are listed in the “Water Quality and Maintenance” section. ImpORTaNT: Add spa water chemicals directly into the filter compartment with the jet pump on high speed for at least ten minutes. OpERaTION NOTE: Adjusting the Total Alkalinity as the first step is important, as out-of-balance TA will affect your ability to adjust the pH correctly and will prevent the sanitizer from operating effectively. -
Page 24: Jets
JETS dIreCT HydroMaSSage JeTS direct Hydromassage jets are small, producing a precisely narrow stream of massaging action. They are placed in groups to perform a soft, soothing massage on your back, neck, and shoulders. CoMbInaTIon HydroMaSSage JeTS These jets deliver a great massage to the feet, back and shoulder areas. These jets may be adjusted to provide either a stationary, direct stream, or, by positioning the nozzle to one side, a variety of rotating massage patterns. -
Page 25: Jet System Menu
JET SYSTEM MENU ® lIMElIgHT COllECTION glEAM (MOdEl glM) ™ Jet Pump 1 - Jet System 2 Jet Pump 1 - Jet System 1 diverter lever in the position diverter lever in the position a) 2 combination XL jets b) 6 direct jets... -
Page 26: Pulse (Model Pls)
® lIMElIgHT COllECTION ® PUlSE (MOdEl PlS) Jet Pump 1 a) 2 combination XL jets b) 2 direct jets c) 2 combination jets d) 6 direct jets e) 2 combination jets f) 1 Water Feature (left wall) lever must be in oN position... -
Page 27: Flair (Model Flr)
® lIMElIgHT COllECTION ® FlAIR (MOdEl FlR) Jet Pump 1 a) 2 combination jets b) 2 combination jets c) 4 direct jets d) 1 combination XL jet e) 1 combination XL jet f) 1 Water Feature (right wall) lever must be in oN position... -
Page 28: Bolt (Model Blt)
® lIMElIgHT COllECTION bOlT (MOdEl blT) ™ JeT PUMP a) 8 direct jets b) 4 direct jets c) 2 combination jets d) 2 combination jets e) 1 combination XL jet Page 25 Jet Menu Jet Menu Page 25 Page 25... -
Page 29: Glow (Model Glw)
® lIMElIgHT COllECTION ® glOW (MOdEl glW) JeT PUMP 1 a) 10 direct jets b) 6 direct jets jets c) 2 combination jets d) 1 Water Feature (right wall) lever must be in oN position JeT PUMP 2 a) 4 direct jets... -
Page 30: Control Panel Operations
cONTROL pANEL OpERATIONS CONTROl PANEl ® your Hot Spring spa comes equipped with a control panel located on the bartop above the equipment compartment door. The control panel allows the user to set the temperature, activate the jets and light, and access menus to lock the temperature and/or spa functions, and uses indicator lights and an integrated LCD display to provide a quick visual check of the spa’s status. - Page 31 Jets Display JeTS ConTroL (gLeaM onLy) The JeTs button activates jet pump 1 when the JeTs button is first pressed, the JeTs symbol and JeT 1 will illuminate on the control panel display. The 1 will flash indicating jet pump 1 is on and in low speed. Press the oN ...
-
Page 32: Indicator Lights
• Press the LIGHT button while in the dIM mode to enter into the coLoR mode. Press oN b utton or OFF ▼ button to change the external light color of all the spa lights to one of 7 different colors. • Press the LIGHT button while in the coLoR mode to enter in the LooP0 mode. Press oN b utton to change the LooP mode from 1 to 3. Press the OFF ▼ button to lower the LOOP mode from 3 to 0. LOOP mode is an electronic color wheel that will display a continuous sequence of colors, the higher the number the faster the color sequence. -
Page 33: Clean Menu
Press the oN b utton to activate the sysoN mode feature. NOTE: once activated, the jet and light functions can still be changed by pressing the JeTs or LIGHT button. To deactivate the system mode, press the Mode button until the sysoN symbol is illuminated on the display. Press the oFF b utton to deactivate. -
Page 34: Audio Menu (Optional)
LoCk overrIde The Lock override feature is for spa users who normally keep the set temperature locked. should the user wish to lock all spa controls temporarily, the spa lock can be applied over an already-applied temperature lock. Then, when the spa lock is removed, the temperature lock will remain on to prevent unwanted tampering with the set temperature. - Page 35 To TUrn aUdIo SySTeM on/off From the AudIo menu: 4. Press the ON ▲ button to display POWR -. 5. Press the ON ▲ button to display POWR + and turn the audio system ON. Press the OFF ▼ button to display PoWR - and turn the audio system oFF. Audio must be ON to advance the audio screens. ImpORTaNT: The power can take a few seconds to turn on or off. To adJUST voLUMe From the AudIo menu: Press the ON ▲ button to display POWR+.
-
Page 36: Display Inversion
To adJUST TrebLe From the seTuP menu: Press the ON ▲ button to display one of four audio sources, IPOD,TV, AUX, BLUE Press the MODE ▲ button to display TRE -5 to +5. 3. Press the ON ▲ button to raise the Treble or press OFF ▼ button to lower the treble. To adJUST baSS From the seTuP menu: Press the ON ▲ button to display one of four audio sources, IPOD,TV, AUX, BLUE Press the MODE ▲ to display TRE. Press the MODE ▲ button to display BAS -5 to +5. Press the TEMP ▲ button to raise the Bass or press OFF ▼ button to lower the Bass. To adJUST baLanCe From the seTuP menu: Press the ON ▲ button to display one of four audio sources, IPOD,TV, AUX, BLUE Press the MODE ▲ button to display TRE. Press the MODE ▲ button to display BAS. Press the MODE ▲button to display BAL -5 to +5. Press the ON ▲ button to raise the Balance # or press OFF ▼ button to lower the Balance #. To adJUST SUbWoofer From the seTuP menu: Press the ON ▲ button to display one of four audio sources, IPOD,TV, AUX, BLUE Press the button to display TRe. -
Page 37: Spa Care And Maintenance
SpA cARE ANd MAINTENANcE “oFF ”buttons simultaneously a second time the screen will go back to it’s original display. ® your Hot Spring spa is manufactured from the highest quality, most durable materials available. even so, the spa care and maintenance program you develop will ultimately determine how long your spa, and its individual components, will last. Regular maintenance and following the advice in this section will help you to protect your investment. -
Page 38: Filter System
This occurrence is considered abuse and is not covered under the warranty. Limelight collection spas are equipped with one filter cartridge, sized to meet the needs of the jet pump system. As with any water filtering system, the filter cartridge may become clogged, resulting in reduced water flow. It is important to maintain a clean, unobstructed filtering system. -
Page 39: Filter Cartridge Removal And Cleaning
FIlTER CARTRIdgE REMOVAl & ClEANINg 1. disconnect the spa from the power supply by tripping both of the GFcI breakers located in the subpanel. 2. Remove and carefully set aside the filter compartment cover. 3. Remove any floating items from within the filter compartment. 4. -
Page 40: Care Of The Spa Cover
CARE OF THE SPA COVER WaRNING: The vinyl cover is a manual safety cover that meets or exceeds all prevailing requirements of AsTM standards for spa safety covers when installed and used correctly as of the date of manufacture. Non-secured, or improperly secured covers are a hazard. open the cover to its fully open position before use. -
Page 41: Vacation Care Instructions
® c. For the Lift ’n Glide retractable cover system: slightly lift the cover at front of spa, glide (push back till it stops), fold cover in half and lift cover moving it to the back of the spa. Insert locking pin into side of lifter to prevent accendental closure. NOTE: When opening a cover with a retractable cover system, only use one of these three specific methods. -
Page 42: Water Quality And Maintenance
wATER qUALITY ANd MAINTENANcE ImpORTaNT: Always keep spa covered when not in use (whether it is empty or full). It’s important to have clean water. Water maintenance is one of the most important areas of spa ownership. Your dealer can guide you through the process of achieving and maintaining perfect water in your spa, given your local conditions; here is our suggested step-by-step program. ImpORTaNT: see “Water Terminology” section found later in this chapter to help you better understand chemical terms. Your program will depend on your water’s mineral content, how often you use your spa, and how many people use it. ® Watkins has developed the everFresh water care system for its spas, which is an alternative to using an entirely chlorine-based system. -
Page 43: Water Maintenance Program
To adMInISTer SPa WaTer CHeMICaLS: 1. Fold back the cover. carefully remove and set aside the filter compartment cover. 2. Push the JeTs button to turn on the jet pump. 3. carefully measure the recommended amount of chemical and slowly pour it into the filter compartment. use care not to splash chemicals on your hands, in your eyes, on the spa shell surface, or on the cabinet. - Page 44 baLanCIng THe pH A. The ideal pH level for your spa water is 7.2-7.6. B. The pH level is the measure of acidity and alkalinity. Values above 7.6 are alkaline; those below 7.2 are acidic. Maintaining the proper pH level is extremely important for: • Optimizing the effectiveness of the sanitizer. • Maintaining water that is comfortable for the user. Add pH ALKALINE • Preventing equipment deterioration. decReAseR To sPA WATeR LoWeR pH C. If the spa water’s pH level is too low, the following may result: (scALING ZoNe) • The sanitizer will dissipate rapidly. • The water may become irritating to spa users.
-
Page 45: Everfresh ® Water Care System
THe WaTkInS WaTer MaInTenanCe qUICk referenCe gUIde Ideal range (ppm) What Chemicals to Use Steps Min. Max. To raise To Lower ® Hot Spring Hot Spring ® FreshWater FreshWater 1 total Alkalinity (Sodium Bisulfate) (Sodium Hydrogen Alkalinity Carbonate, or Sodium Bicarbonate) 2 Calcium Hardness Hot Spring Use a mixture of 75%... -
Page 46: Freshwater Ag+ ® Silver Ion Purifier Replacement ........... 43
EvErfrESh watEr trEatmEnt guidE at spa Follow start-up and Refill Procedures section ® NoTe: use the Clean-Screen pre-filter when filling startup the spa to remove unwanted contaminants. or refill Prior to Add one half (½) teaspoon of sodium dichlor per Add one (1) tablespoon of monopersulfate (MPs)* per 250-gallons (950 liters) 250-gallons (950 liters) -
Page 47: Chlorine (Sodium Dichlor)
SILver IonS qUeSTIonS and anSWerS Question: How are the silver ions actually added to the water? answer: The silver ion cartridge contains ceramic beads that are infused with silver. By placing the cartridge in the circulation pump filter standpipe, it is subjected to the continuous flow of water created by the pump’s 24 hour circulation. The flowing water, through a chemical erosion process, carries with it the silver ions necessary to add a sanitizing residual to the spa water. -
Page 48: Ozone (Optional Equipment)
The FreshWater III high-output ozone system is the only ozone purification system approved for installation in your Limelight collection spa. The FreshWater III ozone system features corona discharge (cd) technology to produce a higher concentration of ozone than is produced by competing ultraviolet light (uV) ozone systems. - Page 49 CLeanIng THe oZone InJeCTor (oPTIonaL eqUIPMenT) on occasion, a mineral build-up may clog the ozone injector, causing a lack of flow, or low flow of ozone bubbles. To prevent this, refer to the following instructions to clean the injector: 1. disconnect power to the spa. 2.
-
Page 50: Common Water Chemistry Questions
While over-exposure to any chemical can be unhealthful, many low levels of chemicals are effective and beneficial. In the case of spa ® water, the chemicals recommended in the Limelight collection Water Maintenance Program are needed to protect the user from water-borne ®... -
Page 51: Service Information
SERvIcE INFORMATION ® your Limelight spa has been designed to provide years of trouble-free use. As with any appliance, problems may occasionally occur that require the expertise of a qualified service person. Though such simple repairs as resetting a GFcI switch or breaker, resetting a high limit thermostat or replacing a light bulb may not require a service call, they may indicate that a more serious condition exists. -
Page 52: No-Fault ® Heater And Heater Thermal Cut-Off
NO-FAUlT HEATER ANd INTEgRATEd PRESSURE ® SWITCH Watkins Manufacturing Corporation unconditionally warrants the No-Fault heater against any failure that would require replacement. This warranty’s duration is equal to the time period identified in the component Warranty. This warranty defines unconditional as warranty coverage without exception provided that the component has failed to operate properly within the spa’s system. This means that conditions that would normally invalidate the limited warranty, such as water chemistry damage, do not apply to the No-Fault heater. It is important to note that the No-Fault heater is protected by both the heater high limit thermostat circuit and the integrated pressure switch. -
Page 53: Disclaimers
caused by a dirty, clogged or calcified filter cartridge; damage to the spa surface caused by the use of tri-chloro chlorine, BCDMH, chemical tablets in a floater, acid, or any other spa chemicals or spa surface cleaners which are not recommended by Watkins Manufacturing Corporation; damage caused by allowing undissolved spa sanitizing chemicals to lie on the spa surface (no spa surface material can withstand this kind of abuse); damage to components or spa surface caused by improper water chemistry maintenance; and damage to the spa surface caused by leaving the spa uncovered while empty of water and in direct exposure to sunlight (this may cause solar heating distress in warm weather regions). These are considered abuses and may invalidate this warranty. Acts of nature, and damage caused by animals, rodents, and insects are considered abuses and are not covered under this warranty. *operation of the spa does not mean “use”... -
Page 54: Troubleshooting Guides
TROUblESHOOTINg ® should you experience any problem, do not hesitate to contact your authorized Hot Spring dealer. Here are some tips to help you to diagnose and rectify some more common sources of trouble yourself, if you choose to do so. gEnEral oPEration trouBlEShooting guidE Problem Probable causes... - Page 55 SPa watEr maintEnancE trouBlEShooting guidE Problem Probable causes Solutions • Clean filters cloudy Water • Dirty filters • Shock spa with sanitizer • Excessive oils / organic matter • Add sanitizer • Improper sanitization • Adjust pH and/or alkalinity to recommended range • Suspended particles / organic matter • Run jet pump(s) and clean filters • Overused or old water • Drain and refill the spa Water odor • Excessive organics in water • Shock spa with sanitizer • Improper sanitization • Add sanitizer • Low pH • Adjust pH to recommended range...
- Page 56 (ModeL GLW) 3/13 ©2013 Watkins Manufacturing corporation. Limelight, Gleam, Pulse, Flair, Bolt, Glow, No-Fault, IQ 2020, everwood, Raio, Wavemaster, silent Flo 5000, covercradle, Clean-Screen, Cover Shield, UpRite, Lift ’n Glide, everFresh, Freshstart, FreshWater, Vidro, FreshWater and The Home Relaxation Specialists are trademarks of Watkins Manufacturing Corporation. BaquaSpa is a trademark of Arch UK Biocides Limited.
Need help?
Do you have a question about the Limelight and is the answer not in the manual?
Questions and answers
Removal of jet vents in Hotspring Flair to clean them of rust
To remove jet vents in a HotSpring Limelight spa for cleaning rust:
1. Check if the jet spins freely. If not, remove the jet by pulling it out gently.
2. Soak the bearing end in a cup of vinegar overnight to soften deposits.
3. Flush with water and test if it spins freely.
4. If it still doesn’t spin, soak again overnight.
5. If the jet still doesn’t work, replace the assembly.
To reinstall:
1. Align the cutout at the back of the face body downward.
2. Push the face body into the spa fitting.
3. Rotate slightly to align, then press firmly.
4. Push and rotate the face clockwise until it locks.
5. Turn on the jet pump to check if it spins freely.
This answer is automatically generated
rust on vents