Table of Contents
Advertisement
Advertisement
Table of Contents

Related Manuals for HotSpring Portable Spaa


Summary of Contents for HotSpring Portable Spaa
- Page 1 O w n e r ’ s M a n u a l...
- Page 2 Important! years of age. Your Hot Spring spa is equipped with a locking cover that meets the ASTM F1346-91 Standard for Safety Covers and as a result, is usually exempt from most barrier requirements. As a general practice, your local Building Department will inform you of any applicable barrier requirements at the time a permit is obtained for the installation of an electrical circuit.
-
Page 3: Table Of Contents
Hot Spring Spa Water Maintenance Program......56 Start-Up and Refill Procedures ..........30 ® EverFresh Water Care System..........58 ® SmartJet System ..............31 Hot Spring Water Treatment Guide..........59 ® Comfort Control System ............31 Freshwater Silver Ion Purifier Replacement ......59 Ag+® ® Moto-Massage Jet ..............31 Chlorine (Sodium Dichlor) ............60... -
Page 4: Safety Information
• To reduce the risk of injury, lower water temperatures are recommended for young children. Children are especially sensitive to hot water. ® • Make sure you always lock the child resistant locks after using the spa for your children’s safety. Every Hot Spring spa is equipped with a locking cover that meets the ASTM F1346-91 Standard for Safety Covers. -
Page 5: Unclean Water
• Persons suffering from obesity, or with a medical history of heart disease, low or high blood pressure, circulatory system problems, or diabetes should consult a physician before using spa. Unclean water ® • Keep the water clean and sanitized with correct chemical care. The recommended levels for your Hot Spring spa are: - Free Available Chlorine (FAC): 3.0-5.0 ppm... -
Page 6: Important Spa Instructions
• Use only approved accessories and recommended spa chemicals and cleaners. DON’T: • Leave the Hot Spring spa exposed to the sun without water or the cover in place. Exposure to direct sunlight can cause solar distress of the shell material. -
Page 7: Spa Specifications
SPA SPECIFICATIONS ® Vista 7'7" x 8'4" 38" 4,000 1008 6,059 230 volt, 50 amp square gallons lbs. lbs. lbs. per Single phase GFCI 2.31m (Model SS) 0.97 m feet square protected circuit 1,893 2,748 2.54m foot litres 150 (G) Model G 1,008 6,233... -
Page 8: Installation Instructions
Your Hot Spring dealership can help you with local information such as zoning regulations and building codes. They can also give you a copy of our planning guide –... -
Page 9: Spa Leveling Instructions
Notice: Though designed for outdoor installation, your Hot Spring spa is not impervious to damage that may be caused by insects, rodents, or other living creatures. A screen has been installed at the bottom of the door to minimize their ability to access the spa’s equipment compartment and cause damage to the spa components. - Page 10 ® ENVOY (MODEL KK) Leveling Points NOTE: All dimensions are approximate; measure your spa before making critical design or pathway decisions. 44 1/2" (113.0cm) 44 1/2" (113.0cm) 18" (45.7cm) 18" (45.7cm) 93" (236.2 cm) • 15 leveling points (place shims approx. 18” in from edge, then center middle shims). Page 7 Installation Instructions...
- Page 11 ® VANGUARD (MODEL V & VV) Leveling Points NOTE: All dimensions are approximate; measure your spa before making critical design or pathway decisions. 87" (221cm) 43 1/2" (110.5cm) 43 1/2" (110.5cm) 18" (45.7cm) 18" (45.7cm) • 15 leveling points (place shims approx. 18” in from edge, then center middle shims). Page 8 Installation Instructions...
- Page 12 ® SOVEREIGN (MODEL I & II ) Leveling Points NOTE: All dimensions are approximate; measure your spa before making critical design or pathway decisions. • 15 leveling points (place shims approx. 18” in from edge, then center middle shims). Page 9 Installation Instructions...
- Page 13 ™ ARIA (MODEL AR) Leveling Points NOTE: All dimensions are approximate; measure your spa before making critical design or pathway decisions. 87" (221cm) 43 1/2" (110.5cm) 43 1/2" (110.5cm) 18" (45.7cm) 18" (45.7cm) • 15 leveling points (place shims approx. 18” in from edge, then center middle shims). Page 10 Installation Instructions...
- Page 14 ® PRODIGY (MODEL H) Leveling Points NOTE: All dimensions are approximate; measure your spa before making critical design or pathway decisions. • 10 leveling points (place shims approx. 15” in from edge, then center middle shims). Page 11 Installation Instructions...
- Page 15 ® JETSETTER (MODEL JJ) Leveling Points NOTE: All dimensions are approximate; measure your spa before making critical design or pathway decisions. 84" (2.13 m) 80" (2.03 m) 20 3/4" (52.7 cm) 19 1/4" (48.9 cm) 19 1/4" (48.9 cm) 20 3/4" (52.7 cm) DOOR SIDE •...
- Page 16 ® JETSETTER (MODEL J) Leveling Points NOTE: All dimensions are approximate; measure your spa before making critical design or pathway decisions. • 10 leveling points (place shims approx. 15” in from edge, then center middle shims). Page 13 Installation Instructions...
-
Page 17: Controls And Equipment
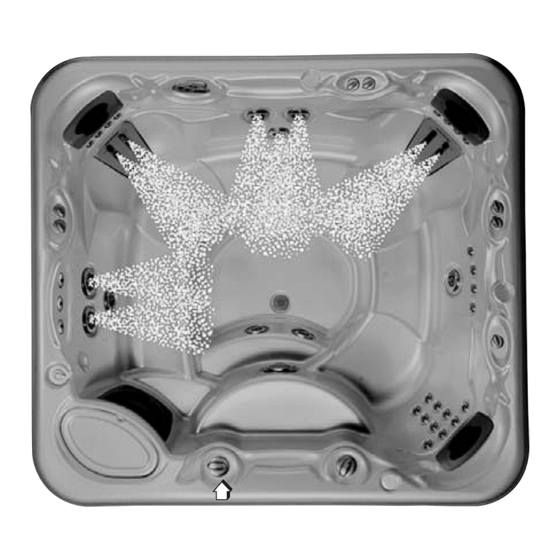
® VISTA (MODEL SS) OVERHEAD VIEW ® A. SmartJet system lever ® B. Moto-Massage jet Comfort ® Control system lever ® C. Precision jets Comfort Control system lever D. Water feature lever E. Hydromassage jet with directional nozzle F. Hydromassage jet with rotary nozzle ®... -
Page 18: Grandee
® GRANDEE (MODEL G & GG) OVERHEAD VIEW ® A. SmartJet system lever ® B. Moto-Massage jet Comfort ® Control system lever ® C. Precision jets Comfort Control system lever ® D. JetStream jet Comfort Control system lever E. Pillow F. -
Page 19: Envoy ® (Model Kk)
® ENVOY (MODEL KK) OVERHEAD VIEW ® A. SmartJet system lever ® B. Moto-Massage jet Comfort ® Control system lever ® C. Precision jets Comfort Control system lever D. Pillow E. Hydromassage jet with directional nozzle F. Hydromassage jet with rotary nozzle G. -
Page 20: Vanguard (Model V & Vv)
® VANGUARD (MODEL V & VV) OVERHEAD VIEW ® A. SmartJet system lever ® B. Moto-Massage jet Comfort ® Control system lever ® C. Precision jets Comfort Control system lever D. Pillow E. Hydromassage jet with directional nozzle F. Hydromassage jet with rotary nozzle G. -
Page 21: Sovereign (Model I & Ii)
® SOVEREIGN (MODEL I & II) OVERHEAD VIEW ® A. SmartJet system lever ® B. Moto-Massage jet Comfort Control system lever ® C. Precision jets Comfort ® Control system lever D. Pillow E. Hydromassage jet with directional nozzle F. Hydromassage jet with rotary nozzle G. -
Page 22: Aria (Model Ar)
™ ARIA (MODEL AR) OVERHEAD VIEW ® A. SmartJet system lever ® ® B. Precision jets Comfort Control system lever ® C. Moto-Massage jet Comfort ® Control system lever D. Pillow E. Hydromassage jet with directional nozzle F. Hydromassage jet with rotary nozzle G. -
Page 23: Prodigy ® (Model H)
® PRODIGY (MODEL H) OVERHEAD VIEW ® A. SmartJet system lever ® B. JetStream jet Comfort ® Control system lever ® C. Precision jets Comfort Control system lever D. Hydromassage jet with directional nozzle E. Hydromassage jet with rotary nozzle F. -
Page 24: Jetsetter ® (Model Jj)
® JETSETTER (MODEL JJ) OVERHEAD VIEW ® A. SmartJet system lever ® B. JetStream jet Comfort ® Control system lever ® C. Moto-Massage DX jet Comfort Control system lever ® D. Precision jets Comfort Control system lever E. Pillow F. Hydromassage jet with directional nozzle G. -
Page 25: Jetsetter (Model J)
® JETSETTER (MODEL J) OVERHEAD VIEW ® A. SmartJet system lever ® B. JetStream jet Comfort ® Control system lever ® C. Moto-Massage jet Comfort Control system lever ® D. Precision jets Comfort Control system lever E. Pillow F. Hydromassage jet with directional nozzle G. -
Page 26: Electrical Requirements And Precautions
Please read and follow the electrical installation requirements and instructions for your specific spa model completely! SERVICE NOTE: All Hot Spring spa models are equipped with a power indicator which, in addition to showing the spa has power to it, has a diagnostic function as well. - Page 27 Your Hot Spring spa has been carefully engineered to provide maximum safety against electric shock. Remember, connecting the spa to an improperly wired circuit will negate many of its safety features.
-
Page 28: Volt Permanently Connected Model
Your Hot Spring spa has been carefully engineered to provide maximum safety against electric shock. Remember, connecting the spa to an improperly wired circuit will negate many of its safety features. -
Page 29: 230 Volt Convertible Models
115-230 VOLT CONVERTIBLE MODELS • Sovereign (Model I) ® • Prodigy ® (Model H) • Jetsetter ® (Model J & JJ) 230 VOLT CONVERSION INSTRUCTIONS Refer to the following instructions to convert a 115 volt spa to a 230 volt spa. NOTE: Converting the spa to 230 volt operation should only be done by an authorized service agent or a qualified electrician. - Page 30 4. Connect the #10 AWG, BLUE wire from the subpanel 30 amp breaker, terminal L1 to TB-1, terminal 1. 5. Connect the #10 AWG, RED wire from the subpanel 30 amp breaker, terminal L2 to TB-1, terminal 3. 6. Connect the #10 AWG, GREEN wire from the subpanel ground bar to TB-1 system ground terminal. 7.
-
Page 31: Volt Operation
WARNING: Removal of the GFCI from the spa’s power cord will result in an unsafe spa and will void the spa’s warranty. IMPORTANT: Should you ever find the need to move or relocate your Hot Spring spa, it is essential that you understand and apply these installation requirements. -
Page 32: Operating Instructions
• Jetsetter (Model J & JJ) The 115 / 230 volt convertible Hot Spring spa models come configured with a familiar 115 volt electrical system, with a GFCI plug at the end of a cord. The GFCI plug contains a GFCI breaker for user and equipment protection. The 115 volt configuration requires a dedicated outlet to supply power to the spa. -
Page 33: Start-Up And Refill Procedures
• Do not add chlorine if treating your spa with polyhexamethylene biguanide (Biguanide, PHMB, eg. BaquaSpa ) sanitizer. 1. Close all drains and fill the spa with water through the filter compartment. Your Hot Spring spa water level should be maintained approximately 1-1/2” above the top of the highest jet. -
Page 34: Smartjet ® System
Control lever in the full air volume position. Should the Moto-Massage DX jet not achieve full vertical travel and the problem is not a closed air control valve or clogged filter cartridge, then your Hot Spring Service Center should be contacted. -
Page 35: Hydromassage Jets
SOOTHING SEVEN The Soothing Seven jet is another unique feature of Hot Spring spas. Its seven outlets are designed to massage the muscles in the upper back and shoulders, gently and thoroughly. Turn the faceplate clockwise to increase the jet pressure and counterclockwise to decrease the jet pressure. -
Page 36: Vista (Model Ss)
Vista (Model SS) Jet System Menu ® Jet Pump 1–Jet System 1 Jet Pump 2–Jet System 1 ® Left SmartJet lever in the 3 o’clock position Right SmartJet lever in the 3 o’clock position ™ ® • 3 Jet-Cluster system on rear wall (2 dual port rotary, •... -
Page 37: Jet Menus
Grandee (Model G) Jet System Menu Grandee (Model G) Jet System Menu ® ® Jet Pump 1–Jet System 1 Jet Pump 2–Jet System 1 ® Left SmartJet lever in the 3 o’clock position Right SmartJet lever in the 3 o’clock position ®... -
Page 38: Grandee (Model Gg)
Grandee (Model GG) Jet System Menu Grandee (Model G) Jet System Menu ® ® Jet Pump 1–Jet System 1 Jet Pump 2–Jet System 1 ® Left SmartJet lever in the 3 o’clock position Right SmartJet lever in the 3 o’clock position ®... -
Page 39: Envoy (Model Kk)
Envoy (Model KK) Jet System Menu ® Jet Pump 2–Jet System 1 Jet Pump 1–Jet System 1 Right SmartJet lever in the 3 o’clock position Left SmartJet lever in the 3 o’clock position ® • 7 directional Precision jets on left back wall •... -
Page 40: Vanguard (Model V)
Vanguard ® Vanguard (Model V) Jet System Menu (Model V) Jet System Menu ® (Endurol) ™ Jet System 1 ® SmartJet lever in the 3 o’clock position ® • 1 Moto-Massage jet on left rear ® • 4 directional Precision jets above left Moto-Massage jet •... -
Page 41: Vanguard (Model Vv)
Vanguard Jet System Menu ® Vanguard (Model V) Jet System Menu (Model V V) ™ Jet Pump 2-Jet System 1 Jet Pump 1-Jet System 1 ® SmartJet lever in the 3 o’clock position ® • 1 Moto-Massage jet on left rear •... -
Page 42: Sovereign (Model I)
Sovereign (Model I) Jet System Menu Sovereign (Model I) Jet System Menu ® ® Jet System 2 Jet System 1 ® SmartJet lever in the 6 o’clock position SmartJet lever in the 3 o’clock position ® • 1 Moto-Massage jet on left rear •... - Page 43 Sovereign (II) Jet System Menu ® Jet System 1 ® SmartJet lever in the 3 o’clock position ® • 1 Moto-Massage jet on left rear ® • 4 directional Precision jets above Moto-Massage jet • 10 directional Precision jets on right rear ™...
-
Page 44: Aria (Model Ar)
Aria (Model AR) Jet System Menu ™ Jet Pump 1 ® • 4 Precision jets on left back wall ® • 4 HydroStream jets on left back wall • 1 Directional hydromassage on back wall ® • 1 Moto-Massage DX jet on right back wall ®... -
Page 45: Prodigy (Model H)
Prodigy (H) Jet System Menu ® Jet System 1 ® SmartJet lever in the 3 o’clock position ® • 10 directional Precision jets on right rear • 2 dual port rotary jets on left rear • 1 directional hydromassage jet on left wall ®... -
Page 46: Jetsetter (Model Jj)
Jetsetter (Model JJ) Jet System Menu Jetsetter (Model J) Jet System Menu ® ® Jet System 1 SmartJet lever in the 3 o’clock position • 1 Moto-Massage DX jet on left rear ® • 4 directional Precision jets above Moto-Massage DX jet ®... -
Page 47: Jetsetter (Model J)
• 1 JetStream jet on front left CONTROL PANELS OPERATION CONTROL PANELS ® ® ® Hot Spring spa models are equipped with a main control panel, Vanguard Sovereign located on the side of the spa, and an auxiliary control panel ® ®... -
Page 48: Main Control Panels
MAIN CONTROL PANEL The main control panel provides a quick visual check of the spa’s status, and allows the user to set the temperature, activate the jets and light, and lock the temperature and/or spa functions. INDICATOR LIGHTS At a glance, the indicator lights are readily visible on the main control panel. The three indicator lights (POWER, READY and CLEAN) work independently from the rest of the control panel display. -
Page 49: Main Control Panel Buttons And Display
temporarily, the spa lock can be applied over an already-applied temperature lock. Then, when the spa lock is removed, the temperature lock will remain on, to prevent unwanted tampering with the set temperature. MAIN CONTROL PANEL BUTTONS AND DISPLAY The main control panel has buttons which the spa user presses to set the temperature, initiate the clean cycle, vary the intensity of the light, and activate or deactivate the jet pump. -
Page 50: Auxiliary Control Panel
LIGHT CONTROL - LUMINESCENCE All Hot Spring spas are equipped with the Luminescence (Multi-Color) light. The intensity of the spa’s light is controlled using the LIGHT Plus (+) or LIGHT Minus (-) buttons. There are five (5) brightness levels plus off. -
Page 51: Volt Gfci
SUMMER MODE Your Hot Spring spa is equipped with a Summer Mode timer. The Summer Mode timer can be activated during extremely hot summer months if it becomes difficult to maintain water temperatures low enough for comfort. Upon switching to the ON mode, the heater will immediately shut down while the circulation pump (which can add heat to the water through normal operation) will remain on for approximately 5 minutes for heater cool- down. -
Page 52: Aria Music System
NOTE: Whenever power is disconnected and then reconnected to the spa, the Summer Mode timer will reset starting with the eight-hour shutdown mode. If a different eight-hour shut down time is desired, deactivate the Summer Mode, then reactivate at the beginning of the desired eight-hour shut down time. -
Page 53: Spa Care And Maintenance
Thermal Cut-off to trip. If this high-limit or thermal cut-off trip occurs during sub-freezing temperatures and goes unnoticed, the spa water may freeze. Any damage to the spa (due to freezing) caused as a result of poor maintenance (stated under misuse or abuse in the Hot Spring spa Limited Warranty), will not be covered by your spa warranty. -
Page 54: Filter Cartridges Removal And Cleaning
SERVICE NOTES: 1. Iron and copper in the water can stain the spa shell if allowed to go unchecked. Ask your Hot Spring dealer about a Stain and Scale Inhibitor to use if your spa water has a high concentration of dissolved minerals. (Watkins recommends FreshWater Stain & Scale Defense.) 2. -
Page 55: Care Of The Spa Cover
5. Rinse off the underside of the cover with water only (use no soap), and wipe it clean with a dry rag. 6. To condition the cover after cleaning, apply a thin film of Hot Spring Cover Shield to the vinyl surface and buff to a high luster. -
Page 56: Vacation Care Instructions
NOTE: When opening a cover with a retractable cover system, only use one of these three specific methods. Do not attempt to open the cover in any other way. Damage caused by improper opening or closing of the cover is not covered under the terms of the limited warranty. How to Close the Cover 1. -
Page 57: Prevention Of Freezing
As an additional precaution against partial freezing of some of the components, the equipment compartment can be insulated with an insulating kit (available from your Hot Spring dealer). This insulating kit will also help to maximize the spa’s energy efficiency. -
Page 58: Water Quality And Maintenance
To Reactivate: ® Reinstall the filter cartridges, close the main drain, and reinstall the drain caps. Follow the Start-Up and Refill Procedures to make your Hot Spring spa operational. IMPORTANT: Always keep spa covered when not in use, whether it is empty or full. -
Page 59: Hot Spring ® Spa Water Maintenance Program
Up (sodium hydrogen carbonate). D. If the Total Alkalinity is too high, the pH level will tend to be high and may be difficult to bring down. It can be lowered by adding Hot Spring FreshWater pH/Alkalinity Down (sodium bisulfate). - Page 60 • The filter cartridge pores may become obstructed. If the pH is too high, it can be decreased by adding Hot Spring FreshWater pH/Alkalinity Down (sodium bisulfate) to the spa water. NOTE: After adding pH/Alkalinity Up (sodium hydrogen carbonate) or pH/Alkalinity Down (sodium bisulfate), wait two hours before testing the water for pH.
-
Page 61: Everfresh ® Water Care System
THE WATKINS WATER MAINTENANCE QUICK REFERENCE GUIDE Ideal Range (ppm) What Chemicals to Use Steps Minimum Maximum To Raise To Lower ® 1 Total Alkalinity HotSpring FreshWater HotSpring FreshWater pH/Alkalinity Up pH/Alkalinity Down Sodium Hydrogen Sodium Bisulfate) Carbonate, or Sodium Bicarbonate) 2 Calcium Hardness HotSpring FreshWater Use a mixture of... -
Page 62: Hot Spring Water Treatment Guide
HOT SPRING ® WATER TREATMENT GUIDE At spa Follow Start-Up and Refill Procedures section ® NOTE: Use the FreshStart pre-filter when filling the startup 10,000 spa to remove unwanted contaminants. or refill Prior to Add one-half (1/2) teaspoon of chlorine per... -
Page 63: Chlorine (Sodium Dichlor)
Ag + • DO test Total Alkalinity and pH weekly. ® • DO use MPS for spas only, such as Hot Spring MPS chlorine-free oxidizer. • DO store all chemicals in a tightly sealed container in a cool, dry place. -
Page 64: Super Chlorination
In-line pre-filters can be purchased at 10,000 ® your local Hot Spring dealer. Foam Inhibitors Spa water requires changing due to the buildup of soap in the water. Typically, soap will cause the spa water to foam when the jets are used. -
Page 65: Ozone
. ® The Hot Spring spa FreshWater III high output ozone system greatly enhances the quality of the spa water when used to supplement the spa owner’s regular water maintenance program. Contrary to some information circulated throughout the pool and spa industry regarding ozone systems, ozone CAN NOT be used as a single-source sanitizer, water clarifier, anti-foamer, and mineral chelating agent. -
Page 66: Autofresh Water Care System
Answer: While over-exposure to any chemical can be unhealthy, many low levels of chemicals are effective and beneficial. In the case of spa ® water, the chemicals recommended in the Hot Spring water maintenance program are needed to protect the user from water-borne pathogens ®... - Page 67 and DON’Ts of Spa Water Maintenance for additional information. Calcium Hardness: The amount of dissolved calcium in the spa water. This should be approximately 150-200 ppm. High levels of calcium can cause cloudy water and scaling. Low levels can cause harm to the spa equipment. Chloramines: Compounds formed when chlorine combines with nitrogen from body oils, urine, perspiration, etc.
-
Page 68: Service Information
PUMP THERMAL CUT-OFF The Hot Spring Silent Flo 5000 circulation pump is a dedicated, water cooled, energy efficient, quiet pump that provides continuous filtration for the spa. Since the Silent Flo 5000 pump is water cooled, it is equipped with a thermal cut-off to prevent the pump from being damaged by running hot when water is not present. -
Page 69: Miscellaneous Service Information
ACTS INVALIDATING WARRANTY The limited warranty is void if the Hot Spring spa has been improperly installed, subjected to alteration, misuse, or abuse, or if any repairs on the spa are attempted by anyone other than an authorized representative of Watkins Manufacturing Corporation. Alteration shall include any component or plumbing change, electrical conversion, or the addition of any non-approved sanitation or water purification device, or heating system which contributes to component or unit failure or unsafe operating system. -
Page 70: Troubleshooting Guides
TROUBLESHOOTING ® Should you experience any problem whatsoever, do not hesitate to contact your authorized Hot Spring dealer. Here are some tips to help you to diagnose and rectify some more common sources of trouble yourself, if you choose to do so. -
Page 71: Spa Care And Maintenance Record
SPA CARE AND MAINTENANCE RECORD Date Date Page 68 Service Information... - Page 72 JETSETTER (MODEL JC & JJC) 4/07 ©2007 Watkins Manufacturing Corporation. Hot Spring, Built for a lifetime of relaxation, Endurol, Moto-Massage, Vista, Grandee, Envoy, Vanguard, Sovereign, Aria, Prodigy, Jetsetter, Jet-Cluster, SmartJet, Comfort Control, No-Fault, IQ 2020, Wavemaster, Silent Flo 5000, Soothing Seven, JetStream, Precision, Everwood, CoverCradle, UpRite, GlideRite, Lift ’n Glide, SpAudio, EverFresh, FreshStart, FreshWater,...
Need help?
Do you have a question about the Portable Spaa and is the answer not in the manual?
Questions and answers
There is are 2 wires one black and one red, 20 gage each under one coating. They both have male factory installed ends. Where does that hook into?
The black and red wires with male factory-installed ends connect to the terminal block (TB-1) inside the spa control box. The black (L1) and red (L2) wires are typically line connections for power input. Specifically:
- The red wire (L2) connects to TB-1, terminal 3 or 4.
- The black wire (L1) connects to TB-1, terminal 2.
These connections provide the 230V line voltage to the spa.
This answer is automatically generated
how to set automatic run . Tub shuts off after 2 hours Rythme hot tub
I had hot springs dealer ship close my hot tube close my tub for winter Now I go to fill and there is a clear tub letting out water as I fill ?