Table of Contents
Advertisement
Owner's Manual
Liquid Propane Gas Grill
MODEL Y0202XC LP
Natural Gas Grill
MODEL Y0202XC NG
Grill Information Center:
missing parts when you unpack this unit from the shipping boxes, call us 8am - 4:30 pm CST,
Monday through Friday at:
!
WARNING:
Read this Owner's Manual carefully and be sure your
gas grill is properly assembled, installed and
maintained. Follow all leak check procedures care-
fully in this manual prior to grill operation. Do this
even if the grill was store assembled. Failure to
follow these instructions could result in serious bodily
injury and/or property damage. This grill is intended for
outdoor use only and is not intended to be installed in
or on recreational vehicles or boats.
Note to Installer:
Leave this Owner's Manual
with the consumer after delivery and/or installation.
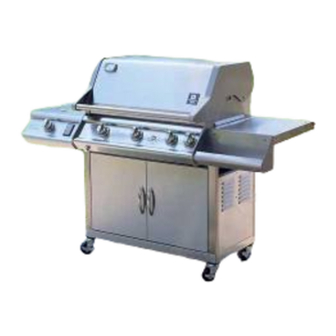
MODEL Y0202XC LP SHOWN
If you have questions about assembly or grill operation, or if there are damaged or
1- 800-770-9769
Note to Consumer:
Leave this Owner's Manual in
a convenient place for future reference.
Important Note:
This grill is manufactured to
exact specifications. Model Y0202XC LP is certified
for use with LP gas and Model Y0202CX NG is
certified for use with Natural Gas. You can not
convert this grill from one fuel type to the other.
For your safety, conversion kits are not available.
Any attempt to convert your grill will void your
warranty.
Manufacturer:
Grand Hall Enterprise Co., Ltd.
9th Fl., No.298, Rueiguang Rd., Neihu,
Taipei, Taiwan (114)
P80146046A - Date: 08/12/2003
Advertisement
Table of Contents

Subscribe to Our Youtube Channel
Related Manuals for Member's Mark Y0202XC NG


Summary of Contents for Member's Mark Y0202XC NG
- Page 1 Owner's Manual Liquid Propane Gas Grill MODEL Y0202XC LP Natural Gas Grill MODEL Y0202XC NG MODEL Y0202XC LP SHOWN Grill Information Center: If you have questions about assembly or grill operation, or if there are damaged or missing parts when you unpack this unit from the shipping boxes, call us 8am - 4:30 pm CST,...
-
Page 2: Table Of Contents
Cooking Instructions ........ 26 ! WARNING Cooking Guide and Recipes ....27 Failure to comply with these instructions Member's Mark Grill Warranty could result in a fire or explosion that could cause serious bodily injury, death, or Full 1-Year Warranty on Grill property damage. - Page 3 • The LP gas tank has a Shut Off Valve, The Regulator and Hose assembly must be terminating in an LP gas supply tank valve inspected before each use of the grill. If there outlet, that is compatible with a Type 1 tank is excessive abrasion or wear or if the hose connection device.
-
Page 4: Natural Gas Safety Instructions
Figure 1 Natural Gas Safety Instructions (For Natural Gas Model Only) • Your Natural Gas Grill is designed to operate on NATURAL GAS SUPPLY Natural Gas only, at a pressure of 7" water column (W.C.) (1/4 psig or 1.75 kpa), regulated at the residential meter. -
Page 5: Pre-Assembly Instructions
Pre-Assembly Instructions CAUTION: BEWARE OF FLASH-BACK CAUTION: Spiders and small insects occa- To reduce the chance of "FLASH-BACK" (see sionally spin webs or make nests in the grill CAUTION at left) clean the Burner Tubes and burner tubes during transit and warehousing. Burners before fully assembling your grill. -
Page 6: Hardware, Parts Diagram And Lists
Contents for Hardware Pack Contents for Hardware Pack (Part #P4182A) Contents for Hardware Pack (Part #P4182A) The following table illustrates a breakdown of the Hardware Pack. It highlights what components are used in the various stages of assembly. Ref. Component Qty. - Page 7 Contents for Hardware Pack (Part # P06002023A For LP) Contents for Hardware Pack (Part #P4182A) Contents for Hardware Pack (Part #P4182A) (Part # P06002040A For N.G.) Actual Size and Quantity of Each Hardware Piece: 1/4" x 2 1/2" Phillips Head Screw - QTY 2 1/4"...
- Page 8 Y0202XC Parts Diagram Remove all components from both cartons and place within easy reach. Turn the largest carton upside down and it will provide a comfortable height work surface for grill assembly.
- Page 9 Y0202XC Parts List REF# DESCRIPTION PART# QTY. REF# DESCRIPTION PART# QTY. Tank Holder(LP) Lid Plate P00129306A P4042A Tank Hook(LP) Lid Side Panel, Left P00105317T P4041A Tank Gauge(LP) Lid Side Panel, Right P00106317T P80N5A 57a. Side Burner Frame Temperature Gauge P0618A P01102025B 57b.
-
Page 10: Rotisserie, Parts Diagram And Lists
Rotisserie Parts Diagram Rotisserie Parts List Hardware for Rotisserie REF# DESCRIPTION PART# QTY. P8083E Handle P05508092F Bushing P05508094F 3/8"x1/2" Thumbscrew P05508091F Collar 9. #10-24x3/4" UNC Screw 9. Washer P05508093F Skewer QTY. 2 QTY. 2 P05508090F Holding Fork P8083K Motor Bracket P07101010A AC Rotisserie Motor Y0100052... -
Page 11: Assembly Instructions
Figure 1 Cart Assembly Instructions LOCKING SCREW NOTCHED HOLE Remove all cart parts, hardware, and Grill Head from shipping boxes. Raise the Grill Lid and remove all CART LEG BRACKET packed components. Use the parts list to check that all necessary parts have been included. Assemble the gas grill on a protective work surface THREADED HOLE FOR to avoid scratching grill surfaces. - Page 12 Figure 4 6. Attach the Door Bracket to Cart Legs. Be sure the folded strip of the bracket is closest to the Cart Legs. Then align the holes on both ends of the bracket with the threaded holes on the Cart Legs. Attach the Door Bracket using 2 of the "E"...
- Page 13 Figure 6 Grill Head Assembly GREASE RECEPTACLE Place the Grill Bowl over the assembled Cart as GREASE DRAINING TRAY shown in Figure 6. Align the holes on both sides of the Grill Bowl with the holes on the Support Bracket. From the inside of the Grill Bowl, insert 4 "N"...
- Page 14 Figure 9 Attach the Side Burner Electrode Wire to the Control Valve. See Figure 9. Attach the Control Valve to the Side Burner Valve Bracket using 2 SIDE BURNER ELECTRODE WIRE of the M3x6 screws attached to the Gas Valve. Make sure that the Gas Valve Orfice is seated inside the Burner Tube as shown in Figure 9A.
- Page 15 LP Gas Fuel Gauge Assembly Figure 10 "AA" BATTERY (See page 4 for Natural Gas Safety and Instal- lation Instructions.) 1. Remove back cover and insert 2 "AA" batteries into Tank Gauge Display battery compartment. See Figure 10. 2. Insert the Tank Gauge Display into the rectangular hole on the Side Burner Control Panel.
- Page 16 Ignitor Battery Installation - See Figure 14 5. If no "clicking" sound is heard check the 1. Unscrew the Ignitor Cap located on the Grill Control following common causes. If you need Panel and remove the Contact and Spring from the assistance call our Grill Information Center Ignitor Slot.
- Page 17 Coupling Nut and result in a hazardous Congratulations condition. Your Member's Mark gas grill is now ready for use. Before the first use and at the 6. Slowly open the tank valve 1/4 to 1/2 open beginning of each season (and whenever a (counterclockwise).
-
Page 18: Lighting Instructions
Basic Grill Lighting Instructions WARNING A strong gas smell, or the hissing sound of Familiarize yourself with the safety guidelines at gas indicates a serious problem with your the front of this manual. Do not smoke while lighting grill or checking gas supply connections. gas grill or the LP gas tank. - Page 19 • Misalignment of Ignitor on Burner Manually Lighting Your Grill by Match Correction: Check for proper position of the To light your gas grill by match, insert a match into the Electrode Tip as shown on page 15. The gap Manual Lighting Stick and follow steps 1 through 6 of between the Spark Electrode Tip and Spark the Basic Lighting Procedures.
-
Page 20: Rotisserie Instructions
Rotisserie Instructions Remove all components from the carton. Attach the m otor bracket on the outside of the left grill bowl panel. Align the two holes of the bracket with the holes on the grill bowl panel. Tighten securely using two No.10-24 x 3/4" UNC screws, flat washers and nuts provided. - Page 21 Install the AC (alternating current) rotisserie motor onto the motor bracket as shown. This is a universal rotisserie motor designed to fit a variety of grills. On your grill the motor attaches to the bracket with the electrical cord UP, not down. This installation insures that once the skewer is inserted into the motor it will also rest securely into the slot of your grill bowl.
-
Page 22: Back Burner, Rotisserie Instructions
10. When rotisserie cooking place a drip pan of some Using your Infrared sort under the food to be cooked. This will Back Burner and Rotisserie capture the drippings and keep grill clean of excess grease which could cause a fire. Use Your new grill includes an Infrared Back Burner and a caution when moving a drip pan containing hot Rotisserie designed to slowly cook foods that are moist... -
Page 23: Cleaning And Maintenance Instructions
Cover each gas Valve Orifice with aluminum foil. Cleaning and Maintenance Brush the inside and bottom of the grill with a Keeping outdoor cooking gas appliance area clear and brass wire brush or fiber cleaning pad, and wash free from comustible materials, gasoline and other with a mild soap and warm water solution. - Page 24 Regardless of which Burner cleaning procedure you Cleaning The Burner Tubes and Burner Ports use, we recommend you also complete the following To reduce the chance of "FLASH-BACK" you must steps to help prolong Burner life. clean the Burner Tubes at least once a month in late Use a wire brush to clean the entire outer surface summer or early fall when spiders are most active or of each Burner until free of food residue and dirt.
-
Page 25: Frequently Asked Questions
Question: My grill has a low flame and sometimes Frequently Asked Questions will not light. Why? Answer: You need to purge air from the gas line or re- Question: Can I convert my grill from LPG to NG? set the Regulator excess gas flow device. Opening the Answer: No, your gas grill is manufactured to exact tank valve all the way or too quickly triggers the Regula- specifications and is certified for Liquid Propane (LPG) or... -
Page 26: Cooking Instructions
Indirect Cooking Cooking Instructions The indirect cooking method can also be used with the supplied cooking grids. To cook indirectly, the food should be placed on the left or right side of your WARNING grill with the burner lit on the opposite side. Indirect Your grill will get very hot. -
Page 27: Cooking Guide And Recipes
Guide to Grilling Meat and Poultry with the Direct Cooking Method Grilling Steak and Ribs Cut of Meat Approximate Cooking Times Turn the grill Burners on high, close the Lid T-bone steak Rare: 4-8 minutes Sirloin steak and preheat your grill 3 to 5 minutes. Open Medium: 10-14 minutes Lid and place the meat on the Cooking Grid Beef spare ribs... - Page 28 Guide to Grilling Fish and Seafood with the Direct Cooking Method Cut of Meat Approximate Cooking Times Whole Fish and Whole Fillets Whole fish 10 - 12 minutes per pound or Preheat your grill on HIGH for 2-3 minutes Whole fish fillets until fish is opaque with the Lid down.
- Page 29 Guide to Slow Roasting and Baking Techniques An Important Note About Heat Settings Food Preparation The suggested heat settings shown are approximate. Trim meat of excess fat. Truss meat and poultry with There are many factors such as outside temperature, cooking string to retain shape if desired.
- Page 30 Guide to Rotisserie Cooking Rotisserie Cooking Note: it is our experience that many smoking chip and pellet products do not actually produce a smoke but Rotisserie cooking produces foods that are moist, instead infuses the food with flavor. Please read flavorful and attractive.
- Page 31 Guide to Stir-Frying and Deep-Frying STIR-FRYING TECHNIQUES DEEP-FRYING TECHNIQUES This method of cooking is popular around the world and A wide variety of foods can be deep-fried outdoors on can be easily accomplished outdoors on your grill. It's your grill, from potatoes, to seafood and chicken. a quick and healthful way of preparing a complete meal Deep-frying uses a large portion of oil, preferably using meat, poultry or seafood in infinite combinations...
- Page 32 teaspoon salt Recipes 1 1/2 pounds lean ground beef cups shredded lettuce cup finely shredded cheddar cheese ONION BURGERS cup dairy sour cream and /or guacamole A honey and mustard sauce glazes the onion slices as they cook alongside these delicious burgers. For Preparing the Salsa optimal sweetness, select Vidalia or Walla Walla onions.
- Page 33 RIB EYE STEAKS WITH GRILLED GARLIC Preparation As they cook, the garlic cloves mellow in flavor, Combine ketchup, pepper, rosemary, basil and garlic making a delicious sauce for any grilled meat. And for powder. Coat both sides of steak with mixture. Grill an appetizer, spread the softened cloves over toasted steak with lid up, directly over medium heat for 6 slices of french bread! Makes 4 servings.
- Page 34 MARINATED TUNA STEAK Preparation Experiment with unique dishes, like this tuna steak Combine thawed fish, margarine or butter, lemon recipe boasting a delicious wine marinade! juice, mustard and basil into a cooking pan or Makes 4 servings. aluminum foil rectangle, and cook directly over low flame until melted.
- Page 35 SOUTHWEST CHICKEN BREASTS BARBECUED CHICKEN This popular recipe can also be a grilled chicken salad! Another backyard favorite, this recipe includes an Slice chicken into small strips and place them on top easy to make, sweet and spicy sauce. of shredded lettuce with avocado dressing and top with Makes 4 servings.
- Page 36 TRADITIONAL HOLIDAY TURKEY PIZZA ON THE GRILL Imagine everyone's surprise when you serve your next You may never want to call out for pizza again! holiday turkey—complete with dressing—delicious Follow this pizza dough recipe, or purchase ready- made pizza dough found in your grocers refrigerated and tender straight from the grill! Serves 8 - 10 section—next to the biscuits.
- Page 37 GRILLED POTATO SKINS FRESH VEGETABLE STIR-FRY Serve these crispy potatoes as a snack or side dish. Take a trip to the Orient with this easy, and healthy We've included microwave instructions for a timesav- vegetable recipe. Makes 4 - 6 servings. ing short cut.
- Page 38 LIMITED WARRANTY Grand Hall Enterprise Co., Ltd. warrants to the original If you live in a state that does not allow disclaimer of owner of each Bakers & Chefs and Members Mark Gas implied Warranties, your state may allow a partial limi- Grill that it is free from defects in workmanship and tation of implied Warranties to limit the duration of such materials under conditions of normal residential use.
Need help?
Do you have a question about the Y0202XC NG and is the answer not in the manual?
Questions and answers