Advertisement
Table of Contents
- 1 Table of Contents
- 2 Safety Instructions
- 3 General Information/Specifications
- 4 Installation
- 5 Initial Filling
- 6 Filter Disassembly/Assembly
- 7 Regular Operation
- 8 Startup/Operation
- 9 Backwash
- 10 Maintenance
- 11 Replace Internal Assembly
- 12 Winterizing
- 13 Repair Parts List
- 14 Troubleshooting Guide
- Download this manual
HIGH RATE SAND FILTERS
Protected by one or more of the following U.S. Patents and all corresponding foreign counterparts: U.S. Pat. No. 4,995,523, 5,190,651, 5,753,071 and 6,036,853
Pentair Water Pool and Spa, Inc.
© 2007 Pentair Water Pool and Spa, Inc. All rights reserved. This document is subject to change without notice.
1620 Hawkins Ave., Sanford, NC 27330 • (919) 566-8000
10951 West Los Angeles Ave., Moorpark, CA 93021 • (805) 553-5000
Trademarks and Disclaimers:
®
®
System 3
, Sta-Rite
and Pentair Water Pool and Spa
and Spa, Inc. and/or its affiliated companies in the United States and/or other counties. Unless noted, names and brands of
others that may be used in this document are not used to indicate an affiliation or endorsement between the proprietors of
these names and brands and Pentair Water Pool and Spa, Inc. Those names and brands may be the trademarks or regis-
tered trademarks of those parties or others.
Printed in U.S.A.
November 1, 2007
SYSTEM 3
O
W
N
E
R ' S
INSTALLATION, OPERATION & PARTS
MODELS
S7S50
®
are trademarks and/or registered trademarks of Pentair Water Pool
®
M
A N
U
A L
This manual should be furnished to
the end user of this filter; its use will
S8S70
reduce service calls and chance of
injury and will lengthen filter life.
S282 (Rev. A)
Advertisement
Table of Contents

Subscribe to Our Youtube Channel
Related Manuals for STA-RITE SYSTEM 3


Summary of Contents for STA-RITE SYSTEM 3
- Page 1 ® SYSTEM 3 HIGH RATE SAND FILTERS R ’ S INSTALLATION, OPERATION & PARTS MODELS This manual should be furnished to the end user of this filter; its use will S7S50 S8S70 reduce service calls and chance of injury and will lengthen filter life.
-
Page 2: Table Of Contents
To avoid unneeded service calls, prevent possible injuries, and get the most out of your filter, READ THIS MANUAL CAREFULLY! The Sta-Rite System 3 High Rate Sand Filter: • Is designed to filter water for swimming pools. • Is an excellent performer; durable, reliable. - Page 3 • Check all clamps, bolts, lids, and system accessories before testing. • Release all air in system before testing. • Tighten Sta-Rite pump trap lids to 30 ft. lbs. (4.1 kg-cm) torque for testing. • Water pressure for test must be less than 25 PSI (172 kPa).
-
Page 4: General Information/Specifications
GENERAL INFORMATION • Clean a new pool as well as possible before filling pool and operating fil- ter. Excess dirt and large particles of foreign matter in the system can Hazardous pressure. Can cause severe cause serious damage to the filter and pump. injury or major Do not operate filter at water temperatures above 120°F (65.5°C). -
Page 5: Installation
2" WC212-134P • Install Sta-Rite Two Position Slide Valve or Multiport Selector Valve with filter. See Table lll. • Filter ports and valve ports are furnished with union connections. NOTICE: Use of valves other than DO NOT use pipe sealants on union collar (nut). -
Page 6: Initial Filling
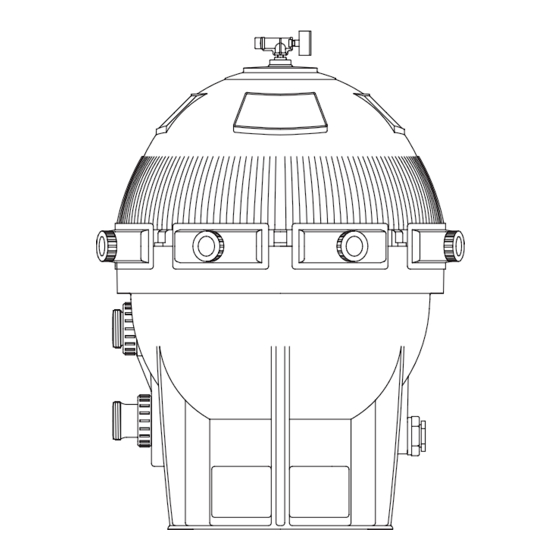
FILTER DISASSEMBLY/ASSEMBLY To avoid equipment damage and personal injury, never change handle position on control valve while pump is running. BEFORE DISASSEMBLING FILTER: 1. STOP PUMP. 2. OPEN air release valve and drain fitting. 3. WAIT until all pressure is released and water drained from filter tank and system before loosening clamp knobs. -
Page 7: Startup/Operation
5. Install clamps. Do not tighten clamps yet. 6. See Figure 4 for clamp tightening sequence. Tighten all clamp knobs se- curely hand tight. NOTICE: To equalize stresses on tank, be sure to tighten clamps in se- quence shown. DO NOT work your way around the filter tightening adja- cent clamps. -
Page 8: Backwash
Backwash Filter (Multi-Port Valve): To prevent equipment damage and possible injury, turn pump OFF be- fore changing valve position. 1. With pump OFF, set valve to ‘BACKWASH’ position. 2. Open air release valve (Key No. 1, Page 10). 3. Start pump, circulating water backwards through filter to waste. 4. -
Page 9: Replace Internal Assembly
2. Skimmer basket - remove debris. 3. Stop pump, release all pressure from system. Remove trap cover and bas- ket, remove debris. 4. Bleed air from filter each time system is started. 5. Check pump for leaks. If found, see pump owner's manual. 6. - Page 10 2859 0597...
-
Page 11: Repair Parts List
REPAIR PARTS LIST Key No. Description Qty. Model S7S50 Model S8S70 2" Gauge 33600-0023T 33600-0023T Valve Assembly WC212-120P WC212-120P Nipple U37-16P U37-16P Adapter Bushing 24900-0504 24900-0504 O-Ring 35505-1423 35505-1423 Tank - Upper Half Kit* 24851-9000 24851-9001 Collector - Manifold Assembly 24900-0100S 24901-0100S Air Bleed Filter... -
Page 12: Troubleshooting Guide
TROUBLESHOOTING GUIDE 1. Short Cycle between backwashes: NOTICE: Time between backwashes will vary with each installation and between different areas of the country. Ask installer about normal back- wash interval in your area. The following causes and remedies are for cycle times shorter than normal for your area. - Page 13 Blank Page...
- Page 14 Blank Page...
- Page 15 Blank Page...
- Page 16 S282 (Rev. A)
Need help?
Do you have a question about the SYSTEM 3 and is the answer not in the manual?
Questions and answers