Table of Contents
Advertisement
Advertisement
Table of Contents

Subscribe to Our Youtube Channel
Related Manuals for Leica TPS800 Series


Summary of Contents for Leica TPS800 Series
- Page 1 Leica TPS800 Series User Manual Version 4.0 English...
- Page 2 Enter the model and serial number in your manual and always refer to this information when you need This manual contains important safety to contact your agency or Leica Geosystems autho- directions as well as instructions for rized service workshop.
- Page 3 All other trademarks are the property of their respec- in death or serious injury. tive owners. Caution Indicates a potentially hazardous situation or an unintended use which, if not avoided, may result in minor or moderate injury and/ or appreciable material, financial and environmental damage. Leica TPS800-4.0.0en...
- Page 4 Validity of this manual Description General This manual applies to all TPS800 Series instruments. Where there are differences between the various models they are clearly described. Telescope • When measuring distances to a reflector with EDM mode "IR" this telescope type uses a wide visible red laser beam, which emerges coaxially from the telescope's objective.
- Page 5 Settings ........... 134 Safety Directions ......163 EDM Settings ........140 Technical Data ........ 184 File Management ......145 International Limited Warranty, Software License Agreement ..195 Start-up sequence ......148 Index ..........197 Check & Adjust....... 149 Leica TPS800-4.0.0en...
-
Page 6: Table Of Contents
Area of applicability ........15 Setting up ............26 PC Program Package Unpacking ............26 Leica Geo Office Tools (LGO-Tools) ..15 Batteries ............27 Installation on the PC ........15 Setting up the tripod ........29 Program content..........15 Instrument Setup ........... - Page 7 Setting job ............47 Check & Adjust ......... 149 Setting Station..........48 Line-of-sight error (Hz-collimation) ... 150 Orientation............49 V-Index (Vertical index error) ....150 Applications ............ 53 Tripod ............153 Introduction ............ 53 Circular level ..........153 Surveying ............54 Leica TPS800-4.0.0en...
- Page 8 Cleaning and Drying ........162 Reduction formulae ........193 Objective, eyepiece and prisms ....162 International Limited Warranty, Fogging of prisms......... 162 Software License Agreement Damp products..........162 ..... 195 Cables and plugs ......... 162 International Limited Warranty ....195 Leica TPS800-4.0.0en...
- Page 9 Software License Agreement ....195 Index ............... 197 Leica TPS800-4.0.0en...
-
Page 10: Introduction
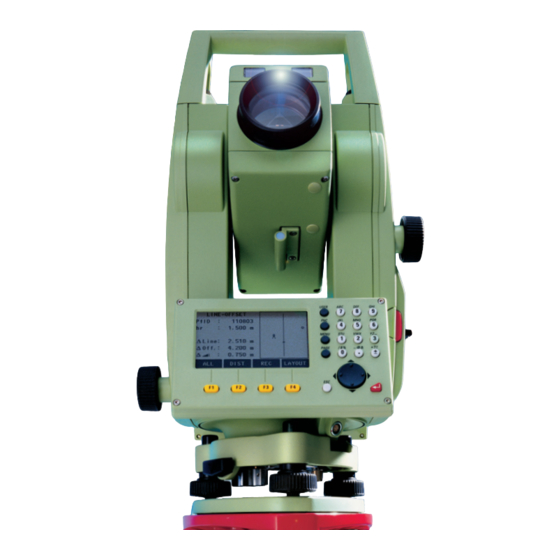
Introduction The Leica Geosystems TPS800 is a high-quality electronic Total Station. Its innovative technology makes the daily surveying jobs easier. The instrument is ideally suited for simple construc- tion surveys and stake out tasks. The easy operation of the instrument functions can be learned without problems in no time. -
Page 11: Introduction
10) Serial interface RS232 11) Foot screw 12) Objective with integrated Electronic Distance Measurement (EDM); Beam exit 13) Display 14) Keyboard 15) Circular level 16) On/Off key 17) Trigger key TPS800_Z02 18) Horizontal drive Instruments with EGL Instruments without EGL Introduction Leica TPS800-4.0.0en... -
Page 12: Technical Terms And Abbreviations
V = Vertical angle / zenith angle VK = Vertical circle With coded circular division for reading the V-angle. TPS800_Z03 Hz = Horizontal direction HK = Horizontal circle With coded circular division for reading the Hz- angle. Introduction Leica TPS800-4.0.0en... - Page 13 Glass plate within the telescope V-Index (Vertical index error) with reticle. With horizontal line-of-sight the V- circle reading should be exactly 90°(100gon). The deviation from TPS800_Z09 this values is termed V-index (i). TPS800_Z06 Introduction Leica TPS800-4.0.0en...
- Page 14 Height difference between station and target point. Reflector height above ground Instrument height above ground Station coordinate (Easting) Station coordinate (Northing) Station height Easting of target point Northing of target point Height of target point TPS800_Z10 Introduction Leica TPS800-4.0.0en...
-
Page 15: Area Of Applicability
Area of applicability PC Program Package Leica Geo Office Tools (LGO-Tools) This User Manual is valid for all instruments of the TPS800 Series. The program package LGO-Tools is used for the data exchange between the Total Station and the PC. It contains several auxiliary programs in order to support your use of the instrument. - Page 16 For EDM Software upload only LGO/LGO- Tools Software Version 3.0 or higher must be used for error free operation. Not using the correct upload Software can permanently damage the instrument. Before the Software Upload, always insert a charged battery into the instrument. Introduction Leica TPS800-4.0.0en...
-
Page 17: Power Supply
GEB121 Power Supply GEB111 Single cells in the battery adapter GAD39 Use the Leica Geosystems batteries, chargers and accessories or accessories recommended by Leica Geosystems to ensure the correct functionality of Your Leica Geosystems instrument is powered by the instrument. -
Page 18: Operating The Instrument
Control of input bar in edit and input mode or control of focus bar. 6) Function keys Are assigned the variable functions displayed at the bottom of the screen. 7) Softkey bar Displays functions that can be called up with the function keys. TPS800_Z11 Operating the Instrument Leica TPS800-4.0.0en... -
Page 19: Fixed Keys
Lang.choice: On is set in Settings dialog. To load an additional language connect the instru- ment to LGO Tools Version 4.0 or higher via the serial interface and load using "LGO Tools - Soft- ware Upload". Operating the Instrument Leica TPS800-4.0.0en... -
Page 20: Distance Measurement
A laser distancer (EDM) is incorporated into the may lead to incorrect distance values. instruments of the TPS800 series. Avoid interrupting the measuring beam while taking In all versions, the distance can be determined by... - Page 21 Therefore, it is recommended to verify that the R- laser is well collimated with the telescope line of sight (refer to the chapter "Checking and adjusting"). Do not measure with two instruments to the same target simultaneously. TPS800_Z13 Correct result Operating the Instrument Leica TPS800-4.0.0en...
- Page 22 (Reflector EDM mode). reflector tape and it must be well adjusted (refer to the chapter "Checking and adjusting"). Make sure the additive constant belongs to the selected target (reflector). Operating the Instrument Leica TPS800-4.0.0en...
-
Page 23: Softkeys
The available scope of each function depends on Find further information about menu/appli- the applications / functions currently active. cation specific buttons in the relevant sections. Operating the Instrument Leica TPS800-4.0.0en... -
Page 24: Symbols
Compensator is off. [PAGE]. Indicates telescope position I or II. Status symbol "Offset" Offset is active. Indicates that Hz is set to "left side angle measurement" (anti-clockwise). Status symbol "Character Input" Numeric Mode Alphanumeric Mode Operating the Instrument Leica TPS800-4.0.0en... -
Page 25: Menu Tree
Display Heater —— EDM Settings —— Date —— EDM-Mode —— Time —— Prism Type —— SW-Info —— Prism Constant Operating-System, Application SW, Layout, —— Laser-Point Instrument Type, Serial Number —— Guide Light —— PIN Protection Operating the Instrument Leica TPS800-4.0.0en... -
Page 26: Measuring Preparation / Setting Up
11) Spacing bracket GHT196 for height meter (optional) 12) Height meter GHM007 (optional) 13) Protective cover / Lens hood 14) Mini prism rods 15) Mini prism + holder (optional) 16) User Manual 17) Counterweight for Zenith eyepiece (optional) TPS800_Z14 Measuring Preparation / Setting up Leica TPS800-4.0.0en... -
Page 27: Batteries
Check and insert battery holder true to side into the housing. • To charge the battery refer to chapter "Charging the batteries". • For the type of battery refer to chapter "Tech- nical data". Measuring Preparation / Setting Leica TPS800-4.0.0en... - Page 28 +20°C/+50°F to +68°F if possible. • It is normal for the battery to become warm during charging. Using the chargers recom- mended by Leica Geosystems, it is not possible to charge the battery if the temperature is too high. Measuring Preparation / Setting up...
-
Page 29: Setting Up The Tripod
Slight corrections of inclination can be made with the foot screws of the tribrach. Larger corrections must be done with the tripod legs. TPS800_Z19 When using a tribrach with an optical plummet, the laser plummet cannot be used. Measuring Preparation / Setting Leica TPS800-4.0.0en... -
Page 30: Instrument Setup
It projects a red spot onto the ground, making it appreciably easier to centre the instrument. • The laser plummet cannot be used in conjunction with a tribrach equipped with an optical plummet. Measuring Preparation / Setting up Leica TPS800-4.0.0en... - Page 31 Extend the tripod legs to allow for a comfortable working posture. Position the tripod over the marked ground point, centring it as well as possible. Fasten the tribrach and instrument onto the tripod. Measuring Preparation / Setting Leica TPS800-4.0.0en...
-
Page 32: Levelling Up With The Electronic Level Step-By-Step
Turn the instrument until it is parallel to two foot- checkmarks are screws. shown, the instrument Centre the elec- has been perfectly tronic level of this leveled up. axis by turning the Accept with [OK]. two footscrews. Arrows show the direction for Measuring Preparation / Setting up Leica TPS800-4.0.0en... -
Page 33: Laser Intensity
(e.g. over pipes). In this case, the laser dot can be made visible by using a transparent plate so that the laser dot can be easily aligned to the centre of the pipe. Measuring Preparation / Setting Leica TPS800-4.0.0en... -
Page 34: Input Mode
2. Inserts an empty character on the 1. Place cursor on character to be right of "1". edited. 2. Input the new character. 3. Input the new characters. 3. Confirm input. 4. Confirm input. Measuring Preparation / Setting up Leica TPS800-4.0.0en... - Page 35 " > " (ASCII 62) " ? " (ASCII 63) " @ " (ASCII 64) " A - Z" (ASCII 65 .. 90) " _ " (ASCII 95) [Underscore] " ‘ " (ASCII 96) Measuring Preparation / Setting Leica TPS800-4.0.0en...
-
Page 36: Pointsearch
[ENH] For manual input of coordinates. By entering an actual point number (e.g. "P13") all [OK] Confirm selected point. points with the corresponding point number are [JOB] To select a different job. found. Measuring Preparation / Setting up Leica TPS800-4.0.0en... -
Page 37: Wildcard Search
Starts point search. Examples: All points of any length are found. All points with exactly the point number "A" are found. A* All points of any length starting with "A" are found (e.g.: A9, A15, ABCD). Measuring Preparation / Setting Leica TPS800-4.0.0en... -
Page 38: Measuring
66.6667 g and their functions. 67.903 m All shown displays are examples. It is 3.987 m possible that local software versions are different to the basic version. DIST Calling up the assigned function. Measuring Preparation / Setting up Leica TPS800-4.0.0en... -
Page 39: Fnc Key
IR/ RL Toggle Displays the current distance and angle unit and gives the possibility to change these. Change between the two EDM types IR (on Reflec- tors) and RL (Reflectorless). New setting is displayed for about one second. FNC Key Leica TPS800-4.0.0en... -
Page 40: Delete Last Record
Meaning Calculation and display of the slope and horizontal The values cannot be calculated as there exist less distance, height difference, azimuth, grade, and co- than 2 valid measurements. ordinate differences between the last two measured FNC Key Leica TPS800-4.0.0en... -
Page 41: Tracking
Off <=> On IR-Fine <=> IR_Track / IR-Fast <=> IR-Track T_Off - RL-Short <=> RL-Track L_Off+ The last active measurement mode remains set L_Off - T_Off+ when the instrument is switched off. TPS800_Z26 Measurement point Offset point FNC Key Leica TPS800-4.0.0en... - Page 42 3. [RESET]: Sets eccentricity to zero. distance to the object. 4. [SET]: calculates the corrected values and jumps to the application from which the offset FNC Key Leica TPS800-4.0.0en...
- Page 43 Use the vertical hair, aim at the left side of the object, then press [HzLeft]. Use the vertical hair, aim at the right side of the object, then press [HzRight]. Rotate the instrument accordingly such that the Hz, the deviation angle, is zero. FNC Key Leica TPS800-4.0.0en...
-
Page 44: Main Settings
Enables you to change the most important settings. 3) Reflector 3 4) Instrument This function determines the height of the instru- ment from measurements to a maximum of 5 target points, with known heights, in two faces. FNC Key Leica TPS800-4.0.0en... -
Page 45: Hidden Point
Save the changes and set the station. 1) E, N, H of Hidden Point 2) Rod Length 3) Distance R1-R2 The program allows measurements to a point that is not directly visible, using a special hidden-point rod. FNC Key Leica TPS800-4.0.0en... - Page 46 FINISH value is exceeded, the program will issue a warning. EDM-Mode [NEW] Returns to step 1. Changes the EDM-Mode. [FINISH] Returns to calling application. Prism type Changes the prism type. Prism Const Displays the prism constant. FNC Key Leica TPS800-4.0.0en...
-
Page 47: Programs
If no job was defined and an application was Start started or if in "Meas & Rec" [ALL] or [REC] was trig- gered, then the system automatically creates a new job and names it "DEFAULT". • ] Settings made. [ ] Settings not made. Programs Leica TPS800-4.0.0en... -
Page 48: Setting Station
4. [OK] Sets the station. If no station was set and no application started and if in "Meas & Rec" [ALL] or [REC] was activated, then the last station is set as the current station. TPS800_Z28 Programs Leica TPS800-4.0.0en... -
Page 49: Orientation
2. Input of Hz-direction, reflector height and PtID. target points with known coordinates can be used. 3. [ALL] Triggers measurement and sets orientation. [REC] Records Hz-direction and sets orientation. TPS800_Z29 1) 1. Target point 2) 2. Target point 3) 3. Target point Leica TPS800-4.0.0en Programs... - Page 50 Answering with no brings you to the Result dialog. PREV RESID Status indication; shows that first point was measured in telescope position I. [OK] Set computed Hz-orientation. 1/I II First point measured in telescope position I and II. Programs Leica TPS800-4.0.0en...
- Page 51 "least squares method". Displaying residuals [RESID] Display of residuals. RESIDUALS BsPt : ABC1 Hz : -0°00'23" -0.045 m TPS800_Z30 0.075 m HzCor: 123°00'23" 1) Actual 2) Design Height correction PREV Correction of the horizontal distance Correction of Hz-angle. Programs Leica TPS800-4.0.0en...
- Page 52 If no orientation was set and an application was started resp. if in "Meas & Rec" [ALL] or [REC] was triggered, then the current Hz-direction and V- angle are set as orientation. Programs Leica TPS800-4.0.0en...
-
Page 53: Applications
The following applications are available: • Surveying • Stake Out • Tie Distance • Area & Volume • Free Station • Reference Line/Arc • Remote Height • Construction • Cogo • Reference Plane • Roadworks 3D (optional) • TraversePRO (optional) Programs Leica TPS800-4.0.0en... -
Page 54: Surveying
(WI41-49), that means that codes are not directly 1. Input PtID, codes and the reflector height if linked to a point. Point codes(WI71-79) are not avail- desired. able. 2. [ALL] Triggers and records measure- ments. [IndivPt] Switches between individual and current point number. Programs Leica TPS800-4.0.0en... -
Page 55: Stake Out
Longitudinal offset: positive if point to be stake out is further away. Height offset: positive if point to be stake out is higher than measured point. Leica TPS800-4.0.0en Programs... - Page 56 Transversal offset, perpendicular to 2) Point to be stake out line-of-sight: positive if nominal point is Easting offset between stake out and actual to the right of measured point. point. Northing offset between stake out and actual point. Programs Leica TPS800-4.0.0en...
-
Page 57: Free Station
Height of the present instrument station, including the instruments Hz-circle orientation. Standard deviations and residuals for accuracy assessments are provided. For the calculation of the station, measured target points can be re-measured, disabled and again enabled. TPS800_Z35 Programs Leica TPS800-4.0.0en... - Page 58 0.000 m, use 0.001 m to enable it for 5. The Hz-circle orientation is computed with the height processing. original averaged face I and face II measure- ments and the final computed plan position. Programs Leica TPS800-4.0.0en...
- Page 59 Enter accuracy limit! 123.760 m Status St.dev.East 0.005 m St.dev.North : 0.005 m AddPt COMPUTE St.dev.Height: 0.010 m St.dev.Angle : 0.0020 g [ALL] Triggers angle and distance measurement (3 point resection). [REC] Saves Hz-direction and V-angle (resection). Programs Leica TPS800-4.0.0en...
- Page 60 [StdDev] Displays standard deviation. [OK] Sets the displayed coordinates and instrument height as new station. If the instrument height was set to 0.000 in the setup screen, then the station height refers to height of trunnion axis. Programs Leica TPS800-4.0.0en...
- Page 61 Remeasures the displayed point. station coordinates [OK] Always sets the displayed coordi- Std.Dev Ang Standard deviation of the orien- nates and instrument height as new tation station. This dialog shows the computed residuals: Residual = Calculated value - Measured value Programs Leica TPS800-4.0.0en...
- Page 62 Recalculates the free station and displays the station standard devia- tion. Press [PREV] to display the new station coordinates. [StdDev] Displays standard deviation. With the function keys, scroll between the residuals of the indi- vidual backsight points. Programs Leica TPS800-4.0.0en...
- Page 63 360° - V ±0.9° for the vertical angle. There is insufficient data measured to be able to compute a position. Either More points or distance required! there are not enough points used or not enough distances measured. Leica TPS800-4.0.0en Programs...
-
Page 64: Reference Line/Arc
The base line is fixed by two base points that can be defined in three ways: • Measured points TPS800_Z36 • Enter coordinates using keypad • Select point from memory. 1) 1st base point 2) 2nd base point Programs Leica TPS800-4.0.0en... - Page 65 All measured data refers to the refer- Input of the parameters: ence line. Use the navigation keys to select the shifting and rotation parameters of the refer- ence line. TPS800_Z37 Off+ Base point Base line Programs Leica TPS800-4.0.0en...
- Page 66 Rotation of the reference line clock- along the reference line. wise around the reference point. No Height Height differences are not computed Height+: Height offset; the reference line is and shown. higher than the selected reference height. Programs Leica TPS800-4.0.0en...
- Page 67 Off: Parallel offset offsets and height differences of the target point The [L&O] function calculates from measurements relative to the reference line. or coordinates longitudinal, cross and height differ- ences of the target point relative to the reference line. Leica TPS800-4.0.0en Programs...
-
Page 68: Reference Line
1.203 m DIST TPS800_Z39 The calculated height difference is relative to the 1RP: 1st reference point selected reference height ( 1BP: 1st base point Reference height Height difference between reference and base point Height difference from reference height Programs Leica TPS800-4.0.0en... - Page 69 ) and the polar ( Hz, ) differences. Procedure: 1. Input the orthogonal stake out elements. 2. [OK] Confirm entry and start calculation. TPS800_Z40 1RP: 1st reference point Measured point Stake out point Reference line Longitudinal offset Off: Parallel offset Leica TPS800-4.0.0en Programs...
- Page 70 1. Input the beginning grid and the values for incre- mentation and line offset. 2. [OK] Confirm entry and start staking out. The signs for the distance and angle differences are correction values (required minus actual). + Hz Turn telescope clockwise to the stake out point. Programs Leica TPS800-4.0.0en...
- Page 71 Reference line from the first to the second reference Begin grid point. Off+ Offset, positive +Offset<-> The stake out point is to the right of the Off- Offset, negative reference line. Incr+ Increment, positive Incr- Increment, negative Programs Leica TPS800-4.0.0en...
- Page 72 This misclosure can be placed at the start, at the end or distributed evenly. The program calculates and displays the stake out elements for the points along the line: polar ( Hz, ) and the orthogonal ( Line, Offset, Programs Leica TPS800-4.0.0en...
- Page 73 RP2: 2nd reference point segment, if applicable. Reference line Cum.Length: The sum of the segment lengths. Segment length Changes with the current number of Misclosure segment. + Hz Turn telescope clockwise to the stake out point. Programs Leica TPS800-4.0.0en...
- Page 74 Quits the STAKE OUT LSEG panel and returns to the previous panel. TPS800_Z81 Start point of arc End point of arc Centre point of circle Point to stake Radius of circle Distance from start of arc, following curve Off: Perpendicular distance from arc Programs Leica TPS800-4.0.0en...
- Page 75 3. "Line & Offset" subapplication Measured point Here you can measure or select points from Difference in horizontal angle memory and you will see Line and Offset refer- HD: Difference in distance measurement ring to the arc. Programs Leica TPS800-4.0.0en...
- Page 76 Off- TPS800_Z82 TPS800_Z83 Start point of arc Start point of arc End point of arc End point of arc Centre point of circle Centre point of circle Point(s) to stake out Point to stake out Arc length Programs Leica TPS800-4.0.0en...
- Page 77 You have three options to distribute the misclosure: Start arc: All of the misclosure will be added to the first arc-section. II) No distribution:All of the misclosure will be added to the last arc-section. Programs Leica TPS800-4.0.0en...
- Page 78 The screen contents and the "Stake Out Arc" section. buttons shown, are the same as described in "Stake Out Arc" section. β β β TPS800_Z84 TPS800_Z85 Chord length β Angle Programs Leica TPS800-4.0.0en...
-
Page 79: Tie Distance
Polygonal Method: TPS800_Z42 Centre point In principal both methods are the same. Any differences will be described. Procedure: 1. Determine first target point. [ALL] Starts measurement to the target point. [FIND] Searches internal memory for point entered. TPS800_Z41 Programs Leica TPS800-4.0.0en... - Page 80 An additional missing line is computed. Program starts again (at point 1). [NewPt 2] Point 2 is set as starting point of a new missing line. New point (Pt 2) must be measured. [RADIAL] Switches to radial method. Programs Leica TPS800-4.0.0en...
-
Page 81: Area & Volume
P3 Target point P1 Start point P4 Target point P2 Target point Perimeter, polygonal length from start point to the current measured point. Calculated area always closed to the start point P1, projected onto the horizontal plane. Leica TPS800-4.0.0en Programs... - Page 82 The area (3D) is calculated once the sloped refer- ence plane is defined by three points. The graphic shows always the area projected onto the horizontal plane. Programs Leica TPS800-4.0.0en...
- Page 83 Volume (3D) = a x c Perimeter (2D), polygonal length from the start point to the current measured point of the area (2D) Area (2D), projected onto the horizontal plane Volume (2D) = f x a Programs Leica TPS800-4.0.0en...
-
Page 84: Remote Height
2. Aim at inaccessible height point [OK] Saves the measured data. [Base] Input and measurement of a new base point. TPS800_Z44 1) Remote point 2) Height diff. 3) Slope distance 4) Base point Programs Leica TPS800-4.0.0en... -
Page 85: Construction
Measured point is right of line. As built check: Height is positive: This dialog shows you the Line, Offset and Measured point height is above line start point’s Height of a measured point in relation to the line. height. Programs Leica TPS800-4.0.0en... - Page 86 During use of the application the previous The graphics show you the position of the prism Orientation and Station parameters will be replaced related to the stake out point. Below, the exact by the new calculated ones. Programs Leica TPS800-4.0.0en...
-
Page 87: Roadworks 3D (Optional)
Afterwards you have to enter the • Upload of horizontal and vertical alignments license code. which are in gsi data format of Leica Road Line Editor • Creation, view and deletion of alignments onboard •... - Page 88 P1 ' P2 ' Projection of the alignment onto the natural surface Natural Surface P1 '' P2 '' Vertical alignment Horizontal Alignment P1 ''' P2 ''' Horizontal alignment Vertical Alignment Grade, angle between the vertical and horizontal alignment. Programs Leica TPS800-4.0.0en...
- Page 89 A straight has to be defined by: (ACW) • Start point (P1) and end point (P2) with known easting and northing coordinates TPS800_Z105 TPS800_Z106 Start point Start point End point End point Radius Direction clockwise Direction anticlockwise Programs Leica TPS800-4.0.0en...
- Page 90 (L) at the start and another given radius at the end. • Direction: Clockwise or Anticlockwise • Spiral type: Spiral In or Spiral Out TPS800_Z99 TPS800_Z129 Entry spiral Start point Exit spiral End point Radius Length Programs Leica TPS800-4.0.0en...
- Page 91 • Start Chainage and Start Height of P1 convex concave • End Chainage and End Height of P2 or Length (L) and Slope (%) TPS800_Z108 TPS800_Z107 Start point Start point End point End point Length Radius Slope Programs Leica TPS800-4.0.0en...
- Page 92 Start Chainage and Start Height of P1 TPS800_Z109a • End Chainage and End Height of P2 • Parameter • or length (L), grade of entry straight (Grade In) and grade of exit straight (Grade Out) TPS800_Z109b Start point End point Length Slope Programs Leica TPS800-4.0.0en...
- Page 93 R2 Radius 2 b2 Curve a1 Straight b3 Straight a2 Curve with R1 b4 Parabola a3 Partial Spiral with R1 and R2 b5 Straight a4 Curve with R2 a5 Spiral Out with R2 and R= ∞ a6 Straight Programs Leica TPS800-4.0.0en...
- Page 94 TPS800_Z111 Natural surface, is the undisturbed surface before project construction. P1 Measured point Horizontal alignment Hinge point Slope Catch point Natural surface Defined Offset Defined Height Difference Cut situation for defined slope Offset to catch point Programs Leica TPS800-4.0.0en...
- Page 95 2. Cut situation 3. Fill situation TPS800_Z113 TPS800_Z112 Horizontal alignment Horizontal alignment Hinge point Hinge point Slope Slope Catch point Catch point Natural surface Natural surface Programs Leica TPS800-4.0.0en...
- Page 96 Workflow Create or upload road alignments Select horizontal and/or vertical alignment files. Define stake/check/slope parameter 4a Sub application Check 4b Sub application Stake 4c Sub application Check Slope 4d Sub application Stake Slope Programs Leica TPS800-4.0.0en...
- Page 97 Road alignments can be deleted onboard or via Data Exchange Manager in LGO Tools Version 5.0 or higher. • Road alignments cannot be edited onboard. This needs to be done via Leica Road Line Editor of LGO Tools. Programs Leica TPS800-4.0.0en...
- Page 98 Create or upload road alignments Select horizontal and/or vertical alignment files. Create horizontal and vertical road alignment files with Leica Road Line Editor and upload them onto Select Alignment Files ! the instrument using Data Exchange Manager of LGO Tools Version 5.0 or higher.
- Page 99 Define stake/check/slope parameter Straight Spiral Curve Radius Offset Left Offset Right d = 155.000 Increment Defined Chainage d = 132.000 d = 122.000 d = 112.000 d = 102.000 TPS800_Z115 Programs Leica TPS800-4.0.0en...
- Page 100 Offs. Right Horizontal offset from the horizontal Slope. alignment to the right side. [CH_SLP] To start sub application Check Slope. Ht. Diff. Vertical offset from the horizontal alignment up or down. Def. Chain Defined Chainage for stake out. Programs Leica TPS800-4.0.0en...
- Page 101 Left Chainage Chainage : 90.194 m Offset, is positive on the right hand side of the Offset 4.678 m alignment. Ht.Diff. : 0.348 m Height difference, is positive when target point is higher than the alignment. DIST Programs Leica TPS800-4.0.0en...
- Page 102 3D-ROAD STAKE OUT 2/2 PtID 1.500 m Offset Center Def.Ch. 102.000 TPS800_Z117 Chain 2.305 m Offset : 1.367 m P1 Target Point Height : 0.100 m P2 Measured Point DIST P3 Measured Point Horizontal alignment Programs Leica TPS800-4.0.0en...
- Page 103 Check mode. P1 Measured Point Horizontal alignment Defined Offset Defined Height Difference Hinge point Actual Slope Natural Surface Offset to Hinge point Offset to Alignment TPS800_Z118 Height Difference to Hinge point Height Difference to Alignment Programs Leica TPS800-4.0.0en...
- Page 104 H Hng Height difference to Hinge, the Height Height value of the current measured vertical offset between current point. defined height at current chainage and current measured position including defined height difference. Programs Leica TPS800-4.0.0en...
- Page 105 SlopeType : Left up to the right of the defined hinge point. SlopeGrade : 1.000: 2.000 v:h Slope Grade Ratio of the slope. The unit for slope grade is defined in the Settings screen. PREV RESET Programs Leica TPS800-4.0.0en...
- Page 106 Defined Height Difference Hinge point Defined Slope Catch point Natural Surface TPS800_Z130 Offset to Catch point Cut/Fill to Catch point Offset to Hinge point Offset to Alignment Height Difference to Hinge point m Height Difference to Alignment Programs Leica TPS800-4.0.0en...
- Page 107 Cut/Fill Vertical offset between catch point of measured offset to horizontal align- defined slope and current measured ment excluding offset right and offset position. A cut is above the slope, a fill left. is below the slope. Programs Leica TPS800-4.0.0en...
- Page 108 H Aln Height difference to alignment, the vertical offset between defined height at current chainage and current measured position excluding defined height difference. Slope distance to Alignment, slope distance from the current measured point to the alignment. Programs Leica TPS800-4.0.0en...
- Page 109 Sign convention Cut situation P1 Measured point P2 Catch point Horizontal alignment Hinge point Offset to Catch point TPS800_Z121a Fill situation P1 Measured point P2 Catch point Horizontal alignment Hinge point Fill TPS800_Z121b Offset to Catch point Programs Leica TPS800-4.0.0en...
-
Page 110: Cogo
α Direction from P1 to P2 you have the option to stake out this d1 Slope distance between P1 and P2 point directly. d2 Horizontal distance between P1 and P2 d3 Height difference between P1 and P2 Programs Leica TPS800-4.0.0en... - Page 111 1 Direction from P1 to P3 d3 Negative offset to the left α 2 Direction from P2 to P3 Unknown Unknown P2 COGO point without offset P3 COGO point P3 COGO point with positive offset P4 COGO point with negative offset Leica TPS800-4.0.0en Programs...
- Page 112 Radius, as defined by the distance from P2 to r2 Radius, as defined by the distance from P2 to P4 and P3 P3 or P4 Unknown Unknown P3 First COGO point P3 First COGO point P4 Second COGO point P4 Second COGO point Programs Leica TPS800-4.0.0en...
- Page 113 P2 Baseline end point P4 Fourth known point P3 Lateral point Line from P1 to P2 Unknown Line from P3 to P4 d1 Difference in length/abzissa (HD) Unknown d2 Lateral deviation/ordinate (Offset) P5 COGO point P4 Base point Leica TPS800-4.0.0en Programs...
- Page 114 P1 Point 1 which defines plane Difference in length/abzissa (HD) P2 Point 2 which defines plane Lateral deviation/ordinate (Offset) P3 Point 3 which defines plane Unknown P4 Offset point P3 Lateral point Unknown P5 COGO point d1 Offset Programs Leica TPS800-4.0.0en...
-
Page 115: Traversepro (Optional)
L1 or Distance misclosure will be distributed with respect to the Unknown length of the traverse legs. The Compass Rule P2, P4 Extended point assumes that the biggest error comes from the longest traverse observations. This method is Leica TPS800-4.0.0en Programs... - Page 116 "Start a traverse without a known backsight". Check Point P1...P3 Traverse Points It is also possible to observe sideshots and check TP1...TP3 Topographic Points points during the traverse. However check points North Direction are not included in the traverse adjustment. Programs Leica TPS800-4.0.0en...
- Page 117 P1...P3 Traverse Points TP1...TP3 Topographic Points Start Enables you to select a job. Only one traverse per job is allowed. If an adjusted or finished traverse is already part of the selected job, then select another job. Leica TPS800-4.0.0en Programs...
- Page 118 Every Traverse must start on a known point. Traverse ID: The name of the new traverse. Method: B’F’F’’B’’: All points are measured in face I, then measured in face II in reverse sequential order. B’B’’F’’F’: Backsight point is Programs Leica TPS800-4.0.0en...
- Page 119 To continue to the panel for be entered or the * wildcard-criteria measuring a backsight point. used. [LIST] Displays the list of available points. [ENH] Opens the coordinate input mode. [OK] Enables you to select the traverse method. Leica TPS800-4.0.0en Programs...
- Page 120 Sight Foresight Point panel appears for [ESC] Quits the backsight and foresight measuring the foresight point. panel. This panel is displayed: 6. Measuring a foresight point A point ID for the foresight point is suggested but can be changed. Programs Leica TPS800-4.0.0en...
- Page 121 The data from To measure a check point. See 7.3 Check the last station is lost. Point. To return to the panel where [ESC] was [ESC] Quits the TRAVERSE MAIN panel. Decide pressed accidentally. what to do next: Programs Leica TPS800-4.0.0en...
- Page 122 ID automatically. the program TraversePro again. Run through the loop of backsight and foresight [BACK] To return to the TRAVERSE MAIN measurements until the number of sets is reached. panel. Programs Leica TPS800-4.0.0en...
- Page 123 3. The results are displayed. 8. Closing a traverse If you chose this method you are Press [CLOSE] in the Sight Foresight Point panel forced to do a distance measurement. before measuring a foresight point after a backsight point measurement. Leica TPS800-4.0.0en Programs...
- Page 124 Hgt.-Distr.: The height error can be distributed option to use the system azimuth saved in the instru- equally, by distance or not at all. ment from another program, for example if Free Station was used before TraversePRO. Programs Leica TPS800-4.0.0en...
- Page 125 Adjusted points are stored as fixpoints with an additional prefix, for example point BS-154.B is stored as CBS- 154.B. After the adjustment the TraversePRO application is left and the system returns to the MAIN MENU. Programs Leica TPS800-4.0.0en...
- Page 126 QUIT Traverse Application? Current You can either quit the application or go back to the previous panel and select Station data will be lost. another option. Tolerances exceeded. Accept? If you do not accept, the calculations can be redone. Programs Leica TPS800-4.0.0en...
- Page 127 Important messages Meaning Traverse points are recalculated and This is an information message displayed while the adjustment is calculated. newly stored. Leica TPS800-4.0.0en Programs...
-
Page 128: Reference Plane
The second point defines the direction of the from P4 to the defined plane. This point is local Z-axis. definitely located on the defined plane. • The third point defines the plane. X-axis of local coordinate system Programs Leica TPS800-4.0.0en... - Page 129 Off- Repeat this for the second and the third point on the reference plane. TPS800_Z147a [FIND] Starts point search. Exact PtIDs can be entered or the * wildcard-criteria used. [LIST] Displays the list of available points. Leica TPS800-4.0.0en Programs...
- Page 130 [New Plan] To define a new reference plane. [EXIT] Goes to the programs menu. NewTgt STAKE NewPlan EXIT Int. PtID: Point ID of the intersection point, the perpendicular projection of the target point on the plane. Programs Leica TPS800-4.0.0en...
-
Page 131: Coding
(WI71-79) are not available. • Attributes with status "Normal" can be edited freely. Procedure: Select code from a codelist or enter new code. [RECORD] The code is directly recorded without a measurement with [ALL]. Programs Leica TPS800-4.0.0en... -
Page 132: Quick Code
... 10 -> tenth code in the code list). Procedure: 1. Press the [Q-Code] button to activate Quick coding. 2. Enter a two digit number on the numeric keypad -> code is selected, the measurement triggered and the measured data and code saved. Programs Leica TPS800-4.0.0en... - Page 133 Entry required ! Code missing. Extend input. Individually entered code blocks are not added to the code list. Leica Geo Office Tools (LGO-Tools) Codelists can be easily created and uploaded to the instrument using the supplied "LGO-Tools" Soft- ware. Programs...
-
Page 134: Settings
The "0"- orientation of the vertical circle can be either selected for the zenith, the horizontal plane or The compensator setting remains active in %. even after the instrument is switched off. Settings Leica TPS800-4.0.0en... - Page 135 From 95.0 to 99.5 gon (or from 105.0 to 100.5 gon) a "Fast beep" sounds whilst from 99.5 to 99.995 gon (or from 100.5 to 100.005 gon) a "Permanent beep" sounds. TPS800_Z45 1) No beep 2) Fast beep (interrupted) 3) Permanent beep Settings Leica TPS800-4.0.0en...
- Page 136 This setting in only required if an High High illumination external storage device is connected and measurements are started at the TPS with DIST/REC or ALL. This setting is not required if the TPS is totally controlled by a datalogger. Settings Leica TPS800-4.0.0en...
- Page 137 PtID, Hz, V (Set Azimuth) Disable The instrument is switched on perma- PtID, Hz, V, SD, ppm+mm, hr, E, N, H nently. Battery discharges quicker. (Measurement) Sleep Economy mode. Instrument is recov- ered by any key stroke. Settings Leica TPS800-4.0.0en...
- Page 138 0.01 mil / 0.05 mil / 0.10 mil The setting of the angle units can be changed at any time. Distance Unit The actual displayed values are converted meter Meter according to the selected unit. ft-in1/16 US-feet-Inch-1/16 inch US-ft US-feet INT-ft International feet Settings Leica TPS800-4.0.0en...
- Page 139 (v/h x 100), for example 20 % Face I Definition Defines the telescope face I in relation to the posi- tion of the Vdrive. Code Record Sets if the codeblock is saved before or after the measurement (see chapter "Coding"). Settings Leica TPS800-4.0.0en...
-
Page 140: Edm Settings
(2mm + 2 ppm) Quick measuring mode with higher measuring speed and IR-Fast reduced accuracy (5mm + 2 ppm) Continuous distance IR-Track measuring (5mm + 2 ppm) Distance measurement using IR-Tape Retro targets (5mm + 2 ppm) EDM Settings Leica TPS800-4.0.0en... - Page 141 +34.4 Mini prism JPMINI Prisms [mm] Reflective +34.4 targets Standard prism (Round) is set at "Prismconst" GPH1 + (-mm + 34.4; e.g.: mm = 14 USER GPR1 -> input = -14 + 34.4 = 20.4) +34.4 Reflectorless EDM Settings Leica TPS800-4.0.0en...
-
Page 142: Prism Constant
This is useful when stake out points. (20 ft) (20 ft) TPS800_Z46 1) Flashing red diode 2) Flashing yellow diode Operat. range: 5 - 150 m (15 -500 ft) Divergence: 12 m (40 ft) at 100 m (330 ft) EDM Settings Leica TPS800-4.0.0en... - Page 143 PPM param- eter. [PPM=0] Sets default parameters. In order to take into consideration these influences [PPM] distance measurements are corrected using atmo- Input of individual scaling parameters. spheric correction parameters. EDM Settings Leica TPS800-4.0.0en...
-
Page 144: Refraction Correction
The refraction correction is taken into account in the calculation of the height differences and the hori- zontal distance. Signal [SIGNAL] Displays EDM signal strength (reflection strength) in steps of 1%. Permits optimal aiming at distant barely visible targets. EDM Settings Leica TPS800-4.0.0en... -
Page 145: File Management
F2 Fixpoints the time of creation. F3 Measurements Job search: Scrolling through jobs. F4 Codes [DELETE] Deletes selected job. [SET] Sets the selected job. [NEW] Starts new job. FILE MANAGEMENT 2 F1 Initialize Memory F2 Memory Statistic File Management Leica TPS800-4.0.0en... - Page 146 Starts point search dialogue. [SAVE] Save data. [VIEW] Displays all measurements. [VIEW] Starts search dialogue. Codes [ATTRIB] Input of attributes. To each code a description and a maximum of 8 attributes with up to 16 characters can be assigned. File Management Leica TPS800-4.0.0en...
- Page 147 After confirming the message all data is deleted permanently. Memory Statistic Displays job specific memory information such as: • Number of stored fixpoints. • Number of recorded data blocks (measured points, codes, etc.). • Number of free or not defined jobs. File Management Leica TPS800-4.0.0en...
-
Page 148: Start-Up Sequence
"Relative entries" such as automatically setting "IR-FINE" a new sequence upon switching on the instrument, are not possible. RECORD [OK] Stores current settings. [RECORD] Defines the key presses that are executed automatically upon start up. Start-up sequence Leica TPS800-4.0.0en... -
Page 149: Check & Adjust
Approximately two minutes per °C of temperature Instrument errors can change with time and temper- difference from storage to working environment but ature. at least 15 min should be taken into account. Check & Adjust Leica TPS800-4.0.0en... -
Page 150: Line-Of-Sight Error (Hz-Collimation)
For horizontal aimings the error of Hz equals the Procedures and conditions required to line-of-sight error. correct line-of-sight and height index errors are the same. Thus the procedure will only be described once. Check & Adjust Leica TPS800-4.0.0en... - Page 151 6. Displays the old and new calculated values. [SET] Sets new adjustment data. [ESC] Quits program without setting new adjustment data. TPS800_Z49 3. [ALL]: Trigger measurement. 4. Change telescope position and aim to the point again. Check & Adjust Leica TPS800-4.0.0en...
- Page 152 Confirmation of the message required. Measurement error appeared (e.g. instable Measurement Error. Try Repeat the process. set up or period between measuring in tele- again. Confirmation of the message required. scope position I and II too long). Check & Adjust Leica TPS800-4.0.0en...
-
Page 153: Tripod
Tighten the articulated joints on the tripod head supplied to center it by turning the adjustment (1) just enough to keep the tripod legs open screws. when you lift it off the ground. After adjustment no screw must be loose. Check & Adjust Leica TPS800-4.0.0en... -
Page 154: Circular Level On The Tribrach
Under normal circumstances setting of the laser plummet is not necessary. If an adjustment is necessary due to external influences the instrument has to be returned to any Leica service department. Checking by turning the instrument by 360°: 1. - Page 155 At a distance of 1.5 m an average value of 2.5 mm diameter must be estimated. The maximum diameter of the circular movement described by the centre of the laser point should not exceed 3 mm at a distance of 1.5 m. Check & Adjust Leica TPS800-4.0.0en...
-
Page 156: Comm Parameters
Carriage return communication parameters of the serial interface Stopbits RS232 must be set. Fixed setting 1. Leica Standard setting Interface plug connections: 19200 Baud, 8 Databit, No Parity, 1 Stopbit, CR/LF Baudrate Data transfer speed 2400, 4800, 9600, 19200 [bits / second] Databits Data transfer is realized with 7 databits. -
Page 157: Data Transfer
Data: Select the data range to be transferred PtID (measurements, fixed points) Horizontal direction Format: Select output format. Select Leica-GSI- Vertical angle format, or your own format created in Orientation the "Format Manager" and transfer to Slope distance Horizontal distance the LGO. -
Page 158: System Info
• Date Displays the current date. Layout: User displays • Time Displays current time. [DATE] Change date and format. Format: There are three display formats: DD.MM.YYYY MM.DD.YYYY YYYY.MM.DDT Date: Input date [TIME] Set time. System Info Leica TPS800-4.0.0en... -
Page 159: Instrument Protection With Pin
PIN protection is deactivated. Procedure: 1. [MENU] > [PIN] 2. Activate PIN by setting <Use PIN Code>: On. 3. Enter your desired personal PIN Code (max. 6 character numeric) and accept with [OK]. Instrument Protection with PIN Leica TPS800-4.0.0en... -
Page 160: Care And Transport
Care and Transport Shipping Transport When transporting the product by rail, air or sea, always use the complete original Leica Geosystems Transport in the field packaging, transport container and cardboard box, When transporting the equipment in the field, always or its equivalent, to protect against shock and vibra- make sure that you tion. -
Page 161: Storage
Remove batteries from the product and the charger before storing. • After storage recharge batteries before using. • Protect batteries from damp and wetness. Wet or damp batteries must be dried before storing or use. Care and Transport Leica TPS800-4.0.0en... -
Page 162: Cleaning And Drying
40°C / 108°F and clean them. Do not repack until everything is completely dry. Cables and plugs Keep plugs clean and dry. Blow away any dirt lodged in the plugs of the connecting cables. TPS800_Z55 Care and Transport Leica TPS800-4.0.0en... -
Page 163: Safety Directions
Disabling safety systems. • Removal of hazard notices. • Opening the product using tools, for example screwdriver, unless this is specifically permitted for certain functions. • Modification or conversion of the product. • Use after misappropriation. Safety Directions Leica TPS800-4.0.0en... -
Page 164: Limits Of Use
Limits of Use damages or defects. • Use with accessories from other manufacturers Environment without the prior explicit approval of Leica Suitable for use in an atmosphere appropriate for Geosystems. permanent human habitation: not suitable for use in • Aiming directly into the sun. -
Page 165: Responsibilities
To understand the safety instructions on the Leica Geosystems AG, CH-9435 Heerbrugg, here- product and the instructions in the user manual. inafter referred to as Leica Geosystems, is respon- • To be familiar with local regulations relating to sible for supplying the product, including the user safety and accident prevention. -
Page 166: Hazards Of Use
Periodically carry out test measurements and perform the field adjustments indicated in the user Precautions: manual, particularly after the product has been Do not use the product in a thunderstorm. Safety Directions Leica TPS800-4.0.0en... - Page 167 Leica Geosystems products. environmental conditions around, for example Caution obstacles, excavations or traffic.
- Page 168 Avoid subjecting the product Precautions: to mechanical stress. Only use chargers recommended by Leica Geosys- tems to charge the batteries. Caution During the transport, shipping or disposal of Warning batteries it is possible for inappropriate mechanical High mechanical stress, high ambient influences to constitute a fire hazard.
- Page 169 WARNING Product specific treatment and waste management If the product is improperly disposed of, the information can be downloaded from the Leica following can happen: Geosystems home page at http://www.leica- geosystems.com/treatment or received from your • If polymer parts are burnt, poisonous gases are Leica Geosystems dealer.
-
Page 170: Laser Classification
• special warning signs in the laser working harmful to the eyes provided that the products are area used and maintained in accordance with this user manual. Safety Directions Leica TPS800-4.0.0en... - Page 171 Description Value Maximum average radiant power 0.33 mW Pulse duration 800 ps Pulse repetition frequency 100 MHz - 150 MHz Wavelength 650 nm - 690 nm Safety Directions Leica TPS800-4.0.0en...
- Page 172 Class 1 Laser Product according to IEC 60825-1 2007 - 03 Type: TC..Art.No.: ..Power: 12V/6V ---, 1A max Leica Geosystems AG CH-9435 Heerbrugg Manufactured: 2003 Made in Switzerland S.No.: ..Complies with 21 CFR 1040.10 and 1040.11 except for deviations pursuant to Laser Notice No.50, dated July 26,2001.
-
Page 173: Distancer, Measurements Without Reflectors (Rl Mode)
(e.g.) beam alignment Prevent direct eye exposure to the beam. Do not with the pupil, worst case accommodation, direct the beam at other people. b) inherent safety margin in the maximum permis- sible exposure to laser radiation (MPE), Safety Directions Leica TPS800-4.0.0en... - Page 174 Do not look through or beside the optical sight at prisms or reflecting objects when the laser is switched on, in laser pointer or distance measure- ment mode. Aiming at prisms is only permitted when looking through the telescope. Safety Directions Leica TPS800-4.0.0en...
- Page 175 Labelling Laser Aperture Laser Radiation Avoid direct eye exposure Class 3R Laser Product according to IEC 60825-1 ( 2007 - 03 ) Po ≤ 5.00 mW λ = 650 - 690 nm TPS800_Z70 a) Laser beam Safety Directions Leica TPS800-4.0.0en...
-
Page 176: Electronic Guide Light Egl
Art.No.: ..The integrated Electronic Guide Light produces a Power: 12V/6V ---, 1A max visible LED beam from the front side of the tele- Leica Geosystems AG CH-9435 Heerbrugg scope. Depending on the type of telescope the EGL Manufactured: 2003 may be designed differently. -
Page 177: Laser Plummet
These products are safe for momentary exposures but can be hazardous for deliberate staring into the beam. Description Value Maximum average radiant power 1.00 mW Pulse duration c.w. Pulse repetition frequency c.w. Wavelength 620 nm - 690 nm Safety Directions Leica TPS800-4.0.0en... - Page 178 Warning From a safety perspective class 2 laser prod- ucts are not inherently safe for the eyes. Precautions: Avoid staring into the beam or pointing the beam at other people. Safety Directions Leica TPS800-4.0.0en...
- Page 179 Labelling Art.No.: ..Type: TC..Power: 12V/6V ---, 1A max Leica Geosystems AG CH-9435 Heerbrugg Manufactured: 2003 Made in Switzerland S.No.: ..Complies with 21 CFR 1040.10 and 1040.11 except for deviations pursuant to Laser Notice No.50, dated July 26,2001.
-
Page 180: Electromagnetic Compatibility Emc
Although the product meets the strict regulations TPS800_Z74 and standards which are in force in this respect, Leica Geosystems cannot completely exclude the 1) Exit for laser beam possibility that other equipment may be disturbed. 2) Laser beam... - Page 181 Warning Use only the equipment and accessories recom- If the product is operated with connecting mended by Leica Geosystems. When combined cables attached at only one of their two ends, for with the product, they meet the strict requirements example external supply cables, interface cables, stipulated by the guidelines and standards.
-
Page 182: Fcc Statement, Applicable In U.s
Warning tial installation. Changes or modifications not expressly approved by Leica Geosystems for compliance This equipment generates, uses and can radiate could void the user's authority to operate the equip- radio frequency energy and, if not installed and used ment. - Page 183 Rules. Operation is subject to the following two conditions: (1) This device may not cause harm- ful interference, and (2) this device must accept any interference received, including inter- ference that may cause undesired operation. TPS800_Z75 Safety Directions Leica TPS800-4.0.0en...
-
Page 184: Technical Data
TC(R)802 ........2" (0.6 mgon) • Type:......visible red laser class 2 TC(R)803 ........3" (1.0 mgon) • Carrier wave: ........635 nm TC(R)805 ........5" (1.5 mgon) • Accuracy: ........Deviation from ..........plumbline 1.5 mm Technical Data Leica TPS800-4.0.0en... - Page 185 ........196 mm Thread diam.:..........5/8" • with tribrach GDF111 ..... 240 mm ± 5 mm .........(DIN 18720 / BS 84) Power supply • Battery GEB111: ........NiMh Voltage:............6V Capacity: ..........2100 mAh • Battery GEB121: ........NiMh Voltage:............6V Capacity: ..........4200 mAh Technical Data Leica TPS800-4.0.0en...
- Page 186 12500 measurements or ≈ -20°C to +50°C / -40°C to +70°C / ..........18000 fixpoints TPS800 -40°F to +158°F -4°F to +122°F -20°C to +50°C / -40°C to +55°C / Battery internal -4°F to +131°F -40°F to +131°F Technical Data Leica TPS800-4.0.0en...
- Page 187 < 0.15 s Tracking 5 mm + 2 ppm typ. 2.4 s IR Tape * Beam interruptions, severe heat shimmer and moving objects within the beam path can result in deviations of the specified accuracy. Technical Data Leica TPS800-4.0.0en...
- Page 188 1300 m (4200 ft) 1) Strong haze, visibility 5km; or strong sunlight, severe heat shimmer 2) Light haze, visibility about 20km; or moderate sunlight, slight heat shimmer 3) Overcast, no haze, visibility about 40km; no heat shimmer Technical Data Leica TPS800-4.0.0en...
- Page 189 300 m (990 ft) of the specified accuracy. 800 m (2630 ft) 400 m (1310 ft) *** Accuracy and measure time depend on atmo- >1000 m spheric conditions, target object and observation >500 m (>1640 ft) (>3280 ft) situation. Technical Data Leica TPS800-4.0.0en...
-
Page 190: Atmospheric Correction
The atmospheric correction takes air pressure and air temperature into account. For utmost precision in distance measurements, atmospheric correction must be determined with 1 ppm accuracy, air temperature to 1°C and air pres- sure to 3mb accuracy. Technical Data Leica TPS800-4.0.0en... - Page 191 550 mb 1000 1050 mb 50°C 50°C 40°C 40°C 30°C 30°C 20°C 20°C 10°C 10°C 0°C 0°C -10°C -10°C -20°C -20°C 550 mb 1000 1050 mb 5000 m 4500 4000 3500 3000 2500 2000 1500 1000 TPS800_Z76 Technical Data Leica TPS800-4.0.0en...
- Page 192 50°F 40°F 40°F 30°F 30°F 20°F 20°F 10°F 10°F 0°F 0°F -10°F -10°F -20°F -20°F 18 19 20 21 22 23 24 25 26 27 28 29 30 31 32 inch Hg [ ft ] TPS800_Z77 Technical Data Leica TPS800-4.0.0en...
-
Page 193: Reduction Formulae
[mm/km] prism constant [mm] = Y - A * X * Y TPS800_Z78 Height measurement 1) Mean sea level = X + B * Y 2) Instrument horizontal distance [m] 3) Reflector height difference [m] Technical Data Leica TPS800-4.0.0en... - Page 194 ζ · |sin ζ · cos ζ vertical-circle reading 1.47 · 10 6.83 · 10 0.13 6.37 · 10 Technical Data Leica TPS800-4.0.0en...
-
Page 195: International Limited Warranty, Software License Agreement
International Limited Warranty which on the product, or that is supplied to you on a data you can download from the Leica Geosystems carrier medium, or that can be downloaded by you home page at http://www.leica-geosystems.com/... - Page 196 You must not install or use the software unless you have read and accepted the terms and conditions of the Leica Geosystems Software License Agree- ment. Installation or use of the software or any part thereof, is deemed to be an acceptance of all the terms and conditions of such license agreement.
-
Page 197: Index
COGO ............53, 110 Collimation axis ..........12 Base Line ............. 64, 65 Communication parameters ......156 Battery .............. 158 Compensator ..........24, 183 Battery capacity ..........24 Computation procedure ........58 Baudrate ............156 Construction ............53 Index Leica TPS800-4.0.0en... - Page 198 Function keys ............. 18 Edit mode ............34 EDM Mode ............140 GSI 8/16 ............137 EDM Settings ........... 140 GSI output format ..........137 EDM type ............24 GSI output mask ..........137 EGL ..............142 GSI-coding ............131 Index Leica TPS800-4.0.0en...
- Page 199 Interface plug connections ....... 156 Laser Classification .......... 170 Intersection Electronic Guide Light EGL ....... 176 Bearing - Bearing ........111 Laser Plummet ........... 177 Bearing - Distance ........112 Laser intensity ............ 33 By Points ............ 113 Index Leica TPS800-4.0.0en...
- Page 200 Laser plummet ........154, 177, 183 Laser Pointer ............ 142 Navigation keys ..........18 Laserpointer ............39 No. of measurements ........185 Leica Geo Office Tools ....... 15, 133 Level ..............32 Level sensitivity ..........183 Offset Level/Plummet ............ 39 Distance - Offset ........
- Page 201 Reference Line/Arc ..........64 Signal ............... 144 Reference Plane ......... 53, 128 Signs ..............35 Reflective targets ..........141 Softkeys ............. 23 Refraction correction ........144 Software Upload ..........16 Remote Height ........... 84 Stake out ............55 Index Leica TPS800-4.0.0en...
- Page 202 Technical Data ..........183 V-Index ............13, 149 Technical terms ..........12 Volume ............53, 81 Telescope ............183 V-Setting ............134 Temperature ............. 139 Temperature range ........... 185 Tie Distance ............79 Weight .............. 184 Tilt Correction ........... 134 Index Leica TPS800-4.0.0en...
- Page 203 Wildcard search ..........37 Zenith ..............13 Zenith angle ............12 Index Leica TPS800-4.0.0en...
- Page 204 International Standards of Quality Management and Quality Systems (ISO standard 9001) and Environmental Management Systems (ISO standard 14001). Ask your local Leica dealer for more information about our TQM program Leica Geosystems AG Heinrich-Wild-Strasse CH-9435 Heerbrugg...
Need help?
Do you have a question about the TPS800 Series and is the answer not in the manual?
Questions and answers