
Related Manuals for Ada Suite 7.1 HD


Summary of Contents for Ada Suite 7.1 HD
- Page 1 Suite 7.1 HD Home Theater Controller nstallation anual 4.0 - J 2010 ersion 602-610 Mamaroneck Avenue, White Plains, NY, 10605, www.ada-usa.com, 1-800-HD-AUDIO, Fax (914) 946-9620...
-
Page 2: Table Of Contents
Solo Test ............................38 Saving (& Loading) Input Configuration & PROM Files ...............39 Recalling Factory & Storing/Recalling Installer Defaults ............40 ADA Bus Address, Baud Rate, IR & Display Blanking ..............41 View HEX Commands & Feedback ....................42 HEX Codes for System Integration ....................43 Dolby and the double-D symbol are trademarks of Dolby Laboratories Licensing Corporation. -
Page 3: Safety Instructions & Electrical Warning
230V SETTING WOULD BE NEEDED, AUDIO DESIGN ASSOCIATES WILL NOT PROVIDE A POWER CORD FOR THE UNIT. THEREFORE, THE USER MUST CONSULT AN AUTHORIZED DEALER OR ADA TO OBTAIN THE PROPER POWER CORD, AS WELL. MAKE SURE THAT THE VOLTAGE SELEC-... -
Page 4: Ac Connections
AC connection. In the event that the Suite 7.1 HD appears power supply that operates to have suffered cosmetic damage due to shipping, please contact... -
Page 5: Power Amplifier (& Powered Subwoofer) Connections
Power Amplifier (& Powered Subwoofer) Connections Audio Connections The Suite 7.1 HD’s Audio Outputs are clearly marked in a white field on the back of the unit. ADA strongly suggests not using directional interconnects that lift the grounds. This diagram includes ADA’s PTM-8150 Eight Channel Power Amplifier. -
Page 6: Introduction - Front Panel Controls & Displays
Knob Features The Suite 7.1 HD acts as both an input selector and surround sound decoder. It is capable of decod- ing Dolby TrueHD, DTS HD Master Audio, Multi-Channel PCM from sources that connected using an HDMI cable as well as Dolby Pro Logic, Dolby Digital (AC-3), and DTS encoded formats and also provide Lucasfilm THX Ultra 2 enhancements and filters. -
Page 7: Power On, Mute, Off, & Master Volume Control
Power On, Mute, Off, & Master Volume Control When the Suite 7.1 HD is off, turning any knob or pushing any knob Power On other than the Volume knob will cause the Suite 7.1 HD’s center LCD Press the Suite 7.1 HD’s display to indicate that you need to push the knob to turn it on. -
Page 8: Input Selector
Input Selector The Suite 7.1 HD permits you to scroll to the next input without hav- ing all of the components you are passing actively process through the Suite 7.1 HD. This prevents the clicking that is commonly as- INPUT sociated with changing TV channels up and down. -
Page 9: Mode Selector & Mode Descriptions
Mode Selector & Mode Descriptions The Suite 7.1 HD permits you to scroll through available modes without necessarily engaging the mode until you have found the one you wish to use. As you turn the mode knob, the top line of the Suite 7.1 HD’s display will read the modes available. - Page 10 LF/RF/C/LS/RS/LB/RB/Sw Custom 3 settings for Pro Logic 2 Movie - permits adjustment of PL IIPL2 Cstm3 +THX LF/RF/C/LS/RS/LB/RB/Sw Adds THX filters to PL Custom mode (above) ADA Proprietary Modes (ADA’s Favorites) AGL Enhanced LF/RF/C/LS/RS/LB/RB/Sw Based on Pro Logic, AGL is an auto-sensing 2-channel mode...
-
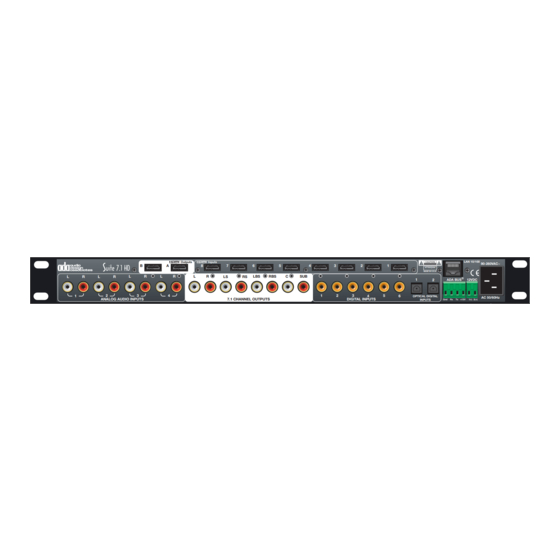
Page 11: Rear Panel Connections
Suite 7.1 HD’s input configurations (providing that the sources have the appropriate outputs). Below is a chart showing the Suite 7.1 HD’s 20 “input labels” and the assignment of the HDMI (audio & video signal) and audio jacks on the rear panel of the unit. Also shown here are the default surround sound modes for the respective inputs when playing 5.1 or 2... -
Page 12: Custom Input Configuration
Custom Input Configuration The Suite 7.1 HD is an incredibly flexible home theater controller that can accommodate a wide array of components. For easy and quick setup, one can use the “Out of the Box” input configuration. One can also elect to do a completely “Custom Input” configuration or a combination of “Out of the Box”... -
Page 13: Setup - Entering & Navigation
ADA strongly suggests using the PC program when ever possible as it is more intuitive. When setting up the Suite 7.1 HD from its front panel, the Mode, Input and Volume knobs are used to move the display’s cursor and to make changes or selections. -
Page 14: Customizing Virtual Inputs
These are here to simply illustrate just or simply remain on the last used volume. how flexible the Suite 7.1 HD is. In the end, the goal of the optimum setup is to make operating Balance Preset - Recall one of four balance pre- the Suite 7.1 HD as easy as selecting an input. -
Page 15: Inputs Labels
Mode knob until it rests on this arrow and press the Mode knob. Doing the same on the letter M exits setup. The Suite 7.1 HD features 20 input labels or virtual inputs. The Factory Default features 20 input labels. Features discussed in this section... -
Page 16: Audio Input Jack Assignment
Audio Input Jack Assignment The Suite 7.1 HD makes it possible to assign any audio and video jack to an Input Label. For audio, there are: 2 TOS-Link Optical inputs, 6 digital coax inputs 4 analog audio inputs 8 HDMI inputs (A/V) -
Page 17: Video Input Jack Assignment
Video Input Jack Assignment The Suite 7.1 HD makes it possible to assign any audio and video jack to an Input Label. For video, there are eight HDMI inputs. There is also a setting for VIDEO OFF which should be used for sources that have no video signal corresponding the source. -
Page 18: Input Presets
L A B E L S A T E L L I T E S A V E On the Suite 7.1 HD, if you are in the LABELS/ A U D I O H D M I L O A D A L L... -
Page 19: Default Modes
Default Modes are loaded to the Suite 7.1 HD along with the Input Labels, AV Input Jack Assignments and Input Presets. As such, before loading it is suggested that you set the Default Modes for the Input Labels you have created or modified. -
Page 20: Loading Custom Input Configurations
While on that Input, press the Send Input button and just that input will be loaded to the Suite 7.1 HD. Also, you save the configuration for all inputs by selecting Save File. Inversely, you can load a previously stored configuration using the Load File feature. -
Page 21: Final Input
Input number will change in the feedback area to the right of these buttons. From the front of the Suite 7.1 HD, while on the I N P U T F I N A L I N P U T 2 O... -
Page 22: Setup 1 - Speaker Size & Crossover Frequency
Setup 1 - Speaker Size & Crossover Frequency The Suite 7.1 HD uses the description of Small (SM), Large (LG), and None (NO) with respect to the speakers. Small refers to speakers that are not designed to handle low frequencies. Bass information is redirected to the subwoofer. - Page 23 (do not press SPEAKER STORE). SPEAKER STORE # button. From the front of the Suite 7.1 HD, while in the T R x B R x V R x setup mode, use the Mode knob to navigate to the T O N E R E C A L L 1 T N B L V L E Q word SETUP and press the Mode knob.
-
Page 24: Setup 2 - Speaker Level
Setup 2 - Speaker Level The Suite 7.1 HD’s makes it easy to balance the speaker channels for the optimum home theater experience. Prior to entering this step, you should already have completed the positioning of your speakers and programmed their size into the Suite 7.1 HD. - Page 25 SPL meter toward it. T R x B R x V R x From the front of the Suite 7.1 HD, while in the T O N E R E C A L L 1 T N B L V L E Q...
-
Page 26: Setup 3 - Delay Settings
Since the Suite 7.1 HD can delay the signal of a channel from reaching that chan- nel’s output (and as such, the amplifier, then the speaker, and then your ears), the delay is applied to all speakers that are closer to the listener than the furthest speaker. - Page 27 T O N E R E C A L L 1 T N B L V L E Q From the front of the Suite 7.1 HD, while in the B A L R E C A L L 1 S E T U P...
-
Page 28: Setup 4 - Bass Limiter
Here you can increase (UP) or decrease (DN) the limiter level in dBs. All changes occur in real-time (instantly). From the front of the Suite 7.1 HD, while in the T R x B R x V R x setup mode, use the Mode knob to navigate to T O N E R E C A L L 1 T N B L V L E Q the word SETUP and press the Mode knob. -
Page 29: Setup 5 - Thx
B O U N D R Y G A I N O F F From the front of the Suite 7.1 HD, while in the S U R R O U N D B A C K S P A C I N G setup mode, use the Mode knob to navigate to <... -
Page 30: Modes, Dts Enhancements & Thx Options
LFE signal. For THX, the Suite 7.1 HD is unique in that it per- mits you to engage Re-Equalization, Deorralation, and Timbre Match at will providing you are not on a THX mode in which case, all three THX filters will automatically be engaged. -
Page 31: Simulated Surround & Dynamic Range Settings
Simulated Surround & Dynamic Range Settings Stereo & Mono Enhance Settings The Suite 7.1 HD features two ADA modes that are designed to enhance your experience when viewing stereo or mono source material such as older films, TV shows, or other programming that is neither Dolby Pro Logic or 5.1 encoded. -
Page 32: Dolby Pro Logic Ii Music & Custom Settings
D E L A Y S S O L O T E S T R E V E R B From the front panel of the Suite 7.1 HD while P L 1 C E N W I D T H 3 S U R 6 K H z... -
Page 33: Reverb Mode Settings
Theater tab and then the top Reverb tab. Then select the reverb mode you wish to adjust. From the front of the Suite 7.1 HD, while in the Setup Mode, turn the Mode knob to navigate the cursor to the S in SETUP and then press the Mode knob. -
Page 34: Maximum & Turn-On Volume Settings
Volume Numeric Direct - This feature is available on the ADA PC program and lets you jump to a specific volume point. In the PC program, a virtual slider accomplishes this. Essentially, when you release the slider the volume command is sent. -
Page 35: Tone Settings
T R x B R x V R x From the front panel of the Suite 7.1 HD while in T O N E R E C A L L 1 T N B L V L E Q... -
Page 36: Parametric Eq (Peq) Setup
Typically, best results are achieved using acoustical measurement systems. The PEQ is a separate PC program to the Suite 7.1 HD PC program. ADA suggests running one or the other but not both at the same time for optimal results. -
Page 37: Hdmi Equalizer Settings
0 to 31. Note that all changes are in real time. From the front panel of the Suite 7.1 HD while in the primary setup mode screen navigate to the S in SETUP and press the Mode knob. Then turn the Mode knob so that the cursor is on the H in HDMI and press the Mode knob. -
Page 38: Solo Test
T U R N O N D E L A Y S S O L O T E S T R E V E R B From the front panel of the Suite 7.1 HD while in O F F *... -
Page 39: Saving (& Loading) Input Configuration & Prom Files
- containing input labels, AV jack links, defalut modes and input presets, the PROM file contains all the other aspects of the Suite 7.1 HD. To nu- merous to mention, these features also should be preserved in a PC file (.S7P extension) as they can be recalled in the event of a problem. -
Page 40: Recalling Factory & Storing/Recalling Installer Defaults
F A C T O R Y R E C A L L [ P M ] From the front panel of the Suite 7.1 HD while in the Setup Mode navigate to the A in ADAUBS and I N S T A L L R E C A L L press the Mode knob. -
Page 41: Ada Bus Address, Baud Rate, Ir & Display Blanking
In the event you want the front panel display on B U S B A U D 1 9 2 O O the Suite 7.1 HD to turn off (blank out), you can set B L A N K I N G O F F ] D E F A U L T S the blanking function between 0 and 60 seconds. -
Page 42: View Hex Commands & Feedback
View HEX Commands & Feedback The Suite 7.1 HD is controllable via HEX com- mands and also provides feedback in HEX that can be translated to ASCII. For each and every function described in this manual, there is a matching HEX command. This includes update... -
Page 43: Hex Codes For System Integration
HEX Codes for System Integration Comments/Notes All Commands below use 00 for the Unit Address number. When the unit address is changed, Byte number 6 (the Checksum Byte) increments by one step in Hex. For example, using the Discrete On Command on with the unit address changed to 01;... - Page 44 Command Name Hex Command On/Off, Volume and Input Related Commands Volume Recall 1 FF, 03, 00, 01, 89, 8D, FF Recalls Volume level 1 as stored Volume Recall 2 FF, 03, 00, 01, 8A, 8E, FF Recalls Volume level 2 as stored Volume Recall 3 FF, 03, 00, 01, 8B, 8F, FF Recalls Volume level 3 as stored...
- Page 45 Back 1 Large FF, 03, 00, 01, 70, 74, FF Turns on only the Left Back Surround speaker and sets to Large Back 2 Small FF, 03, 00, 01, 73, 77, FF Turns on both the Left and Right Back Surround speakers and sets to Small Back 2 Large FF, 03, 00, 01, 71, 75, FF Turns on both the Left and Right Back Surround speakers and sets to Large...
- Page 46 Solo Left and Right Surround FF, 03, 00, 01, 9F, A3, FF When playing audio plays audio only from the Left and Right Surround speakers Solo Surround Back Left FF, 03, 00, 01, A0, A4, FF When playing audio plays audio only from the Surround Back Left speaker Solo Surround Back Right FF, 03, 00, 01, A1, A5, FF When playing audio plays audio only from the Surround Back Right speaker...
- Page 47 Dolby Pro Logic II Cust 3/THX FF, 03, 00, 10, 58, 6B, FF Direct Mode Selection-with Custom settings from PC Set-up and THX (2-Channel Mode) AGL Enhanced FF, 03, 00, 10, 51, 64, FF Direct Mode Selection-Custom AGL Designed ADA mode (2-Channel Mode) Quad Bypass FF, 03, 00, 10, 59, 6C, FF...
- Page 48 FF, 03, 00, 13, 80, 96, FF Recalls all changes/set-ups/settings as stored above as the Installer Default Factory Default Recall FF, 03, 00, 10, FC, 0F, FF Returns all settings/set-ups to the ADA out of box default recalls Page 48...
- Page 49 Command Name Hex Command PEQ-1 Commands Enable PEQ FF, 03, 00, 15, 40, 58, FF Turns on the Parametric Equalizer Function Disable PEQ FF, 03, 00, 15, 41, 59, FF Turns off the Parametric Equalizer Function Get State FF, 03, 00, 15, 43, 5B, FF Requests the current status of the Parametric Equalizer Function Set Preset 1 FF, 03, 00, 15, 4C, 64, FF...
Need help?
Do you have a question about the Suite 7.1 HD and is the answer not in the manual?
Questions and answers