
Related Manuals for Nilfisk-Advance Advolution 2710


Summary of Contents for Nilfisk-Advance Advolution 2710
-
Page 1: Service Manual
Advolution 2710 ™ UHR 70-1700 Service Manual Advance Models: 56422000, 56422002 Nilfi sk Model: 56422001 7/06 revised 6/08 FORM NO. 56043107... -
Page 2: Table Of Contents
TABLE OF CONTENTS INTRODUCTION .........................4 IMPORTANT SAFETY INSTRUCTIONS ................5 TECHNICAL SPECIFICATIONS ..................6 MAINTENANCE SCHEDULE ....................8 KNOW YOUR MACHINE ....................10-11 FUNCTIONAL DESCRIPTION OF CONTROL BUTTONS: ..........12 BURNISHING SYSTEM ....................13 FUNCTIONAL OVERVIEW ..................13 PAD LIFT ACTUATOR REMOVAL AND INSTALLATION ...........14 PAD DRIVE DECK REMOVAL ...................14 PAD DRIVE MOTOR CARBON BRUSH INSPECTION ..........14 PAD DRIVE MOTOR REMOVAL ................15 DUST SHROUD REMOVAL ..................15... - Page 3 TABLE OF CONTENTS (CONTINUED) ELECTRICAL SYSTEM .....................40 BATTERIES ........................40 CHARGING THE BATTERIES ...................41 CHECKING THE BATTERY WATER LEVEL ..............41 BATTERY MAINTENANCE ..................41 CHARGING THE BATTERIES (CONTINUED) ............42 BATTERY TESTING ....................42 BATTERY SPECIFICATIONS ..................42 BATTERY CHARGER SPECIFICATIONS ..............42 ACTUATOR DRIVE NUT ADJUSTMENT ..............43 CURTIS CONTROLLER DIAGNOSTICS: ..............44 FUNCTION OF THE SPEED CONTROLLER STATUS LIGHT AND DISPLAY ..44 PROGRAMMER DIAGNOSTICS: ................44...
-
Page 4: Introduction
INTRODUCTION This manual will help you get the most from your Nilfi sk-Advance Advolution™ 2710 / UHR 70-1700. Read it thoroughly before operating the machine. Note: Bold numbers in parentheses indicate an item illustrated on pages 10 – 11. This product is intended for commercial use only. PARTS AND SERVICE Repairs, when required, should be performed by Nilfi... -
Page 5: Important Safety Instructions
IMPORTANT SAFETY INSTRUCTIONS This machine is only suitable for commercial use, for example in hotels, schools, hospitals, factories, shops and offi ces other than normal residential housekeeping purposes. Read all instructions before using. WARNING! To reduce risk of fi re, electric shock, or injury: •... -
Page 6: Technical Specifications
TECHNICAL SPECIFICATIONS General Specifi cations English (Metric) Burnishing Pad Diameter 27 inches (68.58 cm) Machine Length 65.5 inches (166.37 cm) Machine Width 32 inches (81.28 cm) Machine Height 54 inches (137.16 cm) 484 lbs. (219.53 kg) net w/o batteries Machine Weight 1,379 lbs. - Page 7 TECHNICAL SPECIFICATIONS FORM NO. 56043107 - Advolution 2710 / UHR 70-1700 - 7 ™...
-
Page 8: Maintenance Schedule
MAINTENANCE SCHEDULE MAINTENANCE ITEM Daily Weekly Monthly Yearly Charge Batteries Check/Clean/Replace Burnishing Pad Check/Replace Dust Collection Bag Check Battery Water Level(s) Check/Replace Pad Shroud Skirt Chain Tension - Steering Lubrication - Grease Fittings Check Carbon Brush Wear On Pad/Drive/Vacuum Motors Note: See the individual machine system sections for maintenance information. - Page 9 Advance Advolution 2710 & Nilfisk UHR 70-1700 Rider Burnisher PM Checklist Defect Codes Customer needs adjustment binding Address dirty or contaminated damaged, bent or torn City leaks missing Model Serial Hours W worn out Does OPERATIONAL INSPECTION ITEMS Defect Codes...
-
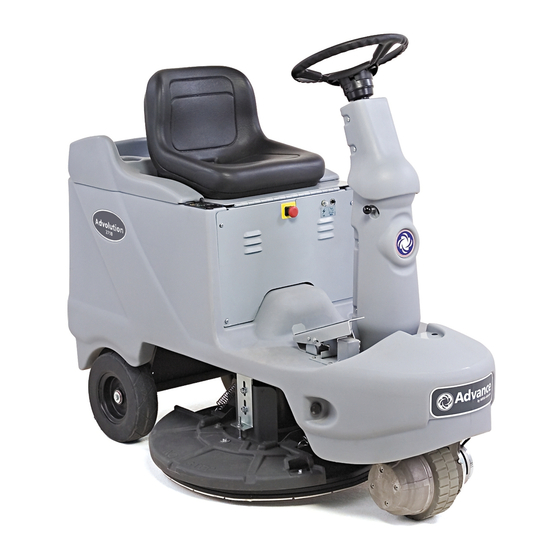
Page 10: Know Your Machine
KNOW YOUR MACHINE As you read this manual, you will occasionally run across a bold number or letter in parentheses - example: (2). These numbers refer to an item shown on these pages unless otherwise noted. Refer back to these pages whenever necessary to pinpoint the location of an item mentioned in the text. - Page 11 KNOW YOUR MACHINE AA Master Key Switch BB Battery Condition Indicator CC Hour Meter / Error Display DD Pad Drive Indicator Light EE Pad Drive Raise / Lower Switch FF Horn Indicator Light GG Horn Switch FORM NO. 56043107 - Advolution 2710 / UHR 70-1700 - 11 ™...
-
Page 12: Functional Description Of Control Buttons
FUNCTIONAL DESCRIPTION OF CONTROL BUTTONS: Key Switch (AA) – Main Power Switch, when turned on controls battery input to machine’s main control board and wheel drive speed control. Battery Condition Indicator (BB) – The Battery Condition Indicator will give an indication of the state of charge of the batteries. Three lights make up the Indicator Display (Red-Yellow-Green). -
Page 13: Burnishing System
BURNISHING SYSTEM FUNCTIONAL OVERVIEW The machines: Advolution 2710 / UHR 70-1700 (Model numbers 56422000, 56422001 & 56411002) use the disk type burnishing system. The pad driver assembly is directly attached to a single 3.25hp – 36v DC permanent magnet motor. -
Page 14: Pad Lift Actuator Removal And Installation
BURNISHING SYSTEM PAD LIFT ACTUATOR REMOVAL AND INSTALLATION WARNING! Disconnect the battery pack by separating the battery connectors (7) whenever servicing the machine. Disconnect the battery pack by separating the battery connectors (7) located underneath the drivers seat. Disconnect the actuator wiring harness at the actuator lift motor. See Figure 1. - Page 15 FIGURE 1 FORM NO. 56043107 - Advolution 2710 / UHR 70-1700 - 15 ™...
-
Page 16: Pad Drive Motor Removal
BURNISHING SYSTEM PAD DRIVE MOTOR REMOVAL Follow instructions for Pad Drive Deck Removal. See Figure 2. Remove the Dust Bag (A). Tip the deck assembly over and remove the Pad Retainer (B), pad (if installed) and the Motor Shaft Screw (C) that fastens the Pad Driver Assembly (D) to the motor shaft. -
Page 17: Dust Shroud Edging Replacement
BURNISHING SYSTEM DUST SHROUD EDGING REPLACEMENT See Figure 3. Remove existing Edging (A) by pulling it away from the Shroud (B). To install start at the rear of the Shroud (B) with one end of the new Edging (A) so that the seam is hidden. Push “U” channel onto Shroud (B), work edging assembly around Shroud (B). -
Page 18: Pad Drive Deck Level Adjustment
BURNISHING SYSTEM Left to Right Pad Contact Adjustment – See Figure 4. PAD DRIVE DECK LEVEL ADJUSTMENT Loosen the (2) Nuts (A) on the Adjustable Bracket (B). Turn the (2) Lock Nuts (C) on the Carriage Screw (D) either NOTE: Install a new pad before performing this adjustment. down to increase or up to decrease Dimension “X”. - Page 19 BURNISHING SYSTEM PAD DRIVE DECK LEVEL ADJUSTMENT NOTE: Install a new pad before performing this adjustment. Put the pad drive deck in the down position. Briefl y run the pad drive motor to get a pattern on the fl oor. CAUTION! Do not run pad motor for an extended period without moving machine.
-
Page 20: Installation Of The Burnishing Pad
BURNISHING SYSTEM INSTALLATION OF THE BURNISHING PAD WARNING! Disconnect the machines Battery Pack Connector (7) when ever servicing the machine. CAUTION! Turn the key switch off (O) and remove the key, before changing the pad, and before opening any access panels. See Figure 6. -
Page 21: Installation Of The Dust Collection Bag
BURNISHING SYSTEM INSTALLATION OF THE DUST COLLECTION BAG The Advolution™ 2710 / UHR 70-1700 uses dust collection bag PN 56391185 (sold 6 to a Package). See Figure 7. Unfold the Dust Collection Bag (5) and while holding onto the Card Board Retainer (A) insert it over the Collection Tube (B) found on the top of the Pad Drive Deck (1) on the left side of the machine. -
Page 22: Troubleshooting Guide Electrical
BURNISHING SYSTEM TROUBLESHOOTING GUIDE ELECTRICAL Symptom Burnishing deck will not raise or lower. Part A, Chart 1 (Control Circuit) Note :Do all testing with key switch on and seat switch activated. Have Pad R/L switch activated and deck in the burnishing position. 22 - FORM NO. - Page 23 BURNISHING SYSTEM TROUBLESHOOTING GUIDE ELECTRICAL Symptom Burnishing deck will not raise or lower. Part A, Chart 2 (Control Circuit) Note :Do all testing with key switch on and seat switch activated. Have Pad R/L switch activated and deck in the burnishing position. Symptom Burnishing deck will not raise or lower.
- Page 24 BURNISHING SYSTEM TROUBLESHOOTING GUIDE ELECTRICAL Symptom Pad drive motor will not run. Part A (Control Circuit) Note :Do all testing with key switch on and seat switch activated. Have Pad R/L switch activated and deck in the burnishing position and drive engaged.
- Page 25 BURNISHING SYSTEM TROUBLESHOOTING GUIDE ELECTRICAL Symptom Pad drive motor will not run. Part B (Load Circuit) Note :Do all testing with key switch on and seat switch activated. Have Pad R/L switch activated and deck in burnishing ready position and drive pedal engaged.
-
Page 26: Wheel Drive System
WHEEL DRIVE SYSTEM GENERAL FUNCTIONAL OVERVIEW See Figures 1 & 2. A 700-watt .9 HP (permanent magnet) 36V motor/gear transmission combination wheel (M1) unit is used to propel all machines. A Curtis model 1228 PMC solid state speed controller (A1) regulates (outputs) the variable speed Fwd/Rev wheel drive motor functions. - Page 27 WHEEL DRIVE SYSTEM FIGURE 2 FORM NO. 56043107 - Advolution 2710 / UHR 70-1700 - 27 ™...
- Page 28 WHEEL DRIVE SYSTEM FIGURE 3 R1 Voltage Values 0 – 2.5V Reverse 2.5 – 5V Forward This drawing shows additional controller input circuit detail. The R1 pot is shown in the neutral position. Resistance is measured between pot low and pot wiper. FIGURE 4 28 - FORM NO.
-
Page 29: Wheel Drive Troubleshooting Guide
WHEEL DRIVE SYSTEM Low Current A1 Speed Control Pin Key Detail Pin # Wire Color Controller Pin Description & Function Open not used Open not used Vio/Brn Throttle Pot R1 pot high input Throttle Pot R1 pot wiper input KSI (key switch input) : Battery (+) powers up controller logic circuits Auxiliary Driver: Battery (-) output to main control box to turn on (activate) the pad motor &... -
Page 30: Wheel Drive Assembly Removal
WHEEL DRIVE SYSTEM FIGURE 5 WHEEL DRIVE ASSEMBLY REMOVAL WARNING! Disconnect the battery pack by separating the battery connectors (7) whenever servicing the machine. Disconnect the battery pack by separating the battery connectors (7) located underneath the drivers seat. See Figure 5. Pull or pry off the Cover Plate (A) to access the Steering Spindle Retainer Nut (B). -
Page 31: Wheel Drive Motor Removal
WHEEL DRIVE SYSTEM WHEEL DRIVE MOTOR REMOVAL WARNING! Disconnect the battery pack by separating the battery connectors (7) whenever servicing the machine. Follow the Wheel Drive Assembly Removal Instructions. See Figure 6. Place motor assembly upright (tire side down) as shown. Remove the (4) Socket Head Cap Screws (A) that secure the electric drive motor to the motor housing casting. -
Page 32: Drive Wheel Removal
WHEEL DRIVE SYSTEM DRIVE WHEEL REMOVAL WARNING! Disconnect the battery pack by separating the battery connectors (7) whenever servicing the machine. Disconnect battery and block rear wheels. See Figure 7. Using a 5mm hex key wrench remove the (4) Screws (A) that secure the Tire/Hub Assembly (B) to the gearbox out put fl ange. Safely lift or jack the front of the machine 1 –... -
Page 33: Electromagnetic Brake Assembly Removal
WHEEL DRIVE SYSTEM ELECTROMAGNETIC BRAKE ASSEMBLY REMOVAL WARNING! Disconnect the battery pack by separating the battery connectors (7) whenever servicing the machine. Disconnect battery and block rear wheels so that the machine will not roll when the brake is removed. See Figure 8. -
Page 34: Steering Chain Removal And Tensioning
WHEEL DRIVE SYSTEM STEERING CHAIN REMOVAL AND TENSIONING WARNING! Disconnect the battery pack by separating the battery connectors (7) whenever servicing the machine. Turn the master key switch off and separate the Battery Connector Assembly. See Figure 9. From underneath the front of the machine loosen the (4) Screws and push the lower steering column toward the front of the machine. -
Page 35: Potentiometer Removal And Testing
WHEEL DRIVE SYSTEM POTENTIOMETER REMOVAL AND TESTING WARNING! Disconnect the battery pack by separating the battery connectors (7) whenever servicing the machine. Potentiometer Removal See Figure 10. Remove the (5) Screws (A) securing the drive pedal mount assembly to the chassis then carefully lift the pedal assembly up and lay it on its side. - Page 36 FIGURE 10 FIGURE 11 36 - FORM NO. 56043107 - Advolution 2710 / UHR 70-1700 ™...
-
Page 37: Drive Pedal Neutral Adjustment & Pedal Replacement
WHEEL DRIVE SYSTEM DRIVE PEDAL NEUTRAL ADJUSTMENT & PEDAL REPLACEMENT If the drive pedal has been removed or replaced, the neutral position for the pedal will have to be set. Follow the steps below to accomplish this. WARNING! Disconnect the machine’s battery pack connector (7) before servicing. •... -
Page 38: Troubleshooting Guide Electrical
WHEEL DRIVE SYSTEM TROUBLESHOOTING GUIDE ELECTRICAL Symptom Wheel drive motor will not run. Part A (load circuit) 38 - FORM NO. 56043107 - Advolution 2710 / UHR 70-1700 ™... - Page 39 WHEEL DRIVE SYSTEM TROUBLESHOOTING GUIDE ELECTRICAL Symptom Wheel drive motor will not run. Part B (control circuit) FORM NO. 56043107 - Advolution 2710 / UHR 70-1700 - 39 ™...
-
Page 40: Electrical System
ELECTRICAL SYSTEM BATTERIES If your machine shipped with batteries installed do the following: • Check that the batteries are connected to the machine (7). • Turn ON the Key Switch (AA) and check the Battery Indicator (BB). If the green light is ON, the batteries are ready for use. If the green light is OFF, the batteries should be charged before use. -
Page 41: Charging The Batteries
ELECTRICAL SYSTEM CHARGING THE BATTERIES Charge the batteries each time the machine is used for 1 hour or longer, or whenever the Battery Condition Indicator Lights (BB) light up red. To Charge the Batteries... IMPORTANT!: Open the Battery Compartment Cover (13) to provide proper ventilation. Disconnect the Battery Connector Assembly (7) and plug the battery charger into the plug connected to the batteries. -
Page 42: Charging The Batteries (Continued)
ELECTRICAL SYSTEM CHARGING THE BATTERIES (CONTINUED) The following lights indicate the percentage of discharge in the battery pack: Battery Voltage Indication Standard Alternate FIGURE 2 Green 33.5+ 33.7+ Green/Yellow 33.4 33.6 Yellow 32.8 33.4 Yellow/Red 31.9 33.2 31.3 Red Flashing 30.6 32.8 BATTERY TESTING... -
Page 43: Actuator Drive Nut Adjustment
ELECTRICAL SYSTEM ACTUATOR DRIVE NUT ADJUSTMENT This manual section explains the steps for adjusting the drive nut (spring housing) setting for all the pad drive lift actuator motor. Reference the chart below to fi nd the IN & OUT dimensional specifi cation for an actuator motor needing adjustment. Part # Actuator Motor Spring Housing IN Position... - Page 44 FIGURE 5 44 - FORM NO. 56043107 - Advolution 2710 / UHR 70-1700 ™...
-
Page 45: Curtis Controller Diagnostics
ELECTRICAL SYSTEM CURTIS CONTROLLER DIAGNOSTICS: Diagnostics Method A: Uses the machine’s control display LED panel and Horn Indicator Light (FF). FUNCTION OF THE SPEED CONTROLLER STATUS LIGHT AND DISPLAY The Curtis 1228 (36V) speed control will output a fault code if there is a problem associated with the speed control and wheel drive system. See Figure 6. -
Page 46: Speed Control Programming Options
ELECTRICAL SYSTEM STATUS LED FAULT CODES (TABLE 1) STATUS LIGHT EXPLANATION POSSIBLE CAUSE CODE DISPLAY over-/under-temperature cutback 1. Temperature >92°C or < -25°C. 2. Excessive load on vehicle 3. Operation in extreme environments. 4. Electromagnetic brake not releasing. 0 00 throttle fault 1. -
Page 47: Installation Checkout For The Curtis Speed Controller
ELECTRICAL SYSTEM INSTALLATION CHECKOUT FOR THE CURTIS SPEED CONTROLLER SAFETY! The 1228 controller is inherently a high power device. When working around any battery powered vehicle, proper safety precautions should be taken. These include, but are not limited to: proper training, wearing eye protection, avoiding loose clothing and jewelry, and using insulated wrenches. -
Page 48: Functional Overview Of Main Control Board
ELECTRICAL SYSTEM FUNCTIONAL OVERVIEW OF MAIN CONTROL BOARD The primary function of the main control board A1 is to position the burnishing pad with respect to the fl oor surface using a lift actuator motor to maintain the correct pad pressure and current draw of the pad motor. When the pad drive switch (EE) is depressed this will lower the pad deck to the operating position and by activating the drive pedal start the pad motor. -
Page 49: Advolution Programming Modes
ELECTRICAL SYSTEM ADVOLUTION PROGRAMMING MODES Fault Recall Mode / Revision Display: Whenever an electrical system fault is detected by the main control unit, one or more error codes are displayed and stored by the control unit. If it is desired, the error code (if any) from the previous operation of the machine can be recalled for troubleshooting purposes. To recall the last stored error codes perform the following steps: Press and hold the horn switch while turning the key switch on. -
Page 50: Status Display
ELECTRICAL SYSTEM ADVOLUTION PROGRAMMING MODES Status Display: If no over-current faults are present, the status display will show the battery voltage. This display is accurate to within +/- 0.15 volts. Therefore, the voltage displayed may not correlate precisely to a high-accuracy, calibrated voltmeter. The leftmost digit of the display is used to indicate the state of the seat switch and the deck interlock switch inputs. -
Page 51: Low Voltage Cutout Threshold Selection Mode
ELECTRICAL SYSTEM ADVOLUTION PROGRAMMING MODES Low Voltage Cutout Threshold Selection Mode: FACTORY DEFAULT: STD The Advolution is equipped with a low voltage cutout feature to prevent over-discharging the batteries. This feature will automatically shut down the pad motor when the battery voltage falls to the selected threshold. The cutout level is adjustable. The standard setting is 31.5 volts (1.75 volts per cell) and the alternate setting is 33.12 volts (1.84 volts per cell). -
Page 52: Forward Motion Alarm Volume Level Adjustment Mode
ELECTRICAL SYSTEM ADVOLUTION PROGRAMMING MODES Forward Motion Alarm Volume Level Adjustment Mode: FACTORY DEFAULT: 0 (OFF) The control system has the ability to activate a forward alarm signal to alert personnel of the approach of the machine. The volume of this alarm is adjustable from 0 to 9. -
Page 53: Troubleshooting Guide
ELECTRICAL SYSTEM TROUBLESHOOTING GUIDE Symptom No machine functions work. (control circuit) Machines without onboard battery charger. Note :Do all testing with the 5 amp circuit breaker reset, key switch on, emergency switch closed and seat switch activated. Check condition of batteries, cables and make sure battery pack is fully charged. FORM NO. - Page 54 ELECTRICAL SYSTEM TROUBLESHOOTING GUIDE Symptom No machine functions work. (control circuit) Machines with onboard battery charger. Note: The onboard charger must be unplugged from the AC wall outlet for the machine to operate. 54 - FORM NO. 56043107 - Advolution 2710 / UHR 70-1700 ™...
-
Page 55: Component Location
ELECTRICAL SYSTEM COMPONENT LOCATION Item Description Speed Controller Circuit Breaker, 5 Amp (Control) Circuit Breaker, 40 Amp (Traction Drive) Fuse, 150 Amp Horn / Back-Up Alarm Contactor 36V (Pad Motor) Headlight (Optional) Beacon, Warning (Optional) Motor / Drive Wheel Motor (Pad Drive) Actuator, Motor Dust Control Vac Motor (Optional) Potentiometer, 5K... -
Page 56: Wiring Diagram / Schematic
ELECTRICAL SYSTEM - - - - - - FUSE, 150 A. FUSE, 150 A. BATTERY, 36 VDC BATTERY, 36 VDC WIRING DIAGRAM / SCHEMATIC CURTIS 1228 SPEED CONTROLLER CURTIS 1228 SPEED CONTROLLER Item Description VIO/BRN Speed Controller Circuit Breaker, 5 Amp (Control) POT. - Page 57 ELECTRICAL SYSTEM WHT 18-1 RED 2-1 BLK 18-3 BATTERY, 36 Vdc BATTERY, 36 Vdc BLK 2-1 SW SPST SW SPST <NOTE> <NOTE> EMERGENCY STOP EMERGENCY STOP SWITCH, SEAT SWITCH, SEAT MOTOR, DUST CONTROL VAC MOTOR, DUST CONTROL VAC CIRCUIT BREAKER, 40 AMP CIRCUIT BREAKER, 40 AMP CIRCUIT BREAKER, 5 AMP CIRCUIT BREAKER, 5 AMP...
- Page 60 www.nilfi sk-advance.com © 2006...
Need help?
Do you have a question about the Advolution 2710 and is the answer not in the manual?
Questions and answers