Table of Contents
Advertisement
Advertisement
Table of Contents

Related Manuals for Hoover U5063-930


Summary of Contents for Hoover U5063-930
-
Page 2: Save These Instructions
Do not use with damaged cord or plug. If appliance is not working as it should, has been dropped, damaged, left outdoors, or dropped into water, take it to a Hoover Factory Service Center or Authorized Hoover Warranty Service Dealer (Depot). -
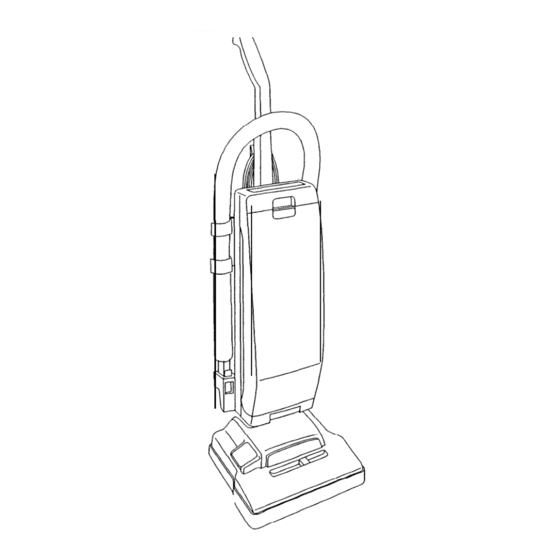
Page 3: Assembling Cleaner
Assembling cleaner It is extremely important to read and fol- low all the instruction steps in order. The assembled cleaner will look like this drawing. If you need assistance with any step of the assembly, call l-800-944-9200 for an automated referral of authorized service outlet locations (U.S. - Page 4 CORD UPPER HANDLE LOWER HANDLE *Do not press against the rod extending from the lower handle. (Fig. 2) If the rod breaks or bends, the cleaner will not work . Do not push handle together with your hands on the pro erl en s o the sections.
- Page 5 PROTECTOR CORD PROTECTOR CORD PROTECTOR ] PROTECTOR 1 Pull cord tight. Do not plug cleaner in until assembly is totally complete.
- Page 6 RAILS RAILS Rock handle side to side while pushing down firmly. Extra pushing effort may be required.
- Page 7 front of handle. (Fig. 11) If bolt will not go through hole easily, check the following: the bracket is properly positioned (see Fig. 9) the handle is pushed completely down (see Fig. 10). back of handle. Hold nut in Note: Only one nut is needed...
- Page 8 very Push hooks into handle. (Fig. 18) Pull...
- Page 9 Make sure all edges of paper bag are completely inside the bag compartment. Break off red tab above ON- Note: If tab has come off during assembly make sure switch is in the OFF position . (down) before plugging cord ON/O into an electrical outlet.
- Page 11 CAUTION: When cleaner is turned on, the agitator brush roll will continue to rotate while cleaner handle is in upright position. Avoid tipping cleaner or setting it on furniture, fringed area rugs or carpeted stairs during tool use.
- Page 12 Cleaner The assembled cleaner will look like the drawing below. description 1. Handle 2. Cord hooks: wrap cord around hooks for storage. The top hook can be rotated right or left for easy cord release. 3. Bag door latch 4. ON/OFF switch: located on side of handle.
-
Page 13: How To Use
How to use To reduce the risk of electric shock, this appliance has a polarized plug (one blade is wider than the other). This plug will fit in a polarized outlet onl one way. If the plug does not fit ully in the outlet, reverse the plug. - Page 14 Signature (Required) Daytime Phone & Area Code Use this form to order HOOVER disposable bags, belts, bulbs, spare tools and air freshener tablets directly from THE HOOVER COMPANY, NORTH CANTON, OHIO. These items will be shipped to your home freight prepaid. They may also be purchased from your local Hoover dealer or Hoover Factory Service Center.
- Page 16 Carpet height adjustment The cleaning of carpet and rugs takes place at the nozzle. It is necessary to raise and lower the nozzle for various carpet pile heights by sliding the nozzle control knob to the correct setting. For ease in sliding knob, the handle should be in the upright position.
-
Page 17: Edge Cleaning
Cleaning lightweight flexible rugs Stand on one end of rug and move cleaner toward other end or edge. Before reaching edge, push down on handle. This will lift up the nozzle (front of cleaner) and will prevent rug from clinging to cleaner. -
Page 18: Cleaning Tools
Cleaning tools The tool set includes a hose, wand(s), crevice tool, furniture nozzle and dusting brush. A. Attach hose to cleaner Turn cleaner OFF before attach- ing or removing hose. With cleaner handle in upright position, open hose door and insert hose connector until locked in position. -
Page 19: How To Clean Tools
Remove obstruction. To continue using tools, re-attach hose to cleaner. If no obstruction is found and a problem persists, contact your Hoover Factory Service Center or an Authorized Warranty Service Dealer (Depot). How to clean tools To clean the hose, wipe off dirt with a cloth dampened in a liquid detergent. - Page 20 For improved cleaning effectiveness and superior filtration, use Genuine HOOVER@ Micro Filtration Type A disposable bags with your cleaner. Regular HOOVER@ Type A disposable bags also fit your cleaner and will provide satisfactory performance. To assure that your cleaner operates at peak...
- Page 21 Close door. The headlight (some models only) What to buy This cleaner uses a 12 volt, wedge Hoover Part base type 912 bulb, How to replace Disconnect cleaner from electri- c a l o u t l e t .
-
Page 22: The Belt
The belt The belt on your HOOVER cleaner causes the agitator to rotate and is important for the effective operation of the cleaner. The belt is located under the bottom plate of the cleaner and should be checked from time to... - Page 23 How to replace Disconnect cleaner from electri- cal outlet. 1. Place handle in operating position and turn cleaner over so bottom side is up. 2. To remove bottom plate, insert end of flat screwdriver into wide area of right-hand slot and push handle of screwdriver to the rear.
- Page 24 7. Remove hood by turning cleaner over and removing nozzle control knob on fromt of hood -- grasp knob and pull up. 8. Place handle in operating position and turn cleaner over. Insert end of flat screwdriver into one of the four slots beside an arrow on bottom of cleaner.
- Page 25 What to buy The agitator may be replaced with either a single or double row of brushes. Single row of brushes - Hoover part No. 48414-051. Double row of brushes -Hoover part No. 48414-049. How to replace Disconnect cleaner from electri- cal outlet.
-
Page 26: If You Have A Problem
The addition of lubricant could cause damage. Do not add lubricant to motor bearings. The agitator is equipped with two ball bearings that should be lubricated periodically by a Hoover Factory Service Center or an Authorized Hoover Warranty Service Dealer (Depot). - Page 27 Service Hoover Warranty Service Dealer (Depot) by: “Vacuum Cleaners - Do not send your cleaner to The Hoover Company in North Canton If further assistance is needed, contact The Hoover Company In Canada, contact Hoover Canada, Burlington, Ontario L7R 4A8, Cleaning Effectiveness Per Amp Rating This is not an Amp rating.
- Page 28 2. Hoover Authorized Warranty Service Dealers (Depot). This warranty does not cover pick up, delivery, or house calls; however, if you mail your appliance to a Hoover Factory Service Center for warranty service, transportation will be paid one way. While this warranty gives you specific legal rights, you may also have other rights which vary from state to state (or province).
- Page 29 0 @)i Hoover and are registered trademarks THE HOOVER COMPANY, NORTH CANTON, OHIO 44720 R2 1 O-96 U5063-/65-/67-/73-930 5651 i-A21...
Need help?
Do you have a question about the U5063-930 and is the answer not in the manual?
Questions and answers