Table of Contents
Advertisement
Service Manual
Washing Machine
Model: DWD-M8051/M8052/M8053
DWD-M1051/M1052/M1053
Caution
: In this Manual, some parts can be changed for improving, their
performance without notice in the parts list. So, if you need the latest
parts information, please refer to PPL(Parts Price List) in Service
Information Center (http://svc.dwe.co.kr).
DAEWOO ELECTRONICS CORP.
http : //svc.dwe.co.kr
S/M No. :
Feb. 2011
Advertisement
Table of Contents

Related Manuals for Daewoo DWD-M8051


Summary of Contents for Daewoo DWD-M8051
-
Page 1: Service Manual
S/M No. : Service Manual Washing Machine Model: DWD-M8051/M8052/M8053 DWD-M1051/M1052/M1053 Caution : In this Manual, some parts can be changed for improving, their performance without notice in the parts list. So, if you need the latest parts information, please refer to PPL(Parts Price List) in Service Information Center (http://svc.dwe.co.kr). -
Page 2: Table Of Contents
AUTO WASHER AUTO WASHER AUTO WASHER AUTO WASHER AUTO WASHER AUTO WASHER AUTO WASHER AUTO WASHER AUTO WASHER AUTO WASHER AUTO WASHER AUTO WASHER AUTO WASHER AUTO WASHER AUTO WASHER AUTO WASHER AUTO WASHER AUTO WASHER AUTO WASHER AUTO WASHER AUTO WASHER AUTO WASHER AUTO WASHER AUTO WASHER AUTO WASHER AUTO WASHER AUTO WASHER AUTO WASHER AUTO WASHER AUTO WASHER AUTO WASHER AUTO WASHER AUTO WASHER AUTO WASHER AUTO WASHER AUTO WASHER AUTO WASHER AUTO WASHER AUTO WASHER AUTO WASHER AUTO WASHER AUTO WASHER AUTO WASHER AUTO WASHER AUTO WASHER AUTO WASHER AUTO WASHER AUTO WASHER AUTO WASHER AUTO WASHER AUTO WASHER AUTO WASHER AUTO WASHER AUTO WASHER... -
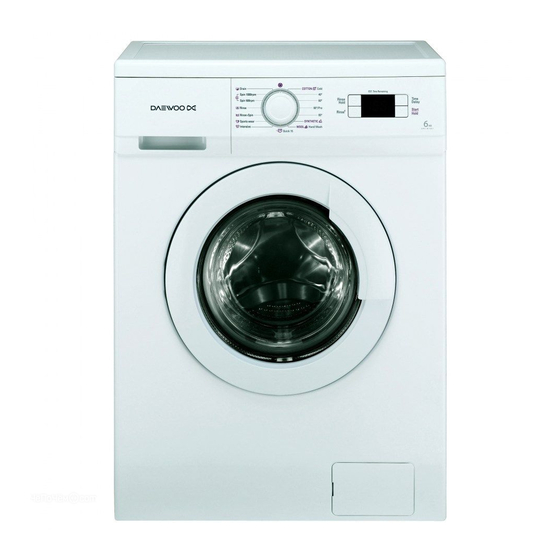
Page 3: Specifications
1. SPECIFICATIONS DWD-M805'S/M105'S INLET HOSE(HOT) (OPTION) INLET HOSE (COLD) DETERGENT CASE POWER CORD CONTROL PANEL DOOR HOSE DRAIN COVER PUMP ADJUSTABLE LEG MODEL DWD-M805'S / M105'S Power Source A.C 220~240V / 50Hz Power Consumption 2000 W Dimension (mm) 595 x 507 x 850 (WxDxH) Maximum mass of textile (kg) 6 kg Unit Weight (kg) -
Page 4: Installation
2. INSTALLATION Removing transit bolts 1. Before operating the washer, remove the transit bolts(3ea) along with the rubber. • If the bolts are not removed, it may cause heavy vibration, noise and malfunction. 2. Unscrew the 3 bolts with the 10mm hex wrench or spanner or cross-tip screwdriver. -
Page 5: Bs Plug Safety Details (For U.k. User)
BS Plug Safety Details (For U.K. User) IMPORTANT THE WIRES IN THIS MAINS LEAD ARE COLOURED IN ACCORDANCE WITH THE FOLLOWING CODE: GREEN AND YELLOW : EARTH BLUE : NEUTRAL BROWN : LIVE This appliance must be earthed As the colours of the wires in the mains lead of this apparatus may not correspond with the coloured markings identifying the terminals in your plug, proceed as follows: The wire which is coloured Green and Yellow must be connected to the terminal in the plug which is marked with the letter E or by the earth symbol... -
Page 6: Installation Of Drain Hose
Installation of drain hose • Never forget to install drain hose before operating your washer. • Open the packing box, and the drain hose is tied at backside of washer. • If you use the laundry tub, Top of laundry tub must be at least 60cm high and no higher than 100cm from bottom of washer. Laundry tub Hose Retainer... -
Page 7: Maintenance
3. MAINTENANCE Before cleaning the washer interior, unplug the electrical power cord to avoid electrical shock hazards. Proper care of your washer can extend its life. This section explains how to care for your washer properly and safely. Cleaning your washer Exterior Interior •... -
Page 8: Cleaning The Water Inlet Filter
Cleaning the water inlet filter. • “IE” error message (refer to troubleshooting guide) will display when the water does not enter the detergent case. • If your water is very hard or contains traces of lime deposit, the water inlet filter may become clogged. And the water leaks from the water inlet. -
Page 9: Cleaning The Detergent Case
Cleaning the detergent case. • In case of residual detergents or fabric softeners have accumulated ; - It should be cleaned with a jet of running water. - If necessary, it can be removed completely from the washing machine. Push point 1 Pull-out 2 Push and pull again •... -
Page 10: Direction For Disassembly
4. DIRECTION FOR DISASSEMBLY DOOR LOCK SWITCH 1 Open the door and remove the clamp door as. 2 Separate the gasket from the cabinet front and remove two screws. 3 Remove the door lock switch from the cabinet front . DRAIN PUMP 1 Separate the cover pump from the cabinet front and 2 Lay the right-side of the washer on the floor. - Page 11 HEATER AND THERMISTOR 1 Separate the plate t as from the washer. 2 Separate the case detergent as and remove two (Remove two screws at rear) screws from panel f. 3 Separate the panel f as from the washer. 4 Separate the cabinet front from the washer. (Remove the clamp door as and 4 screws) 5 Separate connectors from the heater and remove the 6 Remove the earth terminal and loosen the nut by using...
- Page 12 UNIVERSAL MOTOR Firstly, you have to do from 1 to 5 of HEATER AND THERMISTOR DISASSEMBLY. 1 Separate the box inlet as from the washer. 2 Remove the screw of the motor connector. (Remove screws and hose inlet) And separate the connector from the tub. 3 Separate the hose air from the sensor pressure.
-
Page 13: Explode View And Parts List
5. EXPLODE VIEW AND PARTS LIST BOX INLET AS PART NAME PART CODE SPECIFICATION Q'TY REMARK A01 CASE HANDLE 36111T2T00 HIPS, D-MT A02 CASE DETERGENT 36111T2V00 PP, D-MT A03 BOX INLET 3617511700 A04 CAP SOFTENER 3610907800 A05 NOZZLE TOP 3618112000 A06 NOZZLE UNDER 3618112100 A07 HOSE WATER SUPPLY... - Page 14 PANEL FRONT AS PART NAME PART CODE SPECIFICATION Q'TY REMARK B01 PANEL F 36142T3900 B02 BUTTON DIAL 3616647500 B03 PCB AS PRPSSWC280 D-MU805 PCB AS(NVDE,DUAL&BB) PRPSSWC281 D-MU805 PCB AS(NVDE,COLD&NB) PRPSSWC282 D-MU805 PCB AS(NVDE,COLD&BB) PRPSSWC283 D-MU805 PCB AS(NVDE,DUAL&NB) PRPSSWC285 D-MU805 PCB AS(VDE,DUAL&BB) PRPSSWC286 D-MU805 PCB AS(VDE,COLD&NB) PRPSSWC287...
- Page 15 CABINET FRONT AS PART NAME PART CODE SPECIFICATION Q'TY REMARK C01 CABINET F 361081280T SECD T0.7 C02 NUR HEX 7S627W50X1 NUT FLANGE M5x0.8P MFZN C03 SWITCH DOOR LOCK 3619047100 DL-LC BITRON-3P 250V16A C04 SCREW TAPPING 3616029950 TTS " S" HEX F/L 4x8 C05 SCREW TAPPING 7122401408 T2S TRS 4x14 SUS...
-
Page 16: Tub Assembly
TUB AS EXPLODE VIEW AND PARTS LIST... - Page 17 PART NAME PART CODE SPECIFICATION Q'TY REMARK D01 TUB REAR AS 3618830911 D-MT'S TUB REAR+BEARING HOUSING C/CORE D02 BEARING INNER 3616304700 6205ZZ SHENS D03 BEARING OUTER 3616304800 6204ZZ SHENS D04 WATER SEAL 361A600300 D05 GASKET TUB 3612324100 PI=4.5, L=1650, EPDM D06 FIXTURE HEATER 3612009400 SUS, PI=2...
-
Page 18: Cabinet Assembly
CABINET AS EXPLODE VIEW AND PARTS LIST... - Page 19 PART NAME PART CODE SPECIFICATION Q'TY REMARK E01 CABINET 361081WA00 D-MU80 SGCC(GI) 0.7T COLD COLD 361081WA01 D-MU80 SGCC 0.7T COLD+HOT COLD+HOT E02 FRAME LOWER 36122UDR00 SGCC T=0.6 E03 BASE U L 3610394500 SGCC1.2T LEFT BASE U R 3610394600 SGCC1.2T RIGHT E04 LEG ADJUST AS 3617703800 FOOT(BUTYL)+SPECIAL NUT(SCP1)
-
Page 20: Functions Of The Control Panel
6. FUNCTIONS OF THE CONTROL PANEL D-M805'S/M105'S Program selector Indicator light The respective indicator lights up, when the For switching the washing machine on and off required program segment runs or ‘Time and for selecting the program. delay’ is selected. Can be rotated in both direction. -
Page 21: Functions Of The Controller
7. FUNCTIONS OF THE CONTROLLER SEQUENCE CHART (DWD-M805'S/M105'S) Cotton COLD 40 °C 60 °C 60 °C PRE 95 °C Division Progress Time small small small small small Sensing 20sec. ■ ■ Water Supply 2min. Pre Wash 10min. ■ ■ 8min. ■... - Page 22 Wool Intensive Spin Quick Inten Sports Rinse Division Progress Time Synthetic &Hand standard + Spin Rinse Drain sive wear wash course Sensing 20sec. ■ Water Supply 2min. Pre Wash 10.min. ■ 8min. ■ Drain 1min. ■ B-Spin 2min. ■ Middle Spin 3min.
-
Page 23: Function Of The Convenient Service
8. FUNCTION OF THE CONVENIENT SERVICE The test mode of the load movement You can check the PCB ASS'Y and the condition of each load movement simply. • The method to test the load movement 1 Plug the power cord. 2 Turn the program selector to arbitrary program (except for OFF position). -
Page 24: Troubleshooting Guide
9. TROUBLESHOOTING GUIDE This washer is equipped with automatic safety function which detects and diagnoses faults at an early stage and copes properly. When the washer does not operate properly, check the following points. Simply Check Guide Problem Cause Solution Program dose not start. - Page 25 DISPLAY ERROR MESSAGE MESSAGE ERROR CAUSE SOLUTION The water tap is closed. Open the water tap. The filter of the valve inlet is clogged. Clean the filter of the valve inlet. The valve inlet is an inferior product or broke Change the valve inlet.
- Page 26 MESSAGE CAUSE ERROR SOLUTION The water is supplied continuously due to an OVERFLOW Change the valve inlet. inferior valve inlet. ERROR The valve inlet is normal, but the water level Change the water level sensor (sensor sensor (sensor pressure) is inferior. pressure).
-
Page 27: Wiring Diagram
10. WIRING DIAGRAM WIRING DIAGRAM... - Page 28 DAEWOO ELECTRONICS CORP. 1-2, Jeo-dong 1(il)-ga, Jung-gu, Seoul, Korea C.P.O. BOX 8003 SEOUL, KOREA TELEX: DWELEC K28177-8 CABLE: “DAEWOOELEC” S/M NO. : PRINTED DATE: Feb. 2011...
- Page 29 V V I I S S I I O O N N C C R R E E A A T T I I V V E E , , I I N N C C . . 서울 종로구 통의동 6번지 이룸빌딩 4층 담 당 정재열 님 M O D E L DWD-M8051/M8052/M8053 DWD-M1051/M1052/M1053 (S/M) 접 수 2007.06.01 총 31페이지 MEMO 총 28p 11.02.21-전체 신규 28p 11.03.18-19p, 20p 수정_ 신규...
Need help?
Do you have a question about the DWD-M8051 and is the answer not in the manual?
Questions and answers