C. Crane CCWiFi Instruction Manual
Internet radio
Hide thumbs
Also See for CCWiFi:
- Instruction manual (48 pages) ,
- Firmware installation & usage manual (4 pages) ,
- Instruction manual (25 pages)
Table of Contents
Advertisement
Quick Links
Download this manual
See also:
Instruction Manual
Advertisement
Table of Contents

Related Manuals for C. Crane CCWiFi


Summary of Contents for C. Crane CCWiFi
-
Page 1: Internet Radio
Internet Radio INSTRUCTION MANUAL PLEASE READ ALL THE INSTRUCTIONS COMPLETELY BEFORE USE AND SAVE THIS MANUAL FOR FUTURE REFERENCE... -
Page 2: Unpacking
1001 Main St, Fortuna, CA 95540 Phone: 1-800-522-8863 Web: All rights reserved. No part of this booklet may be reproduced, in any form or ccrane.com means whatsoever, without permission in writing from C. Crane Company, Inc. Page 2 CC WiFi... -
Page 3: Table Of Contents
Table of Contents Unpacking ................2 Location of Controls ............4-5 Getting Started Turning the Radio On ..........6 Scanning for Wireless Networks ......7 Connecting to a Wireless Network ......7 Entering Your WEP or WPA Key ......8 Connecting to Network Using Ethernet Cable .. -
Page 4: Location Of Controls
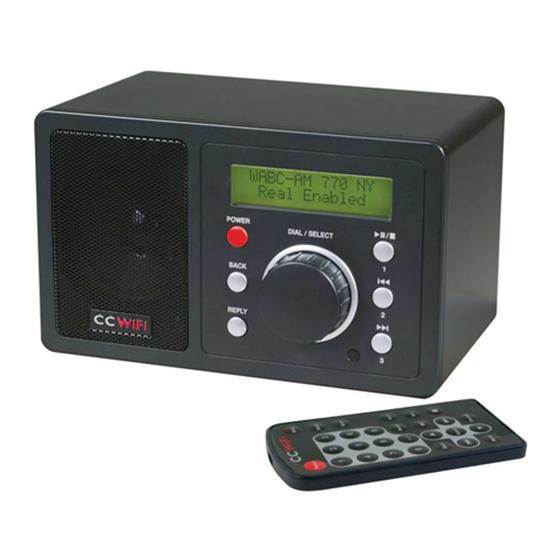
Location of Controls — Front and Back of Radio LCD Display DIAL/VOLUME/SELECT PLAY/PAUSE/STOP or REPLY PRESET #1 BACK PREVIOUS or PRESET #2 POWER ON/OFF NEXT or PRESET #3 Speaker Remote Sensor DC Power Jack Headphone Jack Line Out Jack Ethernet Jack Page 4 CC WiFi... -
Page 5: Location Of Controls
Location of Controls — Remote Control Buttons 23-26 and 29-30 are used only in Media Player mode while playing tracks from your computer. POWER: Switch radio STOP: Stop track play. Press ON/OFF and hold to delete a track from the playlist 1-9: Store presets and recall functions NEXT: Play next track... -
Page 6: Getting Started
Getting Started – Turning On Your WiFi Radio Note: Configuring a WiFi radio is similar to navigating through a cell phone menu. Plug the power adapter cube into a 120V AC power outlet. Connect the power adapters small plug into the jack on the back of the radio that is labeled “DC IN 7.5V”. -
Page 7: Scanning For Wireless Networks
Scanning for Wireless Networks When <Scan for Networks> is displayed, press “SELECT” by press- ing “in” the main dial (the main dial should click when pressed in). The display will show: Scanning If the radio cannot find any wireless networks, then the display will show: No networks found... -
Page 8: Entering Your Wep Or Wpa Key
Connecting to a Wireless Network To connect to your wireless network, align your network name between the brackets and select it by pushing the dial in. Need Help?: refer to help page 28 for help finding which SSID (Network Name) is yours. If the display then continue shows:... - Page 9 Entering Your WEP or WPA Key (Wireless Password) center of the display. Rotate the dial and you will see how the center character is always separated from the other characters. Continue rotating the dial until the first character of your WEP or WPA password is in the center of the display.
-
Page 10: Connecting To Network Using Ethernet Cable
LAN port on your router. The LAN ports are the ones typically numbered 1-4 on the back of your router. Note: Ethernet cables can be purchased from C. Crane Company or your local electronics store. Page 10 CC WiFi... -
Page 11: Choosing A Radio Station
Connecting to a Network Using Ethernet Cable (optional) 2. Connect the opposite end of the Ethernet cable to the Ethernet port on the back of your radio. 3. Plug in the power cord to the radio. After a few seconds the connection light will flash indicating a good connection After the radio successfully connects to your router it will automatically go to the “primary menu”... - Page 12 Choosing a Radio Station station, refer to help page 31. 3. After selecting a “Location” or “Genre”, turn the dial to view all locations or genres. Selections are listed in alphabetical order. Press the dial to continue into the selected menu. By Location: <...
-
Page 13: Changing The Volume
Choosing a Radio Station Example: < > KGO-AM 810 Connecting / Followed by < > KGO-AM 810 Buffering 50% Once the station is fully buffered, it will begin to play. You may need to turn up the volume by using the same dial. When a station is playing, the following information will show on the display (for example): Station Name:... -
Page 14: Play A Stored Radio Station Preset
Store a Radio Station as a Preset “Assigned to Preset”. B. Using the Remote Control to Store Presets 1-9. While a radio station is playing, press and hold the preset number on the remote control that you want the station to be stored to. After three seconds the display screen will show “Assigned to Preset”. -
Page 15: Setting The Time And Date
Setting the Time and Date Note: At any point, you can use the BACK button to start over at the previous screen. 1. If you are currently listening to a radio station, briefly press the dial once to access the primary menu. You can also access the primary menu by repeatedly pressing the BACK button. -
Page 16: Setting The Alarm
Setting the Time and Date Set Date 01 Jan 2008 8. When finished, the radio will show “Time and Date Set”. Time and Date Setting the Alarm Note: At any point, you can use the BACK button to start over at the previous screen. - Page 17 Setting the Alarm Disable All < > 1 OFF 5. Turn the dial until the hour setting is correct — press the dial to select. 6. Turn the dial until the minute setting is correct — press the dial to select.
-
Page 18: Setting The Sleep Timer
Setting the Sleep Timer With the sleep timer enabled, the internet radio will automatically switch itself off after a set amount of time. Note: At any point, you can use the BACK button to start over at the previous screen. 1. -
Page 19: Media Player Functions
Setting the Sleep Timer Sleep Timeout < > 00:15 “Timer Set” will show in the display indicating that the radio will play for the selected amount of time before switching itself off. Timer Set Media Player Functions Requirements In order to play the music files you have stored on your PC via the Media player, you must ensure the following: 1. -
Page 20: Windows Shares
Media Player Functions Accessing a Computers Stored Audio Note: At any point, you can use the BACK button to start over at the previous screen. 1. If you are currently listening to a radio station, briefly press the dial once to access the primary menu. You can also access the primary menu by repeatedly pressing the BACK button. - Page 21 Media Player Functions B. Using “UPNP Servers” method to access stored audio: This method scans for Universal Plug and Play (UPNP) servers on the network. UPNP servers gather media and distribute to other net- work devices. If using Microsoft Windows XP or Windows Vista, it is possible to use Windows Media Player 11 as your UPNP server.
- Page 22 Media Player Functions 3. Turn the dial to the desired artist — press the dial to select. 4. Turn the dial to the desired album — press the dial to select. 5. Turn the dial to the desired audio track — press the dial to select and the track will begin to play.
- Page 23 Media Player Functions Browsing the List of Queued Tracks Press the BROWSE button on the remote control. The name of the track that is currently playing will be listed first. Turn the dial clockwise or press the ▼ button on the remote control, to view all the tracks list- ed in the queue.
-
Page 24: Configure Menu Options
Configure Menu Options To access the “Configure” menu follow these steps: 1. Briefly press the dial once to access the primary menu. You can also access the primary menu by repeatedly pressing the BACK button. The Primary menu contains contains four options: “Stations”, “Configure”, “Media Player”, and “Alarm Clock”. - Page 25 Configure Menu Options you will lose all your presets, clock settings, and wireless network connection settings. <Register> This option will display a key that can be used to register the radio on the Reciva Customer Portal. <Clock Set Up> Use this option to set the time, date and clock format. See “Setting the Time and Date”...
-
Page 26: Configuring "My Stuff
Configuring “My Stuff” Registering an account on Reciva's website: 1. Open Recivaʼs website, http://www.reciva.com, from your Internet browser on your computer. 2. Click on the “My Account” link and follow the on-screen instructions to register an account. Please note, during the registration process, a validation code will be sent to you via email. -
Page 27: Adding A Custom Stream To "My Streams
Adding a Custom Stream to “My Streams” 1. Once you are logged into your Reciva website account, you can add custom internet radio streams to the “My Streams” section, which is listed under the “My Account” section. 2. Clicking on “My Streams” will prompt you to enter the stationʼs name and its media stream URL. -
Page 28: Help
Help Pages — Wireless Network Help “No Networks Found” shows after scanning for wireless net- works: 1. Sometimes your wireless network will not show on the first scan. Try scanning for networks again on your radio. 2. Check the LED lights on the front of your wireless router. Be sure that the “power”... - Page 29 It may be necessary to call your inter- net service provider for help repairing your internet connection. 6. Check to see if the radio will work using an Ethernet cable. If still no success, then call C. Crane (800-522-8863) for troubleshooting assistance. CC WiFi...
- Page 30 2. Your Ethernet cable may be damaged or incompatible. Use a “Straight Through” Cat5 or Cat6 Ethernet Cable. You can purchase Ethernet cables from C. Crane or your local electronics store. Having Trouble Connecting to a Network using an Ethernet Cable: 1.
- Page 31 Help Pages — Radio Station Help Having Trouble Playing a Radio Station: 1. If you are unable to play all radio stations, the radio may have lost connection to your router. Unplug the radioʼs power cord momen- tarily and reconnect. 2.
- Page 32 Help Pages — Using the WiFi Radio as a Media Player 1. Be sure the computer is connected to the same router as the My WiFi Radio Can’t Find My PC After Scanning: radio. 2. Your PC may not show when scanning for “Windows Shares” because “Simple File Sharing”...
-
Page 33: Safety Instructions
2) DISCONNECT THE RADIO IN CASE OF MALFUNCTION If you smell or notice smoke, disconnect the AC Adapter immediately, taking care to avoid burns. Contact C. Crane Company or their repre- sentative for inspection and service before any future operation. Only use the AC-DC Adapter recommended with the unit and replace it if wires become frayed or exposed. -
Page 34: Menu Flow Chart
Menu Flow Chart WiFi definitions can be found at www.ccrane.com/WiFiDefs Page 34 CC WiFi... - Page 35 Menu Flow Chart CC WiFi Page 35...
-
Page 36: Location Of Cc Wifi Radio Serial Number
Location of Your CC WiFi Radio Serial Number From the “Primary Menu” of the CC WiFi Radio, follow this path to find your serial number: CONFIGURE > VERSION > SERIAL NUMBER. Record your serial number here for future reference: This product contains software licensed under version 2 of the GNU public license and version2.1 of the GNU Lesser Public License, The source code for this software is available from: http://www.reciva.com/gpl/...
Need help?
Do you have a question about the CCWiFi and is the answer not in the manual?
Questions and answers