Table of Contents
Advertisement
Quick Links
Advertisement
Table of Contents

Subscribe to Our Youtube Channel
Related Manuals for Cal Flame 2009 year


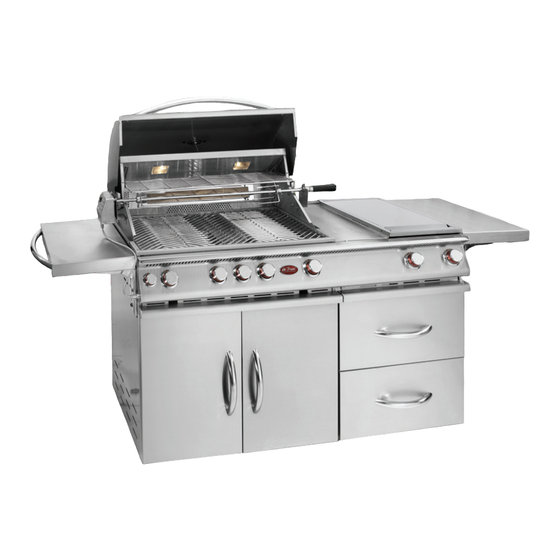
Summary of Contents for Cal Flame 2009 year
- Page 1 LTR20091038, Rev. E 8/18/09...
-
Page 2: Table Of Contents
Copyright 2008-2009 LMS, Inc. All rights reserved. Duplication without written consent is strictly prohibited. California Proposition 65 Warning: Chemicals known Cal Flame™ is registered trademark. to the State of California to cause cancer, birth Due to continuous improvement programs, all models,... -
Page 3: Safety Instructions
• Do not use an extension cord to supply power to cover. your Cal Flame™ grill or cart. Such use may result • The area surrounding your new grill should be in fire, electrical shock or other personal injury. Do kept clean and free from flammable liquids and not install a fuse in the neutral or ground circuit. -
Page 4: Maintenance And Repair
• Never line the grill or side burners with aluminum • Only use dry pot holders and do not use a towel or foil. other bulky cloth in place of pot holders. Moist or damp pot holders used on hot surfaces can cause •... -
Page 5: Installation / Assembly
Cabinet Cut-out Dimensions qualified installers and service technicians to ensure proper operation and prevent accidents. Your Cal Flame™ grill is designed for easy installation When planning your Cal Flame grill or cart location, into a non-combustible enclosure. The supporting deck access to gas lines and 110V power supplies should or counter must be flat and level. - Page 6 Cut-out for flat drop-in grill and drip Model Number Description Width Depth Height tray BBQ08874F 4 Burner Flat Drop In Grill 37 ¾” 22 ¾” 8 ¾” DEPTH WIDTH BBQ04103034 Drip tray cut-out 21 ¾” 1 ¾” 5” 6 ½” GRILL CUT-OUT DRIP...
-
Page 7: Gas Requirements And Connection
If you do not have an updated filler valve on your existing propane tank, you will need to purchase one at your local hardware store. Without it you will not be able to attach your tank to your Cal Flame™ grill or refill the tank at your local propane refill station. -
Page 8: Lp Gas
LP Gas Tank Requirements For plumbed-in LP installation, use a convertible regulator and set it for LP gas. Maximum line pressure for plumbed-in propane is 14” WC (3.5 kPa). Minimum line pressure for propane is 11” WC. The grill unit must be used with the gas pressure regulator. -
Page 9: Natural Gas
0.5 psi (3.5 kPa). Your Cal Flame™ grill for use with natural gas comes equipped with its own regulator that MUST NOT be removed. If, this regulator needs to be replaced use only the type specified by Cal Flame™... -
Page 10: Installing The Transformer
Installing the Transformer All grills with electrical components such as lights or a convection fan will require the transformer to be installed and plugged in before you can use it. This needs to be done before the grill is inserted in the island or modular cart. When the transformer is attached to the grill chassis, use care in placing the grill in the island cutout to avoid hitting the transformer. -
Page 11: Installing Grills In Barbecue Islands
Installing the Rotisserie Installing Grills in Barbecue Islands Attach the two brackets to the sides of the grill, one on each side, using two screws as shown below. You will need a second person to help you to Slide the rotis motor on one of the brackets as avoid damaging the grill, the transformer, or shown below. -
Page 12: Installing Side Burners
Installing Side Burners Connect the flexible hose (male end) to the pipe tee. Assemble a 3/8” pipe nipple to the 3/8” pipe Install and secure the side burner into the island tee using Teflon tape or pipe sealant. Use only by simply setting it in place. -
Page 13: Using Your Grill
Do not use grill, side shelves, cabinets, Remember to use your Cal Flame grill safely by or any area around grill to store flammable following these reminders: materials. -
Page 14: Lighting The Grill
Lighting the Grill Each time you light the grill, check the following: • Inspect the hose before using the grill. If there attached to the regulator before each is excessive abrasion or wear, or if the hose is use . cut, it must be replaced prior to using the grill. -
Page 15: Basic Grill Operation
Basic Grill Operation Turn the control knob to HIGH and preheat the Before lighting, make sure all burner controls are off. grill for 15 minutes. Close the top cover during Do not attempt to light the burners if the smell of the appliance preheat period. -
Page 16: Cooking With A Convection Grill
Cooking with a INTAKE VENTS INTAKE VENTS Convection Grill EXHAUST VENTS HEAT THAT IS DRAWN IN FROM THE BACK. IT IS THEN REDISTRIBUTED A convection grill has an internal fan that circulates heated air evenly throughout the grilling area when the hood is closed. Cooking in this way distributes heat more efficiently so you no longer have to be concerned with “hot spots”... -
Page 17: Using The Deep Fryer Helper
Using the Deep Fryer Helper Cooking with hot oil over an open flame can be dangerous. To make your experience with the Deep Fryer Helper an enjoyable one, you need to take these precautions and follow the directions below . Setting up the Deep Fryer Helper Remove two grates (left or right side) and and the flame tamers (the angular metal pieces covering the burners). - Page 18 about 30 minutes. Wait until the thermometer Correct shows the oil at the optimum frying temperature, between 350° - 375° F. DO NOT ALLOW THE OIL TEMPERATURE TO EXCEED 450° F! NEVER USE THE FRYER WITH A BURNER SET TO HIGH. Add food to the fry basket and place the basket into the oil.
-
Page 19: Turning On And Off The Lights And Fan
The ON / OFF switch controlling your halogen light is located at the control panel on the front lower left side. Certain models of the Cal Flame grill are equipped with either one or two halogen light. Your grill is equipped with a grounded (3 prong) -
Page 20: Cleaning And Maintenance
Cleaning and Maintenance To ensure safe and proper maintenance, we recommend you follow these directions carefully. Clean internal parts of the grill regularly as determined by the amount of use and foods cooked. The entire grill should be cleaned at least once a year. In addition, keep the area around your grill or cart clear and free from combustible materials, gasoline, and other flammable vapors and liquids. -
Page 21: Cleaning The Interior Of Your Grill
Cleaning the Interior of Your paper towel, polish the appliance by rubbing with the grain until excess liquid is removed and the surface Grill shines. It should not be oily to the touch, however some residue is acceptable. Thoroughly clean stains, food, and grime using Some people have reported that using lemon oil a sponge or damp cloth with warm water and a products such as Old English furniture polish is... -
Page 22: Cooking Grates
DO NOT use oven cleaners or abrasive cleaners on (See your local Cal Flame dealer for details.) The cover enameled surfaces. They may damage the finish, will help protect your cart or grill from detrimental causing accelerated wear. -
Page 23: Light Bulb Replacement
Light Bulb Replacement WARNING: Never attempt to replace a light bulb when the grill is in use. Serious burns will result. WARNING: Never touch halogen bulbs with your bare fingers. Use a tissue or a small piece of paper to handle bulbs. Oils from your hands will damage halogen bulbs. -
Page 24: Troubleshooting
Appendix Troubleshooting Problem: Smell of gas is present Solution: Check for loose connections in the gas line. Perform a leak test following the procedure described in this manual. Problem: Burner does not ignite Solution: Use the following procedure with the figure below. Check the position of the sparker tip. - Page 25 • Replace all cotter pins. • Replace cooking components and grease collectors. If an obstruction is suspected in the control valve, contact your local Cal Flame dealer for assistance. Problem: Misalignment of Igniter on Burner Solution: •...
-
Page 26: Converting From Lp To Ng
Supply (L .M .S .) will not be held responsible for an improperly converted gas grill . All Cal Flame grills are manufactured as standard liquid propane (LP) grills and can be converted to burn natural gas (NG). There are two steps required to convert a grill from LP to NG. - Page 27 Step 2: Changing the burner orifices Replace the infrared burner orifices You will need: Using a 13mm wrench, remove the orifice for the infrared burner. • 13mm open end Apply pipe compound to the fitting threads where you will place the wrench new orifice. • One #50 orifice (for single infrared burner) Screw on the correct orifice for your grill until it is finger tight.
-
Page 28: Installing And Replacing Infrared Burners
Installing and Replacing Infrared Burners Take the burner out of the grill and store it in a Disconnect or shut off the liquid propane or safe and dry place. natural gas line connect to the grill. Wait until the burners cool down. Install the infrared burner. -
Page 29: Replacement Covers
Replacement Covers Cover Part Hardware Model Number Cover Size Side burner covers Standard single flat 852P CVRSBR050 11” x 17 1/4” x 5 1/2” Standard side by side 953P CVRSBR052 24 1/4” x 19 1/2” x 6 1/4” Deluxe single side 898P CVRSBR054 13”... -
Page 30: 2009 Warranty
Extent of Warranty This 2009 Cal Flame Warranty is only valid on Cal Flame models delivered in the United States or Canada and extends through the selling dealer to the original purchaser at the original site of installation. This warranty becomes valid at time of purchase and ends either by specified time-frame listed above or upon owner transfer or relocation. -
Page 31: Customer Service
This Limited Warranty applies only to barbecues CA 91766 or call (800) 225-7727. normally used for personal, family, or household See your Cal Flame barbecue dealer for a copy of the purposes. applicable warranty, details and any questions you This Limited Warranty specifically excludes commercial may have regarding the warranty coverage on your barbecue grills or carts. - Page 32 Locating the product serial number The serial number of your Cal Flame grill is located on the back and is visible when the hood is down. You will need this number to properly register your grill or cart and activate coverage. Write this information in the space provided below.
Need help?
Do you have a question about the 2009 year and is the answer not in the manual?
Questions and answers