Advertisement
Quick Links
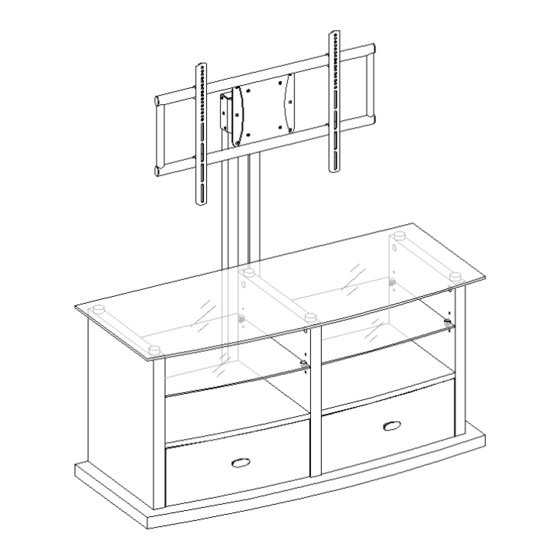
Flat Panel Console with Swinging Floater
Model # WMCPRO-6
2 ADULTS REQUIRED FOR ASSEMBLING
If you have any questions regarding assembly or if parts are missed, do not return this item to the
store where it was purchased. Please call our customer service number and have your instructions
and parts list ready to provide the model name, part name or factory number:
1-866-942-5362
ONLINE: www.whalenstyle.com
THIS INSTRUCTION BOOKLET CONTAINS IMPORTANT SAFETY INFORMATION.
PLEASE READ AND KEEP FOR FUTURE REFERENCE.
Whalen Furniture Mfg., Inc.
8:30 a.m. - 4:30 p.m. PST, Monday - Friday
Video Instruction Guides
Go to http://whalen.showuhow.com to view step-by-step instructional
videos for assembling and installing your product. Enter the following
product number on the ShowUhow homepage.
WMCPRO-6
LOT NUMBER:
DATE PURCHASED: /
EMAIL: parts@whalenfurniture.com
Page 1
Factory No. 105-15491
/
Advertisement

Related Manuals for Whalen WMCPRO-6


Summary of Contents for Whalen WMCPRO-6
- Page 1 8:30 a.m. - 4:30 p.m. PST, Monday - Friday ONLINE: www.whalenstyle.com EMAIL: parts@whalenfurniture.com Video Instruction Guides Go to http://whalen.showuhow.com to view step-by-step instructional videos for assembling and installing your product. Enter the following product number on the ShowUhow homepage. WMCPRO-6 THIS INSTRUCTION BOOKLET CONTAINS IMPORTANT SAFETY INFORMATION.
-
Page 2: Quality Guarantee
Should this product be defective in workmanship or materials or fail under normal use, we will repair or replace it for up to one (1) year from date of purchase. Every Whalen Furniture product is designed to meet your highest expectations. We guarantee that you will immediately see the value of our fine furniture. -
Page 3: Before You Begin
Model # WMCPRO-6 Important Before you begin: Open, identify and count all parts prior to assembly. Lay out on a smooth and non-abrasive surface. You will need the parts identified on page 4, 5 & 6 of this instruction manual. - Page 4 Model # WMCPRO-6 Parts and Hardware List Please read completely through the instructions and verify that all parts listed are present before beginning assembly. A-Left Side Panel (1) B- Right Side Panel (1) C- Divider Panel (1) D- Left Fix Shelf (1)
- Page 5 Model # WMCPRO-6 Parts and Hardware List Please read completely through the instructions and verify that all parts listed are present before beginning assembly. N- Drawer Back Panel (2) O- Left Drawer Bottom Panel (1) O1- Right Drawer Bottom Panel (1)
- Page 6 Model # WMCPRO-6 Parts and Hardware List Please read completely through the instructions and verify that all parts listed are present before beginning assembly. (10) Small Cam Lock (11) Small Cam Bolt (12) Large Wooden Dowel (13) Small Wooden Dowel...
- Page 7 Model # WMCPRO-6 Assembly Instructions Note: Please do not fully tighten all bolts until you finish assembling all parts, then go back and fully tighten all bolts, this will make it easier during assembly of unit. 1. Unpack the unit and confirm that you have all the hardware and required parts listed.
- Page 8 Model # WMCPRO-6 Assembly Instructions 6. Insert the Large Wooden Dowels (12) into the bottom holes in the Left Side Panel (A), Right Side Panel (B), Divider Panel (C) and both Back Panels (G). DO NOT put dowels in the holes with threaded inserts.
- Page 9 Model # WMCPRO-6 Assembly Instructions 10. Insert the Large Cam Locks (8) into the upper holes on the Left & Right Side Panel (A & B) and Divider Panel (C). Make sure that all the arrows on the Cam Locks are pointing up. See detail #3.
- Page 10 Model # WMCPRO-6 Assembly Instructions 13. Pick up one Drawer Back Panel (N) and attach 4 Small Wooden Dowels (13) into the middle holes on both sides with a small amount of Glue. DO NOT put dowels in the Cam Bolt holes.
- Page 11 Model # WMCPRO-6 Assembly Instructions 16. Insert 4 Small Wooden Dowels (13) into front side holes of last assembly as guide, attach Left Drawer Front Panel (H) in place using 4 Small Cam Locks (10) and Small Cam Bolts (11) as shown in detail #5. (Refer to page #3 cam lock system operation supplement).
- Page 12 Model # WMCPRO-6 Assembly Instructions 18. Repeat the steps to install the Right Drawer with the remaining drawer parts. 19. Insert the assembled drawers into TV Console. Extend ball bearing cart all the way to the end of the slides (in both sides), and align the slides on the drawer with the slides on the unit and push it carefully inside until stop, as shown in detail #6.
- Page 13 Model # WMCPRO-6 Assembly Instructions 21. In case of uneven floor, simply tilt the unit back and raise or lower Floor Levelers (16) by hand to correct tilting. As shown in detail #7. The table top configuration is ready for use now.
- Page 14 Model # WMCPRO-6 Assembly Instructions 22. Align and attach Spine (R) to the Divider Panel (C) and Bottom Panel (F) with six 2 1/4” Bolts (1) through Lock Washers & Small Flat Washers (4 & 5) through the holes of Spine into place.
- Page 15 Model # WMCPRO-6 Assembly Instructions Note: There are two mounting options included in this swinging floater TV console: 1. Mounting Plate; 2. XYZ Mounting Frame to accommodate random hole patterns. 24. For LCD 32” or smaller you can mount your LCD directly to the Deluxe Bracket with Mounting Plate (S), using the appropriate Bolts through the Lock Washers and Flat Washers through the proper holes of Mounting Plate and then into the TV.
- Page 16 Model # WMCPRO-6 Assembly Instructions Note: For Plasma and LCD TVs larger than 32”, you must use the XYZ Mounting Frame (T) provided. The XYZ Mounting Frame will accommodate large LCD without VESA Hole Patterns and Plasma TV’s with Random Hole Patterns.
- Page 17 Model # WMCPRO-6 Mounting Monitor Bracket to a television with a flat back Note: For televisions with a curved back or recessed back proceed directly to step #29. 26. Please refer to detail #11 & 11A to determine the correct size bolt your TV requires by several try.
- Page 18 Model # WMCPRO-6 Mounting Monitor Bracket to a television with a curved / recess back 29. Please refer to detail #12 to determine the correct size bolt your TV requires by several try. If you are unable to find the correct bolt consult a local hardware store.
- Page 19 Model # WMCPRO-6 Assembly Instructions 32. Now you can hang your television onto the XYZ Mounting Frame (T). For additional safety please screw two 3/4” Bolts (2) into the upper hooks of Monitor Brackets (U) to prevent TV from falling. See detail #13.
-
Page 20: Tipping Restraint Hardware
Model # WMCPRO-6 TIPPING RESTRAINT HARDWARE Note: We have included one Tipping Restraint Hardware bag for this unit. When properly installed, this restraint can provide protection against the unexpected tipping of the unit due to small tremors, bumps or climbing. We strongly recommend mounting this hardware to a wall stud and your unit when assembling and using your console.
Need help?
Do you have a question about the WMCPRO-6 and is the answer not in the manual?
Questions and answers