Advertisement
Available languages
Available languages
Quick Links
If you have any questions regarding assembly or if parts are missing, DO NOT return this item to the
store where it was purchased. Please call our customer service number and have your instructions
and parts list ready to provide the model name, part name or factory number:
Pacific Standard Time: 8:30 a.m. - 4:30 p.m., Monday - Friday
Or visit our web site 24 hours a day, 7 days a week for product assistance at
THIS INSTRUCTION BOOKLET CONTAINS IMPORTANT SAFETY INFORMATION.
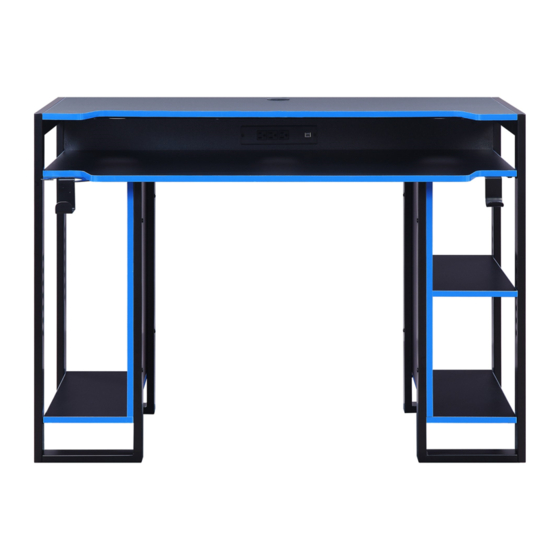
Gaming Desk
Model # WHA-10005
ADULT ASSEMBLY REQUIRED
www.whalenstyle.com
Or e-mail your request to parts@whalenfurniture.com
PLEASE READ AND KEEP FOR FUTURE REFERENCE.
Date 2019-09-16
866-942-5362
Rev. 0001-A
LOT NUMBER:
DATE PURCHASED: /
/
Advertisement

Related Manuals for Whalen WHA-10005


Summary of Contents for Whalen WHA-10005
- Page 1 LOT NUMBER: DATE PURCHASED: / Gaming Desk Model # WHA-10005 ADULT ASSEMBLY REQUIRED If you have any questions regarding assembly or if parts are missing, DO NOT return this item to the store where it was purchased. Please call our customer service number and have your instructions...
-
Page 2: Special Note
M A X I M U M R E C O M M E N D E D W E I G H T L O A D S MANUFACTURER: Whalen Furniture Manufacturing CATALOG: Gaming Desk MODEL # WHA-10005 MADE IN CHINA MAXIMUM LOAD 90.8 kg / 200 lb. - Page 3 IMPORTANT Before you begin: Open, identify and count all parts prior to assembly. Lay out parts on a flat and non-abrasive surface. You will need the parts identified on page 6 of this instruction manuals. NOTE: IT IS VERY IMPORTANT TO USE GLUE WITH THE DOWELS. EXCESS GLUE CAN BE WIPED OFF WITH A DAMP CLOTH.
- Page 4 FURNITURE POWER DISTRIBUTION CENTER IMPORTANT SAFETY INSTRUCTIONS Carefully read all instructions before installing and operating fixture IF YOU HAVE ANY QUESTIONS REGARDING THE PROPER INSTALLATION CONSULT A QUALIFIED ELECTRICIAN. TO REDUCE THE RISK OF FIRE, ELECTRICAL SHOCK OR INJURY TO PERSONS, PLEASE FOLLOW THE BELOW: ...
-
Page 5: Specifications
Product: Furniture Power Distribution Unit ! Your hub automatically shuts off any port with a low Model No: HG3000-DBU Company: Whalen Furniture Manufacturing or excessive current. ! If USB Hub Current Limit Exceeded appears on your NOTE: This equipment has been tested and found to... - Page 6 Parts and Hardware List Please read completely through the instructions and verify that all listed parts and hardware are present before beginning assembly. A- Desk Top (Qty. 1) B- Fixed Shelf (Qty. 1) C- Back Panel (Qty. 1) D- Small Leg (Qty. 4) E- Large Leg (Qty.
- Page 7 Assembly Instructions ② x 4 1. Unpack the unit and confirm that you have all the hardware and required parts. Assemble the unit on a carpeted floor or the empty carton to avoid any scratch. 2. Securely screw the Cam Bolts (2) into the threaded bushing on the Desk Top (A) using a Philips screwdriver.
- Page 8 Assembly Instructions ③ x 2 3. Insert two Wood Dowels (3) into the side holes of the Back Panel (C). Make sure that you use a small amount of glue with both ends of all dowels.
- Page 9 Assembly Instructions ① x 4 4. Align and attach the Back Panel (C) to the Desk Top (A) by engaging four Cam Locks (1) (Refer to page 3 on Cam Lock system operation supplement).
- Page 10 Assembly Instructions ⑨ x 2 5. Feed the wire of Power Center (L) through the cutout of the Back Panel (C) and push into the cutout. Secure it in place with two 15 mm Screws (9). Make sure the wire is not pinched.
- Page 11 Assembly Instructions ④ x 4 6. Ask for assistance to stand the assembled Desk Top (A) vertical. 7. Align and attach the Fixed Shelf (B) to the assembled Back Panel (C) with four 32 mm Screws (4) and securely tighten with a Philips screwdriver.
- Page 12 Assembly Instructions 8. Fit the previous assembly between the Large Legs (E). Making sure the mounting holes of metal tabs overlap the threaded inserts underneath the Desk Top (A) and the Fixed Shelf (B).
- Page 13 Assembly Instructions ⑤ x 8 ⑥ x 8 ⑦ x 8 9. Fasten the Desk Top (A) and the Fixed Shelf (B) into place with eight 5/8" Bolts (5) and eight Washers (6 and 7).
- Page 14 Assembly Instructions ⑤ x 4 ⑥ x 4 ⑦ x 4 10. Fit the return of Small Legs (D) onto U-shaped brackets of Large Legs (E) and fasten them into place with four 5/8" Bolts (5) and four Washers (6 and 7).
- Page 15 Assembly Instructions ⑤ x 4 ⑥ x 4 ⑦ x 4 11. Fasten the Small Legs (D) to the Fixed Shelf (B) with four 5/8" Bolts (5) and four Washers (6 and 7).
- Page 16 Assembly Instructions ⑤ x 8 ⑥ x 8 ⑦ x 8 12. Align and attach the Bottom Panels (G) to the Legs (D and E) with eight 5/8" Bolts (5) and eight Washers (6 and 7).
- Page 17 Assembly Instructions 13. Insert the Partition Panels (F) to against the Small Legs (D). Make sure that the mounting holes on Small Legs (D) align with the threaded inserts on Partition Panels (F) properly.
- Page 18 Assembly Instructions ⑧ x 8 14. Fasten the Partition Panels (F) into place with eight 1 1/8" Bolts (8).
- Page 19 Assembly Instructions I /J ⑤ x 5 ⑥ x 5 ⑦ x 5 15. Align and attach the Cup Holder (I) and the Accessory Hook (J) to the Fixed Shelf (B) with five 5/8" Bolts (5) and five Washers (6 and 7).
- Page 20 Assembly Instructions 16. Attach the Floor Levelers (12) to the bottom of the Small Legs (D).
- Page 21 Assembly Instructions ⑨ x 4 17. Ask for assistance to stand the unit upright and position it at the desired location. 18. Fasten 2 Cable Wheels (K) to the Back Panel (C) with four 15 mm Screws (9). The cable wheels allow you to organize, route and separate your component cords and cables to minimize tangling and signal interference.
- Page 22 Assembly Instructions ⑩ x 2 NOTE: The adjustable shelf (H) is designed to put into either compartment. 19. Depending on your configuration, insert two Shelf Pins (10) into the holes at the desired height on the desired Partition Panel (F). 20.
- Page 23 Assembly Instructions 22. If necessary, adjust the installed floor levelers (12) at the bottom of the Small Legs (D) to level the unit.
-
Page 24: Quality Guarantee
Should this product be defective in workmanship or materials or fail under normal use, we will repair or replace it for up to one (1) year from date of purchase. Every Whalen Furniture product is designed to meet your highest expectations. We guarantee that you will immediately see the value of our fine furniture. - Page 25 LOTE NÚMBERO: FECHA DE COMPRA: / / Escritorio para videojuegos Modelo # WHA-10005 ENSAMBLE REQUERIDO POR ADULTOS Si tiene alguna pregunta relacionada con el montaje o si faltan piezas, NO devuelva este producto al establecimiento donde lo adquirió. Por favor llame a nuestro número de servicio al cliente y tienen sus instrucciones y lista de piezas listo para proporcionar el nombre del modelo, el nombre o el número de parte de la fábrica:...
- Page 26 P E S O S M Á X I M O S R E C O M E N D A D O S FABRICANTE: Whalen Furniture Manufacturing CATALOGO: Escritorio para videojuegos MODELO # WHA-10005 HECHO EN CHINA CARGA MÁXIMA 90.8 kg / 200 lb.
- Page 27 IMPORTANTE Antes de comenzar: Abra, identifique y cuente todas las partes antes del ensamble. Coloque las piezas sobre una superficie plana y no abrasiva. Tendrá que las partes identificadas en la página 6 de este manual de instrucciones. NOTA: ES MUY IMPORTANTE PARA EL USO DE GOMA CON LOS PERNSO DE MADERA. EL. EXCESO DE PEGAMENTO SE PUEDE LIMPIAR CON UN PAÑO HÚMEDO.
-
Page 28: Instrucciones De Seguridad Importantes
CENTRO DE DISTRIBUCION DE ENERGIA DE MUEBLES INSTRUCCIONES DE SEGURIDAD IMPORTANTES Lea cuidadosamente todas las instrucciones antes de instalar y funcionamiento del accesorio SI TIENE ALGUNA PREGUNTA SOBRE LA INSTALACIÓN ADECUADA, CONSULTE A UN ELECTRICISTA CALIFICADO. PARA REDUCIR EL RIESGO DE INCENDIO, DESCARGA ELÉCTRICA O LESIONES A LAS PERSONAS, SIGA LOS SIGUIENTES PASOS: ... - Page 29 Producto: Centro de alimentación para mueble ADVERTENCIAS Modelo No: HG3000-DBU Compañia: Whalen Furniture Manufacturing ¡ El centro de corriente se apaga automáticamente cualquier puerto con una corriente baja o excesiva! NOTA: Este equipo ha sido probado y cumple con los límites para un dispositivo digital de Clase B, de...
- Page 30 Lista de partes y material de ferretería Por favor lea completamente las instrucciones y verifique que estén todas las partes y artículos de ferretería antes de iniciar el ensamblado. A- Tapa del escritorio (Cant. 1) B- Repisa fija (Cant. 1) C- Panel posterior (Cant.
- Page 31 Instructivo de ensamble ② x 4 1. Desempacar la unidad y confirmar que se tiene todo el material de ferretería y partes requeridas. Ensamblar la unidad en un piso alfombrado o en el cartón vacío para evitar rasguños. 2. Atornillar los pernos de fijación (2) en los espacios roscados en la tapa del escritorio (A) usando un desarmador estrella.
- Page 32 Instructivo de ensamble ③ x 2 3. Insertar 2 clavijas de madera (3) en los agujeros laterales del panel posterior (C). Asegurar de usar una cantidad pequeña de pegamento en ambos lados de las clavijas.
- Page 33 Instructivo de ensamble ① x 4 4. Alinear y adjuntar el panel posterior (C) a la tapa del escritorio (A) empleando 4 tuercas de fijación (1) (Consulte la página 3 del sistema de tuerca de fijación).
- Page 34 Instructivo de ensamble ⑨ x 2 5. Meter el cable del centro de poder (L) a través de del recorte del panel posterior (C) y empujar en el recorte. Asegurar en su lugar con 2 pernos de 15 mm (9). Asegurar que el cable no esté apretado.
- Page 35 Instructivo de ensamble ④ x 4 6. Pedir asistencia para poner la tapa del escritorio ensamblada (A) en posición vertical. 7. Alinear y adjuntar la repisa fija (B) al panel posterior ensamblado (C) con 4 pernos de 32 mm (4) y apretar con el desarmador estrella.
- Page 36 Instructivo de ensamble 8. Meter el ensamble previo entre las patas largas (E). Asegurar que los agujeros de montaje de las pestañas de metal estén sobre los insertos roscados abajo de la tapa del escritorio (A) y sujetar la repisa fija (B).
- Page 37 Instructivo de ensamble ⑤ x 8 ⑥ x 8 ⑦ x 8 9. Sujetar la tapa del escritorio (A) y la repisa fija (B) en su lugar con 8 pernos de 5/8" (5) y 8 arandelas (6 y 7).
- Page 38 Instructivo de ensamble ⑤ x 4 ⑥ x 4 ⑦ x 4 10. Meter la parte inferior de las patas cortas (D) en los soportes U de las patas largas (E) y sujetarlos en su lugar con 4 pernos de 5/8" (5) y 4 arandelas (6 y 7).
- Page 39 Instructivo de ensamble ⑤ x 4 ⑥ x 4 ⑦ x 4 11. Sujetar las patas cortas (D) a la repisa fija (B) con 4 pernos de 5/8" (5) y 4 arandelas (6 y 7).
- Page 40 Instructivo de ensamble ⑤ x 8 ⑥ x 8 ⑦ x 8 12. Alinear y adjuntar los paneles inferiores (G) a las patas (D y E) con 8 pernos de 5/8" (5) y 8 arandelas (6 y 7).
- Page 41 Instructivo de ensamble 13. Insertar los paneles divisores (F) en contra a las patas cortas (D). Asegurar que los agujeros de montaje en las patas cortas (D) se alineen con los insertos roscados en los paneles divisores (F) apropiadamente.
- Page 42 Instructivo de ensamble ⑧ x 8 14. Sujetar los paneles divisores (F) en su lugar con 8 pernos de 1 1/8" (8).
- Page 43 Instructivo de ensamble I /J ⑤ x 5 ⑥ x 5 ⑦ x 5 15. Alinear y adjuntar el portavasos (I) y el gancho para accesorios (J) a la repisa fija (B) con 5 pernos de 5/8" (5) y 5 arandelas (6 y 7).
- Page 44 Instructivo de ensamble 16. Adjuntar los niveladores de piso (12) a la parte inferior de las patas cortas (D).
- Page 45 Instructivo de ensamble ⑨ x 4 17. Pedir asistencia para poner la unidad en posición vertical y en el lugar deseado. 18. Sujetar 2 guías de cables (K) al panel posterior (C) con 4 pernos de 15 mm (9). Las guías de cables le permiten organizar, encaminar y separar sus cables y cordones de componentes para minimizar enredos e interferencia de señal.
- Page 46 Instructivo de ensamble ⑩ x 2 NOTA: La repisa ajustable (H) esta diseñada para ponerse en cualquier compartimiento. 19. Dependiendo de su configuración, insertar 2 pernos de repisa (10) en los agujeros a la altura deseada en el panel divisor deseado (F). 20.
- Page 47 Instructivo de ensamble 22. Si fuera necesario, ajustar los niveladores de piso instalados (12) en la parte inferior de las patas cortas (D) para nivelar la unidad.
- Page 48 Si esté producto tiene algun defecto de ensamble o material, o si tiene alguna falla en uso normal, nosotros lo repararemos o lo re-emplazaremos hasta por un año a partir de la fecha de compra. Todo producto de Whalen Furniture es diseñado para alcanzar sus espectativas más altas. Nosotros le garantizamos que inmediatamente podrá...
Need help?
Do you have a question about the WHA-10005 and is the answer not in the manual?
Questions and answers