
Related Manuals for Goodmans GMN02BT


Summary of Contents for Goodmans GMN02BT
- Page 1 GMN02BT Mini Stereo System User Guide IMPORTANT: Please read all instructions carefully before use and keep for future reference...
-
Page 2: Table Of Contents
Introduction Thank you for choosing this Mini Stereo System. Now you can listen to your favourite CDs or FM radio station. Safety is important Use of any electrical equipment should be undertaken with care. Please read the safety section on page 15 before using your Mini Stereo System. This appliance is for household use only. -
Page 3: Setting Up
Setting Up 1. Unbox your Mini Stereo System and check that you have all the necessary components. 2. Place the Mini Stereo System Base Unit on a sturdy level surface or stand. If it is placed on a shelf, the shelf must be capable of holding at least 12 kg. 3. -
Page 4: 02 Your Mini Stereo System
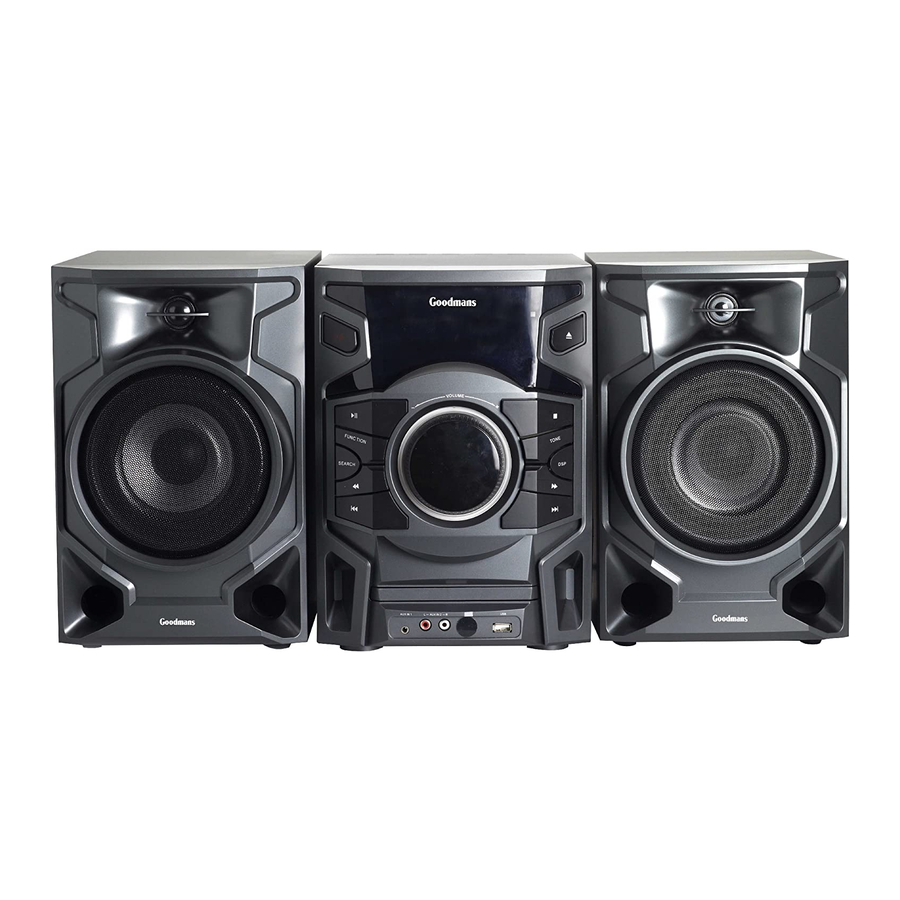
02 Your Mini Stereo System Front view REMOTE INDICATOR DISPLAY CONTROL LIGHT SCREEN SENSOR OPEN/CLOSE ON/STANDBY CD TRAY STOP PLAY/PAUSE TONE FUNCTION SEARCH FORWARD REWIND NEXT PREVIOUS CD TRAY VOLUME CONTROL AUX IN PORTS (3) PORT... -
Page 5: Rear View
Your Mini Stereo System Rear view VENTILATION Slots POWER Switch AERIAL Socket POWER Cable VENTILATION Slots AUDIO OUT SPEAKER Ports Connections... - Page 6 02 Your Mini Stereo System Remote Control Buttons on the Remote Control: - Switches the Mini Stereo System on or to standby. - Opens and closes the CD drawer. CD - Switches the Mini Stereo System to CD mode. BT - Switches the Mini Stereo System to Bluetooth mode. FM - Switches the Mini Stereo System to FM radio mode.
-
Page 7: Daily Use
Daily use Switching ON Inserting a CD To switch the Mini Stereo System Press the button on the remote control (or the one on the front of on, set the POWER switch on the the stereo). back of the base unit to ON. Insert a CD in the CD tray with the To switch from Standby, press the CD label facing up. - Page 8 Daily use Stop Repeat While playing a track, press the While you are playing tracks from a CD, button to stop the playback. Press the CD-R or USB device, you can repeat the button to play the CD, CD-R or track that is currently playing or all the USB device from the beginning.
- Page 9 Daily use Program select the first track, the display skips to the next ripping interface: You can program the Mini Stereo <RIPnnY>. System to play selected tracks from To cancel the track you have a disc in the order you prefer. For selected, or delete a selected track, example, you could program the system enter the track number again.
-
Page 10: Using The Fm Radio
Using the FM Radio To use the FM radio, press the FM Saving Radio Stations to button on the remote control. Memory There are 60 available memory slots in your Mini Stereo System. Aerial When you have located a radio station Before using the FM radio, you must you can press the SAVE button to save first extend the aerial (a vertical... -
Page 11: Using Bluetooth
Place your device in Bluetooth When the call ends, it depends on search mode. the setting of your phone whether the Select GMN02BT from the list of current track will resume playback or found devices. not. Select OK or YES to pair the unit with your Bluetooth device. -
Page 12: Troubleshooting
Troubleshooting Problem Possible Cause What to do No power 1. The plug is not plugged 1. Ensure the plug is plugged into the wall socket. into the wall socket. 2. The wall socket is not 2. Turn on the power at the wall turned on. -
Page 13: Care And Maintenance
Care and Maintenance Handling Discs To remove a disc from its storage case, press down on the centre of the case and lift the disc out. Hold the disc by the edges, to avoid touching the recorded side of the disc. Fingerprints and dust should be carefully wiped from the disc’s surface with a soft cloth. -
Page 14: Technical Specification
Technical Specification Model Number GMN02BT Power Supply ~220-240V AC 50Hz 2 x AAA 1.5V batteries (for remote control) Frequency 20 - 20,000 Hz (+/- 3db) Max Power Disc Type CD, CD-R, MP3, WMA Audio Format MPEG1, MPEG2, Stereo Signal Output... -
Page 15: Warnings
Warnings WEEE WARNING! THIS PRODUCT UTILISES This appliance is labelled in A CLASS 1 LASER. accordance with European USE OF CONTROLS, Directive 2002/96/EG ADJUSTMENTS concerning used electrical and OR PROCEDURES NOT LISTED IN electronic appliances (Waste Electrical THIS USER GUIDE MAY RESULT and Electronic Equipment - WEEE). - Page 16 Warnings Do not continue to operate the Mini Do not use new and old batteries Stereo System if you are ever in doubt together. When replacing the batteries about it working normally, or if it is in the remote control, replace them damaged in any way.
-
Page 17: Electrical Information
Electrical information The mains lead supplied with this Mini Stereo System is fitted with a BS1363/A 13 amp plug. If it is not suitable for your supply sockets it must be removed and replaced with an appropriate plug. If the plug becomes damaged and/or needs to be replaced please follow the wiring instructions below. -
Page 18: Guarantee
The Mini Stereo System is guaranteed for twelve months from the date of original purchase. If any defect should occur due to faulty materials or workmanship, contact Goodmans via the website (www.goodmans.co.uk). Have your receipt of purchase on hand. The guarantee is subject to the following provisions: •... - Page 20 DCS-JUN13-GMN02...
Need help?
Do you have a question about the GMN02BT and is the answer not in the manual?
Questions and answers