Vision Fitness X6100 Owner's Manual
Folding elliptical trainers
Hide thumbs
Also See for X6100:
- Owner's manual (72 pages) ,
- Assembly instructions manual (12 pages) ,
- Assembly manual (10 pages)
Table of Contents
Advertisement
Advertisement
Table of Contents

Related Manuals for Vision Fitness X6100


Summary of Contents for Vision Fitness X6100
- Page 1 O w n e r’s G u i d e X6100 X6000 FOLDING ELLIPTICAL TRAINERS...
- Page 2 Some kinds of service to your Elliptical Trainer should only be performed by your VISION FITNESS retailer. Please contact your authorized VISION FITNESS retailer should service be required. If a question or problem arises which cannot be handled by your VISION FITNESS retailer, please contact us: VISION FITNESS P.O.
-
Page 3: Table Of Contents
Table of Contents A L L M O D E L S G E N E R A L SAFETY INSTRUCTIONS ..4 TROUBLESHOOTING: ASSEMBLY, PLACEMENT, MOVING . . . 6 ELLIPTICAL TRAINERS . -
Page 4: Child Safety Guards
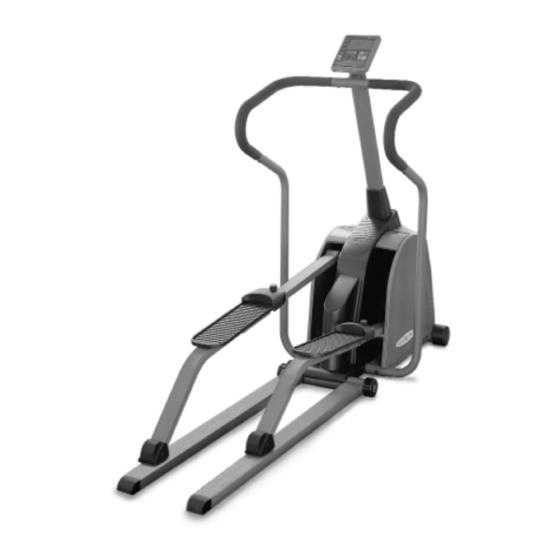
CONSOLE DUAL-ACTION HANDLEBARS TENSION KNOB (X6000 ONLY) FOOT PAD CHILD SAFETY GUARDS PEDAL ARM GUIDE RAIL SIDE STABILIZER FRONT FOOT & TRANSPORT WHEELS X 6 0 0 0 X 6 1 0 0 F O L D I N G E L L I P T I C A L T R A I N E R S... - Page 5 To disconnect, turn the switch to the OFF position, then remove plug from outlet. • Only use the power cord provided with your VISION FITNESS Elliptical Trainer. • Never place the power cord under carpeting or place any object on top of the power cord, which may pinch and damage it.
- Page 6 OTHER SAFETY TIPS FOR YOUR VISION FITNESS ELLIPTICAL TRAINER CAUTION! If you experience chest pains, nausea, dizziness or shortness of breath, stop exercising immediately and consult your physician before continuing. • Do not wear loose clothing that might catch on any part of the Elliptical Trainer.
- Page 7 It is recommended, when possible, that assembly be performed by an authorized VISION FITNESS retailer. If you have any questions regarding any part or function of your Elliptical Trainer, contact your retailer.
- Page 8 Your Elliptical Trainer uses a wall-mount external power supply. Use only the power supplied with your Elliptical Trainer. If you misplace this power supply, please contact your authorized VISION FITNESS retailer for an original replacement. Use of the wrong power supply may cause damage...
-
Page 9: Folding Your Elliptical Trainer
FOLDING YOUR ELLIPTICAL TRAINER NOTE: It is important to always follow the correct order of steps when folding your Elliptical Trainer. STEP 1: Locate the arrow on the side cover that points to the 4 o’ clock position of the disk. Rotate the disk so that the arrow is pointing to the disk axle (the point where the disk and pedal arm connect.) - Page 10 STEP 2: Simultaneously lift both the Pedal Arm and the Guide Rail upon which it is resting to the vertical position (A). The locking device, which is mounted on the Guide Rail, should now be aligned with the lock-receiving bracket on the backside of the Pedal Arm. Firmly push the Guide Rail until it clicks and locks into position (B).
- Page 11 STEP 3: To unfold your Elliptical Trainer, push the recessed lock button found on the underside of one Guide Rail (C). Carefully lower both the Pedal Arm and Guide Rail to the floor simultaneously. Repeat these steps with the other Pedal Arm and Guide Rail to completely unfold your Elliptical Trainer for use.
- Page 12 OPTIONAL CHILD SAFETY GUARDS Always attach the child safety guards to the pedal arm guide rails if there are young children living in or ever visiting your house. Note that when these child safety guards are attached, the pedal arms cannot fold.
- Page 13 X6000 SETTING MPH & KPH The console will be set for your specific product and also for MPH. There are 2 small switches inside the console next to the wire harness plugs. One is for changing from MPH to KM. The other is for setting the console to a bike or an elliptical (EP).
-
Page 14: Quick-Start
X6000 QUICK START Begin striding and press START to begin the program. -
Page 15: Using The Console
USING THE CONSOLE COUNT-UP MODE To use the console in Count-Up Mode, simply begin pedaling and press START. The console will begin counting up from 0:00. COUNT-DOWN MODE SET TIME The console will show 0:00 when you start to pedal. To set a desired exercise time, press the UP L until you reach the desired time. - Page 16 PAUSE/STOP To Pause or Stop the console, simply press the START button. To return to your workout, press START once. RESET To reset the Time function, press the RESET button.
- Page 17 X6100 SETTING MPH & KPH The console will be set for your specific product and also for MPH. There are 2 small switches inside the console next to the wire harness plugs. One is for changing from MPH to KM. The other is for setting the console to a bike or an elliptical (EP).
-
Page 18: Quick-Start
X6100 QUICK START Begin striding and press START to begin in Manual Mode. -
Page 19: Choosing A Program
CHOOSING A PROGRAM Press the UP L or M Down buttons scroll through user programs. Press the SELECT button to choose your program. CHOOSING TIME The LED scrolls “SET TIME USING ARROW KEYS PRESS SELECT TO ENTER”. The default time will be flashing in the Time window. -
Page 20: Choosing A Level
CHOOSING LEVEL The LED scrolls “SET LEVEL USING THE ARROW KEYS PRESS SELECT TO ENTER”. The default level will be flashing in the Level window. Set Level using the UP L or M Down buttons. Press SELECT. NOTE: When using the Constant Watts program, you will set the intended Watt setting in place of Level. -
Page 21: Program Details
X6100 PROGRAM DETAILS MANUAL Customize your program. The Easy Start program uses your default time, which can be set in engineering mode. INTERVALS Helps to strengthen your cardiovascular system by alternating work intervals and recovery intervals. Gives you an efficient workout. - Page 22 X6100 FUNCTIONS PAUSE Press START to stop or pause your program. Press START again to resume your program. The console will pause for five minuets before resetting. RESET Press hold SELECT 3-seconds.
- Page 23 X6100 FUNCTIONS TOGGLE Press SELECT to toggle between Level and Watts.
- Page 24 TROUBLESHOOTING YOUR ELLIPTICAL TRAINER Our Elliptical Trainers are designed to be reliable and easy to use. If, however, you have a problem, these troubleshooting steps may indicate the cause. PROBLEM: The Elliptical Trainer appears to work but there is no resistance change.
- Page 25 COMMON ELLIPTICAL TRAINER QUESTIONS Q: Are the sounds my Elliptical Trainer make normal? A: Our Elliptical Trainers are some of the quietest available because they use belt drives and magnetic resistance. We use the highest grade European bearings and top quality belts to minimize noise. However, because the resistance system itself is so quiet, you will occasionally hear some slight mechanical noises from the drive train.
- Page 26 Q: What kind of routine maintenance is required? A: We use sealed bearings throughout our Elliptical Trainers so lubrication is not needed. The most important maintenance step is to simply wipe your perspiration off the Elliptical Trainer after each use. Q: Will the magnets wear out over time? A: No, we use permanent magnets that will retain their braking force indefinitely in this application.
- Page 27 LABOR - ONE YEAR VISION FITNESS shall cover the Labor cost for the repair of the device for a period of one year from the date of original purchase, so long as...
- Page 28 WARRANTY REGISTRATION Your warranty card must be completed and sent to VISION FITNESS before a warranty claim can be processed. You may also register via our website at www.visionfitness.com. Inside the enclosed warranty card you will find a customer survey.
-
Page 29: Developing Fitness Program
DEVELOPING A FITNESS PROGRAM WARM UP When you exercise you need more oxygen to fuel your muscles. This oxygen is carried to the muscles through blood. The increasing demands of exercise will cause increased breathing rate, heart rate, blood flow and blood temperature. -
Page 30: Flexibility
FLEXIBILITY Before stretching, take a few minutes to warm-up as stretching a cold muscle can cause injury. When stretching you should start slowly, exhaling as you gently stretch the muscle. Try to hold each stretch for at least 15 to 30 seconds. Don’t bounce when you stretch. Holding a stretch is more effective and less of a risk for injury. - Page 31 STANDING CALF STRETCH Standing about 3 feet from a wall, take one step forward with your left foot. Place your hands on the wall in front of you. Your elbows slightly bent, shoulders, hips, and feet are pointed directly towards the wall.
-
Page 32: Exercise Guidelines
EXERCISE GUIDELINES The American College of Sports Medicine (A.C.S.M.) recommends the following exercise guidelines, for healthy aerobic activity: Frequency: Exercise 3 to 5 days each week. Warm-up: Warm-up 5 to 10 minutes before aerobic activity. Duration: Maintain your exercise intensity for 20 to 60 minutes. Cool Down: Gradually decrease the intensity of your workout, then stretch to cool down during the last 5 to 10 minutes. -
Page 33: Target Heart Rate
EXERCISE INTENSITY To reap the most cardiovascular benefits from your workout, it is necessary to exercise within a recommended intensity. The three ways to monitor exercise intensity are Target Heart Rate, Perceived Exertion, and the Talk Test. TARGET HEART RATE Target Heart Rate is a percentage of your maximum heart rate. -
Page 34: Rate Of Perceived Exertion
RATE OF PERCEIVED EXERTION Rate of Perceived Exertion (R.P.E.) is one of the easiest ways to monitor exercise intensity. By becoming familiar with the RPE scale, you can continually assess your level of intensity and insure a level of exertion that is comfortable. - Page 35 Longer term goals can lose some of the immediate motivation benefits. Short term goals are easier to achieve. Your VISION FITNESS Product console provides you with several readouts that can be used to record your progress. You can track Distance, Calories or Time.
- Page 40 500 South C.P. Avenue • P.O. Box 280 Lake Mills, WI 53551 toll free 1.800.335.4348 • phone 1.920.648.4090 fax 1.920.648.3373 www.visionfitness.com 2002 Vision Fitness. All Rights Reserved. HRT is a Trademark of Vision Fitness. 9.02 Part #Z60EP32-OM1818PRD OM18.18PRD REV1...
Need help?
Do you have a question about the X6100 and is the answer not in the manual?
Questions and answers