Table of Contents
Advertisement
Advertisement
Table of Contents

Related Manuals for Waldorf pulse 2


Summary of Contents for Waldorf pulse 2
- Page 1 ANALOG SYNTHESIZER...
-
Page 2: Table Of Contents
Basic Operation ......................14 Foreword ..........................4 Switching on/ off ............14 The Pulse 2 Development Team ........5 The Volume ..............14 We would like to thank ........... 5 Selecting Sounds ............14 ... - Page 3 Modulation Targets ............57 Tips & Tricks ..............58 Technical Data .............. 60 MIDI Controller Numbers ..........61 Glossary ................ 64 Declaration of Conformity ..........69 Product Warranty & Support .......... 72 Pulse 2 User Manual...
-
Page 4: Foreword
Foreword Foreword Thank you for purchasing the Waldorf Pulse 2 Synthesizer. You now own a compact analog synthesizer with an asto- nishing sound. And of course, a very exceptional feature set as for example the paraphonic modes and the APW wave- form. -
Page 5: The Pulse 2 Development Team
Gritzner, Till Kopper, Dirk Krause, Rob Lee, Dr. Ingo Weid- ner. Design: Axel Hartmann Manual: Holger Steinbrink Revision: 1.0, September 2013 Please visit our website pulse2.waldorfmusic.de. Here you will find the latest firmware version as well as other downloads for the Pulse 2. Pulse 2 User Manual... -
Page 6: Control Features And Connections
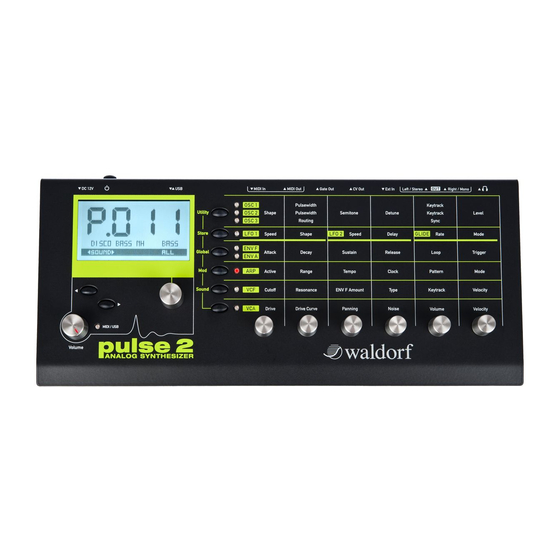
Control Features and Connections Control Features and Connections Front Panel Display Selection Buttons Selection Dial Volume Dial MIDI Input Indicator Parameter Matrix Parameter Matrix Buttons Shift Button Parameter Matrix Dials Pulse 2 User Manual... -
Page 7: Connections
Control Features and Connections Connections Stereo headphone jack MIDI In jack Audio line output left/right (only right: mono) Locking slot Audio line mono input USB port CV/Gate outputs Power switch MIDI Out jack Power supply socket Pulse 2 User Manual... -
Page 8: Introduction
To avoid confusion, the terminology in this manual is The Pulse 2 different modes and parameter pages are based on the Pulse 2 parameter names. You will find a illustrated in a depiction of the display. glossary at the end of this manual; it explains the various terms used. -
Page 9: General Safety Guidelines
Never use a different power cable than the one that • Please read the following safety tips carefully! came with the Pulse 2. They include several precautions you should al- ways observe when dealing with electronic Unplug the device when you are not using it for •... -
Page 10: Maintenance
Any other use is prohibited and voids the war- ranty extended by Waldorf Music. Waldorf Music is not liable for damages due to incorrect use. Do not leave your Pulse 2 near children, mothers- in-law or pets. This could lead to critical interac- tions. -
Page 11: Setup And Connection
MIDI Out jack to the Pulse 2 MIDI In jack In order to get started with your Pulse 2 you will need an AC power outlet. For the connection of the audio 5. Optionally you can connect the Pulse 2 USB... - Page 12 To check the correct reception of MIDI data send any MIDI event to the Pulse 2; the MIDI / USB will light up on any incoming MIDI mes- sage. If this is not the case please check the MIDI connection to the Pulse 2 as well as the Global MIDI configuration.
-
Page 13: The Usb Connection
The USB Connection Keep also in mind that we often offer new firm- ware updates. Please read also the chapter "Up- Using a USB cable you can connect the Pulse 2 to your dating the Firmware". computer observing the following system requirements: Windows PC: Windows XP or newer is recom- •... -
Page 14: Basic Operation
Pulse 2. The display is lit and shows the installed firmware version. After that, the Pulse 2 is ready for some action. Flick the Power switch again to switch off the Pulse 2. Don´t forget to save an edited sound program, before switching off the Pulse 2. -
Page 15: Editing Parameters
Pulse 2 Editing Parameters handling easily. In order to change or edit a sound in the Pulse 2, you Would you like to change the Cutoff of the Pulse filter? must access the appropriate parameters. In spite of the... -
Page 16: Storing Sounds
After you have finished editing a sound, you must store the six Parameter Matrix buttons to change it if you intend to use it again. Any of the Pulse 2 memo- the next six characters. Use the right ry locations are available for this purpose. - Page 17 Use the Store function also if you want to copy sounds. There is no need to edit a sound before storing it. When receiving individual sounds through sysex transfer, they must be store ma- nually in the Pulse 2. Pulse 2 User Manual...
-
Page 18: Sound Parameter
If so, we recommend to read the chapter "Sound Synthesis Basics" in this manual. You should know that the Pulse 2 consists of two diffe- rent types of components for sound generation and sound shaping: Sound Synthesis: Oscillators, Filter, Amplifier with •... -
Page 19: The Oscillator Section (Osc 1-3)
Keep in mind: Some shapes are not available for all of the three oscillators. The Pulse 2 offers three oscillators that nearly use similar parameters for editing. The following shapes are currently available: All controls of the oscillators can be found in the OSC PWM (only OSC 1 and OSC 2) selects the pulse •... - Page 20 UNIAPW P (only OSC 1) creates an unison in • polyphonic mode (same as UNISON P) by using a Keep also in mind: The signal path of the Pulse 2 cluster of eight APW oscillators at once. is mono. All eight voices need to use one VCF and one VCA.
- Page 21 OSC 2 and OSC 3 which can the external audio input for routing its signal be used for creating very complex sounds with un- through the Pulse 2 synthesis path. harmonic frequency proportions. Please keep in mind, that an incoming signal can X1-PWM (only OSC 2) creates a PWM crossmo- •...
- Page 22 Sets the routing behaviour of OSC 3: Mix is the default setting and sends the signal toge- • ther with OSC 1 and OSC 2 to the regular oscilla- tor mixer and further to the VCF and VCA. Pulse 2 User Manual...
- Page 23 Shape, a setting of Keytrack is not possible. Instead, this parameter lets you control the overall detune of the poly This oscillator synced to this oscillator results in this wave oscillators. Pulse 2 User Manual...
-
Page 24: The Lfo Section
Sync can also be very interesting on arpeggio In addition to the main oscillators, the Pulse 2 is equip- sounds. Apply a slow clocked LFO to Oscillator 2 ped with two low frequency oscillators (LFO) that can pitch and the arpeggio starts to move. - Page 25 C SIN creates a sine wave. • C TRI creates a triangle wave. • C SAW creates a sawtooth wave. • C SQR creates a square wave. • C S&H creates sample & hold values. • Pulse 2 User Manual...
-
Page 26: The Envelope Section (Env F And Env A)
Higher settings will result in a long glide time of up to several seconds which can be useful The Pulse 2 envelopes allow you to manipulate sound for solo and effect sounds. With the setting OFF, the parameters via rate or timed modulations. - Page 27 D-D lets alternate the envelope from full scale to • zero to full. Sustain controls the speed. SNG1 / SNG2/ RET 1 / RET 2 / RET 3 Trigger Five different types of triggers determine how and when an envelope is started. Pulse 2 User Manual...
-
Page 28: The Arpeggiator Section (Arp)
The Step Editor parameters are different to edit. for the Arpeggiator to cover a wide range of applica- Please read the corresponding manual section. tions. In addition to the synthesis features, the Pulse 2 offers a Arpeggiator for every sound. 12...1600%... - Page 29 MIDI velocity 127 or mini- mum MIDI velocity 0. In conjunction with SOFT you Use the Parameter buttons and the Parame- can create very lively arpeggios. ter dial to edit the steps as desired. Pulse 2 User Manual...
- Page 30 Pattern Length to 8 you cannot select mind that the arpeggio starts counting with zero. step 9 or higher. If OCT+ is selected, the corresponding step will • be played one octave higher that the original pitch. Pulse 2 User Manual...
- Page 31 Press all keys of the chord simultaneously. • This is the normal procedure you would If ON is selected, the glide effect is enabled for • this step. This means that the previous note gli- Pulse 2 User Manual...
- Page 32 Sets the basic tempo of the arpeggiator in BPM (beats backward and the octaves are transposed down- per minute). If the Pulse 2 receives MIDI Clock data and ward. The arpeggio starts in the highest octave Pulse 2 User Manual...
- Page 33 Global menu should be set to ON. The ward and the octaves are transposed upward. Af- Pulse 2 will send the Arpeggiator notes and the ter reaching the last note of the note list in the MIDI Clock signal via MIDI Out and USB MIDI highest octave to play, the note list is played Out.
-
Page 34: The Filter Section (Vcf)
You can bring more movement into the sound by modu- lating the cutoff frequency via the LFO, the envelope or The Pulse 2 offers a multimode filter. the Keytrack parameter of the filter. At 100% Key- tracking and maximum Resonance level, the then self- A detailed introduction of the filters can be found oscillating filter can be played in a tempered scale. - Page 35 Determines the amount of influence the filter envelope frequencies. This may also give interesting results has on the cutoff frequency, based on key velocity. This in conjunction with cutoff frequency modulation. parameter works similarly to the ENV F Amount para- Pulse 2 User Manual...
-
Page 36: The Amplifier Section (Vca)
Increasing the value will bring in more and more distortion, suitable for harder lead sounds and effects. Is Drive Curve set to NONE, this parameter has no effect. Pulse 2 User Manual... - Page 37 Key Velocity = 64 Key Velocity = 64 Volume of the noise generator. Key Velocity = 1 Key Velocity = 127 Time Time Time Velocity Parameter = 0 Velocity Parameter = +63 Velocity Parameter = -64 Pulse 2 User Manual...
-
Page 38: The Modulation Matrix Menu (Mod)
The Modulation Matrix (Mod Matrix) is the key of the power of each Waldorf synthesizer, so start expe- rimenting with it right now. A complete table of all available sources and targets can be found in the Appendix. -
Page 39: The Sound Menu
Selection dial. 0...36 Bend Upwards Determines the intensity of the pitchbend via MIDI Pitchbend messages in semitones for the selected oscil- lator, when it will be moved upwards. Pulse 2 User Manual... -
Page 40: Additional Settings
OMNI / 1...16 MIDI Channel Sets the basic send and receive channel for the Pulse 2. This setting is valid for all Sound programs. If omni is selected, the Pulse 2 sends on channel 1 and receives on all channels. - Page 41 Incoming MIDI data will be automatically sent via MIDI MIDI clock data over USB MIDI and MIDI. Out port to connected MIDI devices. Additionaly, the Pulse 2 will send out its own data via MIDI Out. OFF / ON TX Arp Notes...
- Page 42 ID is used to distinguish between several This parameter is used to define an arbitrary MIDI Con- Waldorf Pulse 2, if you have more than one Pulse 2 in tinuous Controller as modulation sources for sounds. your setup.
- Page 43 V/OCT selects 1 Volt per Octave (exponential • Microphones or guitars can be directly connected scale). to the Pulse 2, but we recommend to use a suited pre ampflifier. Low signal level instruments V/Hz selects Volt per Hertz (linear scale). •...
-
Page 44: The Utility Menu
HIGH is 3.3 V, high with active trigger. access the Utility menu. Use the Selection buttons or • the Selection dial to select the desired Utility parame- LOW is 0 V, low with active trigger • ter. Pulse 2 User Manual... - Page 45 Keep Dump All Sounds in mind that all edits will be gone by using this function. When you activate this function, the Pulse 2 sends the contents of its memory via MIDI USB and MIDI out port Compare Sound to a connected computer.
- Page 46 Filter Tune - Loud! The filter is tuned at the factory prior to shipping and, as a rule, is very stable. However, the Pulse 2 is an actual analog synthesizer, so diverse factors may cause slight tuning problems. Therefore we recommend that you re- calibrate it from time to time.
-
Page 47: Sound Synthesis Basics
For sure, this is only a minimal selection of the endless variety of waveforms, but the Waldorf Pulse 2 gives you exactly these waveforms at hand. Now, you probably know how these waveforms look... - Page 48 You can easily understand that when you think of a violin. Imagine a bow pulling the string slightly into one direction. At one point, the string abruptly comes off the bow and swings Pulse 2 User Manual...
- Page 49 The following picture shows several pulse waves with different pulse widths: 7th Harmonic Magnitude 1/7 Amplitude Magnitude Time Frequency 11 13 15 Harmonics Additive components of the square wave with 50% pulse width Pulse 2 User Manual...
- Page 50 DC offset. As you have read in the previous chapter, the harmonic content of a 50% pulse wave is a special case. It has a Pulse 2 User Manual...
- Page 51 Additive components of the Triangle wave The reason why the triangle wave is so popular in clas- sic synthesizers: It could act as a suboscillator wave, to emphasize certain frequencies or to frequency modulate other oscillators. Pulse 2 User Manual...
-
Page 52: Filter Introduction
Frequencies below this threshold are hardly affected. The frequency below the cutoff point is called the pass band range, the frequenci- es above are called the stop band range. The Pulse 2’s Frequency filter dampens frequencies in the stop band with a Cutoff certain slope. - Page 53 Resonance Frequency Cutoff If the resonance is raised to a great extent, then the filter will begin to self-oscillate, i.e. the filter generates an audible sine wave even when it does not receive an incoming signal. Pulse 2 User Manual...
-
Page 54: Appendix
Appendix re that this track is assigned to the Pulse 2 Appendix so that it can receive the data Make sure that any Cycle or Loop mode is • Updating the Firmware switched off. Also make sure that any Me-... -
Page 55: Sending & Receiving System Exclusive Data
As soon as the dump from the sending device is acti- vated, the Pulse 2 will receive data and store these in its memory. If a single sound dump is received, it is temporarily stored in its respective edit buffer. -
Page 56: Modulation Sources
MIDI note number PITCH FLW Same as KEYTRACK, but with consideration of portamento and pitchbend PITCHBEND MIDI pitchbend signal MODWHEEL MIDI modulation wheel (CC #1) PRESSURE MIDI channel pressure BREATH CT MIDI breath control (CC #2) Pulse 2 User Manual... -
Page 57: Modulation Targets
Intensity of filter envelope ENVA RATES Intensity of amplifier envelope UNISON DET Detune of the Unison voices PARA FADE 1 Fade out of amplifier envelope in Para-8 mode PARA FADE 2 Fade out of amplifier envelope in Para-4 mode Pulse 2 User Manual... -
Page 58: Tips & Tricks
Appendix Tips & Tricks The Pulse 2 output signal is not interrupted when • you change programs. Try exploiting this feature Here are a few tips that will help you make the most of by using MIDI program change messages to line your Pulse 2. - Page 59 M-MAX -> +20 -> OSC1 PITCH LFO2 -> +63 -> M-MAX M-MAX -> +20 -> OSC2 PITCH The Effect will be that OSC1 will be modulated by LFO1 only while OSC2 is modulated by ma- ximum of LFO1 and LFO2. Pulse 2 User Manual...
-
Page 60: Technical Data
DC 12 V Supply Voltage: 100 – 240 V Maximum current consumption: 400 mA Maximum power consumption: Dimension and Weight Width: 304 mm Depth: 132 mm Height (including knobs): 54 mm Total weight (excluding power supply): 1,5 kg Pulse 2 User Manual... -
Page 61: Midi Controller Numbers
VCF VELOCITY 0…127 0…127 LFO 2 DELAY 0…127 0…127 VCF RESONANCE 0…127 0…127 ENVF TRIGGER 0…127 0…127 VCA VOLUME 0…127 0…127 ENVA TRIGGER 0…127 0…127 VCA VELOCITY 0…127 0…127 OSC1 PULSEWIDTH 0…127 0…127 GLIDE MODE 0…127 Pulse 2 User Manual... - Page 62 0…127 MOD2 SOURCE 0…127 0…127 ACCENT CONTROL 0…127 0…127 MOD2 AMOUNT 0…127 0…127 MOD5 SOURCE 0…127 0…127 MOD2 TARGET 0…127 0…127 MOD5 AMOUNT 0…127 0…127 MOD3 SOURCE 0…127 0…127 MOD5 TARGET 0…127 0…127 MOD3 AMOUNT 0…127 Pulse 2 User Manual...
- Page 63 Appendix 0…127 MOD3 TARGET 0…127 0…127 MOD4 SOURCE 0…127 0…127 MOD4 AMOUNT 0…127 0…127 MOD4 TARGET 0…127 All Sound Off Immediate silence Reset All Controllers Resets controllers All Notes Off Releases voices Pulse 2 User Manual...
-
Page 64: Glossary
The Attack generated. This feature can be used to control the Cutoff phase is initiated immediately after a trigger signal is frequency of the Pulse 2. received, i.e. after you play a note on the keyboard. Amount... - Page 65 An envelope is started via a trigger, usually a fixed trigger. Normally, the trigger is a MIDI Pulse 2 User Manual...
- Page 66 For instance, if you want to use a computer to play the Pulse 2, then the computer is the sender and the Pulse 2 acts as the recei- ver. With a few exceptions, the majority of MIDI devices LFO is an acronym for low-frequency oscillator.
- Page 67 Note on / Note off program change messages. These are the most important MIDI messages. It sets the pitch and velocity of every generated note. The time of arrival is simultaneously the start time of the note. Its Pulse 2 User Manual...
- Page 68 Attack and Decay phases. Sustain lasts until the trigger is terminated. The term describes a sound's output level System Exclusive Data System exclusive data allow access to the heart of a MIDI device. They enable access to data and functions Pulse 2 User Manual...
-
Page 69: Declaration Of Conformity
Waldorf Pulse 2 Gerätetyp / Device type: Synthesizer Gerätenummer / Device number: 4260126380301 in Übereinstimmung mit den Richtlinien, conforms to the requirements 2004/108/EG und 2006/95/EG in Verkehr gebracht wurde. Für die Konformitätserklä- rung wurde nachstehende Norm angewandt: Pulse 2 User Manual... - Page 70 + A1: 2003); Deutsche Fassung EN 55013: 2001 + A1: 2003 2006/95/EG Elektrische Betriebsmittel (Niederspannungsrichtli- nie) EN 55020 Ton-und Fernseh-Rundfunkempfänger und verwandte Geräte Unterhaltungselektronik -Störfestigkeitseigenschaften Grenzwerte und Prüfverfahren ( IEC/ CISPR 20: 2002 + A1: 2002); Deutsche Fassung EN 55020: 2002 + A1: 2003 Pulse 2 User Manual...
- Page 71 Manual, meets FCC requirements. Modifications authorized to distributed this type of product. The statements not expressly approved by Waldorf may void your authority, above apply ONLY to products distributed in the USA. granted by the FCC, to use this product.
-
Page 72: Product Warranty & Support
Product Warranty The warranty covers only those malfunctions caused by Thank you for choosing this Waldorf product. It is a material or work-manship defects that occur during dependable device and is designed to last. However, the normal operation. - Page 73 Waldorf Music GmbH • Landskroner Straße 52 • D-53474 Bad Neuenahr © 2013 Waldorf Music GmbH • All rights reserved www.waldorfmusic.de...
Need help?
Do you have a question about the pulse 2 and is the answer not in the manual?
Questions and answers