Table of Contents
Advertisement
Advertisement
Table of Contents

Related Manuals for JR SX600


Summary of Contents for JR SX600
- Page 1 6-CHANNEL COMPUTER RADIO...
-
Page 3: Table Of Contents
2. Connections Installation Requirements INTRODUCTION TO THE SX600 RADIO SYSTEM Thank you for purchasing the JR SX600 6-Channel before attempting to operate your system. Please Radio System. This unit has been designed to pay particular attention to Page 10, Introduction 4, provide the modeler with a high-quality, user- “Battery Charging.”... -
Page 4: Quick Start
SX600’s features. For modelers who want to get into the Note: Please charge the system batteries as air fast, we have provided Quick Start. -
Page 5: Travel Adjustment
Press the the left. Press the Increase Decrease button to adjust the button to adjust the left travel. left travel. SX600 MANUAL Quick Start... -
Page 6: Using This Manual
• A special “unwanted interference limiter” • The RS600 is compatible with all JR FM- ignores signals outside of the RS600’s transmitting radios. band width when the receiver is on and SX600 MANUAL • INTRODUCTION 1: Using This Manual / INTRODUCTION 2: Features... -
Page 7: Servo Features
• Low current drain SERVO LAYOUT Servo Arm Retaining Screw Servo Mounting Flange Servo Arm/Horn Servo Output Shaft Rubber Grommets Servo Case Servo Eyelet Servo Lead w/Connector Servo Mounting Flange Rubber Grommets Top View SX600 MANUAL • INTRODUCTION 2: Features... -
Page 8: Specifications
1.2V X 8 NICAD (9.6V) 600MAH OUTPUT PULSE 1000-2000 (1500 NEUTRAL) SERVO SPECIFICATIONS TYPE ST47 TORQUE (OZ/IN) SPEED (SEC/60°) WEIGHT (OZ) 1.55 SIZE (IN) (W X L X H) 0.73 X 1.52 X 1.32 MOTOR 3-POLE FERITE SX600 MANUAL • INTRODUCTION 3: Specifications... -
Page 9: Receiver Specifications
AC 100-120V OUTPUT CURRENT 50MAH TX/50MAH RX CHARGING TIME 15 HOURS AIRBORNE BATTERY PACK TYPE AIRPLANE MODEL NUMBER JSPB700 VOLTAGE 4.8V SIZE (IN) (W X L X H) 2.24 X 0.59 X 2.05 WEIGHT (OZ) SX600 MANUAL • INTRODUCTION 3: Specifications... -
Page 10: Battery Charging
50mA for the 700mAh battery pack. OUTSIDE IS POSITIVE Transmitter Only The center pin on all JR remote control systems is negative. Therefore, the center pin on all JR CHARGER PIGTAIL FOR TRANSMITTER chargers is negative, not positive. This is different BLACK TO POSITIVE from any other manufacturers’... -
Page 11: Trainer System
JR radios The transmitter can be used as either a master that have built-in trainer systems. An optional (trainer) or as a slave (trainee). The SX600 is trainer cord (JRPA130) is needed . Trainer ������... -
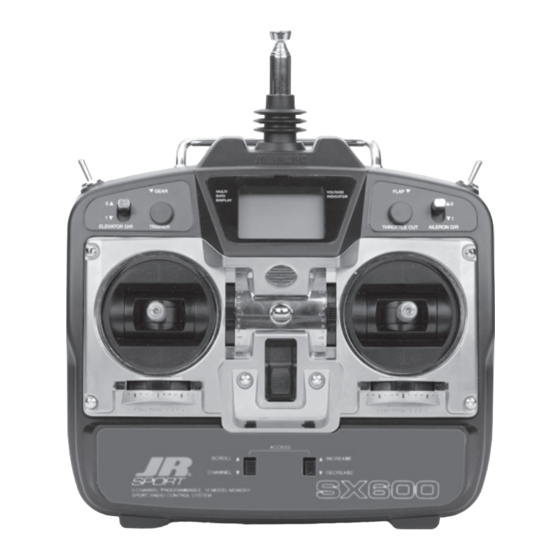
Page 12: Transmitter Controls
4. RUDD: Rudder Channel less than half throttle. This gives easy, accurate 5. GEAR: Gear Channel idle adjustments without affecting the high 6. AUX 1: Flap Channel throttle position. SX600 MANUAL • CHAPTER 1: Transmitter Controls... -
Page 13: Transmitter Rear
Counterclockwise will lengthen the stick and clockwise will shorten it. After the control stick(s) has been adjusted to suit your flying LOOSEN style, tighten the set screw. TIGHTEN SX600 MANUAL • CHAPTER 1: Transmitter Controls... -
Page 14: Direct Servo Control (Dsc)
There is an eye hook on the front of the positioned (see Section 1.1) so that the transmitter for attaching an optional neck transmitter will be perfectly balanced when a strap (JRPA023). The eye hook is precisely neck strap is used. SX600 MANUAL • CHAPTER 1: Transmitter Controls... -
Page 15: Connections
A stalled servo will drain the battery pack CONNECTIONS RECEIVER BATTERY B700 Optional FLAP Optional GEAR ON/OFF SWITCH HARNESS (JSP98017) RUDDER ELEVATOR RS600 Receiver AILERON ANTENNA THROTTLE SX600 MANUAL • CHAPTER 2: Connections... -
Page 16: Key Input And Display
If you are currently in the function mode, the transmitter will exit automatically and return to the normal display (see Section 5.1). SX600 MANUAL • CHAPTER 3: Key Input and Display / CHAPTER 4: Battery Alarm and Display... -
Page 17: Input Mode And Functions
This screen is referred to as the normal display. 10.4 BATTERY VOLTAGE DIRECT TRIM ACCESS DISPLAY The Direct Trim function of the SX600 can be accessed through the use of any of the 4 digital trims levers (throttle, aileron, elevator, or INDICATES CHANNEL rudder). -
Page 18: System Mode
SUB-TRIM Page 26 REV•NORM To enter Function mode, turn TRAVEL ADJUSTMENT on the Power switch and then TRV ADJ Power Switch +I00% Page 27 press both programming levers up. Programming Levers SX600 MANUAL • CHAPTER 5: Input Mode and Functions... -
Page 19: Functions (System Mode)
6. To exit, press the Scroll and Increase 4. Press the Channel and Increase buttons buttons up simultaneously. simultaneously to reset the data. (To confirm that the selected model's SX600 MANUAL • CHAPTER 6: Functions (System Mode) -
Page 20: Model Selection
5. Press the Scroll button to access the wing System mode. type entry function. 3. Press the Scroll button until “MDL” appears 6. To exit, press the Scroll and Increase on the screen. buttons up simultaneously. SX600 MANUAL • CHAPTER 6: Functions (System Mode) - Page 21 Flaperon Setup your SX600. This style of aircraft also employs When using flaperon mixing, two servos (one two wing servos. However, in essence, there is for each aileron) must be used. Connect the not an elevator present.
- Page 22 3. Next press either the Increase or press the Scroll button until once to access the V-tail Decrease buttons once to activate V- “MIX WNG” appears on the mixing screen. tail mixing. screen. SX600 MANUAL • CHAPTER 6: Functions (System Mode)
-
Page 23: Model Name Entry
CHAPTER 6: FUNCTIONS (SYSTEM MODE) CONTINUED MODEL NAME ENTRY • SYSTEM MODE The SX600 allows a 3-character name to be display. This feature is useful to help identify input for each of the 3 models available. The different aircraft types or model setups. -
Page 24: Functions (Function Mode)
3. Press the Scroll button until “REV/NORM” trim function. appears on the screen. 7. To exit, press the Scroll and Increase buttons 4. Press the Channel button until the desired up simultaneously. channel appears on the screen. SX600 MANUAL • CHAPTER 7: Functions (Function Mode) -
Page 25: Dual Rate
9. To exit, press the Scroll and Increase buttons appear when the selected dual rate switch simultaneously. is in the uppermost position and a “1” when the selected switch is in the lower position. SX600 MANUAL • CHAPTER 7: Functions (Function Mode) - Page 26 9. To exit, press the Scroll and Increase buttons is in the uppermost position and a “1” when simultaneously. the selected switch is in the lower position. SX600 MANUAL • CHAPTER 7: Functions (Function Mode)
-
Page 27: Travel Adjustment
7. To exit, press the Scroll and Increase buttons appears on the screen. up simultaneously. 4. Press the Channel button until the desired channel appears on the screen. 5. Press the Increase or Decrease button to SX600 MANUAL • CHAPTER 7: Functions (Function Mode) - Page 28 Press the Increase or Decrease button to achieve the desired travel. Move the stick in the opposite direction to adjust the travel in the opposite direction. SX600 MANUAL • CHAPTER 7: Functions (Function Mode)
-
Page 29: Sub Trim
40% ± % ± % ± VALUE AILE (AI) ELEV (EL) NORM • DUAL FLAPERON WING TYPE POS 0 RATE • DELTA POS 1 V-TAIL ON • OFF EXPO POS 0 RATE POS 1 SX600 MANUAL • CHAPTER 8: DATA SHEET... - Page 30 40% ± % ± % ± VALUE AILE (AI) ELEV (EL) NORM • DUAL FLAPERON WING TYPE POS 0 RATE • DELTA POS 1 V-TAIL ON • OFF EXPO POS 0 RATE POS 1 SX600 MANUAL • CHAMPTER 8: DATA SHEET...
- Page 31 40% ± % ± % ± VALUE AILE (AI) ELEV (EL) NORM • DUAL FLAPERON WING TYPE POS 0 RATE • DELTA POS 1 V-TAIL ON • OFF EXPO POS 0 RATE POS 1 SX600 MANUAL • CHAPTER 8: DATA SHEET...
-
Page 32: Important Information
7. Check to be sure that all servo pigtails day’s flying session. The range check should and switch harness plugs are secured be as follows: in the receiver. Also, make sure that the switch harness moves completely in both directions. SX600 MANUAL • IMPORTANT INFORMATION... -
Page 33: Warranty And Service Information
Do not leave it in direct sunlight for long periods of time. REPAIR SERVICE INSTRUCTIONS In the event that your JR Sport radio needs 5. Include your name, mailing address, and a service, please follow the instructions listed phone number where you can be reached below: during the business day. -
Page 34: Frequency Chart
72.250 72.670 72.270 72.690 72.290 72.710 72.310 72.730 72.330 72.750 72.350 72.770 72.370 72.790 72.390 72.810 72.410 72.830 72.430 72.850 72.450 72.870 72.470 72.890 72.490 72.910 72.930 72.950 72.970 72.990 *Channels 11–14 are not available SX600 MANUAL • FREQUENCY CHART... -
Page 35: Notes On The Rs600 Receiver
Lift that tab slightly while pulling on the PC board gently. 3. Place the PC board on the work surface as shown in the following picture, with the Servo connectors to the right. SX600 MANUAL • NOTES ON THE RS600 RECEIVER... - Page 36 DISTRIBUTED EXCLUSIVELY BY HORIZON HOBBY DISTRIBUTORS CHAMPAIGN, IL 61822 www.horizonhobby.com © 2005 Horizon Hobby Distributors, Inc. All Rights Reserved. 7412...
Need help?
Do you have a question about the SX600 and is the answer not in the manual?
Questions and answers